Translated by
Hayashi Masatoshi [FAMILY Given]
Sekiya Kazuchika [FAMILY Given]
Sue Nobuhiro [FAMILY Given]
Mochida Shinya [FAMILY Given]
製作著作 © 2007-2012 Hans Dockter, Adam Murdoch
Copies of this document may be made for your own use and for distribution to others, provided that you do not charge any fee for such copies and further provided that each copy contains this Copyright Notice, whether distributed in print or electronically.
このドキュメントは、個人利用目的および第三者に配布するためにコピーして使用できます。ただし、印刷するにせよ電子媒体を使用するにせよ、以下の点に留意してください。どのような形態であれ使用料を課さないこと。また、このコピーライト条項を配布物に含めること。
目次
- 翻訳版について
- 1. はじめにIntroduction
- 2. 概要Overview
- 3. チュートリアルTutorials
- 4. GradleのインストールInstalling Gradle
- 5. トラブルシューティング Troubleshooting
- 6. ビルドスクリプトの基本Build Script Basics
- 6.1. プロジェクトとタスクProjects and tasks
- 6.2. Hello world
- 6.3. タスク定義のショートカットA shortcut task definition
- 6.4. ビルドスクリプトはコードですBuild scripts are code
- 6.5. タスクの依存関係Task dependencies
- 6.6. 動的なタスクDynamic tasks
- 6.7. 既存のタスクを操作するManipulating existing tasks
- 6.8. 略記法Shortcut notations
- 6.9. 拡張タスクプロパティ Extra task properties
- 6.10. Antタスクの使用Using Ant Tasks
- 6.11. メソッドの使用Using methods
- 6.12. デフォルトタスクDefault tasks
- 6.13. DAGによる設定Configure by DAG
- 6.14. 次のステップは?Where to next?
- 7. JavaクイックスタートJava Quickstart
- 8. 依存関係管理の基本 Dependency Management Basics
- 9. GroovyクイックスタートGroovy Quickstart
- 10. WebアプリケーションクイックスタートWeb Application Quickstart
- 11. Gradleのコマンドラインを使う Using the Gradle Command-Line
- 11.1. 複数のタスクを実行するExecuting multiple tasks
- 11.2. タスクを除外してビルドするExcluding tasks
- 11.3. エラー発生時にビルドを継続する Continuing the build when a failure occurs
- 11.4. タスク名の省略Task name abbreviation
- 11.5. ビルドスクリプトを指定して実行するSelecting which build to execute
- 11.6. ビルドに関する情報を取得するObtaining information about your build
- 11.7. 空実行Dry Run
- 11.8. まとめSummary
- 12. GradleのGUIを使うUsing the Gradle Graphical User Interface
- 13. ビルドスクリプトの記述Writing Build Scripts
- 14. 色々なチュートリアル Tutorial - 'This and That'
- 14.1. ディレクトリの作成 Directory creation
- 14.2. GradleプロパティとシステムプロパティGradle properties and system properties
- 14.3. 外部のビルドスクリプトをプロジェクトに取り込むConfiguring the project using an external build script
- 14.4. 任意のオブジェクトを組み立てる Configuring arbitrary objects
- 14.5. 外部スクリプトで任意のオブジェクトを組み立てる Configuring arbitrary objects using an external script
- 14.6. キャッシング Caching
- 15. タスク詳解More about Tasks
- 15.1. タスクの定義Defining tasks
- 15.2. タスクを配置するLocating tasks
- 15.3. タスクの設定を変更するConfiguring tasks
- 15.4. タスクに依存関係を追加するAdding dependencies to a task
- 15.5. Ordering tasks
- 15.6. タスクに説明書きを追加するAdding a description to a task
- 15.7. タスクの置き換えReplacing tasks
- 15.8. タスクをスキップするSkipping tasks
- 15.9. 更新されていないタスクをスキップするSkipping tasks that are up-to-date
- 15.10. タスクルールTask rules
- 15.11. Finalizer tasks
- 15.12. まとめSummary
- 16. ファイルを取り扱う Working With Files
- 16.1. ファイルを参照する Locating files
- 16.2. ファイルコレクション File collections
- 16.3. ファイルツリー File trees
- 16.4. アーカイブの内容をファイルツリーとして使う Using the contents of an archive as a file tree
- 16.5. 入力ファイルセットを指定する Specifying a set of input files
- 16.6. ファイルをコピーする Copying files
- 16.7.
Syncタスクを使う Using theSynctask - 16.8. アーカイブを作成する Creating archives
- 17. GradleからAntを使うUsing Ant from Gradle
- 18. ロギングLogging
- 19. Gradleデーモン The Gradle Daemon
- 20. ビルド環境 The Build Environment
- 21. Gradleのプラグインについて Gradle Plugins
- 22. 標準GradleプラグインStandard Gradle plugins
- 22.1. 言語プラグインLanguage plugins
- 22.2. 試験的な言語プラグイン Incubating language plugins
- 22.3. 統合プラグインIntegration plugins
- 22.4. 試験的な統合プラグイン Incubating integration plugins
- 22.5. ソフトウェア開発プラグイン Software development plugins
- 22.6. 試験的なソフトウェア開発プラグイン Incubating software development plugins
- 22.7. ベースプラグイン Base plugins
- 22.8. サードパーティプラグインThird party plugins
- 23. JavaプラグインThe Java Plugin
- 23.1. 使用方法Usage
- 23.2. ソースセットSource sets
- 23.3. タスクTasks
- 23.4. プロジェクトレイアウトProject layout
- 23.5. 依存関係の管理Dependency management
- 23.6. 規約プロパティConvention properties
- 23.7. ソースセットの利用Working with source sets
- 23.8. JavadocJavadoc
- 23.9. CleanClean
- 23.10. リソースResources
- 23.11. CompileJavaCompileJava
- 23.12. Incremental Java compilation
- 23.13. テストTest
- 23.14. JarJar
- 23.15. アップロードUploading
- 24. GroovyプラグインThe Groovy Plugin
- 25. Scalaプラグイン The Scala Plugin
- 25.1. 使用方法 Usage
- 25.2. タスク Tasks
- 25.3. プロジェクトレイアウト Project layout
- 25.4. 依存関係の管理 Dependency management
- 25.5. scalaClasspathの自動設定 Automatic configuration of scalaClasspath
- 25.6. 規約プロパティ Convention properties
- 25.7. ソースセットプロパティ Source set properties
- 25.8. Fast Scala Compiler
- 25.9. 別プロセスでコンパイルする Compiling in external process
- 25.10. インクリメンタルコンパイル Incremental compilation
- 25.11. Eclipse Integration
- 25.12. IntelliJ IDEA Integration
- 26. War プラグインThe War Plugin
- 27. EarプラグインThe Ear Plugin
- 28. Jetty プラグインThe Jetty Plugin
- 29. CheckstyleプラグインThe Checkstyle Plugin
- 30. CodeNarcプラグインThe CodeNarc Plugin
- 31. FindBugsプラグインThe FindBugs Plugin
- 32. JDependプラグインThe JDepend Plugin
- 33. PMDプラグインThe PMD Plugin
- 34. The JaCoCo Plugin
- 35. SonarプラグインThe Sonar Plugin
- 35.1. 使用方法 Usage
- 35.2. マルチプロジェクトビルドの解析 Analyzing Multi-Project Builds
- 35.3. カスタムソースセットの解析 Analyzing Custom Source Sets
- 35.4. Java言語以外の解析 Analyzing languages other than Java
- 35.5. カスタムSonarプロパティの設定 Setting Custom Sonar Properties
- 35.6. コマンドラインでSonarの設定を行う Configuring Sonar Settings from the Command Line
- 35.7. タスク Tasks
- 36. The Sonar Runner Plugin
- 36.1. Sonar Runner version and compatibility
- 36.2. Getting started
- 36.3. Configuring the Sonar Runner
- 36.4. Specifying the Sonar Runner version
- 36.5. Analyzing Multi-Project Builds
- 36.6. Analyzing Custom Source Sets
- 36.7. Analyzing languages other than Java
- 36.8. More on configuring Sonar properties
- 36.9. Setting Sonar Properties from the Command Line
- 36.10. Controlling the Sonar Runner process
- 36.11. Tasks
- 37. OSGiプラグインThe OSGi Plugin
- 38. Eclipse プラグインThe Eclipse Plugin
- 39. IDEAプラグイン The IDEA Plugin
- 40. ANTLRプラグイン The ANTLR Plugin
- 41. プロジェクトレポートプラグインThe Project Report Plugin
- 42. 通知プラグイン The Announce Plugin
- 43. ビルド通知プラグインThe Build Announcements Plugin
- 44. The Distribution Plugin
- 45. アプリケーション プラグインThe Application Plugin
- 46. The Java Library Distribution Plugin
- 47. Build Init Plugin
- 48. Wrapper Plugin
- 49. The Build Dashboard Plugin
- 50. The Java Gradle Plugin Development Plugin
- 51. 依存関係の管理 Dependency Management
- 51.1. はじめに Introduction
- 51.2. 依存関係管理のベストプラクティス Dependency Management Best Practices
- 51.3. 依存関係のコンフィギュレーション Dependency configurations
- 51.4. 依存関係の定義方法 How to declare your dependencies
- 51.5. 依存関係を使った作業 Working with dependencies
- 51.6. リポジトリ Repositories
- 51.7. 依存関係解決の仕組み How dependency resolution works
- 51.8. 依存関係解決処理の微調整 Fine-tuning the dependency resolution process
- 51.9. 依存関係のキャッシュ The dependency cache
- 51.10. 推移的依存関係を管理するための戦略 Strategies for transitive dependency management
- 52. アーティファクトの公開 Publishing artifacts
- 53. MavenプラグインThe Maven Plugin
- 54. 署名プラグイン The Signing Plugin
- 55. Building native binaries
- 55.1. Supported languages
- 55.2. Tool chain support
- 55.3. Tool chain installation
- 55.4. Component model
- 55.5. Building a library
- 55.6. Building an executable
- 55.7. Tasks
- 55.8. Finding out more about your project
- 55.9. Language support
- 55.10. Configuring the compiler, assembler and linker
- 55.11. Windows Resources
- 55.12. Library Dependencies
- 55.13. Native Binary Variants
- 55.14. Tool chains
- 55.15. Visual Studio IDE integration
- 55.16. CUnit support
- 56. ビルドのライフサイクルThe Build Lifecycle
- 57. マルチプロジェクトのビルドMulti-project Builds
- 57.1. クロスプロジェクト設定Cross project configuration
- 57.2. サブプロジェクトの設定Subproject configuration
- 57.3. マルチプロジェクトのビルド実行ルールExecution rules for multi-project builds
- 57.4. 絶対パスによるタスクの実行Running tasks by their absolute path
- 57.5. プロジェクトとタスクのパスProject and task paths
- 57.6. 依存関係 - なんの依存関係?Dependencies - Which dependencies?
- 57.7. プロジェクト依存関係Project lib dependencies
- 57.8. Parallel project execution
- 57.9. 分離されたプロジェクト Decoupled Projects
- 57.10. マルチプロジェクトのビルドとテスティングMulti-Project Building and Testing
- 57.11. Multi Project and buildSrc
- 57.12. プロパティとメソッドの継承Property and method inheritance
- 57.13. まとめSummary
- 58. カスタムタスクの作成Writing Custom Task Classes
- 59. カスタムプラグインの作成Writing Custom Plugins
- 60. ビルドロジックの体系化Organizing Build Logic
- 60.1. プロパティとメソッドの継承Inherited properties and methods
- 60.2. 設定のインジェクションInjected configuration
- 60.3.
buildSrcプロジェクトのソースをビルドするBuild sources in thebuildSrcproject - 60.4. 別のGradleビルドを、現在のビルドから呼び出して実行するRunning another Gradle build from a build
- 60.5. ビルドスクリプトで外部ライブラリを使うときの依存関係設定External dependencies for the build script
- 60.6. Antオプショナルタスクの依存関係Ant optional dependencies
- 60.7. まとめSummary
- 61. 初期化スクリプトInitialization Scripts
- 62. Gradleラッパー The Gradle Wrapper
- 63. Embedding Gradle
- 64. Comparing Builds
- 65. Ivy Publishing (new)
- 66. Maven Publishing (new)
- A. Gradleサンプル集 Gradle Samples
- B. 陥りがちな罠 Potential Traps
- C. 機能のライフサイクル The Feature Lifecycle
- D. Gradle コマンドラインGradle Command Line
- E. IDE対応の現状と、IDEによらない開発支援Existing IDE Support and how to cope without it
- 用語集 / Glossary
例目次
- 6.1. 初めてのビルドスクリプト
- 6.2. ビルドスクリプトの実行
- 6.3. タスク定義のショートカット
- 6.4. GradleタスクでGroovyを使う
- 6.5. GradleタスクでGroovyを使う
- 6.6. タスク間の依存関係を宣言する
- 6.7. 遅延評価のdependsOn - タスクがまだ宣言されていない場合
- 6.8. 動的なタスク定義
- 6.9. APIからタスクにアクセスする - 依存関係の追加
- 6.10. APIからタスクにアクセスする - アクションの追加
- 6.11. ビルドスクリプトのプロパティとして既存のタスクにアクセスする
- 6.12. 拡張プロパティをタスクに追加する
- 6.13. AntBuilderを使ってant.loadfileターゲットを実行する
- 6.14. メソッドを抽出してビルドロジックを整理する
- 6.15. デフォルトタスクの定義
- 6.16. 選択したタスクによって異なる結果を得る
- 7.1. Javaプラグインの使用
- 7.2. Javaプロジェクトのビルド
- 7.3. Mavenリポジトリの追加
- 7.4. 依存関係の追加
- 7.5. MANIFEST.MFのカスタマイズ
- 7.6. テスト用システムプロパティの追加
- 7.7. JARファイルの公開
- 7.8. Eclipseプラグイン
- 7.9. Javaの例 - 完全なビルドファイル
- 7.10. マルチプロジェクトビルド - 階層レイアウト
- 7.11. マルチプロジェクトビルド - settings.gradleファイル
- 7.12. マルチプロジェクトビルド - 共通設定
- 7.13. マルチプロジェクトビルド - プロジェクト間の依存関係
- 7.14. マルチプロジェクトビルド - 配布ファイル
- 8.1. 依存関係の宣言
- 8.2. 外部依存関係の定義
- 8.3. 外部依存関係定義のショートカット形式
- 8.4. Mavenセントラルリポジトリの使用
- 8.5. リモートMavenリポジトリの使用
- 8.6. リモートIvyリポジトリの使用
- 8.7. ローカルのIvyディレクトリを使う
- 8.8. Ivyリポジトリに公開する
- 8.9. Mavenリポジトリへの公開
- 9.1. Groovyプラグイン
- 9.2. Dependency on Groovy
- 9.3. Groovy用のビルドファイル(全体)
- 10.1. Warプラグイン
- 10.2. JettyプラグインによるWebアプリケーションの実行
- 11.1. 複数のタスクの実行
- 11.2. タスクの除外
- 11.3. タスク名の省略
- 11.4. キャメルケースのタスク名を省略
- 11.5. ビルドスクリプトを指定してビルドするプロジェクトを選択する
- 11.6. プロジェクトディレクトリを使ってプロジェクトを選択する
- 11.7. プロジェクトに関する情報を取得する
- 11.8. プロジェクトに説明を添付する
- 11.9. タスクに関する情報を取得する
- 11.10. タスクレポートの内容を変更する
- 11.11. タスクに関してもっと多くの情報を取得する
- 11.12. タスクについて詳細なヘルプ情報を取得する
- 11.13. 依存関係の情報を取得する
- 11.14. 依存関係のレポートをコンフィギュレーションでフィルタする
- 11.15. 個別の依存関係に対する解析情報を取得する
- 11.16. プロパティに関する情報
- 12.1. GUIの起動Launching the GUI
- 13.1. Projectオブジェクトへのアクセス
- 13.2. ローカル変数を使用する
- 13.3. 拡張プロパティを使用する
- 13.4. Groovy JDKのメソッド
- 13.5. プロパティアクセサ
- 13.6. カッコなしのメソッド呼び出し
- 13.7. マップリテラル、リストリテラル
- 13.8. メソッドのクロージャ引数
- 13.9. クロージャのdelegate
- 14.1. mkdirでディレクトリを作成する
- 14.2. gradle.propertiesでプロパティを設定する
- 14.3. 外部のビルドスクリプトファイルでプロジェクトの設定を行う
- 14.4. 任意のオブジェクトを組み立てる
- 14.5. 外部スクリプトで任意のオブジェクトを組み立てる
- 15.1. タスクを定義する
- 15.2. タスクを定義する - タスク名に文字列を使用
- 15.3. その他のタスク定義方法
- 15.4. タスクにプロパティとしてアクセスする
- 15.5. tasksコレクションからタスクにアクセスする
- 15.6. パスを使ってタスクにアクセスする
- 15.7. copyタスクの作成
- 15.8. タスクの設定 - 様々な方法
- 15.9. タスクの設定 - クロージャの使用
- 15.10. クロージャを伴うタスク定義
- 15.11. 別プロジェクトのタスクとの依存関係を定義する
- 15.12. taskオブジェクトを使った依存関係定義
- 15.13. クロージャを使った依存関係定義
- 15.14. Adding a 'must run after' task ordering
- 15.15. Adding a 'should run after' task ordering
- 15.16. Task ordering does not imply task execution
- 15.17. A 'should run after' task ordering is ignored if it introduces an ordering cycle
- 15.18. タスクに説明書きを追加する
- 15.19. タスクの上書き
- 15.20. 述語でタスクをスキップ
- 15.21. StopExecutionExceptionでタスクをスキップ
- 15.22. タスクの有効化と無効化
- 15.23. 生成タスク
- 15.24. タスクの入力と出力を宣言
- 15.25. タスクルール
- 15.26. ルールベース・タスクの依存関係
- 15.27. Adding a task finalizer
- 15.28. Task finalizer for a failing task
- 16.1. ファイルを参照する
- 16.2. ファイルコレクションの作成
- 16.3. ファイルコレクションを使う
- 16.4. ファイルコレクションを実装する
- 16.5. ファイルツリーを作成する
- 16.6. ファイルツリーを使う
- 16.7. アーカイブをファイルツリーとして使う
- 16.8. ファイルセットを指定する
- 16.9. ファイルセットを指定する
- 16.10. Copyタスクでファイルをコピーする
- 16.11. Copyタスクのコピー元と宛先を指定する
- 16.12. コピーするファイルを選択する
- 16.13. copy()メソッドで更新チェックせずにファイルをコピーする
- 16.14. copy()メソッドで更新チェックを実施してファイルをコピーする
- 16.15. コピー時にファイルをリネームする
- 16.16. コピー時にファイルをフィルタリングする
- 16.17. 入れ子構造のコピー仕様
- 16.18. Syncタスクで依存関係をコピーする
- 16.19. ZIPアーカイブの作成
- 16.20. ZIPアーカイブの作成
- 16.21. アーカイブタスクの設定 - カスタムアーカイブ名
- 16.22. アーカイブタスクの設定 - appendix & classifier
- 17.1. Antタスクの利用
- 17.2. Antタスクにネストされたテキストを渡す
- 17.3. Antタスクにネストされた要素を渡す
- 17.4. Antタイプの利用
- 17.5. カスタムAntタスクの利用
- 17.6. カスタムAntタスクに対するクラスパスの宣言
- 17.7. カスタムAntタスクと依存関係管理を併用
- 17.8. Antビルドのインポート
- 17.9. Antターゲットに依存するタスク
- 17.10. Antターゲットにふるまいを追加
- 17.11. Ant target that depends on Gradle task
- 17.12. Renaming imported Ant targets
- 17.13. Antプロパティの設定
- 17.14. Antプロパティの取得
- 17.15. Antリファレンスの設定
- 17.16. Antリファレンスの取得
- 18.1. ログに標準出力を使う
- 18.2. 自分でログメッセージを書く
- 18.3. SLF4Jでログを出力する
- 18.4. 標準出力のキャプチャ設定
- 18.5. タスク実行時の標準出力キャプチャ設定
- 18.6. Gradleがロギングするものを変更する
- 20.1. HTTPプロクシの設定Configuring an HTTP proxy
- 20.2. HTTPSプロクシの設定Configuring an HTTPS proxy
- 21.1. プラグインの適用
- 21.2. Applying a script plugin
- 21.3. Applying a binary plugin
- 21.4. Applying a binary plugin by type
- 21.5. 型でプラグインを適用する
- 21.6. Applying a community plugin
- 21.7. プラグインにより追加されたタスク
- 21.8. プラグインのデフォルトを変更する
- 21.9. プラグインの規約オブジェクト
- 23.1. Javaプラグインの使用
- 23.2. Javaソースレイアウトのカスタマイズ
- 23.3. ソースセットへのアクセス
- 23.4. ソースセットのソースディレクトリの設定
- 23.5. ソースセットの定義
- 23.6. ソースセットの依存関係定義
- 23.7. ソースセットのコンパイル
- 23.8. ソースセットのJARを生成
- 23.9. ソースセットのJavadocを生成
- 23.10. ソースセットのテストを実行
- 23.11. Filtering tests in the build script
- 23.12. JUnit Categories
- 23.13. Grouping TestNG tests
- 23.14. Creating a unit test report for subprojects
- 23.15. MANIFEST.MFのカスタマイズ
- 23.16. manifestオブジェクトの作成
- 23.17. 特定のアーカイブ用にMANIFEST.MFを分離
- 23.18. 特定のアーカイブ用にMANIFEST.MFを分離
- 24.1. Groovyプラグインの使用
- 24.2. Groovyソースレイアウトのカスタマイズ
- 24.3. Groovyプラグインの設定
- 24.4. Groovyテスト用の依存関係設定
- 24.5. 同梱のGroovyを使用する依存関係設定
- 24.6. Groovyをファイル依存関係で設定する
- 25.1. Scalaプラグインを使う
- 25.2. Scalaソースレイアウトのカスタマイズ
- 25.3. 製品コードに使うScalaへの依存関係の宣言
- 25.4. テストコードに使うScalaへの依存関係の宣言
- 25.5. Fast Scala Compilerを有効にする
- 25.6. メモリ設定の調整
- 25.7. Zincベースのコンパイラを有効にする
- 26.1. Using the War plugin
- 26.2. Customization of war plugin
- 27.1. Earプラグインの利用
- 27.2. Earプラグインのカスタマイズ
- 28.1. Using the Jetty plugin
- 29.1. Checkstyleプラグインの使用
- 30.1. CodeNarcプラグインの使用
- 31.1. FindBugsプラグインの使用
- 32.1. JDependプラグインの使用
- 33.1. PMDプラグインの使用
- 34.1. Applying the JaCoCo plugin
- 34.2. Configuring JaCoCo plugin settings
- 34.3. Configuring test task
- 34.4. Configuring test task
- 34.5. Using application plugin to generate code coverage data
- 34.6. Coverage reports generated by applicationCodeCoverageReport
- 35.1. Sonarプラグインの適用
- 35.2. Sonar接続設定のコンフィグレーション
- 35.3. Sonarプロジェクト設定のコンフィグレーション
- 35.4. マルチプロジェクトビルドにおけるグローバルコンフィグレーション
- 35.5. マルチプロジェクトビルドにおける共通のプロジェクトコンフィグレーション
- 35.6. マルチプロジェクトビルドにおけるプロジェクト個別コンフィグレーション
- 35.7. 解析対象の言語のコンフィグレーション
- 35.8. プロパティ文法の利用
- 35.9. カスタムソースセットの解析
- 35.10. Java言語以外の解析
- 35.11. カスタムグローバルプロパティ設定
- 35.12. カスタムプロジェクトプロパティ設定
- 35.13. カスタムのコマンドラインプロパティを実装する
- 36.1. Applying the Sonar Runner plugin
- 36.2. Configuring Sonar connection settings
- 36.3. Configuring Sonar runner version
- 36.4. Global configuration settings
- 36.5. Shared configuration settings
- 36.6. Individual configuration settings
- 36.7. Skipping analysis of a project
- 36.8. Analyzing custom source sets
- 36.9. Analyzing languages other than Java
- 36.10. setting custom Sonar Runner fork options
- 37.1. OSGiプラグインの利用
- 37.2. OSGiのMANIFEST.MFファイルの設定
- 38.1. Eclipseプラグインの使用方法
- 38.2. classpath の一部を上書き
- 38.3. project の一部を上書き
- 38.4. 依存関係のエクスポート
- 38.5. 依存関係のエクスポート
- 38.6. XML のカスタマイズ
- 38.7. XML のカスタマイズCustomizing the XML
- 39.1. IDEAプラグインを使う
- 39.2. モジュールの部分的な上書き
- 39.3. プロジェクトの部分的な上書き
- 39.4. Export Dependencies
- 39.5. XMLをカスタマイズする
- 40.1. ANTLRプラグインの利用
- 40.2. ANTLRバージョン宣言
- 42.1. 通知プラグインを使用する
- 42.2. 通知プラグインの設定
- 42.3. 通知プラグインを使用する
- 43.1. ビルド通知プラグインの利用
- 43.2. 初期化スクリプトからビルド通知プラグインを使う
- 44.1. Using the distribution plugin
- 44.2. Adding extra distributions
- 44.3. Configuring the main distribution
- 45.1. Using the application plugin
- 45.2. Configure the application main class
- 45.3. Configure default JVM settings
- 45.4. 他タスクの出力をアプリケーションのディストリビューションに含める
- 45.5. ディストリビューションのファイルを自動的に作成する
- 46.1. Using the Java library distribution plugin
- 46.2. Configure the distribution name
- 46.3. Include files in the distribution
- 49.1. Using the Build Dashboard plugin
- 50.1. Using the Java Gradle Plugin Development plugin
- 51.1. コンフィギュレーションの定義
- 51.2. コンフィギュレーションへのアクセス
- 51.3. コンフィギュレーションの設定変更
- 51.4. モジュール依存関係
- 51.5. アーティファクトオンリー記法
- 51.6. 分類子付きの依存関係
- 51.7. あるコンフィグレーションの内部を列挙する
- 51.8. クライアントモジュール依存関係 - 推移的な依存関係
- 51.9. プロジェクト依存関係
- 51.10. ファイル依存関係
- 51.11. 生成されるファイルへの依存関係
- 51.12. Gradle API依存関係
- 51.13. Gradleに同梱されているGroovyへの依存関係
- 51.14. 推移的な依存関係の除外
- 51.15. 依存関係のオプション属性
- 51.16. 依存関係定義のコレクション、配列
- 51.17. 依存するコンフィギュレーションの指定
- 51.18. 依存するプロジェクトのコンフィギュレーション
- 51.19. Configuration.copy
- 51.20. 宣言した依存関係にアクセスする
- 51.21. Configuration.files
- 51.22. フィルター付きConfiguration.files
- 51.23. Configuration.copy
- 51.24. Configuration.copy vs. Configuration.files
- 51.25. Declaring a Maven and Ivy repository
- 51.26. Providing credentials to a Maven and Ivy repository
- 51.27. Mavenセントラルリポジトリを追加する
- 51.28. BintrayのJCenter Mavenリポジトリを追加する
- 51.29. Using Bintrays's JCenter with HTTP
- 51.30. Mavenのローカルキャッシュをリポジトリとして追加する
- 51.31. カスタムMavenリポジトリを追加する
- 51.32. JARファイル用の追加リポジトリを設定する
- 51.33. パスワード保護されたMavenリポジトリへのアクセス
- 51.34. フラットディレクトリ・リゾルバ
- 51.35. Ivyリポジトリ
- 51.36. Ivy repository with named layout
- 51.37. パターンレイアウトを指定したIvyリポジトリ
- 51.38. Maven互換レイアウトのIvyリポジトリ
- 51.39. Ivy repository with pattern layout
- 51.40. Ivy repository with multiple custom patterns
- 51.41. Ivy repository with Maven compatible layout
- 51.42. パスワードで保護されたIvyリポジトリ
- 51.43. リポジトリ定義へのアクセス
- 51.44. リポジトリの設定変更
- 51.45. カスタムリポジトリの定義
- 51.46. あるグループのライブラリ全てで一貫したバージョンを使用するよう強制する
- 51.47. 独自のバージョニング体制を実装する
- 51.48. バージョンのブラックリスト指定と差し替
- 51.49. 解決時に依存関係のグループ名や名前を変更する
- 51.50. Declaring module replacement
- 51.51. 動的解決モードを有効にする
- 51.52. 'Latest' version selector
- 51.53. Custom status scheme
- 51.54. Ivy component metadata rule
- 51.55. Component selection rule
- 51.56. Component selection rule with module target
- 51.57. Component selection rule with metadata
- 51.58. 動的バージョンのキャッシュ制御
- 51.59. 変更性モジュールのキャッシュ制御
- 52.1. アーカイブタスクを使ってアーティファクトを宣言する
- 52.2. アーティファクトをファイルで宣言する
- 52.3. アーティファクトのカスタマイズ
- 52.4. ファイルでアーティファクトを宣言するMapスタイルの文法
- 52.5. アップロードタスクの設定
- 53.1. Mavenプラグインの利用
- 53.2. スタンドアロンPOMの生成
- 53.3. リモートMavenリポジトリへのファイルアップロード
- 53.4. SSH経由でのファイルアップロード
- 53.5. pomのカスタマイズ
- 53.6. ビルダースタイルでpomをカスタマイズする
- 53.7. 自動生成された内容を変更する
- 53.8. Mavenインストーラーのカスタマイズ
- 53.9. 複数POMの生成
- 53.10. マッピングコンフィグレーションへのアクセス
- 54.1. 署名プラグインの使用
- 54.2. コンフィグレーションに署名する
- 54.3. コンフィグレーションの出力に署名する
- 54.4. タスクを署名する
- 54.5. タスクの出力に署名する
- 54.6. 条件付き署名
- 54.7. Signing a POM for deployment
- 55.1. Defining a library component
- 55.2. Defining executable components
- 55.3. The components report
- 55.4. The 'cpp' plugin
- 55.5. C++ source set
- 55.6. The 'c' plugin
- 55.7. C source set
- 55.8. The 'assembler' plugin
- 55.9. The 'objective-c' plugin
- 55.10. The 'objective-cpp' plugin
- 55.11. Settings that apply to all binaries
- 55.12. Settings that apply to all shared libraries
- 55.13. Settings that apply to all binaries produced for the 'main' executable component
- 55.14. Settings that apply only to shared libraries produced for the 'main' library component
- 55.15. The 'windows-resources' plugin
- 55.16. Configuring the location of Windows resource sources
- 55.17. Building a resource-only dll
- 55.18. Providing a library dependency to the source set
- 55.19. Providing a library dependency to the binary
- 55.20. Declaring project dependencies
- 55.21. Defining build types
- 55.22. Configuring debug binaries
- 55.23. Defining platforms
- 55.24. Defining flavors
- 55.25. Targeting a component at particular platforms
- 55.26. Building all possible variants
- 55.27. Defining tool chains
- 55.28. Reconfigure tool arguments
- 55.29. Defining target platforms
- 55.30. Registering CUnit tests
- 55.31. Registering CUnit tests
- 55.32. Running CUnit tests
- 56.1. シングルプロジェクトのビルド
- 56.2. 階層構造のレイアウト
- 56.3. フラットなレイアウト
- 56.4. プロジェクト・ツリーの属性を変更する
- 56.5. プロジェクトツリーの属性を変更する
- 56.6. 特定プロパティを持つプロジェクトにタスクを追加する
- 56.7. 通知
- 56.8. すべてのタスクにプロパティ値を設定する
- 56.9. タスク実行の開始時および終了時にロギングを行う
- 57.1. マルチプロジェクト・ツリー - warter & bluewhale プロジェクト
- 57.2. water(親プロジェクト)のビルドスクリプト
- 57.3. マルチプロジェクトツリー - water, bluewhaleそしてkrill
- 57.4. Waterプロジェクトのビルドスクリプト
- 57.5. サブプロジェクト共通の振る舞いとすべてのプロジェクト共通の振る舞いをそれぞれ定義する
- 57.6. プロジェクト個別の振る舞いを定義する
- 57.7. krillプロジェクトに個別の振る舞いを定義する
- 57.8. プロジェクトに振る舞いを追加する(プロジェクト名によるフィルタリング)
- 57.9. プロジェクトに振る舞いを追加する(プロパティによるフィルタリング)
- 57.10. サブプロジェクトからビルドを実行する
- 57.11. プロジェクトの評価と実行
- 57.12. プロジェクトの評価と実行
- 57.13. 絶対パスによるタスクの実行
- 57.14. 依存関係とビルド実行順序
- 57.15. 依存関係とビルド実行順序
- 57.16. 依存関係とビルド実行順序
- 57.17. 依存関係を宣言する
- 57.18. 依存関係を宣言する
- 57.19. プロジェクトにまたがるタスク間の依存関係
- 57.20. 評価順序の依存関係
- 57.21. 評価順序の依存関係 - evaluationDependsOn
- 57.22. 評価順序の依存関係
- 57.23. 依存関係 - 実生活の例 - クロスプロジェクト設定
- 57.24. プロジェクト依存関係
- 57.25. プロジェクト依存関係
- 57.26. 細かい依存関係の制御
- 57.27. シングルプロジェクトのビルドとテスト
- 57.28. シングルプロジェクトの部分ビルドとテスト
- 57.29. 依存プロジェクトのビルドとテスト
- 57.30. 依存されているプロジェクトのビルドとテスト
- 58.1. カスタムタスクの定義
- 58.2. hello worldタスク
- 58.3. カスタマイズ可能なhello worldタスク
- 58.4. カスタムタスクのビルド
- 58.5. カスタムタスク
- 58.6. カスタムタスクを別のプロジェクトで使う
- 58.7. カスタムタスクのテスト
- 58.8. Defining an incremental task action
- 58.9. Running the incremental task for the first time
- 58.10. Running the incremental task with unchanged inputs
- 58.11. Running the incremental task with updated input files
- 58.12. Running the incremental task with an input file removed
- 58.13. Running the incremental task with an output file removed
- 58.14. Running the incremental task with an input property changed
- 59.1. カスタムプラグイン
- 59.2. カスタムプラグインのextension
- 59.3. コンフィグレーションクロージャ付きのカスタムプラグイン
- 59.4. ファイルプロパティの遅延評価
- 59.5. カスタムプラグインに対するビルド
- 59.6. カスタムプラグインに対するワイヤリング
- 59.7. 別のプロジェクトでカスタムプラグインを使う
- 59.8. Applying a community plugin with the plugins DSL
- 59.9. カスタムプラグインのテスト
- 59.10. Using the Java Gradle Plugin Development plugin
- 59.11. ドメインオブジェクトの管理
- 60.1. プロパティとメソッドの継承を使う
- 60.2. プロパティとメソッドのインジェクション
- 60.3. カスタムbuildSrcビルドスクリプト
- 60.4. buildSrcルートプロジェクトにサブプロジェクトを追加する
- 60.5. 別のビルドを呼び出す
- 60.6. ビルドスクリプトのクラスパスを宣言する
- 60.7. 外部ライブラリをビルドスクリプトで使用する
- 60.8. Ant optional dependencies
- 61.1. プロジェクト評価前に初期化スクリプトで追加的な設定を行う
- 61.2. 初期化スクリプトの外部依存関係定義
- 61.3. 外部依存関係を持つ初期化スクリプト
- 61.4. Using plugins in init scripts
- 62.1. ラッパータスク
- 62.2. ラッパーにより生成されるファイル
- 65.1. Applying the “ivy-publish” plugin
- 65.2. Publishing a Java module to Ivy
- 65.3. Publishing additional artifact to Ivy
- 65.4. customizing the publication identity
- 65.5. Customizing the module descriptor file
- 65.6. Publishing multiple modules from a single project
- 65.7. Declaring repositories to publish to
- 65.8. Choosing a particular publication to publish
- 65.9. Publishing all publications via the “publish” lifecycle task
- 65.10. Generating the Ivy module descriptor file
- 65.11. Publishing a Java module
- 65.12. Example generated ivy.xml
- 66.1. Applying the 'maven-publish' plugin
- 66.2. Adding a MavenPublication for a Java component
- 66.3. Adding additional artifact to a MavenPublication
- 66.4. customizing the publication identity
- 66.5. Modifying the POM file
- 66.6. Publishing multiple modules from a single project
- 66.7. Declaring repositories to publish to
- 66.8. Publishing a project to a Maven repository
- 66.9. Publish a project to the Maven local repository
- 66.10. Generate a POM file without publishing
- B.1. 変数のスコープ:ローカルスコープとスクリプトスコープ
- B.2. 設定フェーズと実行フェーズの区別
本ドキュメントは、Gradleユーザーガイドを非公式に日本語に翻訳したものです。翻訳作業はgithub上のプロジェクトで行っていますので、誤訳、不自然な点など発見されましたらプロジェクトサイト上からご連絡ください。
なお、原文は添付の代替スタイルシート(original)を使用すれば表示されます。
We would like to introduce Gradle to you, a build system that we think is a quantum leap for build technology in the Java (JVM) world. Gradle provides:
Gradleは、Java(JVM)環境におけるビルドシステムであり、従来のビルド技術を大きく躍進させるものです。Gradleが提供している機能、特長には以下のようなものがあります。
A very flexible general purpose build tool like Ant.
あらゆる目的に使用できる汎用ビルドツールです。GradleはAntと同じような目的で使うことができます。
Switchable, build-by-convention frameworks a la Maven. But we never lock you in!
その一方でMavenのような規約によるビルドフレームワークを提供します。その規約も、気に入らないところは変更可能です。
Very powerful support for multi-project builds.
マルチプロジェクトを強力にサポートします。
Very powerful dependency management (based on Apache Ivy).
強力な依存関係管理 (Apache Ivy ベース)を提供します。
Full support for your existing Maven or Ivy repository infrastructure.
Maven/Ivyリポジトリを完全にサポートします。
Support for transitive dependency management without the need for remote repositories or
pom.xmlandivy.xmlfiles.リモートリポジトリや
pom.xml、ivy.xmlを使用しなくても推移的な依存関係を管理できます。Ant tasks and builds as first class citizens.
Antのタスクとプロジェクトがファーストクラス・オブジェクトとして組み込まれており、デフォルトで使用可能です。
Groovy build scripts.
Groovyでビルドスクリプトを記述します。
A rich domain model for describing your build.
ビルドを記述する際、オブジェクト指向のリッチなドメインモデルを使用可能です。
In 2章概要Overview you will find a detailed overview of Gradle. Otherwise, the tutorials are waiting, have fun :)
2章概要OverviewでGradleの概要について記述しています。チュートリアルも用意しているので楽しんでいってください(^^)
This user guide, like Gradle itself, is under very active development. Some parts of Gradle aren't documented as completely as they need to be. Some of the content presented won't be entirely clear or will assume that you know more about Gradle than you do. We need your help to improve this user guide. You can find out more about contributing to the documentation at the Gradle web site.
このユーザーガイドは、Gradle同様、現在活発に更新されているところです。まだGradleについて必要な部分がすべてドキュメント化されているわけではありません。 また、記載内容には明確でない部分やGradleについて読者が知っている以上の知識を要求する部分があるかもしれません。 このガイドを改良していくため、力を貸してください。 ドキュメンテーションへ参加、貢献していただける方はGradleのウェブサイトをご参照ください。
Throughout the user guide, you will find some diagrams that represent dependency relationships between Gradle tasks. These use something analogous to the UML dependency notation, which renders an arrow from one task to the task that the first task depends on.
Here is a list of some of Gradle's features.
Gradleの特長は以下の通りです。
- 宣言的なビルドの記述と規約によるビルドDeclarative builds and build-by-convention
At the heart of Gradle lies a rich extensible Domain Specific Language (DSL) based on Groovy. Gradle pushes declarative builds to the next level by providing declarative language elements that you can assemble as you like. Those elements also provide build-by-convention support for Java, Groovy, OSGi, Web and Scala projects. Even more, this declarative language is extensible. Add your own new language elements or enhance the existing ones, thus providing concise, maintainable and comprehensible builds.
Gradleの核となっているのは、拡張性豊富なGroovyベースのDSLです。 それは、好きなように組み立てて記述できる、ビルド用の宣言型プログラミング言語とも言えるものであり、従来の宣言的なビルド記述をさらに上の段階へ推し進めます。 そのプログラミング言語には、JavaやGroovy、OSGi、WebそしてScalaなどのプロジェクトを一般的な方法でビルドする機能も備わっています。 さらに、このプログラミング言語はとても拡張性豊富なものです。 新たな言語機能を追加したり、既存の言語機能を拡張したりすることで、簡潔でメンテナンス性の良い、分かりやすいビルドシステムを作ることができるでしょう。
- タスクグラフ用のプログラミング言語Language for dependency based programming
The declarative language lies on top of a general purpose task graph, which you can fully leverage in your builds. It provides utmost flexibility to adapt Gradle to your unique needs.
Gradleの提供する宣言型プログラミング言語は、グラフ構造をもつ汎用のタスク群の上に構築されています。 皆さんのビルドシステムには様々なニーズがあると思いますが、Gradleは、それらに適合できる、究極的な柔軟性を持っているのです。- ビルドの構造化Structure your build
The suppleness and richness of Gradle finally allows you to apply common design principles to your build. For example, it is very easy to compose your build from reusable pieces of build logic. Inline stuff where unnecessary indirections would be inappropriate. Don't be forced to tear apart what belongs together (e.g. in your project hierarchy). Avoid smells like shotgun changes or divergent change that turn your build into a maintenance nightmare. At last you can create a well structured, easily maintained, comprehensible build.
Gradleは柔軟性があり機能が豊富なので、ビルドを記述する際にプログラミングにおける一般的な設計の原則を適用できます。たとえば、ビルド用のロジックを利用可能な単位に細かく分割し、そのロジックを組み立ててビルドを構築することも簡単にできます。ロジックの呼び出しがむやみに複雑になってきたときはインライン化しましょう。同じプロジェクト階層に属しているなど、本来一カ所にあるべきロジックを、無理にいろんなところに書く必要もありません。変更が発散したり分岐したりして、ビルドのメンテナンスが悪夢に変わり果てるのを防ぎ、構造化されたメンテナンス性の良い分かりやすいビルドを記述できます。
- 深いAPIDeep API
From being a pleasure to be used embedded to its many hooks over the whole lifecycle of build execution, Gradle allows you to monitor and customize its configuration and execution behavior to its very core.
ビルドが実行されるライフサイクル全体に、たくさんのフックを埋め込むことができます。 なので、非常に深い部分までGradleの設定や振る舞いをモニタリングしたりカスタマイズしたりすることが可能です。
- ビルドの分割Gradle scales
Gradle scales very well. It significantly increases your productivity, from simple single project builds up to huge enterprise multi-project builds. This is true for structuring the build. With the state-of-art incremental build function, this is also true for tackling the performance pain many large enterprise builds suffer from.
Gradleでは、ビルドの分割を強力にサポートしています。このことは、単純なシングルプロジェクトでもエンタープライズレベルの巨大なマルチプロジェクトでも生産性の大きな向上につながります。ビルドを構造化できますし、最先端のインクリメンタルビルドで、たくさんの大きなプロジェクトをビルドするときのパフォーマンスを改善することもできるからです。
- マルチプロジェクトのビルドMulti-project builds
Gradle's support for multi-project build is outstanding. Project dependencies are first class citizens. We allow you to model the project relationships in a multi-project build as they really are for your problem domain. Gradle follows your layout not vice versa.
Gradleは突出したマルチプロジェクトのサポートが特長です。プロジェクト間の依存関係はGradleのファーストクラス・オブジェクトであり、ごく普通に取り扱うことができます。世の中にはいろいろなビルドがありますが、Gradleではそれぞれのビルドに特有の問題点、課題にしたがってマルチプロジェクト、またプロジェクトの関係をモデリングできます。つまり、Gradleがあなたのプロジェクト構造に従うのであって、その逆ではありません。
Gradle provides partial builds. If you build a single subproject Gradle takes care of building all the subprojects that subproject depends on. You can also choose to rebuild the subprojects that depend on a particular subproject. Together with incremental builds this is a big time saver for larger builds.
Gradleでは部分ビルドが可能です。一つのサブプロジェクトをビルドすれば、Gradleはそのプロジェクトに依存しているすべてのプロジェクトもビルドします。また、依存しているプロジェクトのうち、どのプロジェクトを再ビルドするか選択することもできます。大きなプロジェクトの場合、これはインクリメンタルビルドと同様、大きな時間の節約になるでしょう。
- 依存関係を管理する多くの方法Many ways to manage your dependencies
Different teams prefer different ways to manage their external dependencies. Gradle provides convenient support for any strategy. From transitive dependency management with remote Maven and Ivy repositories to jars or directories on the local file system.
外部ライブラリの解決には、チームごとにさまざまな方法があるものです。リモートのMavenやIvyのリポジトリを使った推移的な依存関係の管理から、ローカルファイルシステム上のjarやディレクトリまで、どのような方法をとるにせよGradleはそれらを強力にサポートします。
- 他のビルドツールとの統合Gradle is the first build integration tool
Ant tasks are first class citizens. Even more interesting, Ant projects are first class citizens as well. Gradle provides a deep import for any Ant project, turning Ant targets into native Gradle tasks at runtime. You can depend on them from Gradle, you can enhance them from Gradle, you can even declare dependencies on Gradle tasks in your build.xml. The same integration is provided for properties, paths, etc ...
Gradleでは、Antのタスクはファーストクラス・オブジェクトです。さらにおもしろいことに、Antのプロジェクトもまたファーストクラス・オブジェクトなのです。Gradleでは、Antプロジェクトをインポートして、実行時にAntのターゲットをGradleネイティブのタスクへ変換できます。もちろんインポートしたタスクへの依存関係を定義できますし、拡張もできます。それどころか、build.xmlの中でGradleのタスクへの依存関係を宣言することさえ可能です。プロパティやパス、その他諸々についても同じレベルで統合されています。
Gradle fully supports your existing Maven or Ivy repository infrastructure for publishing and retrieving dependencies. Gradle also provides a converter for turning a Maven
pom.xmlinto a Gradle script. Runtime imports of Maven projects will come soon.Gradleは、既存のMaven/Ivyリポジトリのインフラ、依存関係の定義や解決といった機能を完全にサポートしています。さらに、Mavenの
pom.xmlをGradleのスクリプトに変換するコンバーターも用意されています。実行時にその変換を行う機能も近いうちに提供される予定です。- 容易に移行可能Ease of migration
Gradle can adapt to any structure you have. Therefore you can always develop your Gradle build in the same branch where your production build lives and both can evolve in parallel. We usually recommend to write tests that make sure that the produced artifacts are similar. That way migration is as less disruptive and as reliable as possible. This is following the best-practices for refactoring by applying baby steps.
Gradleは、どんな構造のプロジェクトにも適用できます。なので、今製品のビルドを行っているブランチがあるなら、それと同じブランチ上で平行してGradleのビルドを開発していくことができます。私たちは常より、成果物を作成するときには、いつもと同様のものができているか確認するようなテストを書くことを推奨していました。この方法で移行すれば、既存のものを破壊するような可能性は少ないし、可能な限りの安全性を確保できます。これは、小さな変更を積み重ねていくという、リファクタリング上のベストプラクティスなのです。
- Groovy
Gradle's build scripts are written in Groovy, not XML. But unlike other approaches this is not for simply exposing the raw scripting power of a dynamic language. That would just lead to a very difficult to maintain build. The whole design of Gradle is oriented towards being used as a language, not as a rigid framework. And Groovy is our glue that allows you to tell your individual story with the abstractions Gradle (or you) provide. Gradle provides some standard stories but they are not privileged in any form. This is for us a major distinguishing feature compared to other declarative build systems. Our Groovy support is not just sugar coating. The whole Gradle API is fully Groovy-ized. Adding Groovy results in an enjoyable and productive experience.
GradleのビルドスクリプトはXMLではなくGroovyで記述します。しかし、それは単純に動的言語のスクリプト機能を生で使わせるということではありません。それではビルドのメンテナンスがむやみに難しくなるだけです。Gradleは、硬直したフレームワークとしてではなく、一つの言語として使用されることを想定してデザインされています。Groovyは、Gradle(またはあなた自身)が提供する抽象性と個々のビルドがもつ独自の筋書きとをくっつける接着剤となっているのです。Gradleでは、いくつかの標準的なビルドの筋書きを用意していますが、それら筋書きが何かの特別な扱いを受けているというわけではありません。別のビルドシステムと比較したとき、このことはGradleの主な特徴の一つになると考えています。GradleのGroovyサポートはただの構文糖衣ではありません。すべてのAPIは完全にGroovy化されていて、楽にGroovyを使うことができ、生産性を向上させています。
- GradleラッパーThe Gradle wrapper
The Gradle Wrapper allows you to execute Gradle builds on machines where Gradle is not installed. This is useful for example for some continuous integration servers. It is also useful for an open source project to keep the barrier low for building it. The wrapper is also very interesting for the enterprise. It is a zero administration approach for the client machines. It also enforces the usage of a particular Gradle version thus minimizing support issues.
Gradleラッパーを使うと、Gradleをインストールしていないマシンでビルドを実行できます。たとえば、CIサーバー上でビルドしたり、オープンソースプロジェクトを簡単にビルドできるようにしたりするのに便利です。また、これはクライアントマシンの管理維持作業を省く(zero administration)というアプローチでもあり、企業向けと考えてもとても面白いものだといえます。使用させるGradleのバージョンを固定し、サポートしなければならないような問題の発生を最小限に抑えることもできます。
- フリーかつオープンソースFree and open source
Gradle is an open source project, and is licensed under the ASL.
Gradleはオープンソースプロジェクトであり、ASLのもとで公開されています。
We think the advantages of an internal DSL (based on a dynamic language) over XML are tremendous when used in build scripts. There are a couple of dynamic languages out there. Why Groovy? The answer lies in the context Gradle is operating in. Although Gradle is a general purpose build tool at its core, its main focus are Java projects. In such projects the team members will be very familiar with Java. We think a build should be as transparent as possible to all team members.
ビルドスクリプトを記述するということを考えたとき、XMLに対する内部DSL(動的言語ベース)のアドバンテージというのは途方もなく大きいものです。 ただ、動的な言語はいくつかあるのに、なぜGroovyなのでしょうか。 その答えは、Gradleが想定しているシチュエーション、環境にあります。 Gradleは本質的に言えば一般的な利用が可能な汎用のビルドツールですが、メインとしてフォーカスしているのはJavaのプロジェクトです。 そのようなプロジェクトの場合、チームのメンバーがJavaに習熟しているのは明らかでしょう。 私たちは、ビルドはすべてのチームメンバーに対してできるだけ分かりやすいものであるべきだと考えています。
In that case, you might argue why we don't just use Java as the language for build scripts. We think this is a valid question. It would have the highest transparency for your team and the lowest learning curve, but because of the limitations of Java, such a build language would not be as nice, expressive and powerful as it could be. [1] Languages like Python, Groovy or Ruby do a much better job here. We have chosen Groovy as it offers by far the greatest transparency for Java people. Its base syntax is the same as Java's as well as its type system, its package structure and other things. Groovy provides much more on top of that, but with the common foundation of Java.
それならGroovyでなくJavaを使えばいいのにと思われるかもしれません。それはもっともな疑問です。 ビルド用の言語にJavaを使えば、開発チームにとって最高に分かりやすく、学習曲線が最小限緩やかなビルドとなるでしょう。 しかし、Javaはビルド用の言語として使うには表現力や機能に限界があるのです。 [2] このような用途には、PythonやGroovy、Rubyのような言語の方が向いています。 私たちは、Java世界の住人にとって断然飛び抜けた分かりやすさを提供するGroovyを選択しました。 Groovyの文法は、型システム、パッケージ構造、その他諸々についてJavaをベースにしています。Groovyはその上に様々な機能を構築していますが、土台はJavaと同じなのです。
For Java developers with Python or Ruby knowledge or the desire to learn them, the above arguments don't apply. The Gradle design is well-suited for creating another build script engine in JRuby or Jython. It just doesn't have the highest priority for us at the moment. We happily support any community effort to create additional build script engines.
Javaの開発者であっても、PythonやRubyの知識を持っていたり、それらを楽しく学んでいるのなら上記の議論は当てはまりません。 Gradleはビルドスクリプト・エンジンとしてJRubyやJythonを使えるよう適切にデザインされています。 私達にとって、目下のところはそれらの優先度は高くありませんが。 私たちは、そういった追加のビルドスクリプトエンジンを作っていただけるあらゆるコミュニティを喜んでサポートします。
[1] At http://www.defmacro.org/ramblings/lisp.html you find an interesting article comparing Ant, XML, Java and Lisp. It's funny that the 'if Java had that syntax' syntax in this article is actually the Groovy syntax.
[2] http://www.defmacro.org/ramblings/lisp.htmlに、AntとXML、Java、Lispを比較している興味深い記事が載っています。 「もしJavaがこの文法を持っていたら」という前提で書かれている構文が、まさにGroovyの文法になっているのが面白いところです。
The following tutorials introduce some of the basics of Gradle, to help you get started.
次のチュートリアルはGradleの基本機能を紹介しているものです。Gradleを始める手助けになるでしょう。
- 4章GradleのインストールInstalling Gradle
Describes how to install Gradle.
Gradleのインストール方法について
- 6章ビルドスクリプトの基本Build Script Basics
Introduces the basic build script elements: projects and tasks.
ビルドスクリプトの基本要素、プロジェクトとタスクの紹介
- 7章JavaクイックスタートJava Quickstart
Shows how to start using Gradle's build-by-convention support for Java projects.
Javaプロジェクトにおける、Gradleの規約によるビルドのチュートリアル
- 8章依存関係管理の基本 Dependency Management Basics
Shows how to start using Gradle's dependency management.
Gradleの依存関係管理のチュートリアル
- 9章GroovyクイックスタートGroovy Quickstart
Using Gradle's build-by-convention support for Groovy projects.
Groovyプロジェクトにおける、Gradleの規約によるビルドのチュートリアル
- 10章WebアプリケーションクイックスタートWeb Application Quickstart
Using Gradle's build-by-convention support for Web applications.
Webアプリケーションプロジェクトにおける、Gradleの規約によるビルドのチュートリアル
Gradle requires a Java JDK or JRE to be installed, version 6 or higher (to check, use java -version).
Gradle ships with its own Groovy library, therefore Groovy does noot need to be installed. Any existing Groovy installation is ignored by Gradle.
Gradleを使用するには、バージョン6以上のJava JDKもしくはJREが必要です(java -versionで確認してください)。
GradleにはGroovyライブラリが同梱されているので、別途Groovyをインストールする必要はありません。すでにインストールされていたとしても、Gradleでは既存のGroovyは使用されません。
Gradle uses whatever JDK it finds in your path.
Alternatively, you can set the JAVA_HOME environment variable to point to the installation directory
of the desired JDK.
Gradleは、システムのパス上にあるJDKを使用します。
パス上のJDKの代わりに、環境変数JAVA_HOMEにJDKをインストールしたディレクトリをセットして、使用したいJDKを指定することもできます。
You can download one of the Gradle distributions from the Gradle web site.
Gradleはウェブサイトからダウンロードできます。
The Gradle distribution comes packaged as a ZIP. The full distribution contains:
Gradleの配布物はZIPで圧縮されています。Gradleのフルパッケージには以下のものが含まれています。
The Gradle binaries.
Gradleのバイナリ
The user guide (HTML and PDF).
ユーザーガイド(HTMLとPDF)
The DSL reference guide.
DSLのリファレンスガイド
The API documentation (Javadoc and Groovydoc).
APIドキュメント(JavadocとGroovydoc)
Extensive samples, including the examples referenced in the user guide, along with some complete and more complex builds you can use as a starting point for your own build.
ユーザーガイドから参照されているサンプルを含め、大量のサンプルが同梱されています。複雑なビルドのサンプルが完全な形で置かれており、自分自身のビルドを記述するためのとっかかりとすることができます。
The binary sources. This is for reference only. If you want to build Gradle you need to download the source distribution or checkout the sources from the source repository. See the Gradle web site for details.
Gradleバイナリのソースコード。これは参照専用のものです。Gradleをビルドするには、ソースを別途ダウンロードするかリポジトリからチェックアウトする必要があります。詳しくはGradleのウェブサイトを参照してください。
For running Gradle, add GRADLE_HOME/binPATH
environment variable. Usually, this is sufficient to run Gradle.
GRADLE_HOME/binPATHに追加してください。Gradleの実行に必要な環境変数の設定は、通常これだけです。
You run Gradle via the gradle command. To check if Gradle is properly installed just type gradle -v. The output shows the Gradle version and also the local environment configuration (Groovy, JVM version, OS, etc.). The displayed Gradle version should match the distribution you have downloaded.
Gradleは、gradleコマンドで実行します。Gradleが正しくインストールされていることを確認するには、gradle -vと入力してください。Gradleのバージョンとローカルの実行環境(groovyやjvmのバージョンなど)が表示されます。表示されたgradleのバージョンが、ダウンロードした配布物のバージョンと一致していることを確認してください。
JVM options for running Gradle can be set via environment variables. You can use either GRADLE_OPTS
or JAVA_OPTS, or both. JAVA_OPTS is by convention an environment
variable shared by many Java applications. A typical use case would be to set the HTTP proxy in JAVA_OPTS
and the memory options in GRADLE_OPTS. Those variables can also be set at the beginning
of the gradle or gradlew script.
Gradle実行時に引き渡すJVMオプションは、環境変数GRADLE_OPTSとJAVA_OPTSで設定します。両方一緒に使うこともできます。
JAVA_OPTSに設定したオプションは、慣習により多くのJavaアプリケーションで共有されるものです。
典型的な例で言えば、HTTPプロキシはJAVA_OPTSに設定し、使用メモリに関する設定はGRADLE_OPTSにセットする、といった使い分けが考えられるでしょう。
これらの設定はgradleやgradlewスクリプトの頭に記述することもできます。
Note that it's not currently possible to set JVM options for Gradle on the command line.
This chapter is currently a work in progress.
この章は現在執筆途中です。
When using Gradle (or any software package), you can run into problems. You may not understand how to use a particular feature, or you may encounter a defect. Or, you may have a general question about Gradle.
Gradleを使っていると(他のソフトウェアでも同じですが)、問題に突き当たる可能性が常にあります。 ある機能をどうやって使えばいいのか分からなかったり、バグに遭遇したりといった場合もありますし、FAQに頭を抱えているかもしれません。
This chapter gives some advice for troubleshooting problems and explains how to get help with your problems.
この章ではトラブルシューティングのためのアドバイスや、突き当たった問題に対して手助けを求める方法について記載します。
If you are encountering problems, one of the first things to try is using the very latest release of Gradle. New versions of Gradle are released frequently with bug fixes and new features. The problem you are having may have been fixed in a new release.
何かトラブルが起こったとき、まず試すことができるのは、最新版のGradleを使ってみることです。Gradleの新バージョンはバグフィックスや新機能追加のため頻繁にリリースされています。その問題は、新しいバージョンでは修正されているかもしれません。
If you are using the Gradle Daemon, try temporarily disabling the daemon (you can pass the command line switch --no-daemon).
More information about troubleshooting the daemon process is located in 19章Gradleデーモン The Gradle Daemon.
Gradleデーモンを使っているなら、一時的にデーモンを停止してみてください(--no--daemonオプションをつけて実行)。
デーモン使用時のトラブルシューティングについて、詳しくは19章Gradleデーモン The Gradle Daemonを参照してください。
The place to go for help with Gradle is http://forums.gradle.org. The Gradle Forums is the place where you can report problems and ask questions of the Gradle developers and other community members.
Gradleに関して手助けを求めたいときは、http://forums.gradle.orgに行ってみましょう。 Gradleフォーラムでは、Gradleのデベロッパーやコミュニティメンバーに問題を報告したり、質問したりすることができます。
If something's not working for you, posting a question or problem report to the forums is the fastest way to get help. It's also the place to post improvement suggestions or new ideas. The development team frequently posts news items and announces releases via the forum, making it a great way to stay up to date with the latest Gradle developments.
何か問題が発生したら、フォーラムに質問や報告を投げるのが最も早く手助けを得られる方法です。 フォーラムでは、改善のための提案や新しいアイデアを投稿することもできます。 また、Gradleの開発チームが頻繁にニュースやリリースのアナウンスを投稿していますので、Gradle開発の最前線に触れるという意味でもフォーラムはとても便利です。
Everything in Gradle sits on top of two basic concepts: projects and tasks.
Gradleの根本にあるのは、プロジェクトとタスクという二つの基本的な概念です。
Every Gradle build is made up of one or more projects. What a project represents depends on what it is that you are doing with Gradle. For example, a project might represent a library JAR or a web application. It might represent a distribution ZIP assembled from the JARs produced by other projects. A project does not necessarily represent a thing to be built. It might represent a thing to be done, such as deploying your application to staging or production environments. Don't worry if this seems a little vague for now. Gradle's build-by-convention support adds a more concrete definition for what a project is.
Gradleによるビルドは、一つ以上のプロジェクトから構成されます。プロジェクトとは、ビルドされるソフトウェアを構成するコンポーネントのことですが、正確な意味は何をビルドするかによって変わります。たとえば、あるプロジェクトはライブラリjarやWebアプリケーションをビルドするものかもしれません。または、別のプロジェクトによってビルドされたjarを集めて配布用のzipファイルを作成するものかもしれません。何か具体的なものを組み立てるのではなく、処理を行うだけというプロジェクトもありえます。アプリケーションを本番環境にステージするというプロジェクトがその一例です。今は少しあいまいな印象を受けられるかもしれませんが、心配する必要はありません。Gradleは規約によるビルドをサポートしており、プロジェクトの定義については明確に規定されています。
Each project is made up of one or more tasks. A task represents some atomic piece of work which a build performs. This might be compiling some classes, creating a JAR, generating Javadoc, or publishing some archives to a repository.
それぞれのプロジェクトは、一つ以上のタスクから構成されます。タスクとは、分割不能な何らかの作業単位を表す概念です。たとえば、クラスをコンパイルしたり、JARファイルを作成したり、Javadocを生成したり、アーカイブをリポジトリに公開したりするタスクが考えられます。
For now, we will look at defining some simple tasks in a build with one project. Later chapters will look at working with multiple projects and more about working with projects and tasks.
では、実際にプロジェクト上でいくつか簡単なタスクを定義してビルドしてみましょう。マルチプロジェクトでのビルド例やプロジェクト/タスクのもっと詳しい情報については後の章をご参照ください。
You run a Gradle build using the gradle command. The gradle command
looks for a file called build.gradle in the current directory.
[3]
We call this build.gradle file a build script, although strictly speaking it is
a build configuration script, as we will see later. The build script defines a project and its tasks.
Gradleのビルドは、gradleコマンドで実行します。gradleコマンドはカレントディレクトリのbuild.gradleファイルを参照してビルドを行います。[4]このファイルは、一般的にはビルドスクリプトと呼ばれます(後述しますが、正確には「ビルドの設定を行うスクリプト」です)。Gradleのプロジェクトとタスクは、このビルドスクリプトで定義されます。
To try this out, create the following build script named build.gradle.
次のようなスクリプトを、build.gradleという名前で作成して試してみてください。
In a command-line shell, move to the containing directory and execute the build script with
gradle -q hello:
コンソールを開いてこのbuild.gradleのあるディレクトリに移動して、gradle -q helloと打ち込んでください。ビルドスクリプトが実行され、以下のように出力されるはずです。
-qオプションって何?What does -q do?
Most of the examples in this user guide are run with the -q command-line option.
This suppresses Gradle's log messages, so that only the output of the tasks is shown. This keeps the example
output in this user guide a little clearer. You don't need to use this option if you don't want to.
See 18章ロギングLogging for more details about the command-line options which affect Gradle's output.
このユーザーガイドでは、ほぼすべての例で-qをつけてコマンドを実行しています。このオプションはGradleのログメッセージを抑制するもので、タスクによる出力のみが表示されるようになります。おかげでユーザーガイドの出力例はちょっとすっきりしていますが、もちろん使いたくなければこのオプションを使う必要はありません。Gradleの出力に関係するオプションについては、18章ロギングLoggingにもっと詳しく記載されています。
What's going on here? This build script defines a single task, called hello, and
adds an action to it. When you run gradle hello, Gradle executes the
hello task, which in turn executes the action you've provided. The action is simply a
closure containing some Groovy code to execute.
何が起こったのでしょう。ビルドスクリプトは、helloというタスクを一つ定義していて、このタスクにアクションを一つ追加しています。gradle helloと実行することで、Gradleがこのhelloを実行し、helloに追加したアクションが実行されたのです。アクションはGroovyコードを含む単なるクロージャです。
If you think this looks similar to Ant's targets, well, you would be right. Gradle tasks are the equivalent to
Ant targets, but as you will see, they are much more powerful. We have used a different terminology than Ant
as we think the word task is more expressive than the word target.
Unfortunately this introduces a terminology clash with Ant, as Ant calls its commands, such as
javac or copy, tasks. So when we talk about tasks,
we always mean Gradle tasks, which are the equivalent to Ant's targets. If we talk
about Ant tasks (Ant commands), we explicitly say Ant task.
Antのtargetに似ているなと思われたかもしれません。実際、GradleのtaskはAntでいえばtargetに相当するものです。ただ、これから見ていきますがGradleのtaskはAntのtargetよりもずっと強力なものです。Gradleではtaskという、Antとは異なる用語を採用しました。これはtaskという言葉が、targetという言葉よりも実態に合った表現だと考えたためです。しかし、残念ながらtaskという用語はAntでもcopyやjavacといったコマンドを示すものとして使われており、Gradleのtaskと競合してしまいます。このため、Antのtaskについて述べるときには常にant taskと明示的にいい、単にtaskとしたときはGradleのタスクのことを示すものとします。
There is a shorthand way to define a task like our hello task above, which is more
concise.
タスク定義は、実際にはもっと短く書けます。先ほどのhelloタスクも、次のように簡潔に書くことができます。
Again, this defines a task called hello with a single closure to execute.
We will use this task definition style throughout the user guide.
この例も先ほどと同様、実行するクロージャを一つだけもったhelloを定義するものです。このユーザーガイドではこちらの定義方法を使用します。
Gradle's build scripts give you the full power of Groovy. As an appetizer, have a look at this:
GradleのビルドスクリプトではGroovyの機能をすべて使うことができます。手始めに次の例をご覧ください。
例6.4 GradleタスクでGroovyを使う
build.gradle
task upper << {
String someString = 'mY_nAmE'
println "Original: " + someString
println "Upper case: " + someString.toUpperCase()
}gradle -q upper の出力
> gradle -q upper Original: mY_nAmE Upper case: MY_NAME
or
さらに
例6.5 GradleタスクでGroovyを使う
build.gradle
task count << {
4.times { print "$it " }
}gradle -q count の出力
> gradle -q count 0 1 2 3
As you probably have guessed, you can declare tasks that depend on other tasks.
ご想像の通り、タスク間の依存関係を宣言できます。
例6.6 タスク間の依存関係を宣言する
build.gradle
task hello << {
println 'Hello world!'
}
task intro(dependsOn: hello) << {
println "I'm Gradle"
}gradle -q intro の出力
> gradle -q intro Hello world! I'm Gradle
To add a dependency, the corresponding task does not need to exist.
依存関係にタスクを追加するときは、そのタスクがその時点で宣言されていなくてもかまいません。
例6.7 遅延評価のdependsOn - タスクがまだ宣言されていない場合
build.gradle
task taskX(dependsOn: 'taskY') << { println 'taskX' } task taskY << { println 'taskY' }
gradle -q taskX の出力
> gradle -q taskX taskY taskX
The dependency of taskX to taskY is declared before
taskY is defined. This is very important for multi-project builds. Task dependencies are
discussed in more detail in 「タスクに依存関係を追加するAdding dependencies to a task」.
taskXがtaskYに依存していることが宣言されていますが、宣言した時点ではtaskYの定義文はありません。このことは、マルチプロジェクトのビルドで非常に重要になってきます。タスク間の依存関係については、「タスクに依存関係を追加するAdding dependencies to a task」でさらに詳しく述べられています。
Please notice, that you can't use a shortcut notation (see 「略記法Shortcut notations」) when referring to a task that is not yet defined.
なお、未定義のタスクを参照する場合、略記法(「略記法Shortcut notations」参照)は使えませんので注意してください。
The power of Groovy can be used for more than defining what a task does. For example, you can also use it to dynamically create tasks.
Groovyが力を発揮するのは、タスクが実行するアクションを記述するときだけではありません。たとえば、次のようにタスクを動的に定義することもできます。
例6.8 動的なタスク定義
build.gradle
4.times { counter ->
task "task$counter" << {
println "I'm task number $counter"
}
}gradle -q task1 の出力
> gradle -q task1 I'm task number 1
Once tasks are created they can be accessed via an API. For instance, you could use this to dynamically add dependencies to a task, at runtime. Ant doesn't allow anything like this.
タスクが公開しているAPIを使えば、既存のタスクにアクセスして定義内容を操作することができます。これはAntと異なるGradleの特長の一つです。たとえば、次のように後からタスクの依存関係を追加することができます。
例6.9 APIからタスクにアクセスする - 依存関係の追加
build.gradle
4.times { counter ->
task "task$counter" << {
println "I'm task number $counter"
}
}
task0.dependsOn task2, task3gradle -q task0 の出力
> gradle -q task0 I'm task number 2 I'm task number 3 I'm task number 0
Or you can add behavior to an existing task.
また、既存のタスクにアクションを追加することもできます。
例6.10 APIからタスクにアクセスする - アクションの追加
build.gradle
task hello << {
println 'Hello Earth'
}
hello.doFirst {
println 'Hello Venus'
}
hello.doLast {
println 'Hello Mars'
}
hello << {
println 'Hello Jupiter'
}gradle -q hello の出力
> gradle -q hello Hello Venus Hello Earth Hello Mars Hello Jupiter
The calls doFirst and doLast can be executed multiple times.
They add an action to the beginning or the end of the task's actions list. When the task executes, the
actions in the action list are executed in order. The << operator is simply an
alias for doLast.
doFirstやdoLastは何回でも呼び出すことができ、既存のタスクが実行する一連のアクションの最初や最後に、新しいアクションを追加します。タスクに追加されたアクションは、タスクが実行されたときに順番に実行されます。<<はdoLastの単なるエイリアスです。
As you might have noticed in the previous examples, there is a convenient notation for accessing an existing task. Each task is available as a property of the build script:
先ほどの例をみたとき、おやっと思われたかもしれません。既存のタスクにアクセスするときは、便利な略記法を使うことができます。ただのプロパティとしてすべてのタスクにアクセスできるのです。
例6.11 ビルドスクリプトのプロパティとして既存のタスクにアクセスする
build.gradle
task hello << {
println 'Hello world!'
}
hello.doLast {
println "Greetings from the $hello.name task."
}gradle -q hello の出力
> gradle -q hello Hello world! Greetings from the hello task.
This enables very readable code, especially when using the tasks provided by the plugins,
like the compile task.
この略記法は、コードをとても読みやすいものにします。特に、プラグインなどで外部から提供されるタスク(たとえばcompile)にアクセスするときには威力を発揮します。
You can add your own properties to a task. To add a property named myProperty,
set ext.myProperty to an initial value. From that point on, the property can be read
and set like a predefined task property.
独自のプロパティをタスクに追加することができます。例えば、myPropertyというプロパティを追加するには、ext.myPropertyに初期値を設定してください。
その時点で、このプロパティを定義済みのプロパティと同じように読み書きできるようになります。
例6.12 拡張プロパティをタスクに追加する
build.gradle
task myTask {
ext.myProperty = "myValue"
}
task printTaskProperties << {
println myTask.myProperty
}gradle -q printTaskProperties の出力
> gradle -q printTaskProperties myValue
Extra properties aren't limited to tasks. You can read more about them in 「拡張プロパティ Extra properties」.
拡張プロパティを追加できるのは、タスクだけではありません。詳細については、「拡張プロパティ Extra properties」を参照してください。
Ant tasks are first-class citizens in Gradle. Gradle provides excellent integration for Ant tasks by simply
by relying on Groovy. Groovy is shipped with the fantastic AntBuilder. Using Ant tasks
from Gradle is as convenient and more powerful than using Ant tasks from a build.xml
file. From the example below, you can learn how to execute Ant tasks and how to access Ant properties:
AntのタスクはGradleのファーストクラス・オブジェクトであり、デフォルトで使用できるようになっています。Groovyの持つ機能のおかげで、GradleはAntを非常に高いレベルで統合しています。Groovyには素晴らしきAntBuilderが組み込まれているのです。Antのタスクは、build.xmlで使うよりGradleで使ったほうが便利で強力です。次の例を見てください。Antのタスクを実行する方法やAntのプロパティにアクセスする方法を示しています。
例6.13 AntBuilderを使ってant.loadfileターゲットを実行する
build.gradle
task loadfile << {
def files = file('../antLoadfileResources').listFiles().sort()
files.each { File file ->
if (file.isFile()) {
ant.loadfile(srcFile: file, property: file.name)
println " *** $file.name ***"
println "${ant.properties[file.name]}"
}
}
}gradle -q loadfile の出力
> gradle -q loadfile *** agile.manifesto.txt *** Individuals and interactions over processes and tools Working software over comprehensive documentation Customer collaboration over contract negotiation Responding to change over following a plan *** gradle.manifesto.txt *** Make the impossible possible, make the possible easy and make the easy elegant. (inspired by Moshe Feldenkrais)
There is lots more you can do with Ant in your build scripts. You can find out more in 17章GradleからAntを使うUsing Ant from Gradle.
Antのタスクを使ってできることはもっとたくさんあります。17章GradleからAntを使うUsing Ant from Gradleをご参照ください。
Gradle scales in how you can organize your build logic. The first level of organizing your build logic for the example above, is extracting a method.
Gradleでは、段階的にビルドロジックを体系化していくことができます。最初の一歩として、上の例をメソッドの抽出を使ってリファクタリングしてみましょう。
例6.14 メソッドを抽出してビルドロジックを整理する
build.gradle
task checksum << {
fileList('../antLoadfileResources').each {File file ->
ant.checksum(file: file, property: "cs_$file.name")
println "$file.name Checksum: ${ant.properties["cs_$file.name"]}"
}
}
task loadfile << {
fileList('../antLoadfileResources').each {File file ->
ant.loadfile(srcFile: file, property: file.name)
println "I'm fond of $file.name"
}
}
File[] fileList(String dir) {
file(dir).listFiles({file -> file.isFile() } as FileFilter).sort()
}gradle -q loadfile の出力
> gradle -q loadfile I'm fond of agile.manifesto.txt I'm fond of gradle.manifesto.txt
Later you will see that such methods can be shared among subprojects in multi-project builds. If your build logic becomes more complex, Gradle offers you other very convenient ways to organize it. We have devoted a whole chapter to this. See 60章ビルドロジックの体系化Organizing Build Logic.
後でマルチプロジェクトの各プロジェクトでメソッドを共有する方法について学びます。それでもビルドロジックが複雑になってくることもあるでしょう。Gradleでは、ロジックを体系化する便利な方法をいくつも用意しています。ビルドロジックの体系化については一つの章をすべて割り当てて取り扱っていますのでご参照ください。(60章ビルドロジックの体系化Organizing Build Logic)
Gradle allows you to define one or more default tasks for your build.
Gradleでは、ビルドに一つ以上のデフォルトタスクを定義することができます。
例6.15 デフォルトタスクの定義
build.gradle
defaultTasks 'clean', 'run' task clean << { println 'Default Cleaning!' } task run << { println 'Default Running!' } task other << { println "I'm not a default task!" }
gradle -q の出力
> gradle -q Default Cleaning! Default Running!
This is equivalent to running gradle clean run. In a multi-project build every
subproject can have its own specific default tasks. If a subproject does not specify default tasks, the
default tasks of the parent project are used (if defined).
これは、gradle clean runと入力するのと同じです。マルチプロジェクトのビルドでは、すべてのサブプロジェクトが個別にデフォルトタスクを持つことができます。サブプロジェクトにデフォルトタスクが定義されていない時は、(定義されていれば)親プロジェクトの定義が使用されます。
As we later describe in full detail (See 56章ビルドのライフサイクルThe Build Lifecycle) Gradle has a configuration phase and an execution phase. After the configuration phase, Gradle knows all tasks that should be executed. Gradle offers you a hook to make use of this information. A use-case for this would be to check if the release task is among the tasks to be executed. Depending on this, you can assign different values to some variables.
詳しくは56章ビルドのライフサイクルThe Build Lifecycleで説明しますが、Gradleのビルドはいくつかのフェーズに分かれて実行されます。Gradleはどのタスクを実行するのかを設定フェーズで決定しますが、この情報を使うためのフックが提供されています。実行タスクにあるタスクが含まれるかどうかによって、変数に別の値を割り当てたりできるわけです。ユースケースとしては、releaseタスクが実行されるタスクに入っているかどうかチェックするといったものが考えられるでしょう。
In the following example, execution of the distribution and release tasks results in different value of the version variable.
次の例では、distributionタスクを実行するかreleaseタスクを実行するかでversion変数に違う値を割り当てています。
例6.16 選択したタスクによって異なる結果を得る
build.gradle
task distribution << {
println "We build the zip with version=$version"
}
task release(dependsOn: 'distribution') << {
println 'We release now'
}
gradle.taskGraph.whenReady {taskGraph ->
if (taskGraph.hasTask(release)) {
version = '1.0'
} else {
version = '1.0-SNAPSHOT'
}
}gradle -q distribution の出力
> gradle -q distribution We build the zip with version=1.0-SNAPSHOT
gradle -q release の出力
> gradle -q release We build the zip with version=1.0 We release now
The important thing is that whenReady affects the release task before the release task is executed.
This works even when the release task is not the primary task (i.e., the task passed to the gradle command).
ここで大事なことは、releaseタスクが実行予定にあるという事実を、releaseタスクが実行される前に利用できる点です。releaseタスクがプライマリタスク、つまりgradleコマンドに引き渡されているタスクでなくてもかまいません。
In this chapter, we have had a first look at tasks. But this is not the end of the story for tasks. If you want to jump into more of the details, have a look at 15章タスク詳解More about Tasks.
この章で、私たちは初めてタスクというものに触れました。しかし、タスクについての話はこれで全部ではありません。さらに詳しくタスクについて知りたい場合は、15章タスク詳解More about Tasksを見てみてください。
Otherwise, continue on to the tutorials in 7章JavaクイックスタートJava Quickstart and 8章依存関係管理の基本 Dependency Management Basics.
そうでなければ、7章JavaクイックスタートJava Quickstartと8章依存関係管理の基本 Dependency Management Basicsに進み、チュートリアルを続けてください。[3] There are command line switches to change this behavior. See 付録D Gradle コマンドラインGradle Command Line)
[4] この動作はコマンドラインスイッチを使用して変更できます。付録D Gradle コマンドラインGradle Command Lineを参照してください。
As we have seen, Gradle is a general-purpose build tool. It can build pretty much anything you care to implement in your build script. Out-of-the-box, however, it doesn't build anything unless you add code to your build script to do so.
ここまで見てきたように、Gradleは汎用のビルドツールです。ビルドスクリプトで実装したいと思うようなものはほぼ何でもビルドできます。しかし、初期状態では、ビルドスクリプトに何かを行うためのコードを追加しない限り、何もビルドはしません。
Most Java projects are pretty similar as far as the basics go: you need to compile your Java source files, run some unit tests, and create a JAR file containing your classes. It would be nice if you didn't have to code all this up for every project. Luckily, you don't have to. Gradle solves this problem through the use of plugins. A plugin is an extension to Gradle which configures your project in some way, typically by adding some pre-configured tasks which together do something useful. Gradle ships with a number of plugins, and you can easily write your own and share them with others. One such plugin is the Java plugin. This plugin adds some tasks to your project which will compile and unit test your Java source code, and bundle it into a JAR file.
多くのJavaプロジェクトは、基本的な部分では非常に似通っています。つまり、Javaソースファイルをコンパイルし、ユニットテストを実行し、クラスを含んだJARファイルを生成する必要があります。すべてのプロジェクトで、これらをいちいちコーディングするのは面倒です。幸運にもその必要はありません。Gradleはプラグインによってこの問題を解決します。プラグインは、何らかの方法(よくあるのは設定済みの一連の有用なタスクの追加)によってプロジェクトを構成する、Gradleの拡張です。Gradleには多くのプラグインが同梱されており、さらに自作のプラグインを書き、共有することも簡単にできます。こういったプラグインの一つがJavaプラグインです。このプラグインは、Javaソースコードのコンパイルやユニットテスト、JARファイルの作成などを行うタスクをプロジェクトに追加します。
The Java plugin is convention based. This means that the plugin defines default values for many aspects of the project, such as where the Java source files are located. If you follow the convention in your project, you generally don't need to do much in your build script to get a useful build. Gradle allows you to customize your project if you don't want to or cannot follow the convention in some way. In fact, because support for Java projects is implemented as a plugin, you don't have to use the plugin at all to build a Java project, if you don't want to.
Javaプラグインは規約ベースです。すなわち、このプラグインはプロジェクトのさまざまな点、例えばJavaソースファイルを置く場所などについてデフォルト値を定義しています。プロジェクトがこの規約に従う限り、大抵はビルドスクリプトであまり多くのことを行わなくても有用なビルドを行うことができます。何らかの事情で規約に従いたくない、または従えない場合、Gradleはプロジェクトのカスタマイズも許しています。実際、Javaプロジェクトのサポートがプラグインとして実現されているので、希望しない場合には、Javaプロジェクトのビルドであってもこのプラグインをまったく使わないことも可能です。
We have in-depth coverage with many examples about the Java plugin, dependency management and multi-project builds in later chapters. In this chapter we want to give you an initial idea of how to use the Java plugin to build a Java project.
Javaプラグイン、依存関係の管理、マルチプロジェクトのビルドについては、後の章で多くの実例付きで詳しく扱います。この章では、JavaプロジェクトをビルドするためのJavaプラグインの使い方について、まず基本的な知識を提供したいと思います。
Let's look at a simple example. To use the Java plugin, add the following to your build file:
シンプルな例から見ていきましょう。Javaプラグインを使うためには、ビルドファイルに以下を加えます:
例7.1 Javaプラグインの使用
build.gradle
apply plugin: 'java'ノート: 本例のソースコードは、Gradleのバイナリ配布物またはソース配布物に含まれています。以下の場所をご参照ください。samples/java/quickstart
This is all you need to define a Java project. This will apply the Java plugin to your project, which adds a number of tasks to your project.
Javaプロジェクトの定義に必要なのはこれだけです。これでプロジェクトにJavaプラグインが適用され、多くのタスクが追加されます。
どんなタスクが利用可能?What tasks are available?
You can use gradle tasks to list the tasks of a project. This will let you see
the tasks that the Java plugin has added to your project.
gradle tasksを使えば、プロジェクトのタスクを一覧することができます。これによって、Javaプラグインがプロジェクトに追加したタスクを見ることができるでしょう。
Gradle expects to find your production source code under src/main/java and your test
source code under src/test/java. In addition, any files under
src/main/resources will be included in the JAR file as resources, and any files under
src/test/resources will be included in the classpath used to run the tests. All output
files are created under the build directory, with the JAR file ending up in the
build/libs directory.
Gradleは、製品のソースコードがsrc/main/javaに、テストのソースコードがsrc/test/javaにあることを想定しています。さらに、src/main/resourcesの下にあるファイルはすべてリソースとしてJARに入れられ、またsrc/test/resourcesにあるファイルはテスト実行時に使われるクラスパスに入れられます。すべての出力ファイルはbuildディレクトリの下に作られ、最終的にbuild/libsディレクトリにJARファイルが作られます。
The Java plugin adds quite a few tasks to your project. However, there are only a handful of tasks
that you will need to use to build the project. The most commonly used task is the build task,
which does a full build of the project. When you run gradle build, Gradle will
compile and test your code, and create a JAR file containing your main classes and resources:
Javaプラグインはかなり多くのタスクをプロジェクトに追加します。しかし、プロジェクトをビルドするのに必要なタスクはほんの一握りです。最もよく使われるのはプロジェクトのフルビルドを行うbuildタスクです。gradle buildを実行すると、Gradleはコードをコンパイルしてテストし、メインクラスやリソースを含んだJARファイルを生成します:
例7.2 Javaプロジェクトのビルド
gradle build の出力
> gradle build :compileJava :processResources :classes :jar :assemble :compileTestJava :processTestResources :testClasses :test :check :build BUILD SUCCESSFUL Total time: 1 secs
Some other useful tasks are:
他にも便利なタスクがあります:
- clean
Deletes the
builddirectory, removing all built files.buildディレクトリを削除し、ビルドしたすべてのファイルを削除します。- assemble
Compiles and jars your code, but does not run the unit tests. Other plugins add more artifacts to this task. For example, if you use the War plugin, this task will also build the WAR file for your project.
コードをコンパイルしJARを生成しますが、ユニットテストは実行しません。他のプラグインはこのタスクにより多くのアーティファクトを追加します。例えばWarプラグインを使う場合、このタスクはプロジェクトのWARファイルも生成します。
- check
Compiles and tests your code. Other plugins add more checks to this task. For example, if you use the
checkstyleplugin, this task will also run Checkstyle against your source code.コードをコンパイルし、テストします。他のプラグインはこのタスクにより多くの検査項目を追加します。例えばCode-qualityプラグインを使う場合、このタスクはソースコードに対してCheckstyleも実行します。
Usually, a Java project will have some dependencies on external JAR files. To reference these JAR files in the project, you need to tell Gradle where to find them. In Gradle, artifacts such as JAR files, are located in a repository. A repository can be used for fetching the dependencies of a project, or for publishing the artifacts of a project, or both. For this example, we will use the public Maven repository:
Javaプロジェクトは外部のJARファイルに依存することが普通です。プロジェクトで使うこういったJARファイルを参照するため、Gradleにそれらの場所を伝える必要があります。Gradleでは、JARファイルのようなアーティファクトはリポジトリに置かれます。リポジトリは、プロジェクトが依存するものを取得したり、プロジェクトのアーティファクトを公開したり、あるいはその両方のために利用することができます。この例では、公開Mavenリポジトリを使います:
Let's add some dependencies. Here, we will declare that our production classes have a compile-time dependency on commons collections, and that our test classes have a compile-time dependency on junit:
依存関係をいくつか追加してみましょう。製品クラスはコンパイル時にcommonsコレクションに依存し、テストクラスはコンパイル時にjunitに依存することを宣言します:
例7.4 依存関係の追加
build.gradle
dependencies {
compile group: 'commons-collections', name: 'commons-collections', version: '3.2'
testCompile group: 'junit', name: 'junit', version: '4.+'
}You can find out more in 8章依存関係管理の基本 Dependency Management Basics.
詳しい説明は51章依存関係の管理 Dependency Managementをご覧ください。
The Java plugin adds a number of properties to your project. These properties have default values which are usually sufficient to get started. It's easy to change these values if they don't suit. Let's look at this for our sample. Here we will specify the version number for our Java project, along with the Java version our source is written in. We also add some attributes to the JAR manifest.
Javaプラグインは多くのプロパティをプロジェクトに追加します。こういったプロパティには普通、十分適切なデフォルト値が設定されています。不適切な場合、これらの値を変更するのは簡単です。では、実例を見てみましょう。ここでは、ソースの書かれたJavaバージョンとともに、Javaプロジェクトのバージョン番号を指定しています。また、JAR manifestにいくつか属性を追加しています。
例7.5 MANIFEST.MFのカスタマイズ
build.gradle
sourceCompatibility = 1.5 version = '1.0' jar { manifest { attributes 'Implementation-Title': 'Gradle Quickstart', 'Implementation-Version': version } }
どんなプロパティが利用可能?What properties are available?
You can use gradle properties to list the properties of a project. This will allow
you to see the properties added by the Java plugin, and their default values.
gradle propertiesを使えば、プロジェクトのプロパティを一覧することができます。これによって、Javaプラグインが追加したプロパティとそのデフォルト値を見ることができるでしょう。
The tasks which the Java plugin adds are regular tasks, exactly the same as if they were declared in
the build file. This means you can use any of the mechanisms shown in earlier chapters to customize
these tasks. For example, you can set the properties of a task, add behaviour to a task, change the
dependencies of a task, or replace a task entirely. In our sample, we will configure the
test task, which is of type Test, to
add a system property when the tests are executed:
Javaプラグインが追加するタスクはごく普通のタスクで、ビルドファイルで宣言されるものとまったく同等のものです。つまり、これらのタスクは、ここまでの章で説明したあらゆるメカニズムを使ってカスタマイズすることが可能だということです。例えば、タスクのプロパティを設定したり、タスクに振る舞いを追加したり、タスクの依存関係を変更したり、あるはタスク全体を完全に置き換えることすら可能です。以下の例では、Test型であるtestタスクを設定して、テスト実行時のシステムプロパティを追加しています:
Usually the JAR file needs to be published somewhere. To do this, you need to tell Gradle where to publish the JAR file. In Gradle, artifacts such as JAR files are published to repositories. In our sample, we will publish to a local directory. You can also publish to a remote location, or multiple locations.
通常は、JARファイルをどこかに公開する必要があるでしょう。このため、GradleにJARファイルの公開先を教える必要があります。Gradleでは、JARファイルのようなアーティファクトはリポジトリに置かれます。以下の例ではローカルディレクトリに公開します。リモートな場所や、複数の場所に公開することも可能です。
To publish the JAR file, run gradle uploadArchives.
JARファイルを公開するには、gradle uploadArchivesを実行してください。
To create the Eclipse-specific descriptor files, like .project, you need to add
another plugin to your build file:
.projectのようなEclipse固有の設定ファイルを生成するには、別のプラグインをビルドファイルに追加する必要があります:
Now execute gradle eclipse command to generate Eclipse project files. More information
about the eclipse task can be found in 38章Eclipse プラグインThe Eclipse Plugin.
これでgradle eclipseコマンドを実行すればEclipseのプロジェクトファイルが生成されます。Eclipseタスクの詳細は38章Eclipse プラグインThe Eclipse Pluginをご覧ください。
Here's the complete build file for our sample:
これまでの例の完全なビルドファイルを以下に示します:
例7.9 Javaの例 - 完全なビルドファイル
build.gradle
apply plugin: 'java' apply plugin: 'eclipse' sourceCompatibility = 1.5 version = '1.0' jar { manifest { attributes 'Implementation-Title': 'Gradle Quickstart', 'Implementation-Version': version } } repositories { mavenCentral() } dependencies { compile group: 'commons-collections', name: 'commons-collections', version: '3.2' testCompile group: 'junit', name: 'junit', version: '4.+' } test { systemProperties 'property': 'value' } uploadArchives { repositories { flatDir { dirs 'repos' } } }
Now let's look at a typical multi-project build. Below is the layout for the project:
さて、ここで典型的なマルチプロジェクトのビルドを見てみましょう。プロジェクトのレイアウトは以下の通りです:
例7.10 マルチプロジェクトビルド - 階層レイアウト
Build layout
multiproject/ api/ services/webservice/ shared/ services/shared/
ノート: 本例のソースコードは、Gradleのバイナリ配布物またはソース配布物に含まれています。以下の場所をご参照ください。samples/java/multiproject
Here we have four projects. Project api produces a JAR file which is shipped to the
client to provide them a Java client for your XML webservice. Project webservice is a
webapp which returns XML. Project shared contains code used both by api
and webservice. Project services/shared has code that depends on the
shared project.
この例には三つのプロジェクトがあります。プロジェクトapiは、このwebサービス用のJavaクライアントを提供するために顧客に出荷されるJARファイルを生成します。プロジェクトwebserviceはXMLを返すwebアプリケーションです。プロジェクトsharedは、apiとwebserviceの両方で使われる共通コードです。
To define a multi-project build, you need to create a settings file. The settings
file lives in the root directory of the source tree, and specifies which projects to include in the
build. It must be called settings.gradle. For this example, we are using a simple
hierarchical layout. Here is the corresponding settings file:
マルチプロジェクトのビルドを定義するためには、settingsファイルを作成する必要があります。settingsファイルはソースツリーのルートディレクトリに置かれ、このビルドにどのプロジェクトが含まれるかを指定します。名前はsettings.gradleでなければなりません。この例では、シンプルな階層レイアウトを使っています。対応するsettingsファイルは以下のようになります:
例7.11 マルチプロジェクトビルド - settings.gradleファイル
settings.gradle
include "shared", "api", "services:webservice", "services:shared"
You can find out more about the settings file in 57章マルチプロジェクトのビルドMulti-project Builds.
settingsファイルの詳細は57章マルチプロジェクトのビルドMulti-project Buildsをご覧ください。
For most multi-project builds, there is some configuration which is common to all projects.
In our sample, we will define this common configuration in the root project, using a technique called
configuration injection. Here, the root project is like a container and the
subprojects method iterates over the elements of this container - the projects in
this instance - and injects the specified configuration. This way we can easily define the manifest
content for all archives, and some common dependencies:
大抵のマルチプロジェクトビルドでは、すべてのプロジェクトに共通な設定があります。この例では、設定のインジェクションと呼ばれる技法を使い、こういった共通設定をルートプロジェクトで定義します。ここでは、ルートプロジェクトはコンテナのようなもので、subprojectsメソッドはコンテナの全要素、すなわちこの実例の中の全プロジェクト、に対して反復しつつ指定された設定をインジェクトします。このようにして、全アーカイブのmanifestコンテンツや共通の依存関係を簡単に定義できます:
例7.12 マルチプロジェクトビルド - 共通設定
build.gradle
subprojects {
apply plugin: 'java'
apply plugin: 'eclipse-wtp'
repositories {
mavenCentral()
}
dependencies {
testCompile 'junit:junit:4.11'
}
version = '1.0'
jar {
manifest.attributes provider: 'gradle'
}
}Notice that our sample applies the Java plugin to each subproject. This means the tasks and
configuration properties we have seen in the previous section are available in each subproject.
So, you can compile, test, and JAR all the projects by running gradle build from
the root project directory.
この例で、各サブプロジェクトにJavaプラグインが適用されていることに注意してください。
これは、前の節で述べたタスクや設定プロパティが各サブプロジェクトでも利用可能であることを意味しています。
そんなわけで、ルートプロジェクトディレクトリからgradle buildを実行することによって、
すべてのプロジェクトをコンパイルし、テストし、JARを生成できるのです。
Also note that these plugins are only applied within the subprojects section, not
at the root level, so the root build will not expect to find Java source files in the root project,
only in the subprojects.
You can add dependencies between projects in the same build, so that, for example, the JAR file of one
project is used to compile another project. In the api build file we will add a dependency
on the shared project. Due to this dependency, Gradle will
ensure that project shared always gets built before project api.
同じビルド内のプロジェクト間の依存関係を追加することもできます。したがって例えば、一つのプロジェクトのJARファイルを別のプロジェクトのコンパイルのために利用することもできます。ここでは、apiのビルドファイルにsharedプロジェクトが作るJARへの依存関係を追加します。この依存関係のため、Gradleはsharedプロジェクトがapiプロジェクトより前にビルドされることを確実にします。
See 「依存プロジェクトをビルドしないようにするDisabling the build of dependency projects」 for how to disable this functionality.
この機能を無効にする方法については「依存プロジェクトをビルドしないようにするDisabling the build of dependency projects」を参照してください。
In this chapter, you have seen how to do some of the things you commonly need to build a Java based
project. This chapter is not exhaustive, and there are many other things you can do with Java projects in
Gradle.
You can find out more about the Java plugin in 23章JavaプラグインThe Java Plugin, and you can find more sample
Java projects in the samples/java directory in the Gradle distribution.
この章では、Javaベースのプロジェクトをビルドするときに、一般的に必要になる作業のやり方を見てきました。この章は、Javaプロジェクトについて完全に網羅しているわけではありません。Gradleでできることはもっとたくさんあります。Javaプロジェクトについて更に掘り下げたい場合は、23章JavaプラグインThe Java Pluginで詳しく知ることができます。また、Gradleの配布物に含まれるsample/javaにはもっと多くのサンプルがあります。
Otherwise, continue on to 8章依存関係管理の基本 Dependency Management Basics.
そうでない場合は、続けて8章依存関係管理の基本 Dependency Management Basicsに進んでください。
This chapter introduces some of the basics of dependency management in Gradle.
本章では、Gradleにおける依存関係の管理について、基本的なところを紹介します。
Very roughly, dependency management is made up of two pieces. Firstly, Gradle needs to know about the things that your project needs to build or run, in order to find them. We call these incoming files the dependencies of the project. Secondly, Gradle needs to build and upload the things that your project produces. We call these outgoing files the publications of the project. Let's look at these two pieces in more detail:
おおざっぱに言って、依存関係の管理とは二つの部分に分けられます。まず、Gradleは、あなたのプロジェクトをビルドしたり実行したりするのに必要なファイルが何かを判定し、それらを見つけてこなければなりません。これらの入力ファイルを、プロジェクトの依存関係と呼びます。 次に、Gradleはあなたのプロジェクトをビルドし、生成されたものをアップロードする必要があります。これらの出力ファイルを、プロジェクトの公開物と呼びます。
Most projects are not completely self-contained. They need files built by other projects in order to be compiled or tested and so on. For example, in order to use Hibernate in my project, I need to include some Hibernate jars in the classpath when I compile my source. To run my tests, I might also need to include some additional jars in the test classpath, such as a particular JDBC driver or the Ehcache jars.
ほとんどのプロジェクトは、完全に自己完結しているわけではありません。コンパイル、テスト、その他諸々のために、他のプロジェクトがビルドするファイルを必要とするものです。例えば、Hibernateを自分のプロジェクトで使うために、ソースコードのコンパイル時にHibernateのjarファイルをいくつか取り込む、といった具合です。テストをするためには、さらにいくつかのjarファイル、JDBCドライバやEhcacheのjarをテスト時クラスパスに追加する必要があるかもしれません。
These incoming files form the dependencies of the project. Gradle allows you to tell it what the dependencies of your project are, so that it can take care of finding these dependencies, and making them available in your build. The dependencies might need to be downloaded from a remote Maven or Ivy repository, or located in a local directory, or may need to be built by another project in the same multi-project build. We call this process dependency resolution.
これらの入力ファイルは、プロジェクトの依存関係から読み込まれます。 Gradleにプロジェクトの依存関係を教えて、プロジェクトが依存しているファイルを見つけたり、ビルド時にそれらを使えるようにできます。 依存ファイルは、リモートのMavenやIvyのリポジトリからダウンロードされるかもしれませんし、ローカルのディレクトリにあるかもしれません。また、マルチプロジェクトの場合、別のプロジェクトにビルドさせる必要があることもあります。
Note that this feature provides a major advantage over Ant. With Ant, you only have the ability to specify absolute or relative paths to specific jars to load. With Gradle, you simply declare the “names” of your dependencies, and other layers determine where to get those dependencies from. You can get similar behavior from Ant by adding Apache Ivy, but Gradle does it better.
Often, the dependencies of a project will themselves have dependencies. For example, Hibernate core requires several other libraries to be present on the classpath with it runs. So, when Gradle runs the tests for your project, it also needs to find these dependencies and make them available. We call these transitive dependencies.
また、依存しているファイルが、それ自身の依存関係を持っていることが多々あります。例えば、Hibernateコアは、実行時にいくつかの別のライブラリをクラスパスに含めなければなりません。なので、Gradleがあなたのプロジェクトのテストを走らせるときには、それらの依存関係も見つけてきて、使用できるようにしなければならないのです。これを、推移的な依存関係と呼びます。
The main purpose of most projects is to build some files that are to be used outside the project. For example, if your project produces a Java library, you need to build a jar, and maybe a source jar and some documentation, and publish them somewhere.
ほとんどのプロジェクトは、ファイルを作成し、それらをプロジェクトの外部で使うということを主な目的としています。 例えば、もしあなたのプロジェクトがJavaライブラリを作成するものならば、あなたはjarを作成し、ときにはソースjarやドキュメントも作成し、どこかにそれらを公開しなければなりません。
These outgoing files form the publications of the project. Gradle also takes care of this important work for you. You declare the publications of your project, and Gradle take care of building them and publishing them somewhere. Exactly what “publishing” means depends on what you want to do. You might want to copy the files to a local directory, or upload them to a remote Maven or Ivy repository. Or you might use the files in another project in the same multi-project build. We call this process publication.
ファイルの公開は、プロジェクトの公開設定から読み込まれて行われます。Gradleは、この重要な仕事も引き受けてくれます。プロジェクトが公開するファイルを宣言すれば、Gradleがそれらをビルドし、任意の場所へ公開します。 「公開する」ということの正確な意味は、何をしたいのかによって異なります。ローカルディレクトリにファイルをコピーしたいかもしれませんし、リモートのMavenやIvyのリポジトリにアップロードしたいかもしれません。また、マルチプロジェクトの場合、別プロジェクトからそのファイルを使いたいという場合もあります。 これらの処理を、公開と呼んでいます。
Let's look at some dependency declarations. Here's a basic build script:
さて、では依存関係の宣言についていくつか見ていきましょう。ここに、ある基本的なビルドスクリプトがあります。
例8.1 依存関係の宣言
build.gradle
apply plugin: 'java' repositories { mavenCentral() } dependencies { compile group: 'org.hibernate', name: 'hibernate-core', version: '3.6.7.Final' testCompile group: 'junit', name: 'junit', version: '4.+' }
What's going on here? This build script says a few things about the project. Firstly, it states that Hibernate core 3.6.7.Final is required to compile the project's production source. By implication, Hibernate core and its dependencies are also required at runtime. The build script also states that any junit >= 4.0 is required to compile the project's tests. It also tells Gradle to look in the Maven central repository for any dependencies that are required. The following sections go into the details.
一体、何が起きるでしょうか。このビルドスクリプトにはそれほど多くの情報はありません。まず、このプロジェクトはソースコードをコンパイルするためにHibernate core 3.6.7を使用すると言っています。それはすなわち、実行時にHibernate coreとその依存関係が必要になるということでもあります。 このスクリプトはまた、バージョン4.0以上のJUnitのどれかを、プロジェクトのテストをコンパイルするのに必要とするとも言っています。さらに、Gradleに、全ての依存関係を見つけるのにMavenのセントラルリポジトリを探すように指示しています。次の節で、それぞれの詳細について見ていきましょう。
In Gradle dependencies are grouped into configurations. A configuration is simply a named set of dependencies. We will refer to them as dependency configurations. You can use them to declare the external dependencies of your project. As we will see later, they are also used to declare the publications of your project.
Gradleでは、依存関係は、コンフィグレーションによってグループ化されます。コンフィグレーションとは、単なる名前の付いた依存関係の集まりです。コンフィグレーションは依存関係設定として参照されます。プロジェクトが外部に依存しているものを宣言するのに使われ、また後で見るように、プロジェクトが外部に公開するものを宣言するためにも使用されます。
The Java plugin defines a number of standard configurations. These configurations represent the classpaths that the Java plugin uses. Some are listed below, and you can find more details in 表23.5「Javaプラグイン - 依存関係のコンフィギュレーションJava plugin - dependency configurations」.
Javaプラグインは、いくつかの標準コンフィグレーションを定義します。これらのコンフィグレーションは、Javaプラグインが使用するクラスパスを表すものです。いくつかを以下にリストしました。詳細については、表23.5「Javaプラグイン - 依存関係のコンフィギュレーションJava plugin - dependency configurations」を参照してください。
- compile
The dependencies required to compile the production source of the project.
プロジェクトのプロダクトコードをコンパイルするのに必要な依存関係
- runtime
The dependencies required by the production classes at runtime. By default, also includes the compile time dependencies.
プロダクトのクラスを実行するときに必要になる依存関係。デフォルトで、コンパイル時の依存関係もここに含まれる。
- testCompile
The dependencies required to compile the test source of the project. By default, also includes the compiled production classes and the compile time dependencies.
プロジェクトのテストコードをコンパイルするのに必要な依存関係。デフォルトで、コンパイルされたプロダクトクラスと、コンパイル時の依存関係も含まれる。
- testRuntime
The dependencies required to run the tests. By default, also includes the compile, runtime and test compile dependencies.
テストを実行するのに必要な依存関係。デフォルトで、compile、runtime、testCompileの各依存関係もここに含まれる。
Various plugins add further standard configurations. You can also define your own custom configurations to use in your build. Please see 「依存関係のコンフィギュレーション Dependency configurations」 for the details of defining and customizing dependency configurations.
多くのプラグインが、このような標準コンフィグレーションを追加します。また、自分のビルドに使うためのカスタムコンフィギュレーションを独自に定義することもできます。依存関係のコンフィグレーション定義やカスタマイズの詳細については、「依存関係のコンフィギュレーション Dependency configurations」を参照してください。
There are various types of dependencies that you can declare. One such type is an external dependency. This a dependency on some files built outside the current build, and stored in a repository of some kind, such as Maven central, or a corporate Maven or Ivy repository, or a directory in the local file system.
定義できる依存関係には、さまざまなタイプがあります。そのうちの一つが、外部依存関係です。これは、今のビルドとは別に作られ、MavenセントラルリポジトリやIvyリポジトリ、ローカルファイルシステムなどに保存されているファイルへの依存関係です。
To define an external dependency, you add it to a dependency configuration:
外部依存関係を定義するには、それを依存関係のコンフィグレーションに追加します。
例8.2 外部依存関係の定義
build.gradle
dependencies {
compile group: 'org.hibernate', name: 'hibernate-core', version: '3.6.7.Final'
}
An external dependency is identified using group, name and version attributes.
Depending on which kind of repository you are using, group and version may be optional.
外部依存関係は、group属性、name属性、そしてversion属性を用いて定義します。
使用しているリポジトリの種類によっては、group属性とversion属性はオプショナルになるかもしれません。
The shortcut form for declaring external dependencies looks like “group:name:version
There is a shortcut form for declaring external dependencies, which uses a string of the form ".
group:name:version"
外部依存関係を定義するときは、ショートカット形式を使うこともできます。"という文字列を使う形式です。
group:name:version"
例8.3 外部依存関係定義のショートカット形式
build.gradle
dependencies {
compile 'org.hibernate:hibernate-core:3.6.7.Final'
}To find out more about defining and working with dependencies, have a look at 「依存関係の定義方法 How to declare your dependencies」.
依存関係を定義して取り扱う方法について、詳しくは「依存関係の定義方法 How to declare your dependencies」を見てください。
How does Gradle find the files for external dependencies? Gradle looks for them in a repository.
A repository is really just a collection of files, organized by group, name and
version. Gradle understands several different repository formats, such as Maven and Ivy, and several
different ways of accessing the repository, such as using the local file system or HTTP.
Gradleは、どうやって外部依存関係を見つけるのでしょうか? Gradleは、それらをリポジトリから探します。リポジトリの実体は、ただのファイルの集合です。それらのファイルは、グループ、名前、そしてバージョンによって分類されています。Gradleは、MavenやIvyなど、様々なリポジトリ形式に対応できます。また、ローカルファイルシステムやHTTPなど、リポジトリにアクセスするための手段についても様々なものを使うことができます。
By default, Gradle does not define any repositories. You need to define at least one before you can use external dependencies. One option is use the Maven central repository:
デフォルトでは、Gradleはリポジトリを一切定義していません。外部依存関係を使うには、少なくとも一つのリポジトリを定義する必要があります。 選択肢の一つは、Mavenのセントラルリポジトリを使うことです。
Or a remote Maven repository:
または、別のMavenリモートリポジトリを使います。
Or a remote Ivy repository:
または、リモートのIvyリポジトリを使います。
You can also have repositories on the local file system. This works for both Maven and Ivy repositories.
さらに、ローカルファイルシステム上にリポジトリを持つこともできます。これは、Maven、Ivy双方のリポジトリ形式で動作します。
例8.7 ローカルのIvyディレクトリを使う
build.gradle
repositories {
ivy {
// URL can refer to a local directory
url "../local-repo"
}
}A project can have multiple repositories. Gradle will look for a dependency in each repository in the order they are specified, stopping at the first repository that contains the requested module.
一つのプロジェクトが、複数のリポジトリを持つことができます。Gradleは、それぞれのリポジトリを、指定された順序で順に探しに行きます。要求されたモジュールが含まれる、最初のリポジトリを見つけるまで走査を続けます。
To find out more about defining and working with repositories, have a look at 「リポジトリ Repositories」.
リポジトリを定義し、取り扱う方法について、詳しくは「リポジトリ Repositories」を参照してください。
Dependency configurations are also used to publish files.[5] We call these files publication artifacts, or usually just artifacts.
依存関係のコンフィグレーションは、ファイルを公開するのにも使用します。[6] これらのファイルを、公開アーティファクト、大体は単にアーティファクトと呼びます。
The plugins do a pretty good job of defining the artifacts of a project, so you usually don't need to do anything special to tell Gradle
what needs to be published. However, you do need to tell Gradle where to publish the artifacts. You do this by attaching repositories
to the uploadArchives task. Here's an example of publishing to a remote Ivy repository:
プラグインが非常に適切にプロジェクトのアーティファクトを定義してくれるので、何を公開したいかGradleに教えるのに、特別何かする必要はほとんどの場合ありません。ただ、どこに公開したいかはGradleに教えてやる必要があります。これは、リポジトリをuploadArchivesタスクに結びつけることで行います。次のコードは、リモートのIvyリポジトリに公開する例です。
例8.8 Ivyリポジトリに公開する
build.gradle
uploadArchives {
repositories {
ivy {
credentials {
username "username"
password "pw"
}
url "http://repo.mycompany.com"
}
}
}
Now, when you run gradle uploadArchives, Gradle will build and upload your Jar.
Gradle will also generate and upload an ivy.xml as well.
これでgradle uploadArchivesを走らせれば、Gradleがjarをビルドしてアップロードしてくれます。
さらに、ivy.xmlも生成されてアップロードされます。
You can also publish to Maven repositories. The syntax is slightly different.[7]
Note that you also need to apply the Maven plugin in order to publish to a Maven repository. when this is in place, Gradle
will generate and upload a pom.xml.
Mavenリポジトリに公開することもできますが、その文法はすこし異なります[8]。
また、Mavenリポジトリへ公開するには、Mavenプラグインを使う必要もあるので注意してください。この場合、Gradleはpom.xmlも生成してアップロードします。
例8.9 Mavenリポジトリへの公開
build.gradle
apply plugin: 'maven' uploadArchives { repositories { mavenDeployer { repository(url: "file://localhost/tmp/myRepo/") } } }
To find out more about publication, have a look at 52章アーティファクトの公開 Publishing artifacts.
アーティファクトの公開について、詳しくは52章アーティファクトの公開 Publishing artifactsをご参照ください。
For all the details of dependency resolution, see 51章依存関係の管理 Dependency Management, and for artifact publication see 52章アーティファクトの公開 Publishing artifacts.
依存関係解決については、51章依存関係の管理 Dependency Managementに全て詳細に載っています。そして、アーティファクトの公開については52章アーティファクトの公開 Publishing artifactsに載っています。
If you are interested in the DSL elements mentioned here, have a look at Project.configurations{},
Project.repositories{} and Project.dependencies{}.
本章で使ったDSLに興味があるのであれば、Project.configurations{}やProject.repositories{}、Project.dependencies{}を見てください。
Otherwise, continue on to some of the other tutorials.
それ以外の場合は、チュートリアルから他のチュートリアルを進めてください。
[5] We think this is confusing, and we are gradually teasing apart the two concepts in the Gradle DSL.
[6] 私たちは、これは混乱の元になると考えています。そのため、GradleのDSLでは、段階的に二つに概念に分けていくつもりです。
[7] We are working to make the syntax consistent for resolving from and publishing to Maven repositories.
[8] 私たちは、Mavenリポジトリからの取得とMavenリポジトリへの公開を一貫した文法で行えるよう作業しているところです。
To build a Groovy project, you use the Groovy plugin. This plugin extends the Java plugin to add Groovy compilation capabilities to your project. Your project can contain Groovy source code, Java source code, or a mix of the two. In every other respect, a Groovy project is identical to a Java project, which we have already seen in 7章JavaクイックスタートJava Quickstart.
Groovyプロジェクトをビルドするのには、Groovyプラグインを使います。このプラグインはJavaプラグインを拡張して、Groovyのコンパイル能力をプロジェクトに加えます。 プロジェクトはGroovyソースコード、Javaソースコード、またはこれらの両方を含むことができます。これ以外の点では、Groovyプロジェクトは7章JavaクイックスタートJava Quickstartですでに見たJavaプロジェクトを同じです。
Let's look at an example. To use the Groovy plugin, add the following to your build file:
実例を見てみましょう。Groovyプラグインを使うためには、ビルドファイルに以下を記述を追加します:
例9.1 Groovyプラグイン
build.gradle
apply plugin: 'groovy'ノート: 本例のソースコードは、Gradleのバイナリ配布物またはソース配布物に含まれています。以下の場所をご参照ください。samples/groovy/quickstart
This will also apply the Java plugin to the project, if it has not already been applied. The Groovy plugin
extends the compile task to look for source files in directory
src/main/groovy, and the compileTest task to look for test source
files in directory src/test/groovy. The compile tasks use joint compilation for these
directories, which means they can contain a mixture of Java and Groovy source files.
これにより、(もしまだなら)プロジェクトにはJavaプラグインも適用されます。Groovyプラグインはcompileタスクを拡張してsrc/main/groovyディレクトリにあるソースファイルも参照するようにし、またcompileTestタスクを拡張してsrc/test/groovyディレクトリにあるテスト用ソースファイルも参照するようにします。compileタスクはこれらのディレクトリに対してジョイントコンパイルを使うので、javaとgroovyのソースファイルが混在していてもかまいません。
To use the Groovy compilation tasks, you must also declare the Groovy version to use and where to find the
Groovy libraries. You do this by adding a dependency to the groovy configuration.
The compile configuration inherits this dependency, so the Groovy libraries will
be included in classpath when compiling Groovy and Java source. For our sample, we will use Groovy 2.2.0
from the public Maven repository:
Groovy用のcompileタスクを使うには、GroovyのバージョンとGroovyライブラリを探してくる場所を宣言する必要があります。これは、compileコンフィギュレーションに依存関係を追加することによって行います。この例では、Groovy 2.2.0を使用します。
例9.2 Dependency on Groovy
build.gradle
repositories {
mavenCentral()
}
dependencies {
compile 'org.codehaus.groovy:groovy-all:2.3.6'
}Here is our complete build file:
以下にビルドファイルの全体を示します:
例9.3 Groovy用のビルドファイル(全体)
build.gradle
apply plugin: 'eclipse' apply plugin: 'groovy' repositories { mavenCentral() } dependencies { compile 'org.codehaus.groovy:groovy-all:2.3.6' testCompile 'junit:junit:4.11' }
Running gradle build will compile, test and JAR your project.
gradle buildを実行すれば、プロジェクトがコンパイル、テストされ、JARが生成されます。
This chapter describes a very simple Groovy project. Usually, a real project will require more than this. Because a Groovy project is a Java project, whatever you can do with a Java project, you can also do with a Groovy project.
この章では非常にシンプルなGroovyプロジェクトについて説明しました。通常、実プロジェクトではこの例よりもっと複雑な記述が必要でしょう。GroovyプロジェクトはJavaプロジェクトでもあるので、Javaプロジェクトで可能なことなら何でもGroovyプロジェクトでも可能です。
You can find out more about the Groovy plugin in 24章GroovyプラグインThe Groovy Plugin, and you can find more
sample Groovy projects in the samples/groovy directory in the Gradle distribution.
24章GroovyプラグインThe Groovy Pluginでは、Groovyプラグインをより詳しく説明しています。また、Gradle配布物のsamples/groovyディレクトリには、Groovyプロジェクトの実例が多く含まれています。
This chapter is a work in progress.
この章は執筆途中です。
This chapter introduces the Gradle support for web applications. Gradle provides two plugins for web application development: the War plugin and the Jetty plugin. The War plugin extends the Java plugin to build a WAR file for your project. The Jetty plugin extends the War plugin to allow you to deploy your web application to an embedded Jetty web container.
この章ではGradleのWebアプリケーションサポートについて紹介します。 GradleはWebアプリケーション開発に対応する2つのプラグイン、WarプラグインとJettyプラグインを提供しています。 WarプラグインはJavaプラグインを拡張して、プロジェクトでWARファイルのビルドができるようにします。 JettyプラグインはWarプラグインを拡張して、組み込みJettyコンテナにWebアプリケーションをデプロイできるようにします。
To build a WAR file, you apply the War plugin to your project:
WARファイルをビルドするために、プロジェクトにWarプラグインを適用します:
例10.1 Warプラグイン
build.gradle
apply plugin: 'war'ノート: 本例のソースコードは、Gradleのバイナリ配布物またはソース配布物に含まれています。以下の場所をご参照ください。samples/webApplication/quickstart
This also applies the Java plugin to your project. Running gradle build will compile,
test and WAR your project. Gradle will look for the source files to include in the WAR file in
src/main/webapp. Your compiled classes and their runtime dependencies are also
included in the WAR file, in the WEB-INF/classes and WEB-INF/lib
directories, respectively.
これにより、プロジェクトにはJavaプラグインも適用されます。
gradle buildを実行すれば、プロジェクトがコンパイル、テストされ、WARが生成されます。
Gradleはsrc/main/webappにあるファイルからWARに含めるものを探します。
コンパイル済みクラスや実行時に必要となる依存ライブラリもWARに追加されます。
Groovy WebアプリケーションGroovy web applications
You can combine multiple plugins in a single project, so you can use the War and Groovy plugins together to build a Groovy based web application. The appropriate Groovy libraries will be added to the WAR file for you.
単一のプロジェクト内で複数のプラグインを組み合わせることができるので、 GroovyベースのWebアプリケーションをビルドするためにWarプラグインとGroovyプラグインを同時に使えます。 その場合、適切なGroovyライブラリがWARファイルに追加されます。
To run your web application, you apply the Jetty plugin to your project:
Webアプリケーションを実行するためには、プロジェクトにJettyプラグインを適用します:
This also applies the War plugin to your project. Running gradle jettyRun will
run your web application in an embedded Jetty web container. Running gradle jettyRunWar
will build the WAR file, and then run it in an embedded web container.
これにより、プロジェクトにはWarプラグインも適用されます。
gradle jettyRunを実行すれば、組み込みJettyコンテナ上でWebアプリケーションが実行されます。
gradle jettyRunWarを実行するとWARファイルが生成され、その後組み込みWebコンテナで実行されます。
TODO: which url, configure port, uses source files in place and can edit your files and reload.
TODO: URLの確認方法、ポートの設定、ソースファイルの編集と動的リロードの方法など
You can find out more about the War plugin in 26章War プラグインThe War Plugin and the Jetty plugin in
28章Jetty プラグインThe Jetty Plugin. You can find more sample Java projects in the
samples/webApplication directory in the Gradle distribution.
Warプラグインについての詳細は26章War プラグインThe War Plugin、
Jettyプラグインの詳細については28章Jetty プラグインThe Jetty Pluginを参照してください。
Gradle配布物のsamples/webApplicationディレクトリにサンプルJavaプロジェクトがあります。
This chapter introduces the basics of the Gradle command-line. You run a build using the gradle command, which you have already seen in action in previous chapters.
本章では、Gradleのコマンドラインについて基本的な部分を紹介します。これまで動かしてきたように、Gradleのビルドはgradleコマンドで実行します。
You can execute multiple tasks in a single build by listing each of the tasks on the command-line. For example,
the command gradle compile test will execute the compile and
test tasks. Gradle will execute the tasks in the order that they are listed on the
command-line, and will also execute the dependencies for each task. Each task is executed once only,
regardless of how it came to be included in the build: whether it was specified on the command-line, or as a
dependency of another task, or both. Let's look at an example.
一回のビルドで、複数のタスクを実行することができます。ビルドを実行するときに、タスクを並べて指定してください。たとえば、gradle compile testというコマンドを実行すれば、compileタスクとtestタスクが実行されます。Gradleはタスクを列挙された順に実行するほか、それらが依存しているタスクも実行します。また、タスクが実行されるのはそれぞれ一度だけです。コマンドラインで明示的に指定されたタスクも、それらに依存して実行されるタスクも、またその両方に含まれるタスクも同様です。次の例を見てください。
Below four tasks are defined. Both dist and test depend on the
compile task. Running gradle dist test for this build script
results in the compile task being executed only once.
この例では、四つのタスクが定義されており、distとtestはどちらもcompileタスクに依存しています。このビルドスクリプトを呼び出してgradle dist testと実行しても、実行された二つのタスクから依存されているcompileタスクは一度だけしか実行されません。

例11.1 複数のタスクの実行
build.gradle
task compile << {
println 'compiling source'
}
task compileTest(dependsOn: compile) << {
println 'compiling unit tests'
}
task test(dependsOn: [compile, compileTest]) << {
println 'running unit tests'
}
task dist(dependsOn: [compile, test]) << {
println 'building the distribution'
}gradle dist test の出力
> gradle dist test :compile compiling source :compileTest compiling unit tests :test running unit tests :dist building the distribution BUILD SUCCESSFUL Total time: 1 secs
Each task is executed only once only, so gradle test test is exactly the same
as gradle test.
タスクが一度だけ実行されるということは、gradle test testと打ち込んでもgradle testと打ち込んでも、実行される処理は全く同じだということです。
You can exclude a task from being executed using the -x command-line option and providing
the name of the task to exclude. Let's try this with the sample build file above.
-xオプションでタスクの名前を指定することで、そのタスクを除外してビルドを実行することができます。先ほどのサンプルで試してみましょう。
例11.2 タスクの除外
gradle dist -x test の出力
> gradle dist -x test :compile compiling source :dist building the distribution BUILD SUCCESSFUL Total time: 1 secs
You can see from the output of this example, that the test task is not executed, even
though it is a dependency of the dist task. You will also notice that the
test task's dependencies, such as compileTest
are not executed either. Those dependencies of test that are required by another task, such as
compile, are still executed.
distタスクはtestに依存しているのですが、この例ではtestタスクは実行されていないことが分かります。また、testタスクが依存しているタスク、たとえばcompileTestタスクもやはり実行されていません。しかし、testタスクが依存しているタスクのうち、test以外からも依存されているタスク、つまりcompileタスクは実行されているのです。
By default, Gradle will abort execution and fail the build as soon as any task fails. This allows the build to complete sooner, but hides other failures
that would have occurred. In order to discover as many failures as possible in a single build execution, you can use the --continue option.
デフォルトでは、タスクが失敗するとすぐにGradleは実行を中止してビルドを失敗させます。これはビルドの完了は早くなりますが、発生するかもしれない他のエラーを隠してしまうかもしれません。
一回のビルド実行でできるだけ多くのエラーを発見するには、--continueオプションを使用します。
When executed with --continue, Gradle will execute every task to be executed where all of the dependencies for that task completed without failure,
instead of stopping as soon as the first failure is encountered. Each of the encountered failures will be reported at the end of the build.
--continueオプションをつけてビルドすると、エラー発生時に即ビルドが停止されるのではなく、失敗せずに完了したタスクに依存するタスクは全て実行されるようになります。
また、ビルド中に発生したエラーはビルド終了時に全てレポートされます。
If a task fails, any subsequent tasks that were depending on it will not be executed, as it is not safe to do so. For example, tests will not run if there is a compilation failure in the code under test; because the test task will depend on the compilation task (either directly or indirectly).
タスクが失敗した場合、依存関係上の後続タスクは安全に実行できないため行われません。 例えば、テストの際、コードのコンパイルでエラーが発生するとテストは実施されません。テストタスクはコンパイルタスクに直接的、間接的に依存しているからです。
When you specify tasks on the command-line, you don't have to provide the full name of the task. You only need to provide enough of the
task name to uniquely identify the task. For example, in the sample build above, you can execute task
dist by running gradle d:
タスク名をコマンドラインで指定するとき、タスク名をすべて入力する必要はありません。タスク名を一つに決定できるだけの文字を入力すればよいのです。先ほどの例で言えば、gradle dと入力すればdistを実行できます。
例11.3 タスク名の省略
gradle di の出力
> gradle di :compile compiling source :compileTest compiling unit tests :test running unit tests :dist building the distribution BUILD SUCCESSFUL Total time: 1 secs
You can also abbreviate each word in a camel case task name. For example, you can execute task compileTest
by running gradle compTest or even gradle cT
キャメルケースで分割されたそれぞれの単語を省略することもできます。たとえば、compileTestというタスクだと、gradle compTestと入力したり、gradle cTと入力したりすることで実行できます。
例11.4 キャメルケースのタスク名を省略
gradle cT の出力
> gradle cT :compile compiling source :compileTest compiling unit tests BUILD SUCCESSFUL Total time: 1 secs
You can also use these abbreviations with the -x command-line option.
-xオプションで除外タスクを指定するときにも、同じようにタスク名を省略できます。
When you run the gradle command, it looks for a build file in the current directory.
You can use the -b option to select another build file.
If you use -b option then settings.gradle file is not used. Example:
gradleコマンドは、デフォルトではカレントディレクトリにあるビルドスクリプトを探して実行しますが、-bオプションを使えば別のビルドスクリプトを指定することもできます。次の例を見てください。
なお、-bを使うと、settings.gradleファイルは使用されなくなります。
例11.5 ビルドスクリプトを指定してビルドするプロジェクトを選択する
subdir/myproject.gradle
task hello << {
println "using build file '$buildFile.name' in '$buildFile.parentFile.name'."
}gradle -q -b subdir/myproject.gradle hello の出力
> gradle -q -b subdir/myproject.gradle hello using build file 'myproject.gradle' in 'subdir'.
Alternatively, you can use the -p option to specify the project directory to use.
For multi-project builds you should use -p option instead of -b option.
別の方法として、-pオプションを指定して、使用するプロジェクトディレクトリを変更することもできます。
マルチプロジェクトの場合は、-bオプションでなく-pオプションを使用するべきです。
例11.6 プロジェクトディレクトリを使ってプロジェクトを選択する
gradle -q -p subdir hello の出力
> gradle -q -p subdir hello using build file 'build.gradle' in 'subdir'.
Gradle provides several built-in tasks which show particular details of your build. This can be useful for understanding the structure and dependencies of your build, and for debugging problems.
ビルドに関する様々な情報を表示するために、組み込みのタスクがいくつか用意されています。自分の作ったビルドが今どんな構造になっているのか調べたり、何か問題が起こったときにデバッグしたりするのに役立つはずです。
In addition to the built-in tasks shown below, you can also use the project report plugin to add tasks to your project which will generate these reports.
この組み込みタスクに加えて、プロジェクトレポートプラグインというプラグインを使うこともできます。このプラグインは、これらの情報をレポートに保存するタスクをプロジェクトに追加してくれます。
Running gradle projects gives you a list of the sub-projects of the selected project,
displayed in a hierarchy. Here is an example:
gradle projectsを実行すると、指定したプロジェクトのサブプロジェクトを一覧できます。プロジェクトの一覧は階層構造で表示されます。次の例をご覧ください。
例11.7 プロジェクトに関する情報を取得する
gradle -q projects の出力
> gradle -q projects ------------------------------------------------------------ Root project ------------------------------------------------------------ Root project 'projectReports' +--- Project ':api' - The shared API for the application \--- Project ':webapp' - The Web application implementation To see a list of the tasks of a project, run gradle <project-path>:tasks For example, try running gradle :api:tasks
The report shows the description of each project, if specified. You can provide a description for a project
by setting the description property:
このレポートは、プロジェクトに説明書きが添付されている場合、その説明も表示されます。プロジェクトの説明は、プロジェクトのプロパティで設定してください。
Running gradle tasks gives you a list of the main tasks of the
selected project. This report shows the default tasks for the project, if any, and a description for
each task. Below is an example of this report:
gradle tasksを実行すると、プロジェクトに設定されているメインタスクの一覧とデフォルトタスクを表示します。さらに、タスクに説明書きが添付されていれば、その説明も表示されます。
例11.9 タスクに関する情報を取得する
gradle -q tasks の出力
> gradle -q tasks ------------------------------------------------------------ All tasks runnable from root project ------------------------------------------------------------ Default tasks: dists Build tasks ----------- clean - Deletes the build directory (build) dists - Builds the distribution libs - Builds the JAR Build Setup tasks ----------------- init - Initializes a new Gradle build. [incubating] wrapper - Generates Gradle wrapper files. [incubating] Help tasks ---------- components - Displays the components produced by root project 'projectReports'. dependencies - Displays all dependencies declared in root project 'projectReports'. dependencyInsight - Displays the insight into a specific dependency in root project 'projectReports'. help - Displays a help message. projects - Displays the sub-projects of root project 'projectReports'. properties - Displays the properties of root project 'projectReports'. tasks - Displays the tasks runnable from root project 'projectReports' (some of the displayed tasks may belong to subprojects). To see all tasks and more detail, run with --all.
By default, this report shows only those tasks which have been assigned to a task group. You can do this
by setting the group property for the task. You can also set the description
property, to provide a description to be included in the report.
デフォルトでは、このレポートは何らかのタスクグループに属しているタスクしか表示されません。タスクのgroupプロパティを設定することでタスクにグループを割り当てることができます。また、このレポートでタスクに関する説明書きを表示させるには、タスクのdescriptionプロパティに説明書きを設定してください。
You can obtain more information in the task listing using the --all option. With
this option, the task report lists all tasks in the project, grouped by main task, and the dependencies
for each task. Here is an example:
--allオプションを追加すると、タスクリストについてもっと多くの情報を取得できます。プロジェクトにあるすべてのメインタスクとタスク間の依存関係が表示されます。次の表示例をご覧ください。
例11.11 タスクに関してもっと多くの情報を取得する
gradle -q tasks --all の出力
> gradle -q tasks --all
------------------------------------------------------------
All tasks runnable from root project
------------------------------------------------------------
Default tasks: dists
Build tasks
-----------
clean - Deletes the build directory (build)
api:clean - Deletes the build directory (build)
webapp:clean - Deletes the build directory (build)
dists - Builds the distribution [api:libs, webapp:libs]
docs - Builds the documentation
api:libs - Builds the JAR
api:compile - Compiles the source files
webapp:libs - Builds the JAR [api:libs]
webapp:compile - Compiles the source files
Build Setup tasks
-----------------
init - Initializes a new Gradle build. [incubating]
wrapper - Generates Gradle wrapper files. [incubating]
Help tasks
----------
components - Displays the components produced by root project 'projectReports'.
api:components - Displays the components produced by project ':api'.
webapp:components - Displays the components produced by project ':webapp'.
dependencies - Displays all dependencies declared in root project 'projectReports'.
api:dependencies - Displays all dependencies declared in project ':api'.
webapp:dependencies - Displays all dependencies declared in project ':webapp'.
dependencyInsight - Displays the insight into a specific dependency in root project 'projectReports'.
api:dependencyInsight - Displays the insight into a specific dependency in project ':api'.
webapp:dependencyInsight - Displays the insight into a specific dependency in project ':webapp'.
help - Displays a help message.
api:help - Displays a help message.
webapp:help - Displays a help message.
projects - Displays the sub-projects of root project 'projectReports'.
api:projects - Displays the sub-projects of project ':api'.
webapp:projects - Displays the sub-projects of project ':webapp'.
properties - Displays the properties of root project 'projectReports'.
api:properties - Displays the properties of project ':api'.
webapp:properties - Displays the properties of project ':webapp'.
tasks - Displays the tasks runnable from root project 'projectReports' (some of the displayed tasks may belong to subprojects).
api:tasks - Displays the tasks runnable from project ':api'.
webapp:tasks - Displays the tasks runnable from project ':webapp'.Running gradle help --task someTask gives you detailed information about a specific task or multiple
tasks matching the given task name in your multiproject build.
Below is an example of this detailed information:
gradle help --task someTaskを実行すると、ある特定のタスク、マルチプロジェクトの場合は指定した名前にマッチする全てのタスクについての詳細な情報が表示されます。
表示される情報の例は以下の通りです。
例11.12 タスクについて詳細なヘルプ情報を取得する
gradle -q help --task libs の出力
> gradle -q help --task libs
Detailed task information for libs
Paths
:api:libs
:webapp:libs
Type
Task (org.gradle.api.Task)
Description
Builds the JARThis information includes the full task path, the task type, possible commandline options and the description of the given task.
上記の通り、表示される情報にはタスクのフルパス、使用可能なコマンドラインオプション、またタスクの説明が含まれています。
Running gradle dependencies
gives you a list of the dependencies of the selected project, broken down by configuration. For each
configuration, the direct and transitive dependencies of that configuration are shown in a tree. Below
is an example of this report:
gradle dependenciesはプロジェクトの依存関係をコンフィギュレーションごとに一覧表示します。プロジェクトに直接設定されている依存関係と推移的依存関係が、コンフィギュレーション別のツリー構造で表示されます。
例11.13 依存関係の情報を取得する
gradle -q dependencies api:dependencies webapp:dependencies の出力
> gradle -q dependencies api:dependencies webapp:dependencies
------------------------------------------------------------
Root project
------------------------------------------------------------
No configurations
------------------------------------------------------------
Project :api - The shared API for the application
------------------------------------------------------------
compile
\--- org.codehaus.groovy:groovy-all:2.3.6
testCompile
\--- junit:junit:4.11
\--- org.hamcrest:hamcrest-core:1.3
------------------------------------------------------------
Project :webapp - The Web application implementation
------------------------------------------------------------
compile
+--- project :api
| \--- org.codehaus.groovy:groovy-all:2.3.6
\--- commons-io:commons-io:1.2
testCompile
No dependencies
Since a dependency report can get large, it can be useful to restrict the report to a particular configuration.
This is achieved with the optional --configuration parameter:
依存関係のレポートは巨大になることもあるので、レポート内容を特定のコンフィギュレーションのみに限定できれば便利です。
これは、オプションの--configurationを指定することで実現できます。
例11.14 依存関係のレポートをコンフィギュレーションでフィルタする
gradle -q api:dependencies --configuration testCompile の出力
> gradle -q api:dependencies --configuration testCompile
------------------------------------------------------------
Project :api - The shared API for the application
------------------------------------------------------------
testCompile
\--- junit:junit:4.11
\--- org.hamcrest:hamcrest-core:1.3Running gradle dependencyInsight
gives you an insight into a particular dependency (or dependencies) that match specified input.
Below is an example of this report:
gradle dependencyInsightを実行すると、個別の、または複数の依存関係を指定して、それぞれに対する解析情報を取得することができます。以下がそのレポートの例です。
例11.15 個別の依存関係に対する解析情報を取得する
gradle -q webapp:dependencyInsight --dependency groovy --configuration compile の出力
> gradle -q webapp:dependencyInsight --dependency groovy --configuration compile
org.codehaus.groovy:groovy-all:2.3.6
\--- project :api
\--- compile
This task is extremely useful for investigating the dependency resolution,
finding out where certain dependencies are coming from and why certain versions are selected.
For more information please see the DependencyInsightReportTask class in the API documentation.
dependencyInsightは、依存関係がどのように解決されているか調査するときにとても便利なタスクです。ある依存関係がどこから来て、なぜそのバージョンが選択されているのか調べることができます。
詳細については、DependencyInsightReportTaskを参照してください。
The built-in dependencyInsight task is a part of the 'Help' tasks group.
The task needs to configured with the dependency and the configuration.
The report looks for the dependencies that match the specified dependency spec in the specified configuration.
If Java related plugin is applied, the dependencyInsight task is pre-configured with 'compile' configuration because typically it's the compile dependencies we are interested in.
You should specify the dependency you are interested in via the command line '--dependency' option.
If you don't like the defaults you may select the configuration via '--configuration' option.
For more information see the DependencyInsightReportTask class in the API documentation.
組み込みのdependencyInsightタスクは、Helpグループに属しています。
このタスクは、依存関係およびコンフィグレーションを指定しないと使用できません。
レポートが出力される際は、指定されたコンフィグレーションの指定された依存関係を探しに行きます。
Java関連のプラグインが適用されていれば、dependencyInsightタスクは既にcompileコンフィグレーションに対して設定されています。一般的に言って、よく調べたくなる依存関係はこのコンフィグレーションに属しているからです。
また、調査対象の依存関係を「--dependency」オプションで指定しなければなりません。
さらに、デフォルトのコンフィグレーションが気に入らないときは「--configuration」オプションで明示的にコンフィグレーションを指定します。
詳しくはDependencyInsightReportTaskを参照してください。
Running gradle properties gives you a list of the properties of the selected
project. This is a snippet from the output:
gradle propertiesはプロジェクトのプロパティを一覧表示します。出力例の一部を以下に示します。
例11.16 プロパティに関する情報
gradle -q api:properties の出力
> gradle -q api:properties ------------------------------------------------------------ Project :api - The shared API for the application ------------------------------------------------------------ allprojects: [project ':api'] ant: org.gradle.api.internal.project.DefaultAntBuilder@12345 antBuilderFactory: org.gradle.api.internal.project.DefaultAntBuilderFactory@12345 artifacts: org.gradle.api.internal.artifacts.dsl.DefaultArtifactHandler_Decorated@12345 asDynamicObject: org.gradle.api.internal.ExtensibleDynamicObject@12345 baseClassLoaderScope: org.gradle.api.internal.initialization.DefaultClassLoaderScope@12345 buildDir: /home/user/gradle/samples/userguide/tutorial/projectReports/api/build buildFile: /home/user/gradle/samples/userguide/tutorial/projectReports/api/build.gradle
The --profile command line option will record some useful timing information
while your build is running and write a report to the build/reports/profile directory.
The report will be named using the time when the build was run.
コマンドラインオプションで--profileをつけてビルドを実行すると、ビルドに要した時間のうち有用と思われるいくつかの情報を計測して、結果をbuild/reports/profileディレクトリを出力します。レポート名には、ビルドを行った時刻が付加されます。
This report lists summary times and details for both the configuration phase and task execution. The times for configuration and task execution are sorted with the most expensive operations first. The task execution results also indicate if any tasks were skipped (and the reason) or if tasks that were not skipped did no work.
このレポートでは、ビルド時間に関する概要のほか、設定フェーズとタスク実行に要した時間がタスクごとに表示されます。設定フェーズ、タスク実行に関するレポートは必要時間の降順でソートされており、さらにタスク実行については、タスクがスキップされたかどうか、作業が発生したかどうかみることができるようになっています。
Builds which utilize a buildSrc directory will generate a second profile report for buildSrc in the
buildSrc/build directory.
なお、buildSrcディレクトリを使っている場合、buildSrc/buildにbuildSrcのレポートが別途出力されます。
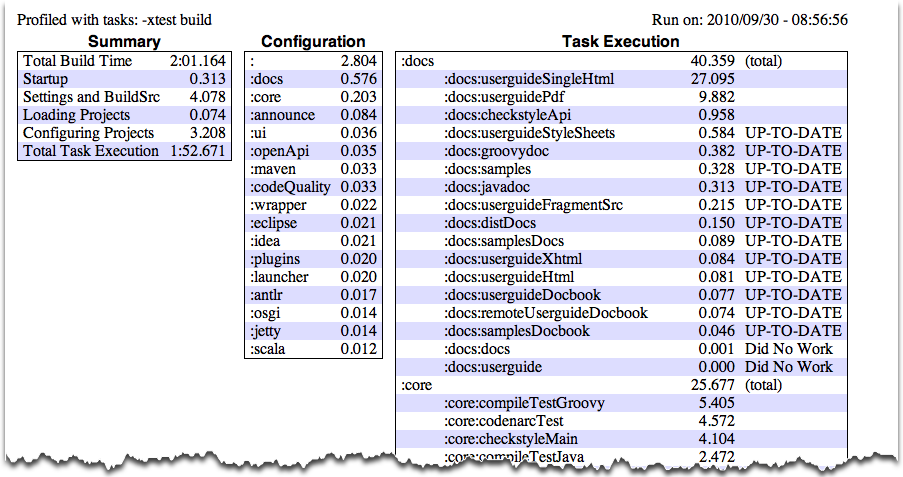 |
Sometimes you are interested in which tasks are executed in which order for a given set of tasks specified on the
command line, but you don't want the tasks to be executed. You can use the -m option for this.
For example, if you run “gradle -m clean compile”, you'll see all the tasks that would be
executed as part of the clean and compile tasks.
This is complementary to the tasks task, which shows you the tasks which are available for
execution.
コマンドラインにタスク名を並べて実行したときに、どのタスクがどの順番で実行されるのか知りたくなることがあります。しかしそのために実際にタスクを実行したくはありません。このような場合、-mオプションをつけて実行してください。たとえば、gradle -m clean compileと実行すれば、cleanタスクとcompileタスクの実行にあたって実際に実行されるすべてのタスクが実行順に表示されます。これは、実行可能なタスクの一覧を表示するtasksタスクの補足にもなります。
In this chapter, you have seen some of the things you can do with Gradle from the command-line. You can find out more about the gradle command in 付録D Gradle コマンドラインGradle Command Line.
この章では、コマンドラインで使えるGradleの機能をいくつか見てきました。gradleコマンドについては付録D Gradle コマンドラインGradle Command Lineにも記載してあります。
In addition to supporting a traditional command line interface, Gradle offers a graphical user interface. This is a stand alone user interface that can be launched with the --gui option.
伝統的なコマンドラインインターフェースに加え、Gradleはグラフィカルユーザーインターフェースも提供しています。これはスタンドアローンのインターフェースで、--guiオプションを使って起動できます。
Note that this command blocks until the Gradle GUI is closed. Under *nix it is probably preferable to run this as a background task (gradle --gui&)
このコマンドは、GUIをクローズするまでブロックされることに注意してください。*nixでは、バックグラウンドタスク(gradle --gui&)で実行した方がいいかもしれません。
If you run this from your Gradle project working directory, you should see a tree of tasks.
このコマンドをgradleプロジェクトの作業ディレクトリで実行すると、タスクのツリーが表示されることが分かります。
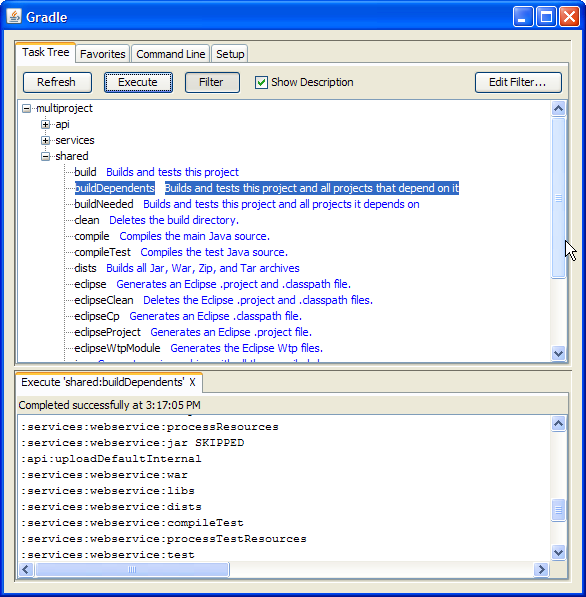
It is preferable to run this command from your Gradle project directory so that the settings of the UI will be stored in your project directory. However, you can run it then change the working directory via the Setup tab in the UI.
このコマンドは、自分のgradleプロジェクトのディレクトリで実行した方がいいでしょう。そうすれば、UI設定がプロジェクトのディレクトリに保存されるからです。しかし、コマンドを実行してから、UIのSetupタブで作業ディレクトリを変更することもできます。
The UI displays 4 tabs along the top and an output window along the bottom.
UIには上部に4つのタブがあり、下部には出力を表示するウィンドウがあります。
The Task Tree shows a hierarchical display of all projects and their tasks. Double clicking a task executes it.
Task Treeは、すべてのプロジェクトとタスクの階層構造を表示します。タスクをダブルクリックすると、そのタスクが実行されます。
There is also a filter so that uncommon tasks can be hidden. You can toggle the filter via the Filter button. Editing the filter allows you to configure which tasks and projects are shown. Hidden tasks show up in red. Note: newly created tasks will show up by default (versus being hidden by default).
また、フィルターも用意されているので、一般的でないタスクは非表示にすることができます。フィルターを有効にするかどうかはFilterボタンで切り替えできます。 フィルター編集画面では、どのタスクとプロジェクトを表示するかを設定します。非表示に設定されたタスクは赤色で強調されます。 注意: 新しく作成されたタスクは、デフォルトでは表示に設定されます(デフォルトで非表示に設定されるのではなく)。
The Task Tree context menu provides the following options:
タスクツリーのコンテキストメニューでは、以下の機能も使うことができます。
Execute ignoring dependencies. This does not require dependent projects to be rebuilt (same as the -a option).
依存関係を無視したタスクの実行する。依存プロジェクトを再ビルドしません(-aオプションと同じ)。
Add tasks to the favorites (see Favorites tab)
タスクをお気に入りに追加する(Favoritesを参照してください)。
Hide the selected tasks. This adds them to the filter.
選択したタスクを隠す。タスクをフィルターに追加します。
Edit the build.gradle file. Note: this requires Java 1.6 or higher and requires that you have .gradle files associated in your OS.
build.gradleファイルの編集。注意: この機能を使うには、1.6以上のバージョンのJavaが必要です。また、OS上で.gradleファイルの関連づけを設定しなければなりません。
The Favorites tab is a good place to store commonly-executed commands. These can be complex commands (anything that's legal to Gradle) and you can provide them with a display name. This is useful for creating, say, a custom build command that explicitly skips tests, documentation, and samples that you could call “fast build”.
Favoriteタブでは、よく実行するコマンドをお気に入りとして保存できます。保存するコマンドは複雑なもの(Gradleにとって正しいものならなんでもかまいません)でもよく、わかりやすい表示名をつけることもできます。お気に入りは、テストやドキュメンテーション、サンプル作成などを明示的にスキップする、"急速なビルド"と呼べるようなカスタムビルドを作成するのに便利だと言えます。
You can reorder favorites to your liking and even export them to disk so they can imported by others. If you edit them, you are given options to “Always Show Live Output”. This only applies if you have “Only Show Output When Errors Occur”. This override always forces the output to be shown.
お気に入りは、好きなように並び替えることができます。また、お気に入りをディスクにエクスポートしたり、そこから逆にインポートしたりすることも可能です。 お気に入りを追加、編集するとき、"Always Show Live Output"というオプションがあるはずです。 これは、'Only Show Output When Errors Occur'(エラー発生時のみ出力を表示する)設定を有効にしているときのみ適用されるオプションです。 このオプションを有効にすると、その設定を上書きし常に出力が表示されるようになります。The Command Line tab is where you can to execute a single Gradle command directly. Just enter whatever you would normally enter after 'gradle' on the command line. This also provides a place to try out commands before adding them to favorites.
Command Lineタブでは、ひとつのgradleコマンドを直接実行できます。いつも'gradle'のあとに入力しているコマンドを入力するだけです。お気に入りにコマンドを追加する前に、試しにそのコマンドを実行してみることもできます。The Setup tab allows configuration of some general settings.
Setupタブは、一般的な設定を行うところです。
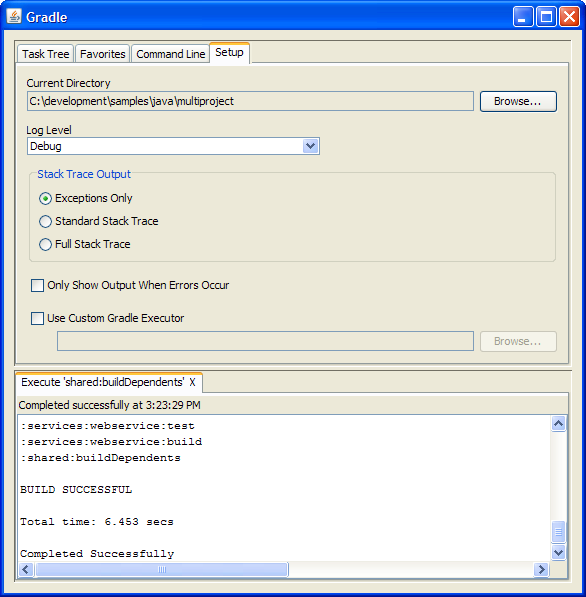
Current Directory
Defines the root directory of your Gradle project (typically where build.gradle is located).
gradleプロジェクトのルートディレクトリを設定します(典型的には、build.gradleが置かれているディレクトリになります)。
Stack Trace Output
This determines how much information to write out in stack traces when errors occur. Note: if you specify a stack trace level on either the Command Line or Favorites tab, it will override this stack trace level.
ここでは、エラーが発生したとき、どれだけの情報をスタックトレースに書き出すかを設定します。注意: スタックトレースレベルをCommand LineタブやFavoritesタブで指定している場合、ここで設定したスタックトレースレベルは上書きされます。
Only Show Output When Errors Occur
Enabling this option hides any output when a task is executed unless the build fails.
有効にすると、ビルドに失敗しない限り出力が表示されないようになります。
Use Custom Gradle Executor - Advanced feature
Use Custom Gradle Executor - 高度な機能
This provides you with an alternate way to launch Gradle commands. This is useful if your project requires some extra setup that is done inside another batch file or shell script (such as specifying an init script).
gradleコマンドの実行方法を変更できます。これは、自分のプロジェクトが、バッチファイルやシェルスクリプトの中で追加的なセットアップをしてからgradleを呼び出しているときに便利です。
This chapter looks at some of the details of writing a build script.
本章では、ビルドスクリプトの記述についてもう少し詳しく見ていきます。
Gradle provides a domain specific language, or DSL, for describing builds. This build language is based on Groovy, with some additions to make it easier to describe a build.
Gradleは、ビルドシステムを記述するためのドメイン特化言語(DSL)を提供します。 このビルド用言語は、Groovyをベースに、ビルドシステムの記述を簡単にするための機能をいくつか追加したものです。
A build script can contain any Groovy language element. [9] Gradle assumes that each build script is encoded using UTF-8.
In the tutorial in 7章JavaクイックスタートJava Quickstart we used, for example, the
apply() method. Where does this method come from? We said earlier that the build script
defines a project in Gradle. For each project in the build, Gradle creates an object of type
Project and associates this Project object with
the build script. As the build script executes, it configures this Project object:
例えば、7章JavaクイックスタートJava Quickstartのチュートリアルで使用したapply()メソッド、このメソッドはどこから来たのでしょうか。まず、前述のようにビルドスクリプトはGradleのプロジェクトを定義します。
ビルドに含まれるプロジェクトそれぞれに対し、Project型のインスタンスが一つ作られ、ビルドスクリプトと関連づけられます。ビルドが実行されると、このプロジェクト・インスタンスは以下のように振る舞います。
ビルドスクリプトのリファレンスを見たいときはGetting help writing build scripts
Don't forget that your build script is simply Groovy code that drives the Gradle API. And the
Project interface is your starting point for accessing everything
in the Gradle API. So, if you're wondering what 'tags' are available in your build script, you can
start with the documentation for the Project interface.
ビルドスクリプトは、GradleのAPIを呼び出しているだけの単なるGroovyスクリプトだということを忘れないでください。Projectインターフェースが、GradleのAPIを呼び出すときのスタートポイントです。なので、ビルドスクリプトでどんな「文言」が使えるか分からないときはProjectインターフェースのドキュメントを見ることから始めるといいでしょう。
Any method you call in your build script which is not defined in the build script, is delegated to the
Projectobject.ビルドスクリプトで呼び出されたメソッドのうち、そのスクリプトで定義されていないものは
Projectオブジェクトに委譲されます。Any property you access in your build script, which is not defined in the build script, is delegated to the
Projectobject.ビルドスクリプトでのプロパティアクセスも、そのスクリプトで定義されていないプロパティについては
Projectオブジェクトに委譲されます。
Let's try this out and try to access the name property of the
Project object.
プロジェクトオブジェクトのnameプロパティにアクセスして試してみましょう。
例13.1 Projectオブジェクトへのアクセス
build.gradle
println name println project.name
gradle -q check の出力
> gradle -q check projectApi projectApi
Both println statements print out the same property. The first uses auto-delegation to
the Project object, for properties not defined in the build script. The other
statement uses the project property available to any build script, which returns the
associated Project object. Only if you define a property or a method which has the
same name as a member of the Project object, would you need to use the project
property.
どちらのprintlnも出力結果は同じです。最初のprintlnは、ビルドスクリプトで定義されていないプロパティへのアクセスを、暗黙のうちにプロジェクトオブジェクトに委譲しています。もう一方の例では、プロジェクトオブジェクトを返すprojectプロパティを使って、nameにアクセスしています。projectプロパティには、ビルドスクリプトのどこからでもアクセスできます。プロジェクトオブジェクトのプロパティやメソッドと同名のものをビルドスクリプトに定義している場合は、projectプロパティからアクセスすることになるでしょう。
The Project object provides some standard properties, which are available in
your build script. The following table lists a few of the commonly used ones.
プロジェクトオブジェクトは標準でいくつかのプロパティを提供しており、ビルドスクリプトでこれらのプロパティにアクセスできます。次の表によく使うプロパティを少しですが載せてみました。
表13.1 プロジェクトプロパティProject Properties
| プロパティ名Name | 型Type | デフォルト値Default Value |
project |
Project |
ProjectインスタンスThe Project instance |
name |
String |
プロジェクトディレクトリの名前The name of the project directory. |
path |
String |
プロジェクトの絶対パスThe absolute path of the project. |
description |
String |
プロジェクトの説明A description for the project. |
projectDir |
File |
ビルドスクリプトのあるディレクトリThe directory containing the build script. |
buildDir |
File |
|
group |
Object |
未設定unspecified |
version |
Object |
未設定unspecified |
ant |
AntBuilder |
AntBuilderインスタンスAn AntBuilder instance |
When Gradle executes a script, it compiles the script into a class which implements Script.
This means that all of the properties and methods declared by the Script interface
are available in your script.
ビルドスクリプトが実行されるときは、スクリプトはScriptを実装したクラスにコンパイルされます。つまり、ビルドスクリプトではScriptインターフェースで宣言されているプロパティとメソッドを全て使うことができるということです。
There are two kinds of variables that can be declared in a build script: local variables and extra properties.
ビルドスクリプトでは、二つの方法で変数を宣言できます。ローカル変数と拡張プロパティです。
Local variables are declared with the def keyword. They are only visible in the scope where they have been declared.
Local variables are a feature of the underlying Groovy language.
ローカル変数は、defキーワードで宣言する変数です。変数のスコープは、変数が宣言されている場所に制限されます。なお、ローカル変数はGroovy言語に依る機能です。
All enhanced objects in Gradle's domain model can hold extra user-defined properties. This includes, but is not limited to, projects, tasks,
and source sets. Extra properties can be added, read and set via the owning object's ext property. Alternatively, an
ext block can be used to add multiple properties at once.
Gradleのドメインモデルを構成する全ての拡張オブジェクトには、ユーザー定義のプロパティ、拡張プロパティを新たに追加することができます。
拡張プロパティを追加できるオブジェクトには、projects、tasks、source setsを始め、様々なオブジェクトがあります。
拡張プロパティをセットしたり読み込んだりするには、対象オブジェクトのextプロパティを使用して下さい。また、extブロックを使って複数のプロパティを一気に追加することもできます。
例13.3 拡張プロパティを使用する
build.gradle
apply plugin: "java" ext { springVersion = "3.1.0.RELEASE" emailNotification = "build@master.org" } sourceSets.all { ext.purpose = null } sourceSets { main { purpose = "production" } test { purpose = "test" } plugin { purpose = "production" } } task printProperties << { println springVersion println emailNotification sourceSets.matching { it.purpose == "production" }.each { println it.name } }
gradle -q printProperties の出力
> gradle -q printProperties 3.1.0.RELEASE build@master.org main plugin
In this example, an ext block adds two extra properties to the project object. Additionally,
a property named purpose is added to each source set by setting ext.purpose to
null (null is a permissible value). Once the properties have been added, they can be read and set like
predefined properties.
この例では、extブロックで二つの拡張プロパティをprojectオブジェクトに追加しています。
さらに、ext.purposeにnullをセットすることで(nullでも構いません)、全てのソースセットにpurposeという拡張プロパティを追加しています。
一度プロパティが追加されれば、定義済みのプロパティと同じように読み込んだり書き込んだりすることができるようになります。
By requiring special syntax for adding a property, Gradle can fail fast when an attempt is made to set a (predefined or extra) property but the property is misspelled or does not exist. Extra properties can be accessed from anywhere their owning object can be accessed, giving them a wider scope than local variables. Extra properties on a project are visible from its subprojects.
For further details on extra properties and their API, see the ExtraPropertiesExtension class in the API documentation.
Groovy provides plenty of features for creating DSLs, and the Gradle build language takes advantage of these. Understanding how the build language works will help you when you write your build script, and in particular, when you start to write custom plugins and tasks.
GroovyにはDSLを作るための機能が豊富に用意されていて、Gradleもその長所を活用しています。Gradleビルド言語がどういう仕組みで動いているか理解すれば、ビルドスクリプトを書くのに、特にカスタムプラグインやタスクを作り始めたときには役に立つはずです。
Groovy adds lots of useful methods to the standard Java classes. For example, Iterable gets
an each method, which iterates over the elements of the Iterable:
Groovyは、たくさんの便利なメソッドをJavaの標準クラスに追加しています。たとえば、Iterableにはeachというメソッドが追加されていて、要素を走査するときに次のように書くことができます。
例13.4 Groovy JDKのメソッド
build.gradle
// Iterable gets an each() method
configurations.runtime.each { File f -> println f }Have a look at http://groovy.codehaus.org/groovy-jdk/ for more details.
詳細はhttp://groovy.codehaus.org/groovy-jdk/をご参照ください。
Groovy automatically converts a property reference into a call to the appropriate getter or setter method.
Groovyは、プロパティ参照を自動的にゲッター/セッターメソッドの呼び出しに変換してくれます。
例13.5 プロパティアクセサ
build.gradle
// Using a getter method println project.buildDir println getProject().getBuildDir() // Using a setter method project.buildDir = 'target' getProject().setBuildDir('target')
Parentheses are optional for method calls.
Groovyではメソッド呼び出しのカッコは省略できます。
例13.6 カッコなしのメソッド呼び出し
build.gradle
test.systemProperty 'some.prop', 'value' test.systemProperty('some.prop', 'value')
Groovy provides some shortcuts for defining List and Map
instances. Both kinds of literals are straightforward, but map literals have some interesting twists.
Groovyでは、ListやMapのインスタンスを作るときにショートカット記法が使えます。
For instance, the “apply” method (where you typically apply plugins) actually
takes a map parameter. However, when you have a line like “apply plugin:'java'”, you
aren't actually using a map literal, you're actually using “named parameters”, which have almost exactly
the same syntax as a map literal (without the wrapping brackets). That named parameter list gets converted
to a map when the method is called, but it doesn't start out as a map.
例13.7 マップリテラル、リストリテラル
build.gradle
// List literal test.includes = ['org/gradle/api/**', 'org/gradle/internal/**'] List<String> list = new ArrayList<String>() list.add('org/gradle/api/**') list.add('org/gradle/internal/**') test.includes = list // Map literal. Map<String, String> map = [key1:'value1', key2: 'value2'] // Groovy will coerce named arguments // into a single map argument apply plugin: 'java'
The Gradle DSL uses closures in many places. You can find out more about closures here. When the last parameter of a method is a closure, you can place the closure after the method call:
GradleのDSLでは、クロージャ(詳細はこちら)を多用します。Groovyでは、メソッドの最後の引数がクロージャになっている場合、そのメソッドをクロージャをつけて呼び出すことができます。
例13.8 メソッドのクロージャ引数
build.gradle
repositories {
println "in a closure"
}
repositories() { println "in a closure" }
repositories({ println "in a closure" })
Each closure has a delegate object, which Groovy uses to look up variable and method
references which are not local variables or parameters of the closure. Gradle uses this for
configuration closures, where the delegate object is set to
the object to be configured.
すべてのクロージャは、delegateオブジェクトを持っています。クロージャ内では、(クロージャ引数やローカル変数以外の)変数やメソッドはdelegateオブジェクトから検索されます。Gradleの設定用クロージャでは、delegateオブジェクトに設定対象のオブジェクトがセットされています。
例13.9 クロージャのdelegate
build.gradle
dependencies {
assert delegate == project.dependencies
testCompile('junit:junit:4.11')
delegate.testCompile('junit:junit:4.11')
}There is a common situation where multiple tasks depend on the existence of a directory. Of course you can
deal with this by adding a
mkdir
to the beginning of those tasks, but it's almost always a bad idea to repeat a sequence of code
that you only need once (Look up the DRY principle). A better solution would use the
dependsOn relationship between tasks to reuse the task to create the directory:
複数のタスクが、ある一つのディレクトリが存在していることを前提としている、ということがよくあります。
それらのタスク全てでmkdirを呼ぶことももちろんできますが、それではやはり冗長です。
この場合、次のように、ディレクトリを必要とするタスクにdependsOn関係を追加するのが良い方法です。
例14.1 mkdirでディレクトリを作成する
build.gradle
def classesDir = new File('build/classes') task resources << { classesDir.mkdirs() // do something } task compile(dependsOn: 'resources') << { if (classesDir.isDirectory()) { println 'The class directory exists. I can operate' } // do something }
gradle -q compile の出力
> gradle -q compile The class directory exists. I can operate
Gradle offers a variety of ways to add properties to your build. With the -D command line
option you can pass a system property to the JVM which runs Gradle. The -D option of the
gradle command has the same effect as the -D option of the
java command.
Gradleでは、さまざまな方法でビルドにプロパティ値を渡すことができます。
-Dオプションを使えばGradleを実行しているJVMにシステムプロパティを渡すことができます。
gradleコマンドは-Dオプションをjavaコマンドへの-Dオプションと同じように処理します。
You can also directly add properties to your project objects using properties files. You can place a
gradle.properties file in the Gradle user home directory (defined by the
“GRADLE_USER_HOME” environment variable, which if not set defaults to
USER_HOME/.gradlegradle.properties files in any subproject directory.
The properties set in a gradle.properties file can be accessed via the project object. The
properties file in the user's home directory has precedence over property files in the project directories.
propertiesファイルを記述することで、projectオブジェクトに直接プロパティを追加することもできます。
このプロパティファイルgradle.propertiesはGradleのホームディレクトリ
(デフォルトではUSER_HOME/.gradlegradle.propertiesに記述されたプロパティはprojectオブジェクトからアクセスすることができます。
なお、ホームディレクトリのgradle.propertiesは、プロジェクトディレクトリのgradle.propertiesの定義を上書きし、優先的に使用されます。
You can also add properties directly to your project object via the -P command line option.
projectオブジェクトに追加するプロパティは、コマンドラインオプションの-Pオプションで直接設定することもできます。
Gradle can also set project properties when it sees specially-named system properties or
environment variables. This feature is very useful when you don't have admin rights to a continuous integration
server and you need to set property values that should not be easily visible, typically for security reasons.
In that situation, you can't use the -P option, and you can't change the system-level
configuration files. The correct strategy is to change the configuration of your continuous integration
build job, adding an environment variable setting that matches an expected pattern. This won't be visible
to normal users on the system.
[10]
projectオブジェクトに追加するプロパティは、コマンドラインオプションの-Pオプションで設定することもできます。また、さらにエキゾチックな使い方に備えて、環境変数やシステムプロパティからプロパティを直接取り込む機能もあります。たとえば、管理権限のないマシン上のCIサーバーで継続的なビルドを行う場合について考えてみましょう。自分のビルドスクリプトに、他人から見られたくない値をプロパティとして設定する必要がある場合、-Pオプションは使えません。このときは、プロジェクトの管理者のみアクセスできるようなCIサーバー上のページで環境変数を設定することで、ビルドスクリプトにプロパティを渡すことができます。
[11]
ここで設定する環境変数名にはあるパターンがあり、ORG_GRADLE_PROJECT_という環境変数を設定した場合propertyName=somevaluepropertyNameというプロパティがプロジェクトに設定されます。また、システムプロパティでも同様のメカニズムを実装しています。パターンがorg.gradle.project.となっていること以外は環境変数の場合と同じです。propertyName
If the environment variable name looks like
ORG_GRADLE_PROJECT_,
then Gradle will set a prop=somevalueprop property on your project object, with the value
of somevalue. Gradle also supports this for
system properties, but with a different naming pattern, which looks like
org.gradle.project..
prop
You can also set system properties in the gradle.properties file. If a property
name in such a file has the prefix “systemProp.”, like “systemProp.propName”,
then the property and its value will be set as a system property, without the prefix. In a multi project
build, “systemProp.” properties set in any project except the root will be ignored.
That is, only the root project's gradle.properties file will be checked for
properties that begin with the “systemProp.” prefix.
gradle.propertiesファイルでもシステムプロパティを設定することができます。
ファイル内でプレフィックスにsystemPropをつけてプロパティを設定することで、プレフィックス部分をのぞいたプロパティ名でシステムプロパティに追加されます。
例14.2 gradle.propertiesでプロパティを設定する
gradle.properties
gradlePropertiesProp=gradlePropertiesValue sysProp=shouldBeOverWrittenBySysProp envProjectProp=shouldBeOverWrittenByEnvProp systemProp.system=systemValue
build.gradle
task printProps << {
println commandLineProjectProp
println gradlePropertiesProp
println systemProjectProp
println envProjectProp
println System.properties['system']
}gradle -q -PcommandLineProjectProp=commandLineProjectPropValue -Dorg.gradle.project.systemProjectProp=systemPropertyValue printProps の出力
> gradle -q -PcommandLineProjectProp=commandLineProjectPropValue -Dorg.gradle.project.systemProjectProp=systemPropertyValue printProps commandLineProjectPropValue gradlePropertiesValue systemPropertyValue envPropertyValue systemValue
You can access a project property in your build script simply by using its name as you would use a
variable. If this property does not exist, an exception will be thrown and the build will fail. If your
build script relies on optional properties the user might set, perhaps in a gradle.properties file,
you need to check for existence before you access them. You can do this by using the method
hasProperty('propertyName')
which returns
true
or false.
プロジェクトに設定されたプロパティは、ビルドスクリプト内では単にプロパティ名でアクセスできます。この場合、アクセスしたプロパティがプロジェクトに設定されてなければ、例外が発生してビルドは失敗します。プロパティをオプションにして、必要なときのみgradle.propertiesなどでユーザーにプロパティをセットさせたい場合などは、アクセスする前にプロパティがセットされているかどうか確認しなければなりません。hasProperty('propertyName')がtrueやfalseを返すので、それでプロパティの存在を確認できます。
You can configure the current project using an external build script. All of the Gradle build language is available in the external script. You can even apply other scripts from the external script.
外部のビルドスクリプトを取り込んでプロジェクトを設定することができます。取り込む外部スクリプト内では、Gradleの文法がすべて使用できます。その外部スクリプトから、さらに別の外部スクリプトを取り込むことさえ可能です。
例14.3 外部のビルドスクリプトファイルでプロジェクトの設定を行う
build.gradle
apply from: 'other.gradle'other.gradle
println "configuring $project" task hello << { println 'hello from other script' }
gradle -q hello の出力
> gradle -q hello configuring root project 'configureProjectUsingScript' hello from other script
You can configure arbitrary objects in the following very readable way.
次のような非常に読みやすい方法で、あらゆるオブジェクトを設定することができます。
例14.4 任意のオブジェクトを組み立てる
build.gradle
task configure << {
def pos = configure(new java.text.FieldPosition(10)) {
beginIndex = 1
endIndex = 5
}
println pos.beginIndex
println pos.endIndex
}gradle -q configure の出力
> gradle -q configure 1 5
You can also configure arbitrary objects using an external script.
外部スクリプトを使って、任意のオブジェクトを組み立てることもできます。
例14.5 外部スクリプトで任意のオブジェクトを組み立てる
build.gradle
task configure << {
def pos = new java.text.FieldPosition(10)
// Apply the script
apply from: 'other.gradle', to: pos
println pos.beginIndex
println pos.endIndex
}other.gradle
gradle -q configure の出力
> gradle -q configure 1 5
To improve responsiveness Gradle caches all compiled scripts by default. This includes all build scripts,
initialization scripts, and other scripts. The first time you run a build for a project, Gradle creates a
.gradle directory in which it puts the compiled script. The next time you run this
build, Gradle uses the compiled script, if the script has not changed since it was compiled. Otherwise the
script gets compiled and the new version is stored in the cache. If you run Gradle with the
--recompile-scripts option, the cached script is discarded and the script is compiled and stored
in the cache. This way you can force Gradle to rebuild the cache.
応答速度を上げるため、Gradleはコンパイル済みのスクリプトをデフォルトですべてキャッシュします。キャッシュ対象には、すべてのビルドスクリプトや初期化スクリプトなどが含まれます。最初にプロジェクトをビルドしたとき、Gradleは.gradleディレクトリをプロジェクトディレクトリに作成します。そこにコンパイル済みのスクリプトが保存され、次回のビルドからは、そのコンパイル済みのスクリプトが使用されるのです。もし前回コンパイルしたときからスクリプトが変更されていれば、キャッシュは再度コンパイルされます。--recompile-scriptsオプションをつけてGradleを実行すれば、キャッシュはすべて破棄され、再度コンパイル、保存されます。これにより、Gradleにキャッシュを再構築させることができます。
In the introductory tutorial (6章ビルドスクリプトの基本Build Script Basics) you learned how to create simple tasks. You also learned how to add additional behavior to these tasks later on, and you learned how to create dependencies between tasks. This was all about simple tasks, but Gradle takes the concept of tasks further. Gradle supports enhanced tasks, which are tasks that have their own properties and methods. This is really different from what you are used to with Ant targets. Such enhanced tasks are either provided by you or built into Gradle.
「6章ビルドスクリプトの基本Build Script Basics」の入門的なチュートリアルでは、簡単なタスクの作り方や、後からタスクにアクションを追加する方法について学びました。 さらに、タスク間の依存関係を定義する方法についても学びました。 単純なタスクについてはこんなところですが、Gradleはタスクという概念をもっと進化させています。 拡張タスク、つまり自身のプロパティやメソッドを持ったタスクを使うことができるのです。 これは、今まで使われてきたAntのターゲットとは全く異なる概念です。 拡張タスクは、Gradleがデフォルトで用意しているものもありますし、自分自身で新たに作成することもできます。
We have already seen how to define tasks using a keyword style in 6章ビルドスクリプトの基本Build Script Basics. There are a few variations on this style, which you may need to use in certain situations. For example, the keyword style does not work in expressions.
「6章ビルドスクリプトの基本Build Script Basics」で、キーワードを使ったタスク定義を紹介しましたが、タスクの定義方法は他にも少しあります。ときには、それらの方法が必要になることもあるでしょう。たとえば、式の中ではキーワード形式の定義方法を使うことができません。
例15.1 タスクを定義する
build.gradle
task(hello) << {
println "hello"
}
task(copy, type: Copy) {
from(file('srcDir'))
into(buildDir)
}You can also use strings for the task names:
タスク名に文字列を使うこともできます。
例15.2 タスクを定義する - タスク名に文字列を使用
build.gradle
task('hello') << { println "hello" } task('copy', type: Copy) { from(file('srcDir')) into(buildDir) }
There is an alternative syntax for defining tasks, which you may prefer to use:
他にもいくつかシンタックスが用意されています。もしかすると、これらのシンタックスの方が好みに合うという人もいるかもしれません。
例15.3 その他のタスク定義方法
build.gradle
tasks.create(name: 'hello') << { println "hello" } tasks.create(name: 'copy', type: Copy) { from(file('srcDir')) into(buildDir) }
Here we add tasks to the tasks collection. Have a look at
TaskContainer for more variations of the create()
method.
この例では、tasksコレクションにタスクを追加しています。create()メソッドのバリエーションについてはTaskContainerをご参照ください。
You often need to locate the tasks that you have defined in the build file, for example, to configure them or use them for dependencies. There are a number of ways of doing this. Firstly, each task is available as a property of the project, using the task name as the property name:
ビルドファイルから、定義済みのタスクを探して取得したい、というケースがよくあります。例えば、既存のタスクの設定を変更したり、依存関係を定義するために参照したいといった場面です。タスクを取得する方法はたくさんありますが、まずはプロジェクトのプロパティとしてアクセスする方法を見てみましょう。タスク名がプロパティ名として使用できます。
Tasks are also available through the tasks collection.
tasksコレクションからタスクを持ってくることもできます。
例15.5 tasksコレクションからタスクにアクセスする
build.gradle
task hello
println tasks.hello.name
println tasks['hello'].nameYou can access tasks from any project using the task's path using the tasks.getByPath()
method. You can call the getByPath() method with a task name, or a relative path, or an
absolute path.
tasks.getByPath()を使えば、あらゆるプロジェクトのタスクにアクセスできます。getByPath()にはタスク名のほか、タスクの相対パスや絶対パスを渡すことが可能です。
例15.6 パスを使ってタスクにアクセスする
build.gradle
project(':projectA') { task hello } task hello println tasks.getByPath('hello').path println tasks.getByPath(':hello').path println tasks.getByPath('projectA:hello').path println tasks.getByPath(':projectA:hello').path
gradle -q hello の出力
> gradle -q hello :hello :hello :projectA:hello :projectA:hello
Have a look at TaskContainer for more options for locating tasks.
そのほかの方法については、TaskContainerをご参照ください。
As an example, let's look at the Copy task provided by Gradle. To create a
Copy task for your build, you can declare in your build script:
例として、Gradleに用意されているCopyタスクを見てみましょう。Copyタスクを自分のビルドで作成するには、ビルドスクリプトで次のように宣言します。
This creates a copy task with no default behavior.
The task can be configured using its API (see Copy).
The following examples show several different ways to achieve the same configuration.
作成されたコピータスクには、デフォルトでは何の動作も設定されていません。
タスクは、タスクのAPI(Copy参照)を使って設定することができます。
次のいくつかの例は、どれも同じ設定を行うものです。
Just to be clear, realize that the name of this task is “myCopy”, but it is of
type “Copy”. You can have multiple tasks of the same
type, but with different names. You'll find this gives you a lot of power to implement
cross-cutting concerns across all tasks of a particular type.
例15.8 タスクの設定 - 様々な方法
build.gradle
Copy myCopy = task(myCopy, type: Copy) myCopy.from 'resources' myCopy.into 'target' myCopy.include('**/*.txt', '**/*.xml', '**/*.properties')
This is similar to the way we would configure objects in Java. You have to repeat the context
(myCopy) in the configuration statement every time. This is a redundancy and not very
nice to read.
これは、普段私たちがJavaオブジェクトを設定するのと同じ方法で設定する方法です。この方法では、設定処理を呼び出すたびに同じコンテキスト(myCopy)を何度も書く必要があります。これは冗長だし、あまり可読性もよくありません。
There is another way of configuring a task. It also preserves the context and it is arguably the most readable. It is usually our favorite.
タスクの設定には別の方法があります。この方法でも同様にコンテキストは保持されますし、おそらく最も可読性の高い方法です。私たちは、普段この方法を好んで使っています。
例15.9 タスクの設定 - クロージャの使用
build.gradle
task myCopy(type: Copy)
myCopy {
from 'resources'
into 'target'
include('**/*.txt', '**/*.xml', '**/*.properties')
}This works for any task. Line 3 of the example is just a shortcut for the
tasks.getByName() method. It is important to note that if you pass a closure to the
getByName() method, this closure is applied to configure the task, not when
the task executes.
この方法は、あらゆるタスクで使用できます。3行目のコードは、tasks.getByName()の単なるショートカットです。大事なことは、getByName()メソッドにクロージャを渡すと、そのクロージャがタスクが実行されるときではなく、設定されるときに適用されるという点です。
You can also use a configuration closure when you define a task.
また、タスクを定義するときに、同時に設定クロージャを使うこともできます。
例15.10 クロージャを伴うタスク定義
build.gradle
task copy(type: Copy) {
from 'resources'
into 'target'
include('**/*.txt', '**/*.xml', '**/*.properties')
}Don't forget about the build phases
A task has both configuration and actions.
When using the <<, you are simply using a shortcut to define an action.
Code defined in the configuration section of your task will get executed during the configuration phase of the build regardless of what task was targeted.
See 56章ビルドのライフサイクルThe Build Lifecycle for more details about the build lifecycle.
There are several ways you can define the dependencies of a task. In
「タスクの依存関係Task dependencies」
you were introduced to defining dependencies using task names. Task names can refer to tasks in the same
project as the task, or to tasks in other projects. To refer to a task in another project, you prefix the
name of the task with the path of the project it belongs to. The following is an example which adds a dependency
from
projectA:taskX
to
projectB:taskY:
タスクの依存関係を定義する方法はいくつかあります。「タスクの依存関係Task dependencies」では、タスク名を使って依存関係を定義する方法を紹介しました。タスク名を使うと、同じプロジェクトのタスク、または別のプロジェクトのタスクも参照できます。別のプロジェクトのタスクを参照するには、タスク名に、そのタスクが属しているプロジェクトのパスをプレフィックスとして付けてください。次の例では、projectA:taskXからprojectB:taskYへの依存関係を定義しています。
例15.11 別プロジェクトのタスクとの依存関係を定義する
build.gradle
project('projectA') { task taskX(dependsOn: ':projectB:taskY') << { println 'taskX' } } project('projectB') { task taskY << { println 'taskY' } }
gradle -q taskX の出力
> gradle -q taskX
taskY
taskX
Instead of using a task name, you can define a dependency using a
Task object, as shown in this example:
タスク名を使う代わりに、次の例のように、Taskオブジェクトを使って依存関係を定義することも出来ます。
例15.12 taskオブジェクトを使った依存関係定義
build.gradle
task taskX << {
println 'taskX'
}
task taskY << {
println 'taskY'
}
taskX.dependsOn taskYgradle -q taskX の出力
> gradle -q taskX taskY taskX
For more advanced uses, you can define a task dependency using a closure. When evaluated, the closure is
passed the task whose dependencies are being calculated. The closure should return a single
Task or collection of Task objects, which are then treated
as dependencies of the task. The following example adds a dependency from taskX
to all the tasks in the project whose name starts with lib:
より上級ユーザー向けの方法として、クロージャを使って依存関係を定義することが出来ます。評価フェーズ時に、そのクロージャは、依存関係を算出中のタスクに渡されます。そのクロージャは、一つのTaskオブジェクトかTaskオブジェクトのコレクションを返さなければなりません。返されたタスクが依存タスクとして設定されます。次の例では、taskXから、名前がlibで始まる全てのタスクへの依存関係を設定しています。
例15.13 クロージャを使った依存関係定義
build.gradle
task taskX << {
println 'taskX'
}
taskX.dependsOn {
tasks.findAll { task -> task.name.startsWith('lib') }
}
task lib1 << {
println 'lib1'
}
task lib2 << {
println 'lib2'
}
task notALib << {
println 'notALib'
}gradle -q taskX の出力
> gradle -q taskX lib1 lib2 taskX
For more information about task dependencies, see the Task API.
さらにタスクの依存関係に関する情報を得るには、Task APIを参照してください。
Task ordering is an incubating feature. Please be aware that this feature may change in later Gradle versions.
In some cases it is useful to control the order in which 2 tasks will execute, without introducing an explicit dependency between those tasks. The primary difference between a task ordering and a task dependency is that an ordering rule does not influence which tasks will be executed, only the order in which they will be executed.
Task ordering can be useful in a number of scenarios:
- Enforce sequential ordering of tasks: eg. 'build' never runs before 'clean'.
- Run build validations early in the build: eg. validate I have the correct credentials before starting the work for a release build.
- Get feedback faster by running quick verification tasks before long verification tasks: eg. unit tests should run before integration tests.
- A task that aggregates the results of all tasks of a particular type: eg. test report task combines the outputs of all executed test tasks.
There are two ordering rules available: “must run after” and “should run after”.
When you use the “must run after” ordering rule you specify that taskB must always
run after taskA, whenever both taskA and taskB will
be run. This is expressed as taskB.mustRunAfter(taskA). The “should run
after” ordering rule is similar but less strict as it will be ignored in two situations. Firstly if using
that rule introduces an ordering cycle. Secondly when using parallel execution and all dependencies of a
task have been satisfied apart from the “should run after” task, then this task will be run regardless of
whether its “should run after” dependencies have been run or not. You should use “should run after”
where the ordering is helpful but not strictly required.
With these rules present it is still possible to execute taskA without taskB and vice-versa.
例15.14 Adding a 'must run after' task ordering
build.gradle
task taskX << {
println 'taskX'
}
task taskY << {
println 'taskY'
}
taskY.mustRunAfter taskXgradle -q taskY taskX の出力
> gradle -q taskY taskX taskX taskY
例15.15 Adding a 'should run after' task ordering
build.gradle
task taskX << {
println 'taskX'
}
task taskY << {
println 'taskY'
}
taskY.shouldRunAfter taskXgradle -q taskY taskX の出力
> gradle -q taskY taskX taskX taskY
In the examples above, it is still possible to execute taskY without causing taskX to run:
To specify a “must run after” or “should run after” ordering between 2 tasks, you use the Task.mustRunAfter() and Task.shouldRunAfter() methods.
These methods accept a task instance, a task name or any other input accepted by Task.dependsOn().
Note that “B.mustRunAfter(A)” or “B.shouldRunAfter(A)” does not imply any execution dependency between the tasks:
- It is possible to execute tasks
AandBindependently. The ordering rule only has an effect when both tasks are scheduled for execution. - When run with
--continue, it is possible forBto execute in the event thatAfails.
As mentioned before, the “should run after” ordering rule will be ignored if it introduces an ordering cycle:
例15.17 A 'should run after' task ordering is ignored if it introduces an ordering cycle
build.gradle
task taskX << {
println 'taskX'
}
task taskY << {
println 'taskY'
}
task taskZ << {
println 'taskZ'
}
taskX.dependsOn taskY
taskY.dependsOn taskZ
taskZ.shouldRunAfter taskXgradle -q taskX の出力
> gradle -q taskX taskZ taskY taskX
You can add a description to your task. This description is displayed when executing
gradle tasks.
定義したタスクに、説明書きを追加できます。追加した説明は、たとえばgradle tasksを実行したときなどに表示されます。
例15.18 タスクに説明書きを追加する
build.gradle
task copy(type: Copy) {
description 'Copies the resource directory to the target directory.'
from 'resources'
into 'target'
include('**/*.txt', '**/*.xml', '**/*.properties')
}Sometimes you want to replace a task. For example, if you want to exchange a task added by the Java plugin with a custom task of a different type. You can achieve this with:
ときには、タスクを置き換えたくなることがあります。例えば、Javaプラグインによって追加されたタスクを、別のタイプのカスタムタスクに入れ替えたいといった場合です。これは、次のようにして実現できます。
例15.19 タスクの上書き
build.gradle
task copy(type: Copy)
task copy(overwrite: true) << {
println('I am the new one.')
}gradle -q copy の出力
> gradle -q copy I am the new one.
This will replace a task of type Copy with the task you've defined, because it
uses the same name. When you define the new task, you have to set the overwrite property
to true. Otherwise Gradle throws an exception, saying that a task with that name already exists.
ここでは、Copyタイプのタスクを、シンプルな別のタスクに置き換えています。タスクを作成するときに、overwriteプロパティをtrueにセットしなければなりません。そうしないと、Gradleは例外を投げ、すでに同名のタスクが定義済みだと警告してきます。
Gradle offers multiple ways to skip the execution of a task.
Gradleは、タスクの実行をスキップする方法を複数用意しています。
You can use the onlyIf() method to attach a predicate to a task. The task's
actions are only executed if the predicate evaluates to true. You implement the predicate as a closure.
The closure is passed the task as a parameter, and should return true if the task should execute
and false if the task should be skipped. The predicate is evaluated just before the task is due
to be executed.
onlyIf()メソッドを使って、タスクに述語を付けることができます。タスクは、付加された述語がtrueと評価されたときのみ実行されます。述語は、一つのクロージャとして実装します。そのクロージャには、対象のタスクが引数に渡されます。タスクが実行されるべきならこのクロージャはtrueを返し、スキップされるべきならfalseを返さなければなりません。述語は、タスクが実行される直前に評価されます。
例15.20 述語でタスクをスキップ
build.gradle
task hello << {
println 'hello world'
}
hello.onlyIf { !project.hasProperty('skipHello') }gradle hello -PskipHello の出力
> gradle hello -PskipHello :hello SKIPPED BUILD SUCCESSFUL Total time: 1 secs
If the logic for skipping a task can't be expressed with predicate, you can use the
StopExecutionException. If this exception is thrown by an action,
the further execution of this action as well as the execution of
any following action of this task is skipped. The build continues with executing the next task.
タスクスキップのルールが述語で表現できない場合、StopExecutionExceptionを使うことができます。この例外がタスクのアクションから投げられたら、実行中のアクション、およびそのタスクの残りのアクションはすべてスキップされます。ビルド自体は継続されるので、次のタスクが実行されることになります。
例15.21 StopExecutionExceptionでタスクをスキップ
build.gradle
task compile << {
println 'We are doing the compile.'
}
compile.doFirst {
// Here you would put arbitrary conditions in real life.
// But this is used in an integration test so we want defined behavior.
if (true) { throw new StopExecutionException() }
}
task myTask(dependsOn: 'compile') << {
println 'I am not affected'
}gradle -q myTask の出力
> gradle -q myTask I am not affected
This feature is helpful if you work with tasks provided by Gradle. It allows you to add conditional execution of the built-in actions of such a task. [12]
この機能は、Gradleが標準提供しているタスクが絡んでいるときに役に立ちます。このようなビルドインのタスクを、条件付きで実行させることができるのです。 [13]
Every task has an enabled
flag which defaults to true. Setting it to false prevents the
execution of any of the task's actions.
すべてのタスクは、enabledフラグを持っており、デフォルトではtrueに設定されています。このフラグをfalseにすると、そのタスクのすべてのアクションが実行されなくなります。
例15.22 タスクの有効化と無効化
build.gradle
task disableMe << {
println 'This should not be printed if the task is disabled.'
}
disableMe.enabled = falsegradle disableMe の出力
> gradle disableMe :disableMe SKIPPED BUILD SUCCESSFUL Total time: 1 secs
If you are using one of the tasks that come with Gradle, such as a task added by the Java plugin, you might have noticed that Gradle will skip tasks that are up-to-date. This behaviour is also available for your tasks, not just for built-in tasks.
JavaプラグインのようなGradleが提供しているタスクを使ったとき、Gradleが未更新(UP-TO-DATE)のタスクをスキップすることに気づかれたかもしれません。この動作は、ビルドインのタスクだけでなく、任意のタスクに組み込むことができます。
Let's have a look at an example. Here our task generates several output files from a source XML file. Let's run it a couple of times.
一つ例を見てみましょう。ここでは、定義したタスクが、XMLのソースファイルを元にいくつかのファイルを出力しています。このタスクを、何度か実行してみます。
例15.23 生成タスク
build.gradle
task transform {
ext.srcFile = file('mountains.xml')
ext.destDir = new File(buildDir, 'generated')
doLast {
println "Transforming source file."
destDir.mkdirs()
def mountains = new XmlParser().parse(srcFile)
mountains.mountain.each { mountain ->
def name = mountain.name[0].text()
def height = mountain.height[0].text()
def destFile = new File(destDir, "${name}.txt")
destFile.text = "$name -> ${height}\n"
}
}
}gradle transform の出力
> gradle transform :transform Transforming source file.
gradle transform の出力
> gradle transform :transform Transforming source file.
Notice that Gradle executes this task a second time, and does not skip the task even though nothing has changed. Our example task was defined using an action closure. Gradle has no idea what the closure does and cannot automatically figure out whether the task is up-to-date or not. To use Gradle's up-to-date checking, you need to declare the inputs and outputs of the task.
タスクを2回目に実行したとき、なにも変更されていないにもかかわらず、タスクの実行がスキップされなかったことに注目してください。この例にあるタスクでは、ひとつのクロージャを使ってアクションを定義していますが、Gradleにはこのクロージャが何をしているか知る手段がなく、タスクがUP-TO-DATEなのかどうかを自動的に決定することができないのです。GradleのUP-TO-DATEチェックを使うには、タスクの入力と出力を宣言する必要があります。
Each task has an inputs and outputs property, which you use to
declare the inputs and outputs of the task. Below, we have changed our example to declare that it takes
the source XML file as an input and produces output to a destination directory. Let's run it a couple
of times.
すべてのタスクにはinputsプロパティとoutputsプロパティがあります。これが入力と出力を宣言するために使うプロパティです。次の例では、先ほどの例を修正し、このタスクがXMLのソースファイルを入力とし、あるディレクトリに出力ファイルを生成することを宣言しています。
例15.24 タスクの入力と出力を宣言
build.gradle
task transform {
ext.srcFile = file('mountains.xml')
ext.destDir = new File(buildDir, 'generated')
inputs.file srcFile
outputs.dir destDir
doLast {
println "Transforming source file."
destDir.mkdirs()
def mountains = new XmlParser().parse(srcFile)
mountains.mountain.each { mountain ->
def name = mountain.name[0].text()
def height = mountain.height[0].text()
def destFile = new File(destDir, "${name}.txt")
destFile.text = "$name -> ${height}\n"
}
}
}gradle transform の出力
> gradle transform :transform Transforming source file.
gradle transform の出力
> gradle transform :transform UP-TO-DATE
Now, Gradle knows which files to check to determine whether the task is up-to-date or not.
これで、GradleはタスクがUP-TO-DATEなのかどうかを決定するため、どのファイルをチェックするべきか知ることができます。
The task's inputs property is of type TaskInputs.
The task's outputs property is of type TaskOutputs.
タスクのinputsプロパティはTaskInputs型、outputsプロパティはTaskOutputs型です。
A task with no defined outputs will never be considered up-to-date.
For scenarios where the outputs of a task are not files, or for more complex scenarios, the
TaskOutputs.upToDateWhen() method allows you to calculate programmatically if
the tasks outputs should be considered up to date.
A task with only outputs defined will be considered up-to-date if those outputs are unchanged since the previous build.
Before a task is executed for the first time, Gradle takes a snapshot of the inputs. This snapshot contains the set of input files and a hash of the contents of each file. Gradle then executes the task. If the task completes successfully, Gradle takes a snapshot of the outputs. This snapshot contains the set of output files and a hash of the contents of each file. Gradle persists both snapshots for the next time the task is executed.
タスクが初回に実行されるとき、実行前にGradleは入力物のスナップショットをとります。このスナップショットには、入力ファイルのセットと、それぞれのファイル内容のハッシュが含まれています。Gradleは、その後、タスクを実行します。もしタスクが正常に終了すれば、Gradleは出力物のスナップショットを保存します。このスナップショットには、やはり出力ファイルのセットと、それぞれのファイル内容のハッシュが含まれていて、Gradleが、出力ディレクトリ内でファイルが作成または変更、削除されたことを検知するために使用されます。Gradleは、次回そのタスクが実行されたときのために、双方のスナップショットを保管します。
Each time after that, before the task is executed, Gradle takes a new snapshot of the inputs and outputs. If the new snapshots are the same as the previous snapshots, Gradle assumes that the outputs are up to date and skips the task. If they are not the same, Gradle executes the task. Gradle persists both snapshots for the next time the task is executed.
この後は、タスクが実行される前に毎回、入力物と出力物のスナップショットを新しく作成します。 もし、新しいスナップショットが、前回のスナップショットと同じなら、Gradleは出力がUP-TO-DATEだと見なし、タスクをスキップします。 スナップショットが異なっていれば、Gradleはタスクを実行し、次回実行されるときのためにスナップショットを保存しなおします。
Note that if a task has an output directory specified, any files added to that directory since the last time it was executed
are ignored and will NOT cause the task to be out of date. This is so unrelated tasks may share an output directory without interfering with each other.
If this is not the behaviour you want for some reason, consider using TaskOutputs.upToDateWhen()
Sometimes you want to have a task whose behavior depends on a large or infinite number value range of parameters. A very nice and expressive way to provide such tasks are task rules:
ときには、広範囲、または無限大な範囲のパラメータに応じた動作を行うタスクを定義したくなることがあります。このようなタスクを定義するための、表現力のあるよい方法がタスクルールです。
例15.25 タスクルール
build.gradle
tasks.addRule("Pattern: ping<ID>") { String taskName -> if (taskName.startsWith("ping")) { task(taskName) << { println "Pinging: " + (taskName - 'ping') } } }
gradle -q pingServer1 の出力
> gradle -q pingServer1 Pinging: Server1
The String parameter is used as a description for the rule, which is shown with gradle tasks.
文字列が引数に渡されていますが、これはルールの説明として使用されます。例えば、gradle tasksを実行したときなどに表示されます。
Rules not only used when calling tasks from the command line. You can also create dependsOn relations on rule based tasks:
ルールは、ただコマンドラインからのタスク呼び出しにのみ使えるものではありません。dependsOnによる依存関係定義のときも、ルールベースのタスクを使うことができます。
例15.26 ルールベース・タスクの依存関係
build.gradle
tasks.addRule("Pattern: ping<ID>") { String taskName -> if (taskName.startsWith("ping")) { task(taskName) << { println "Pinging: " + (taskName - 'ping') } } } task groupPing { dependsOn pingServer1, pingServer2 }
gradle -q groupPing の出力
> gradle -q groupPing Pinging: Server1 Pinging: Server2
If you run “gradle -q tasks” you won't find a task named
“pingServer1” or “pingServer2”, but this script is executing logic
based on the request to run those tasks.
Finalizers tasks are an incubating feature (see 「試験的 Incubating」).
Finalizer tasks are automatically added to the task graph when the finalized task is scheduled to run.
例15.27 Adding a task finalizer
build.gradle
task taskX << {
println 'taskX'
}
task taskY << {
println 'taskY'
}
taskX.finalizedBy taskYgradle -q taskX の出力
> gradle -q taskX taskX taskY
Finalizer tasks will be executed even if the finalized task fails.
例15.28 Task finalizer for a failing task
build.gradle
task taskX << {
println 'taskX'
throw new RuntimeException()
}
task taskY << {
println 'taskY'
}
taskX.finalizedBy taskYgradle -q taskX の出力
> gradle -q taskX taskX taskY
On the other hand, finalizer tasks are not executed if the finalized task didn't do any work, for example if it is considered up to date or if a dependent task fails.
Finalizer tasks are useful in situations where the build creates a resource that has to be cleaned up regardless of the build failing or succeeding. An example of such a resource is a web container that is started before an integration test task and which should be always shut down, even if some of the tests fail.
To specify a finalizer task you use the Task.finalizedBy() method.
This method accepts a task instance, a task name, or any other input accepted by Task.dependsOn().
If you are coming from Ant, an enhanced Gradle task like Copy seems like a cross between an Ant target and an Ant task. Although Ant's tasks and targets are really different entities, Gradle combines these notions into a single entity. Simple Gradle tasks are like Ant's targets, but enhanced Gradle tasks also include aspects of Ant tasks. All of Gradle's tasks share a common API and you can create dependencies between them. These tasks are much easier to configure than an Ant task. They make full use of the type system, and are more expressive and easier to maintain.
以前にAntを使ったことがあれば、Copyのような拡張タスクは、Antのターゲットとタスクの間をとったようなものに見えるでしょう。 Antのタスクとターゲットは実際には異なるエンティティですが、Gradleはこれらの記法を1つのエンティティにまとめています。 単純なGradleのタスクはAntのターゲットのようなものだし、拡張タスクはAntタスクの性質を含んでいます。 すべてのGradleタスクは、同じのAPIを共有していて、タスク間の依存関係を定義することができます。 このため、GradleのタスクはAntタスクに比べて、より設定しやすいものになっているでしょう。 Gradleのタスクは、型システムをフル活用しており、より表現力豊かで、メンテナンス性もよくなっています。
[12] You might be wondering why there is neither an import for the
StopExecutionException
nor do we access it via its fully qualified name. The reason is, that Gradle adds a set of default imports
to your script. These imports are customizable (see 付録E IDE対応の現状と、IDEによらない開発支援Existing IDE Support and how to cope without it).
[13] なぜimport文も完全修飾名も使用せずStopExecutionExceptionにアクセスできているのか不思議に思われたかもしれません。これは、Gradleがデフォルトでスクリプトにいくつかのimportを追加しているからです。このimportのセットはカスタマイズ可能です(付録E IDE対応の現状と、IDEによらない開発支援Existing IDE Support and how to cope without it参照)。
Most builds work with files. Gradle adds some concepts and APIs to help you achieve this.
ファイルの取り扱いは、ほとんどのビルドで発生する作業です。なので、それを補助するため、Gradleはいくつかの概念とAPIを導入しています。
You can locate a file relative to the project directory using the
Project.file() method.
Project.file() メソッドで、プロジェクトディレクトリからの相対参照でファイルを取得できます。
例16.1 ファイルを参照する
build.gradle
// Using a relative path File configFile = file('src/config.xml') // Using an absolute path configFile = file(configFile.absolutePath) // Using a File object with a relative path configFile = file(new File('src/config.xml'))
You can pass any object to the file() method, and it will attempt to convert the value
to an absolute File object. Usually, you would pass it a
String or File instance. If this path is an absolute path, it is used
to construct a File instance. Otherwise, a File instance is
constructed by prepending the project directory path to the supplied path. The file()
method also understands URLs, such as file:/some/path.xml.
file()メソッドには、あらゆるオブジェクトを渡すことができます。渡したオブジェクトは、絶対参照のFileに変換されます。大抵はStringかFileのインスタンスを渡すことになるでしょう。渡されたオブジェクトのtoString()が呼ばれ、その返値がファイルパスとして使われます。もしそのパスが絶対パスだった場合、そのパスでFileインスタンスが構築されます。そうでなければ、プロジェクトディレクリのパスを先頭に追加してからFileインスタンスが構築されます。また、file()メソッドはfile:/some/path.xmlのようなURLにも対応しています。
Using this method is a useful way to convert some user provided value into an absolute File.
It is preferable to using new File(somePath), as file() always evaluates
the supplied path relative to the project directory, which is fixed, rather than the current working
directory, which can change depending on how the user runs Gradle.
このメソッドを使って、ユーザーが指定した値を簡単に絶対参照のFileインスタンスに変換できます。
これは、new File(somePath)を使うよりもよい方法でしょう。file()メソッドは、常にプロジェクトディレクリからの相対参照で解決されるからです。ワーキングディレクトリはGradleをどう実行したかによって変化しうるわけですが、それに依存せずにファイルを参照できます。
A file collection is simply a set of files. It is represented by the
FileCollection interface. Many objects in the Gradle API implement
this interface. For example, dependency configurations implement
FileCollection.
ファイルコレクションは、単なるファイルの集合です。これは、FileCollectionインターフェースで表現されます。Gradle APIに含まれる多くのオブジェクトがこのインターフェースを実装しています。例えば、依存関係のコンフィグレーションもこのFileCollectionインターフェースを実装しています。
One way to obtain a FileCollection instance is to use the
Project.files() method. You can pass this method any number of
objects, which are then converted into a set of File objects. The
files() method accepts any type of object as its parameters. These are evaluated relative
to the project directory, as per the file() method, described in 「ファイルを参照する Locating files」.
You can also pass collections, iterables, maps and arrays to the files() method. These are flattened
and the contents converted to File instances.
FileCollectionを取得する方法の一つは、Project.files()メソッドを使うことです。このメソッドには任意の数のオブジェクトを渡すことができ、渡したオブジェクトはFileオブジェクトの集合に変換されます。これらのオブジェクトは、「ファイルを参照する Locating files」で述べたfile()メソッドと同じように、プロジェクトディレクトリからの相対参照で解決されます。
また、コレクション、イテレーブル、マップ、配列を渡すこともできます。これらは、フラット化されてから、各要素がFileインスタンスに変換されます。
例16.2 ファイルコレクションの作成
build.gradle
FileCollection collection = files('src/file1.txt', new File('src/file2.txt'), ['src/file3.txt', 'src/file4.txt'])
A file collection is iterable, and can be converted to a number of other types using the as
operator. You can also add 2 file collections together using the + operator, or subtract one
file collection from another using the - operator.
Here are some examples of what you can do with a file collection.
ファイルコレクションはイテレーブルです。さらに、as演算子で様々な型に変換することができます。
また、二つのファイルコレクションを+演算子で合成したり、-演算子でファイルコレクションから別のファイルコレクションの要素を取り除いたりすることができます。
次の例は、ファイルコレクションでどのようなことができるかを示すものです。
例16.3 ファイルコレクションを使う
build.gradle
// Iterate over the files in the collection collection.each {File file -> println file.name } // Convert the collection to various types Set set = collection.files Set set2 = collection as Set List list = collection as List String path = collection.asPath File file = collection.singleFile File file2 = collection as File // Add and subtract collections def union = collection + files('src/file3.txt') def different = collection - files('src/file3.txt')
You can also pass the files() method a closure or a Callable
instance. This is called when the contents of the collection are queried, and its return value is converted
to a set of File instances. The return value can be an object of any of the types
supported by the files() method. This is a simple way to 'implement' the
FileCollection interface.
files()メソッドには、クロージャやCallableのインスタンスを渡すこともできます。
これはそのファイルコレクションの内容が要求されたときに実行され、返値がFileインスタンスの集合に変換されます。返値はfiles()に渡すことができるオブジェクトならなんでも構いません。これは、FileCollectionインタフェースを簡単に「実装する」方法とも言えます。
例16.4 ファイルコレクションを実装する
build.gradle
task list << {
File srcDir
// Create a file collection using a closure
collection = files { srcDir.listFiles() }
srcDir = file('src')
println "Contents of $srcDir.name"
collection.collect { relativePath(it) }.sort().each { println it }
srcDir = file('src2')
println "Contents of $srcDir.name"
collection.collect { relativePath(it) }.sort().each { println it }
}gradle -q list の出力
> gradle -q list Contents of src src/dir1 src/file1.txt Contents of src2 src2/dir1 src2/dir2
Some other types of things you can pass to files():
他にもいくつかfiles()メソッドに渡せる型があります。
FileCollectionThese are flattened and the contents included in the file collection.
フラット化されてから、その内容がファイルコレクションに追加される。
TaskThe output files of the task are included in the file collection.
タスクの出力ファイルがファイルコレクションに追加される。
TaskOutputsThe output files of the TaskOutputs are included in the file collection.
TaskOutputsの出力ファイルがファイルコレクションに追加される。
It is important to note that the content of a file collection is evaluated lazily, when it is needed.
This means you can, for example, create a FileCollection that represents files which
will be created in the future by, say, some task.
留意すべき重要な点は、ファイルコレクションの内容は、必要になったときに遅延評価されるということです。
これはつまり、例えば未来にタスクなどによって作られるであろうファイル群を表すFileCollectionを作ることもできる、ということを意味します。
A file tree is a collection of files arranged in a hierarchy. For example, a file tree
might represent a directory tree or the contents of a ZIP file. It is represented
by the FileTree interface. The FileTree interface
extends FileCollection, so you can treat a file tree exactly the same way as you would a
file collection. Several objects in Gradle implement the FileTree interface, such as
source sets.
ファイルツリーは、階層構造を持つファイルの集合です。例えば、ディレクトリツリーやZIPの中身を表すことができます。ファイルツリーはFileTreeインターフェースによって表現されます。FileTreeインターフェースはFileCollectionインターフェースを継承しています。なので、FileTreeはFileCollectionと全く同じ方法で取り扱うことができます。
いくつかのGradleオブジェクトはFileTreeを実装しています。例えば、ソースセットなどです。
One way to obtain a FileTree instance is to use the
Project.fileTree() method.
This creates a FileTree defined with a base directory, and optionally some Ant-style
include and exclude patterns.
FileTreeインスタンスを取得する方法の一つは、Project.fileTree()メソッドを使用することです。
このメソッドは、ベースディレクトリとAntスタイルのinclude/excludeパターンを指定してFileTreeを構築します。
例16.5 ファイルツリーを作成する
build.gradle
// Create a file tree with a base directory FileTree tree = fileTree(dir: 'src/main') // Add include and exclude patterns to the tree tree.include '**/*.java' tree.exclude '**/Abstract*' // Create a tree using path tree = fileTree('src').include('**/*.java') // Create a tree using closure tree = fileTree('src') { include '**/*.java' } // Create a tree using a map tree = fileTree(dir: 'src', include: '**/*.java') tree = fileTree(dir: 'src', includes: ['**/*.java', '**/*.xml']) tree = fileTree(dir: 'src', include: '**/*.java', exclude: '**/*test*/**')
You use a file tree in the same way you use a file collection. You can also visit the contents of the tree, and select a sub-tree using Ant-style patterns:
ファイルツリーは、ファイルコレクションと同じ方法で使うことができます。さらに、ツリー構造を辿ったり、Antスタイルのパターンを指定してサブツリーを選択することも可能です。
例16.6 ファイルツリーを使う
build.gradle
// Iterate over the contents of a tree tree.each {File file -> println file } // Filter a tree FileTree filtered = tree.matching { include 'org/gradle/api/**' } // Add trees together FileTree sum = tree + fileTree(dir: 'src/test') // Visit the elements of the tree tree.visit {element -> println "$element.relativePath => $element.file" }
You can use the contents of an archive, such as a ZIP or TAR file, as a file tree. You do this using
the Project.zipTree() and
Project.tarTree() methods. These methods return a FileTree
instance which you can use like any other file tree or file collection. For example, you can use it to expand
the archive by copying the contents, or to merge some archives into another.
ZIPやTARファイルなどのアーカイブを、ファイルツリーとして使うことができます。そのためのメソッドが、Project.zipTree()やProject.tarTree()です。これらのメソッドは、FileTreeインスタンスを返すもので、返されたインスタンスは、他のファイルツリーやファイルコレクションと同様に扱うことができます。
例えば、内容をコピーすることでアーカイブを解凍したり、別のアーカイブとマージしたりできます。
例16.7 アーカイブをファイルツリーとして使う
build.gradle
// Create a ZIP file tree using path FileTree zip = zipTree('someFile.zip') // Create a TAR file tree using path FileTree tar = tarTree('someFile.tar') //tar tree attempts to guess the compression based on the file extension //however if you must specify the compression explicitly you can: FileTree someTar = tarTree(resources.gzip('someTar.ext'))
Many objects in Gradle have properties which accept a set of input files. For example, the
JavaCompile task has a source property,
which defines the source files to compile. You can set the value of this property using any of the types
supported by the files() method, which was shown above.
This means you can set the property using, for example, a File, String,
collection, FileCollection or even a closure.
Here are some examples:
多くのGradleオブジェクトが入力ファイルセットを格納できるプロパティを持っています。例えば、JavaCompileタスクにはsourceプロパティがあり、コンパイルするべきソースファイルの集合をそこに定義します。
このプロパティの値には、files()でサポートされている、上記の全ての型が使用可能です。
つまり、File、String、コレクション、FileCollection、クロージャでさえセット可能ということです。次の例を見てください。
例16.8 ファイルセットを指定する
build.gradle
// Use a File object to specify the source directory compile { source = file('src/main/java') } // Use a String path to specify the source directory compile { source = 'src/main/java' } // Use a collection to specify multiple source directories compile { source = ['src/main/java', '../shared/java'] } // Use a FileCollection (or FileTree in this case) to specify the source files compile { source = fileTree(dir: 'src/main/java').matching { include 'org/gradle/api/**' } } // Using a closure to specify the source files. compile { source = { // Use the contents of each zip file in the src dir file('src').listFiles().findAll {it.name.endsWith('.zip')}.collect { zipTree(it) } } }
Usually, there is a method with the same name as the property, which appends to the set of files. Again, this method accepts any of the types supported by the files() method.
大抵、そのプロパティと同名のメソッドも定義されていて、そのメソッドでファイルセットを追加できるようになっています。このメソッドにもfiles()でサポートされている全ての型を渡すことができます。
例16.9 ファイルセットを指定する
build.gradle
compile {
// Add some source directories use String paths
source 'src/main/java', 'src/main/groovy'
// Add a source directory using a File object
source file('../shared/java')
// Add some source directories using a closure
source { file('src/test/').listFiles() }
}You can use the Copy task to copy files. The copy task is very flexible, and allows
you to, for example, filter the contents of the files as they are copied, and map to the file names.
Copyタスクを使ってファイルをコピーできます。このタスクはとても柔軟で、コピーしたファイルの内容をフィルターにかけたり、ファイル名をマッピングで変換したりできます。
To use the Copy task, you must provide a set of source files to copy, and a destination directory to copy
the files to. You may also specify how to transform the files as they are copied. You do all this using a
copy spec. A copy spec is represented by the CopySpec interface. The
Copy task implements this interface.
You specify the source files using the CopySpec.from()
method. To specify the destination directory, use the CopySpec.into()
method.
Copyタスクを使うには、コピーすべきソースファイルと、コピー先のディレクトリを指定しなければなりません。また、コピー時にファイルを編集する場合は、それについても指定します。これらの指定は全て、Copy仕様を使って行います。Copy仕様は、CopySpecインターフェースで表現されており、Copyタスクはこのインターフェースを実装したものです。ソースファイルの指定には、CopySpec.from()メソッドを使います。コピー先ディレクトリの指定には、CopySpec.into()メソッドを使います。
例16.10 Copyタスクでファイルをコピーする
build.gradle
task copyTask(type: Copy) {
from 'src/main/webapp'
into 'build/explodedWar'
}The from() method accepts any of the arguments that the
files() method does. When an argument resolves to a directory,
everything under that directory (but not the directory itself) is recursively copied into the destination
directory. When an argument resolves to a file, that file is copied into the destination directory.
When an argument resolves to a non-existing file, that argument is ignored. If the argument is
a task, the output files (i.e. the files the task creates) of the task are copied and the task is automatically
added as a dependency of the Copy task.
The into() accepts
any of the arguments that the file() method does. Here is another
example:
from()メソッドが受け付ける型は、files()メソッドと同じです。ディレクトリパスに解決されるような引数を渡した場合、そのディレクトリ以下の全て(ただし、そのディレクトリ自身は除く)が再帰的にターゲットディレクトリにコピーされます。渡した引数がファイルパスに解決された場合は、そのファイルが目的のディレクトリにコピーされます。
もし、引数に渡したパスにファイルがない場合、その引数は無視されます。
引数にタスクを渡した場合、そのタスクの出力ファイル(タスクが作成するファイル)がコピーされ、そのタスクは自動的にCopyタスクが依存しているタスクとして設定されます。
into()メソッドは、file()と同じ型を引数に取ります。以下にもう一つ例を挙げます。
例16.11 Copyタスクのコピー元と宛先を指定する
build.gradle
task anotherCopyTask(type: Copy) {
// Copy everything under src/main/webapp
from 'src/main/webapp'
// Copy a single file
from 'src/staging/index.html'
// Copy the output of a task
from copyTask
// Copy the output of a task using Task outputs explicitly.
from copyTaskWithPatterns.outputs
// Copy the contents of a Zip file
from zipTree('src/main/assets.zip')
// Determine the destination directory later
into { getDestDir() }
}You can select the files to copy using Ant-style include or exclude patterns, or using a closure:
Antスタイルのinclude/excludeパターンかクロージャを用いて、コピーするファイルを選択することができます。
例16.12 コピーするファイルを選択する
build.gradle
task copyTaskWithPatterns(type: Copy) {
from 'src/main/webapp'
into 'build/explodedWar'
include '**/*.html'
include '**/*.jsp'
exclude { details -> details.file.name.endsWith('.html') &&
details.file.text.contains('staging') }
}You can also use the Project.copy() method to copy files. It works the
same way as the task with some major limitations though. First, the copy() is not incremental
(see 「更新されていないタスクをスキップするSkipping tasks that are up-to-date」).
また、Project.copy()メソッドでファイルをコピーすることもできます。これはタスクの場合と大体同じように動作しますが、いくつかの大きな制限もあります。まず、copy()メソッドはインクリメンタルには実施されません(「更新されていないタスクをスキップするSkipping tasks that are up-to-date」参照)。
例16.13 copy()メソッドで更新チェックせずにファイルをコピーする
build.gradle
task copyMethod << {
copy {
from 'src/main/webapp'
into 'build/explodedWar'
include '**/*.html'
include '**/*.jsp'
}
}Secondly, the copy() method can not honor task dependencies when a task is used as a copy source
(i.e. as an argument to from()) because it's a method and not a task.
As such, if you are using the copy() method as part of a task action, you must explicitly
declare all inputs and outputs in order to get the correct behavior.
次に、タスクがコピー元として使われる場合(from()メソッドの引数になる場合)でも、copy()メソッドはタスクの依存関係を考慮しません。copy()はあくまでメソッドであってタスクではないからです。
よって、copy()メソッドをタスクアクションの中で呼び出す場合は、正しく動作させるために明示的に全ての入力と出力を宣言する必要があります。
例16.14 copy()メソッドで更新チェックを実施してファイルをコピーする
build.gradle
task copyMethodWithExplicitDependencies{
// up-to-date check for inputs, plus add copyTask as dependency
inputs.file copyTask
outputs.dir 'some-dir' // up-to-date check for outputs
doLast{
copy {
// Copy the output of copyTask
from copyTask
into 'some-dir'
}
}
}
It is preferable to use the Copy task wherever possible, as it supports incremental building and task dependency inference
without any extra effort on your part. The copy() method can be used to copy files as part of a task's
implementation. That is, the copy method is intended to be used by custom tasks (see 58章カスタムタスクの作成Writing Custom Task Classes) that need to copy files
as part of their function. In such a scenario, the custom task should sufficiently declare the inputs/outputs relevant to the copy action.
できるだけCopyタスクのほうを使用するようにしてください。そうすれば、余計な手間をかけずにインクリメンタルビルドやタスク依存関係の恩恵を受けることができます。
一方、copy()メソッドは、あるタスクの実装の一部としてファイルコピーを組み込むことができます。
つまり、copy()メソッドはカスタムタスク(58章カスタムタスクの作成Writing Custom Task Classes参照)の機能でファイルコピーが必要になった場合に使用されることを想定しています。
そのカスタムタスクでは、ファイルコピーの実際の仕様に基づいて適切に入力と出力が宣言されていなければなりません。
例16.15 コピー時にファイルをリネームする
build.gradle
task rename(type: Copy) {
from 'src/main/webapp'
into 'build/explodedWar'
// Use a closure to map the file name
rename { String fileName ->
fileName.replace('-staging-', '')
}
// Use a regular expression to map the file name
rename '(.+)-staging-(.+)', '$1$2'
rename(/(.+)-staging-(.+)/, '$1$2')
}例16.16 コピー時にファイルをフィルタリングする
build.gradle
import org.apache.tools.ant.filters.FixCrLfFilter import org.apache.tools.ant.filters.ReplaceTokens task filter(type: Copy) { from 'src/main/webapp' into 'build/explodedWar' // Substitute property tokens in files expand(copyright: '2009', version: '2.3.1') expand(project.properties) // Use some of the filters provided by Ant filter(FixCrLfFilter) filter(ReplaceTokens, tokens: [copyright: '2009', version: '2.3.1']) // Use a closure to filter each line filter { String line -> "[$line]" } }
A “token” in a source file that both the “expand” and “filter” operations look for, is formatted like “@tokenName@” for a token named “tokenName”.
Copy specs form a hierarchy. A copy spec inherits its destination path, include patterns, exclude patterns, copy actions, name mappings and filters.
コピー仕様は階層構造を構成でき、宛先パス、include/excludeパターン、コピー動作、ファイル名のマッピング、フィルターを継承できます。
例16.17 入れ子構造のコピー仕様
build.gradle
task nestedSpecs(type: Copy) {
into 'build/explodedWar'
exclude '**/*staging*'
from('src/dist') {
include '**/*.html'
}
into('libs') {
from configurations.runtime
}
}The Sync task extends the Copy task. When it
executes, it copies the source files into the destination directory, and then removes any files from the
destination directory which it did not copy. This can be useful for doing things such as installing your
application, creating an exploded copy of your archives, or maintaining a copy of the project's dependencies.
SyncはCopyタスクを継承したタスクです。このタスクは、宛先ディレクトリにファイルをコピーし、その後、コピーしたファイル以外の全ファイルを宛先ディレクトリから削除します。これは、アプリケーションをインストールしたり、アーカイブを解凍したり、プロジェクトの依存関係のコピーをメンテナンスしたりするのに便利です。
Here is an example which maintains a copy of the project's runtime dependencies in the build/libs
directory.
次の例では、build/libsにある実行時依存関係のコピーをメンテナンスしています。
例16.18 Syncタスクで依存関係をコピーする
build.gradle
task libs(type: Sync) {
from configurations.runtime
into "$buildDir/libs"
}
A project can have as many as JAR archives as you want. You can also add WAR, ZIP and TAR archives to your project.
Archives are created using the various archive tasks:
Zip,
Tar,
Jar,
War, and
Ear.
They all work the same way, so let's look at how you create a ZIP file.
一つのプロジェクトで、JARファイルを好きなだけ作成することができます。WAR、ZIP、TARなどのアーカイブをプロジェクトに加えることもできます。
アーカイブは、
Zip、
Tar、
Jar、
War、
Earなどのアーカイブタスクを使って作成します。
これらは全て同じ使い方なので、ここではZIPファイルの作成方法を見てみましょう。
例16.19 ZIPアーカイブの作成
build.gradle
apply plugin: 'java' task zip(type: Zip) { from 'src/dist' into('libs') { from configurations.runtime } }
なぜJavaプラグインを使うのですか? Why are you using the Java plugin?
The Java plugin adds a number of default values for the archive tasks. You can use the archive tasks without using the Java plugin, if you like. You will need to provide values for some additional properties.
Javaプラグインは、アーカイブタスクに多くのデフォルト値を追加します。必要なら、Javaプラグインなしでアーカイブタスクを使うことも可能です。その場合、いくつかのプロパティを自分で定義する必要があるでしょう。
The archive tasks all work exactly the same way as the Copy task, and implement the same
CopySpec interface. As with the Copy task, you specify the input
files using the from() method, and can optionally specify where they end up in the
archive using the into() method. You can filter the contents of file, rename files, and
all the other things you can do with a copy spec.
アーカイブタスクは、全てCopyタスクと全く同じように動作します。これらのタスクは、Copyタスク同様、CopySpecインターフェースを実装しています。Copyタスクと同じようにfrom()メソッドで入力ファイルを指定し、必須ではありませんがinto()メソッドで最終的にアーカイブが出力される場所を指定します。ファイルのフィルタリング、リネーム、その他コピー仕様で使える全てのオプションを使うことができます。
The format of projectName-version.type
作成されるアーカイブの名前は、デフォルトではprojectName-version.type
例16.20 ZIPアーカイブの作成
build.gradle
apply plugin: 'java' version = 1.0 task myZip(type: Zip) { from 'somedir' } println myZip.archiveName println relativePath(myZip.destinationDir) println relativePath(myZip.archivePath)
gradle -q myZip の出力
> gradle -q myZip zipProject-1.0.zip build/distributions build/distributions/zipProject-1.0.zip
This adds a Zip archive task with the name myZip which produces
ZIP file zipProject-1.0.zip. It is important to distinguish between the name of the archive task
and the name of the archive generated by the archive task. The default name for archives can be
changed with the archivesBaseName project property. The name of the archive can also be
changed at any time later on.
ここでは、myZipという名前のZipアーカイブタスクが、zipProject-1.-.zipというZIPファイルを作成しています。大事なことは、アーカイブタスクの名前と、そのタスクで作成したアーカイブ名に関連がないことです。デフォルトのアーカイブ名は、プロジェクトのarchivesBaseNameプロパティで変更できます。そのアーカイブ名も、後からいつでも変更可能です。
There are a number of properties which you can set on an archive task. These are listed below in 表16.1「アーカイブタスク - ネーミングプロパティ Archive tasks - naming properties」. You can, for example, change the name of the archive:
アーカイブタスクにセットできるプロパティはたくさんあります。それらを下の表16.1「アーカイブタスク - ネーミングプロパティ Archive tasks - naming properties」にリストしました。例えば、アーカイブの名前を変更したい場合は次のようにします。
例16.21 アーカイブタスクの設定 - カスタムアーカイブ名
build.gradle
apply plugin: 'java' version = 1.0 task myZip(type: Zip) { from 'somedir' baseName = 'customName' } println myZip.archiveName
gradle -q myZip の出力
> gradle -q myZip customName-1.0.zip
You can further customize the archive names:
アーカイブ名をさらにカスタマイズすることもできます。
例16.22 アーカイブタスクの設定 - appendix & classifier
build.gradle
apply plugin: 'java' archivesBaseName = 'gradle' version = 1.0 task myZip(type: Zip) { appendix = 'wrapper' classifier = 'src' from 'somedir' } println myZip.archiveName
gradle -q myZip の出力
> gradle -q myZip gradle-wrapper-1.0-src.zip
表16.1 アーカイブタスク - ネーミングプロパティ Archive tasks - naming properties
| プロパティ名 Property name | 型 Type | デフォルト値 Default value | 説明 Description |
archiveName |
String |
If any of these properties is empty the trailing プロパティが空だった場合、それに伴う |
生成されるアーカイブのベースファイル名 The base file name of the generated archive |
archivePath |
File |
|
生成されるアーカイブの絶対パス The absolute path of the generated archive. |
destinationDir |
File |
アーカイブの種類に依存する。JAR、WARの場合は |
アーカイブが生成されるディレクトリ The directory to generate the archive into |
baseName |
String |
|
アーカイブ名の「ベース名」部 The base name portion of the archive file name. |
appendix |
String |
null |
アーカイブ名の「付加」部 The appendix portion of the archive file name. |
version |
String |
|
アーカイブ名の「バージョン」部 The version portion of the archive file name. |
classifier |
String |
null |
アーカイブ名の「分類子」部 The classifier portion of the archive file name, |
extension |
String |
アーカイブの種類に依存する。TARファイルの場合、圧縮方法にも依存する。Depends on the archive type, and for TAR files, the compression type as well: zip, jar,
war, tar, tgz or tbz2. |
アーカイブ名の拡張子 The extension of the archive file name. |
You can use the Project.copySpec() method to share content between archives.
Project.copySpec()メソッドを使ってアーカイブ間で中身を共有できます。
Often you will want to publish an archive, so that it is usable from another project. This process is described in 52章アーティファクトの公開 Publishing artifacts
アーカイブを別のプロジェクトで使えるようにするために、そのアーカイブを公開したくなることがよくあります。この処理については、52章アーティファクトの公開 Publishing artifactsに記載されています。
Gradle provides excellent integration with Ant. You can use individual Ant tasks or entire Ant builds in your Gradle builds. In fact, you will find that it's far easier and more powerful using Ant tasks in a Gradle build script, than it is to use Ant's XML format. You could even use Gradle simply as a powerful Ant task scripting tool.
Gradleは優れたAntとの統合機能を提供しています。 Gradleビルドの中で、個別のAntタスクや、Antビルド全体を利用することができます。 実際、AntのXMLフォーマットを利用するよりも、Gradleビルドの中でAntタスクを使う方がはるかに簡単でより強力であることに気づくでしょう。 Gradleを単に強力なAntスクリプティングツールとして使ってもよいくらいです。
Ant can be divided into two layers. The first layer is the Ant language. It provides the syntax for the
build.xml, the handling of the targets, special constructs like macrodefs, and so on.
In other words, everything except the Ant tasks and types. Gradle understands this language, and allows you to
import your Ant build.xml directly into a Gradle project. You can then use the targets of
your Ant build as if they were Gradle tasks.
Antは二つのレイヤーに分割できます。
第一のレイヤーはAnt言語で、build.xmlの文法やターゲットの取り扱い、およびmacrodefのような特別な構成要素などを提供します。
別の言い方では、Antタスクとタイプを除くすべてのものです。
Gradleはこの言語を理解し、GradleプロジェクトにAntのbuild.xmlを直接インポートすることを可能にしています。
そのため、AntビルドのターゲットをGradleのタスクであるかのように利用することができます。
The second layer of Ant is its wealth of Ant tasks and types, like javac,
copy or jar. For this layer Gradle provides integration
simply by relying on Groovy, and the fantastic AntBuilder.
Antの第二のレイヤーは、javacやcopy、jarといった豊富なAntタスクやタイプの資産です。
このレイヤーに対してはGroovyのすばらしいAntBuilderが利用できるため、Gradleはシンプルな統合機能を提供するのみです。
Finally, since build scripts are Groovy scripts, you can always execute an Ant build as an external process.
Your build script may contain statements like:"ant clean compile".execute().
[14]
最後に、ビルドスクリプトはGroovyスクリプトなので、いつでもAntビルドを外部プロセスとして実行できます。
ビルドスクリプトは"ant clean compile".execute()のような実行文を含んでいてもかまいません。
[15]
You can use Gradle's Ant integration as a path for migrating your build from Ant to Gradle. For example, you could start by importing your existing Ant build. Then you could move your dependency declarations from the Ant script to your build file. Finally, you could move your tasks across to your build file, or replace them with some of Gradle's plugins. This process can be done in parts over time, and you can have a working Gradle build during the entire process.
GradleのAnt統合機能を、AntからGradleへのビルド移行パスとして利用することもできます。 例えば、既存のAntビルドをインポートするところから始めてもよいでしょう。 それから、依存関係の宣言をAntスクリプトから新しいビルドファイルへ移動していきます。 最後に、タスクを新しいビルドファイルへ移動するか、Gradleプラグインで置き換えます。 このプロセスは一部分づつ段階的に実施でき、プロセス全体を通してGradleによるビルドを利用できます。
In your build script, a property called ant is provided by Gradle. This is a reference
to an AntBuilder instance. This AntBuilder is used to
access Ant tasks, types and properties from your build script. There is a very simple mapping from Ant's
build.xml format to Groovy, which is explained below.
ビルドスクリプトではGradleによってプロパティantが提供されます。
これはAntBuilderインスタンスへの参照です。
このAntBuilderはビルドスクリプトからAntタスクやタイプ、プロパティへのアクセスに利用します。
Antのbuild.xmlフォーマットからGroovyへのマッピングは非常に簡単です。
以下で説明します。
You execute an Ant task by calling a method on the AntBuilder instance. You use the task
name as the method name. For example, you execute the Ant echo task by calling the
ant.echo() method. The attributes of the Ant task are passed as Map parameters to the
method. Below is an example of the echo task. Notice that we can also mix
Groovy code and the Ant task markup. This can be extremely powerful.
Antタスクを実行するには、AntBuilderインスタンスのメソッドを呼び出します。
Antタスク名がメソッド名になります。
例えば、Antのechoタスクを実行する場合は、ant.echo()メソッドを呼び出します。
Antタスクの属性は、メソッドにMap型のパラメータとして渡します。
以下はechoタスクを実行するサンプルです。
GroovyコードとAntタスクのマークアップを混在できることに注意してください。
これは非常に強力です。
例17.1 Antタスクの利用
build.gradle
task hello << {
String greeting = 'hello from Ant'
ant.echo(message: greeting)
}gradle hello の出力
> gradle hello :hello [ant:echo] hello from Ant BUILD SUCCESSFUL Total time: 1 secs
You pass nested text to an Ant task by passing it as a parameter of the task method call. In this example, we
pass the message for the echo task as nested text:
Antタスクのメソッド呼び出しのパラメータとして渡してやることで、ネストされたテキストをAntタスクに渡すことができます。
この例では、echoタスクに対するメッセージをネストされたテキストとして渡しています。
例17.2 Antタスクにネストされたテキストを渡す
build.gradle
task hello << {
ant.echo('hello from Ant')
}gradle hello の出力
> gradle hello :hello [ant:echo] hello from Ant BUILD SUCCESSFUL Total time: 1 secs
You pass nested elements to an Ant task inside a closure. Nested elements are defined in the same way as tasks, by calling a method with the same name as the element we want to define.
Antタスクにネストされた要素を渡す場合はクロージャの内部に記述します。 ネストされた要素はタスクと同じように、指定したい要素名と同じメソッドを呼び出すことで指定できます。
例17.3 Antタスクにネストされた要素を渡す
build.gradle
task zip << {
ant.zip(destfile: 'archive.zip') {
fileset(dir: 'src') {
include(name: '**.xml')
exclude(name: '**.java')
}
}
}You can access Ant types in the same way that you access tasks, using the name of the type as the
method name. The method call returns the Ant data type, which you can then use directly in your build script. In the
following example, we create an Ant path object, then iterate over the contents of it.
Antタスクにアクセスするのと同じ方法、すなわちタイプ名をメソッド名として利用することでAntタイプにアクセスできます。
メソッド呼び出しの戻り値はAntデータ型なので、ビルドスクリプトの中で直接利用できます。
次の例では、Antのpathオブジェクトを生成し、その内容をすべてイテレートしています。
例17.4 Antタイプの利用
build.gradle
task list << {
def path = ant.path {
fileset(dir: 'libs', includes: '*.jar')
}
path.list().each {
println it
}
}More information about AntBuilder can be found in 'Groovy in Action' 8.4 or at the
Groovy Wiki
AntBuilderに関する詳細は「Groovy in Action」の8.4節、ないしはGroovy Wikiを参照してください。
To make custom tasks available in your build,
you can use the taskdef (usually easier) or typedef Ant task,
just as you would in a build.xml file. You can then refer to the custom Ant task as you
would a built-in Ant task.
ビルドでカスタムタスクを有効にするためには、
build.xmlファイルと同じくAntタスクのtaskdef(大抵はこちらの方が簡単です)かtypedefを利用します。
これにより組み込みのAntタスクと同様にカスタムAntタスクが参照できるようになります。
例17.5 カスタムAntタスクの利用
build.gradle
task check << {
ant.taskdef(resource: 'checkstyletask.properties') {
classpath {
fileset(dir: 'libs', includes: '*.jar')
}
}
ant.checkstyle(config: 'checkstyle.xml') {
fileset(dir: 'src')
}
}You can use Gradle's dependency management to assemble the classpath to use for the custom tasks. To do this, you need to define a custom configuration for the classpath, then add some dependencies to the configuration. This is described in more detail in 「依存関係の定義方法 How to declare your dependencies」.
カスタムタスクを利用するために必要なクラスパスの設定には、Gradleの依存関係管理機能が利用できます。 このために、クラスパスに対するカスタムコンフィグレーションを定義して、コンフィグレーションに対する依存関係を追加する必要があります。 詳細については「依存関係の定義方法 How to declare your dependencies」に記述されています。
例17.6 カスタムAntタスクに対するクラスパスの宣言
build.gradle
configurations {
pmd
}
dependencies {
pmd group: 'pmd', name: 'pmd', version: '4.2.5'
}To use the classpath configuration, use the asPath property of the custom configuration.
クラスパスを設定するには、カスタムコンフィグレーションのasPathプロパティを利用します。
例17.7 カスタムAntタスクと依存関係管理を併用
build.gradle
task check << {
ant.taskdef(name: 'pmd',
classname: 'net.sourceforge.pmd.ant.PMDTask',
classpath: configurations.pmd.asPath)
ant.pmd(shortFilenames: 'true',
failonruleviolation: 'true',
rulesetfiles: file('pmd-rules.xml').toURI().toString()) {
formatter(type: 'text', toConsole: 'true')
fileset(dir: 'src')
}
}You can use the ant.importBuild() method to import an Ant build into your Gradle
project. When you import an Ant build, each Ant target is treated as a Gradle task. This means you can
manipulate and execute the Ant targets in exactly the same way as Gradle tasks.
ant.importBuild()メソッドを利用して、GradleプロジェクトにAntビルドをインポートできます。
Antビルドをインポートした場合、各AntターゲットはGradleのタスクとして扱われます。
つまり、AntターゲットとGradleタスクをまったく同一の方法で操作することができるということです。
例17.8 Antビルドのインポート
build.gradle
ant.importBuild 'build.xml'build.xml
<project> <target name="hello"> <echo>Hello, from Ant</echo> </target> </project>
gradle hello の出力
> gradle hello :hello [ant:echo] Hello, from Ant BUILD SUCCESSFUL Total time: 1 secs
You can add a task which depends on an Ant target:
Antターゲットに依存するタスクを追加することもできます:
例17.9 Antターゲットに依存するタスク
build.gradle
ant.importBuild 'build.xml' task intro(dependsOn: hello) << { println 'Hello, from Gradle' }
gradle intro の出力
> gradle intro :hello [ant:echo] Hello, from Ant :intro Hello, from Gradle BUILD SUCCESSFUL Total time: 1 secs
Or, you can add behaviour to an Ant target:
Antターゲットにふるまいを追加することも可能です:
例17.10 Antターゲットにふるまいを追加
build.gradle
ant.importBuild 'build.xml' hello << { println 'Hello, from Gradle' }
gradle hello の出力
> gradle hello :hello [ant:echo] Hello, from Ant Hello, from Gradle BUILD SUCCESSFUL Total time: 1 secs
It is also possible for an Ant target to depend on a Gradle task:
Gradleタスクに依存するAntターゲットを定義することも可能です:
例17.11 Ant target that depends on Gradle task
build.gradle
ant.importBuild 'build.xml' task intro << { println 'Hello, from Gradle' }
build.xml
<project> <target name="hello" depends="intro"> <echo>Hello, from Ant</echo> </target> </project>
gradle hello の出力
> gradle hello :intro Hello, from Gradle :hello [ant:echo] Hello, from Ant BUILD SUCCESSFUL Total time: 1 secs
Sometimes it may be necessary to “rename” the task generated for an Ant target to avoid a naming collision with existing Gradle tasks.
To do this, use the AntBuilder.importBuild() method.
例17.12 Renaming imported Ant targets
build.gradle
ant.importBuild('build.xml') { antTargetName -> 'a-' + antTargetName }
build.xml
<project> <target name="hello"> <echo>Hello, from Ant</echo> </target> </project>
gradle a-hello の出力
> gradle a-hello :a-hello [ant:echo] Hello, from Ant BUILD SUCCESSFUL Total time: 1 secs
Note that while the second argument to this method should be a Transformer, when programming in Groovy we can simply
use a closure instead of an anonymous inner class (or similar) due to Groovy's support for automatically coercing closures to single-abstract-method types.
There are several ways to set an Ant property, so that the property can be used by Ant tasks. You can
set the property directly on the AntBuilder instance. The Ant properties are also
available as a Map which you can change. You can also use the Ant property task.
Below are some examples of how to do this.
Antタスクで利用できるようにAntプロパティを設定する方法は複数あります。
AntBuilderインスタンスのプロパティを直接設定できます。
Antプロパティは変更可能なMapとしても利用可能です。
Antのpropertyタスクも利用できます。
以下はこれらをどのように実行するのかを示すサンプルです。
例17.13 Antプロパティの設定
build.gradle
ant.buildDir = buildDir ant.properties.buildDir = buildDir ant.properties['buildDir'] = buildDir ant.property(name: 'buildDir', location: buildDir)
build.xml
<echo>buildDir = ${buildDir}</echo>
Many Ant tasks set properties when they execute. There are several ways to get the value of these properties.
You can get the property directly from the AntBuilder instance. The Ant properties are
also available as a Map. Below are some examples.
多くのAntタスクは実行時にプロパティを設定します。
これらのプロパティを取得する方法も複数あります。
AntBuilderインスタンスからプロパティを直接取得できます。
AntプロパティはMapとしても参照可能です。
以下はサンプルです。
例17.14 Antプロパティの取得
build.xml
<property name="antProp" value="a property defined in an Ant build"/>
build.gradle
println ant.antProp
println ant.properties.antProp
println ant.properties['antProp']There are several ways to set an Ant reference:
Antリファレンスを設定する方法は複数あります:
例17.15 Antリファレンスの設定
build.gradle
ant.path(id: 'classpath', location: 'libs') ant.references.classpath = ant.path(location: 'libs') ant.references['classpath'] = ant.path(location: 'libs')
build.xml
<path refid="classpath"/>
There are several ways to get an Ant reference:
Antリファレンスを取得する方法も複数あります:
例17.16 Antリファレンスの取得
build.xml
<path id="antPath" location="libs"/>
build.gradle
println ant.references.antPath
println ant.references['antPath']The log is the main 'UI' of a build tool. If it is too verbose, real warnings and problems are easily hidden by this. On the other hand you need the relevant information for figuring out if things have gone wrong. Gradle defines 6 log levels, as shown in 表18.1「ログレベルLog levels」. There are two Gradle-specific log levels, in addition to the ones you might normally see. Those levels are QUIET and LIFECYCLE. The latter is the default, and is used to report build progress.
ログは、ビルドツールのユーザーインターフェースとも言えるものです。あまりにくどいと本当に重要な警告や問題が埋もれてしまいますが、何かおかしくなったとき、その原因を突き止めるための情報はとてもありがたいものです。Gradleでは、6つのログレベル(表18.1「ログレベルLog levels」)を規定しています。だいたいはどこか見たことのあるログレベルだと思いますが、QUIETとLIFECYCLEの2つはGradle特有のものです。LIFECYCLEはデフォルトのログレベルで、ビルドプロセスの進行状況をレポートするために使われます。
表18.1 ログレベルLog levels
| レベルLevel | 用途Used for |
| ERROR | エラーメッセージError messages |
| QUIET | 重要な情報メッセージImportant information messages |
| WARNING | 警告メッセージWarning messages |
| LIFECYCLE | 進行状況を示す情報メッセージProgress information messages |
| INFO | 情報メッセージInformation messages |
| DEBUG | デバッグメッセージDebug messages |
You can use the command line switches shown in 表18.2「ログレベルに関するコマンドラインオプションLog level command-line options」 to choose different log levels. In 表18.3「スタックトレースに関するコマンドラインオプションStacktrace command-line options」 you find the command line switches which affect stacktrace logging.
表示させるログレベルは、コマンドラインオプション(表18.2「ログレベルに関するコマンドラインオプションLog level command-line options」)で変更できます。表18.3「スタックトレースに関するコマンドラインオプションStacktrace command-line options」には、スタックトレースログをどうするか指定する方法を載せています。
表18.2 ログレベルに関するコマンドラインオプションLog level command-line options
| オプションOption | 出力ログレベルOutputs Log Levels |
| ロギングオプション未指定no logging options | LIFECYCLE以上LIFECYCLE and higher |
-q または --quiet
|
QUIET以上QUIET and higher |
-i または --info
|
INFO以上INFO and higher |
-d または --debug
|
DEBUG以上(要するに全部)DEBUG and higher (that is, all log messages) |
表18.3 スタックトレースに関するコマンドラインオプションStacktrace command-line options
| オプションOption | 意味Meaning |
| スタックトレースオプション未指定No stacktrace options | ビルドエラー(コンパイルエラーとか)のスタックトレースはコンソールに表示されず、内部からの例外のみスタックトレースが表示される。ただし、ログレベルオプションで-dが指定されている場合、切り詰められたスタックトレースが常に表示される。No stacktraces are printed to the console in case of a build error (e.g. a compile error). Only in
case of internal exceptions will stacktraces be printed. If the DEBUG log level
is chosen, truncated stacktraces are always printed.
|
-s または --stacktrace
|
切り詰められたスタックトレースが表示される。Groovyのフルスタックトレースはあまりに冗長(動的言語としての呼び出しメカニズムが色々出力され、自分のコードのどこがダメなのか有用な情報がでてこない)ので、こちらの切り詰め済みスタックトレースを推奨します。Truncated stacktraces are printed. We recommend this over full stacktraces. Groovy full stacktraces are extremely verbose (Due to the underlying dynamic invocation mechanisms. Yet they usually do not contain relevant information for what has gone wrong in your code.) |
-S または --full-stacktrace
|
フルスタックトレースを表示する。The full stacktraces are printed out. |
A simple option for logging in your build file is to write messages to standard output. Gradle redirects
anything written to standard output to it's logging system at the QUIET log level.
ログメッセージを書く簡単な方法は、標準出力に書き込むことです。Gradleは、標準出力に書かれたすべてのメッセージを、GradleのロギングシステムにQUIETレベルでリダイレクトします。
Gradle also provides a logger property to a build script, which is an instance of
Logger. This interface extends the SLF4J
Logger interface and adds a few Gradle specific methods to it. Below is an example
of how this is used in the build script:
また、ビルドスクリプト内ではloggerプロパティも使えます。このプロパティには、Logger(SLF4JのLoggerインターフェースにGradle特有のメソッドを少し追加したもの)のインスタンスがセットされています。使い方は以下の例をご覧ください。
例18.2 自分でログメッセージを書く
build.gradle
logger.quiet('An info log message which is always logged.') logger.error('An error log message.') logger.warn('A warning log message.') logger.lifecycle('A lifecycle info log message.') logger.info('An info log message.') logger.debug('A debug log message.') logger.trace('A trace log message.')
You can also hook into Gradle's logging system from within other classes used in the build (classes from
the buildSrc directory for example). Simply use an SLF4J logger. You can use this
logger the same way as you use the provided logger in the build script.
さらに、ビルドで使っている別のクラス(たとえばbuildSrcディレクトリのクラス)の中から、Gradleのロギングシステムへログを出力することもできます。やり方も、ただSLF4Jのロガーを使えばいいだけです。このロガーは、ビルドスクリプトで使えるロガーと全く同じように使うことができます。
例18.3 SLF4Jでログを出力する
build.gradle
import org.slf4j.Logger import org.slf4j.LoggerFactory Logger slf4jLogger = LoggerFactory.getLogger('some-logger') slf4jLogger.info('An info log message logged using SLF4j')
Internally, Gradle uses Ant and Ivy. Both have their own logging system. Gradle redirects their logging
output into the Gradle logging system. There is a 1:1 mapping from the Ant/Ivy log levels to the Gradle log
levels, except the Ant/Ivy TRACE log level, which is mapped to Gradle
DEBUG log level. This means the default Gradle log level will not show any Ant/Ivy output
unless it is an error or a warning.
内部的には、GradleはAntとIvyを使っています。どちらも、自身で独自のロギングシステムを持っています。Gradleはそれらのログ出力をGradleのロギングシステムにリダイレクトしているのです。Ant、Ivyのログレベルは、基本的にGradleのログレベルと1対1で対応しています(TRACEだけはGradleのDEBUGに対応)。つまり、Gradleのデフォルトログレベルだと、Ant、Ivyのメッセージはエラーやワーニングでないと出力されないと言うことです。
There are many tools out there which still use standard output for logging. By default, Gradle redirects
standard output to the QUIET log level and standard error to the ERROR
level. This behavior is configurable. The project object provides a
LoggingManager, which allows you to change the log levels that
standard out or error are redirected to when your build script is evaluated.
ログに標準出力を使っているツールは、いまだにたくさんあります。デフォルトでは、Gradleは標準出力をQUIETレベルログに、標準エラーをERRORレベルログにリダイレクトします。また、この動作は設定で変更可能です。プロジェクトオブジェクトのLoggingManagerを使えば、ビルドスクリプト実行時の標準出力、標準エラーをどのログレベルにリダイレクトするか変更できるようになっています。
例18.4 標準出力のキャプチャ設定
build.gradle
logging.captureStandardOutput LogLevel.INFO
println 'A message which is logged at INFO level'
To change the log level for standard out or error during task execution, tasks also provide a LoggingManager.
さらに、タスク実行時のログリダイレクト設定も変更できるよう、タスクにもLoggingManagerがあります。
例18.5 タスク実行時の標準出力キャプチャ設定
build.gradle
task logInfo {
logging.captureStandardOutput LogLevel.INFO
doFirst {
println 'A task message which is logged at INFO level'
}
}Gradle also provides integration with the Java Util Logging, Jakarta Commons Logging and Log4j logging toolkits. Any log messages which your build classes write using these logging toolkits will be redirected to Gradle's logging system.
Gradleは、Java標準のロギング実装や、Jakarta CommonsのCommons Logging、Log4jも統合しています。ビルドで使っているクラスが、これらのツールキットでログメッセージを出力すれば、すべてGradleのロギングシステムにリダイレクトされるでしょう。
You can replace much of Gradle's logging UI with your own. You might do this, for example, if you want to
customize the UI in some way - to log more or less information, or to change the formatting. You replace
the logging using the Gradle.useLogger() method. This
is accessible from a build script, or an init script, or via the embedding API.
Note that this completely disables Gradle's default output.
Below is an example init script which changes how task execution and build completion is logged.
GradleのロギングUIを、独自のものに差し替えることができます。もっと多くの情報を出したい場合、また、逆に出力される情報を減らしたい場合、さらにログフォーマットを変えたいときなどに検討してください。ロギングを差し替えるには、ビルドスクリプトや初期化スクリプト、組み込みAPIからアクセスできるGradle.useLogger()メソッドを使います。次の例では、初期化スクリプトを使って、タスク実行、ビルドの完了をロギングする方法を変更しています。
例18.6 Gradleがロギングするものを変更する
init.gradle
useLogger(new CustomEventLogger()) class CustomEventLogger extends BuildAdapter implements TaskExecutionListener { public void beforeExecute(Task task) { println "[$task.name]" } public void afterExecute(Task task, TaskState state) { println() } public void buildFinished(BuildResult result) { println 'build completed' if (result.failure != null) { result.failure.printStackTrace() } } }
gradle -I init.gradle build の出力
> gradle -I init.gradle build [compile] compiling source [testCompile] compiling test source [test] running unit tests [build] build completed
Your logger can implement any of the listener interfaces listed below. When you register a logger, only the logging for the interfaces that it implements is replaced. Logging for the other interfaces is left untouched. You can find out more about the listener interfaces in 「ライフサイクルからの通知に応答するResponding to the lifecycle in the build script」. 独自ロガーは、以下にリストしたリスナーインターフェースを実装できます。登録したロガーのインターフェースに対応したロギングのみ差し替えられ、その他のロギングは変更されません。リスナーインターフェースの詳細については「ライフサイクルからの通知に応答するResponding to the lifecycle in the build script」をご参照ください。
The Gradle daemon (sometimes referred as the build daemon) aims to improve the startup and execution time of Gradle.
Gradleデーモン(ビルドデーモンと呼ばれることもあります)はGradleの起動と実行の速度を改善します。
We came up with several use cases where the daemon is very useful. For some workflows, the user invokes Gradle many times to execute a small number of relatively quick tasks. For example: デーモン実行が非常に有用だと思われるユースケースをいくつか考えてみました。 例えば、少数の、比較的実行が早く終わるようなタスクを、何度も実行しなければならないような場面があります。
- When using test driven development, where the unit tests are executed many times. テスト駆動開発にて、ユニットテストを度々実行するような場合
- When developing a web application, where the application is assembled many times. Webアプリケーション開発にて、アプリケーションを何度も構築する場合
- When discovering what a build can do, where
gradle tasksis executed a number of times. ビルドの挙動を調べるために、gradle tasksを何度も実行する場合
For these workflows, it is important that the startup cost of invoking Gradle is as small as possible. これらの場合、Gradleを起動・実行するための時間は出来る限り短いことが重要でしょう。
In addition, user interfaces can provide some interesting features if the Gradle model can be built relatively quickly. For example, the daemon might be useful for the following scenarios: さらに、Gradleモデルがより素早く構築されるようになれば、ユーザーインターフェースが面白い機能を実装できる可能性があります。 例えば、次のようなケースでデーモンが役に立つかもしれません。
- Content assistance in the IDE 統合開発環境で入力補完する場合
- Live visualisation of the build in a GUI GUIでビルド状況を表示する場合
- Tab completion in a CLI コマンドラインインターフェースでのタブ補完する場合
In general, snappy behavior of the build tool is always handy. If you try using the daemon for your local builds, you won't want to go back.
一般的にいって、ビルドツールが軽快に動作して困るということはありません。 ローカル環境のビルドでデーモンを試してみてください。デーモンを使わない普通のビルドにはもう戻れなくなるでしょう。
The Tooling API (see Chapter 63, Embedding Gradle) uses the daemon all the time, e.g. you cannot officially use the Tooling API without the daemon. This means that whenever you are using the STS Gradle plugin for Eclipse or the Gradle support in Intellij IDEA, you're already using the Gradle Daemon.
ツールAPI (参照 Chapter 63, Embedding Gradle)は常にデーモンを使用します。つまり、通常、デーモンなしでツールAPIは使えません。 したがって、EclipseのSTS GradleプラグインやIntelliJ IDEAのGradleサポートを使っているときは、常にデーモンが背後で起動しています。
In future, there are plans for more features in the daemon: 今後は下記の機能が追加される予定です。
- Snappy up-to-date checks: use native file system change notifications (e.g. via jdk7 nio.2) to preemptively perform up-to-date analysis. 軽快な更新チェック: ファイルシステムネイティブの変更通知を(jdk7 nio.2経由などで)使い、プロジェクトが更新されたかどうか前もって解析する
- Even faster builds: preemptively evaluate projects, so that the model is ready when the user next invokes Gradle. 更なるビルドの高速化: あらかじめプロジェクトを評価し、次回のGradle実行時にプロジェクトモデルを準備しておく
- Did we mention faster builds? The daemon can potentially preemptively download dependencies or check for new versions of snapshot dependencies. 更なるビルドの高速化、はもう言いましたっけ、とにかく、デーモンは潜在的にはあらかじめ依存関係をダウンロードしたり、スナップショットに依存している場合はその最新バージョンをチェックしておくといったことが可能です。
- Utilize a pool of reusable processes available for compilation and testing. For example, both the Groovy and Scala compilers have a large startup cost. The build daemon could maintain a process with Groovy and/or Scala already loaded. 再利用可能なプロセスのプールを活用して、コンパイル、テストを実施する。 例えばGroovyとScalaコンパイラーの起動にはどちらも多大なコストがかかります。 しかし、ビルドデーモンは、GroovyやScalaが既にロードされたプロセスを維持しておくことができます。
- Preemptive execution of certain tasks, for example compilation. Quicker feedback. コンパイルなど、ある種のタスクは事前に実行しておく。より早いフィードバックが可能になります。
- Fast and accurate bash tab completion. 速くて正確なbash上のタブ補完
- Periodically garbage collect the Gradle caches. Gradleキャッシュを定期的にガーベージコレクトする
The basic idea is that the Gradle command forks a daemon process, which performs the actual build. Subsequent invocations of the Gradle command will reuse the daemon, avoiding the startup costs. Sometimes we cannot use an existing daemon because it is busy or its Java version or jvm arguments are different. For exact details on when exactly a new daemon process is forked read the dedicated section below. The daemon process automatically expires after 3 hours of idle time.
デーモン実行の基本にある考え方は、gradleコマンドがデーモンプロセスを起動して、そのデーモンが実際のビルドを実行するというものです。 そうすれば、後続のgradleコマンドがそのデーモンプロセスを再利用でき、起動に掛かるコストを抑えることができます。 しかし、既存のデーモンプロセスが使用できないこともあります。例えば、プロセスがビジーだったり、要求されたJavaのバージョンやJVM引数が違うといった場合です。 新しいデーモンプロセスが、正確にはいつ起動されるかの詳細については、以下を参照してください。 デーモンプロセスは、アイドル状態で3時間経過すると自動的に期限切れになります。
Here are all situations in which we fork a new daemon process: デーモンプロセスが新しく起動される場面を全て列挙すると、
- If the daemon process is currently busy running some job, a brand new daemon process will be started. 既存のデーモンがある処理を実行中の場合、新たなデーモンが起動されます。
- We fork a separate daemon process per Java home. So even if there is some idle daemon waiting for build requests but you happen to run a build with a different Java home then a brand new daemon will be forked. デーモンプロセスは、java homeごとに起動されます。アイドル状態のデーモンがビルドリクエストを待機していたとしても、別のjava homeからビルドを実行した場合デーモンプロセスが新しく起動されます。
- We fork a separate daemon process if the jvm arguments for the build are sufficiently different. For example we will not fork a new daemon if a some system property has changed. However if the -Xmx memory setting changed or some fundamental immutable system property changed (e.g. file.encoding) then a new daemon will be forked. ビルドのJVM引数が大きく異なる場合、デーモンプロセスが新しく起動されます。いくつかのシステムプロパティに関しては、変更されても新プロセスを立ち上げないこともあります。しかし、-Xmxメモリ設定や、その他の基本的で変更できないシステムプロパティ(file.encodingなど)が変更された場合、プロセスが新しく起動されます。
- At the moment the daemon is coupled with a particular version of Gradle.
This means that even if some daemon is idle but you are running the build
with a different version of Gradle, a new daemon will be started.
This also has a consequence for the
--stopcommand line instruction: this command will only stop daemons that were started with Gradle version that is executing--stop. 起動されているデーモンは、特定のバージョンのGradleと関連づいています。 そのため、アイドル状態のデーモンが存在したとしても、それと別のバージョンのGradleでビルドを実行すると新しいデーモンが起動されます。 これは、--stopコマンドについてあることを教唆しています――つまり、--stopで停止できるデーモンは、その--stopを実行しているGradleと同じバージョンのGradleで起動されたデーモンだけだということです。
We plan to improve the functionality of managing and pooling the daemons in the future. 今後、デーモンの管理方法、プール方法の改善を行う予定です。
For command line usage, look at the dedicated section in 付録D Gradle コマンドラインGradle Command Line. If you are tired of using the same command line options again and again, take a look at 「gradle.propertiesを使用したビルド環境の構築Configuring the build environment via gradle.properties」. This section contains information on how to configure certain behavior of the daemon (including turning on the daemon by default) in a more 'persistent' way.
コマンドラインの利用方法については別節付録D Gradle コマンドラインGradle Command Lineを参照してください。 同じコマンドラインを何度も何度も指定してうんざりしている場合は、「gradle.propertiesを使用したビルド環境の構築Configuring the build environment via gradle.properties」を参照してください。 上記の節には、デーモンの振る舞いをより「永続的に」設定する方法が(デフォルトでデーモンを起動する方法を含めて)詳細に記述されています。
Some ways of troubleshooting the Gradle daemon: デーモンのトラブルシューティングについていくつか方法を示します。
- If you have a problem with your build, try temporarily disabling the daemon
(you can pass the command line switch
--no-daemon). ビルドで問題が発生した場合、一時的にデーモンを無効化してみてください(コマンドラインにスイッチ--no-daemonを渡す)。 - Occasionally, you may want to stop the daemons either via the
--stopcommand line option or in a more forceful way.--stopオプションや、もっと強制的な方法でデーモンを停止しなければならない場面もあります。 - There is a daemon log file, which by default is located in the Gradle user home directory. デーモンのログファイルは、デフォルトではGradleユーザーホームディレクトリーにあります。
- You may want to start the daemon in
--foregroundmode to observe how the build is executed. ビルドの実行状況を見るには、--feoregroundを使ってデーモンを起動します。
Some daemon settings, such as JVM arguments, memory settings or the Java home, can be configured. Please find more information in 「gradle.propertiesを使用したビルド環境の構築Configuring the build environment via gradle.properties」
デーモン設定のうち、JVM引数、メモリーの設定、Java homeなどは設定ファイルなどで変更できます。詳細については「gradle.propertiesを使用したビルド環境の構築Configuring the build environment via gradle.properties」を参照してください。
Gradle provides several options that make it easy to configure the Java process that will be used to execute your build.
While it's possible to configure these in your local environment via GRADLE_OPTS or JAVA_OPTS,
certain settings like JVM memory settings, Java home, daemon on/off
can be more useful if they can be versioned with the project in your VCS so that
the entire team can work with a consistent environment.
Setting up a consistent environment for your build is as simple as placing these settings into a gradle.properties file.
The configuration is applied in following order
(if an option is configured in multiple locations the last one wins):
(in case an option is configured in multiple locations the last one wins):
Gradleでは、ビルドを実行するJavaプロセスの設定を簡単に変更するための方法が複数用意されています。
ローカルの環境変数でGRADLE_OPTSやJAVA_OPTSを使って設定することもできますが、一部の設定値、JVMメモリ設定やJava home、デーモンのオンオフなどについてはプロジェクトのVCSに格納してバージョン管理しておけば、チームメンバー全員が一貫した環境で作業することができるので便利です。
こうした一貫した設定値は、gradle.propertiesに設定値を保存するだけで実現可能です。
設定値は以下の順序で適用されます(複数箇所で設定されている場合は最後の一つが優先されます)。
- from
gradle.propertieslocated in project build dir. プロジェクトのビルドディレクトリに置かれたgradle.properties - from
gradle.propertieslocated ingradle user home.gradleユーザーホームディレクトリに置かれたgradle.properties - from system properties, e.g. when
-Dsome.propertyis used in the command line.-Dsome.propertyなどで指定されたシステムプロパティ
The following properties can be used to configure the Gradle build environment: 以下のプロパティがGradleのビルド環境を設定するために使用されます。
org.gradle.daemonWhen set to true the Gradle daemon is used to run the build.
For local developer builds this is our favorite property. The developer environment is optimized for speed and feedback
so we nearly always run Gradle jobs with the daemon.
We don't run CI builds with the daemon (i.e. a long running process)
as the CI environment is optimized for consistency and reliability.
trueに設定するとデーモンによりビルドが実行されます。
開発者がローカルでビルドを実行する際は、このプロパティを設定することをおすすめします。開発環境ではスピードやフィードバックという点を重視したいので、私たちもほとんどいつもデーモンを使ってGradleのジョブを走らせています。
一方、CI環境では並行性、信頼性といった点を重視したいため、CIビルド(というか実行時間の長い処理)でデーモンを使うことはありません。
org.gradle.java.homeSpecifies the Java home for the Gradle build process.
The value can be set to either a jdk or jre location,
however, depending on what your build does, jdk is safer.
A reasonable default is used if the setting is unspecified.
Gradleのビルドシステムで使用するJava homeを指定します。
設定するのはjdkでもjre構いませんが、プロジェクトによってはjdkを指定した方が安全かもしれません。
指定しなければ、適当なデフォルト値が設定されます。
org.gradle.jvmargsSpecifies the jvmargs used for the daemon process. The setting is particularly useful for tweaking memory settings. At the moment the default settings are pretty generous with regards to memory.
デーモンプロセスに渡すJVM引数を指定します。 この設定はメモリ設定を調節するのに特に便利です。 デフォルト値はメモリに応じて適切に設定されます。
org.gradle.configureondemandEnables new incubating mode that makes Gradle selective when configuring projects. Only relevant projects are configured which results in faster builds for large multi-projects. See 「Configuration on demand」.
Gradleがプロジェクトを選択的に設定する試験的なモードを有効にします。 関係のあるプロジェクトのみを評価することで、巨大なマルチプロジェクト・ビルドをより高速にビルドできるようにします。 詳しくは「Configuration on demand」を参照してください。
org.gradle.parallelWhen configured, Gradle will run in incubating parallel mode.
この設定を行うと、Gradleの試験的な並列ビルドモードが有効化されます。
Many settings (like the Java version and maximum heap size) can only be specified when launching a new JVM for the build process. This means that Gradle
must launch a separate JVM process to execute the build after parsing the various gradle.properties files.
When running with the daemon, a JVM with the correct parameters is started once and reused for each daemon build execution.
When Gradle is executed without the daemon, then a new JVM must be launched for every build execution,
unless the JVM launched by the Gradle start script happens to have the same parameters.
JVMに関する設定の多く(Javaバージョンや最大ヒープサイズなど)は、新しくJVMプロセスを起動するときのみ設定できます。
これはつまり、Gradleが解析した多様なgradle.propertiesに従ってビルドを実行するには、JVMプロセスを新しく起動しなければならないということを意味します。
デーモンを実行しているときは、適切なパラメーターが設定されたJVMが起動され、デーモンごとに再利用されます。
デーモンを使用せずにビルドを実行したときは、Gradleのスタートスクリプトが起動したJVMとたまたま同じパラメーターでビルドするのでない限り、ビルドの度に新しくJVMを起動しなければなりません。
This launching of an extra JVM on every build execution is quite expensive, which is why if you are
setting either org.gradle.java.home or org.gradle.jvmargs
we highly recommend that you use the Gradle Daemon. See 19章Gradleデーモン The Gradle Daemon for more details.
ビルドを実行する度にJVMを余分に起動しなければならないというのは、とても大きなコストになります。なので、org.gradle.java.homeやorg.gradle.jvmargsを設定しているのであればGradleデーモンを使ってビルドすることを強く推奨します。詳細については19章Gradleデーモン The Gradle Daemonを参照してください。
Configuring an HTTP proxy (for downloading dependencies, for example) is done via standard JVM system properties. These properties can be set directly in the build script; for example, setting the proxy host
would be done with System.setProperty('http.proxyHost', 'www.somehost.org'). Alternatively, the properties can be specified in a gradle.properties file,
either in the build's root directory or in the Gradle home directory.
(例えば依存関係のダウンロードするための)HTTPプロクシの設定は 標準的なJVMのシステムプロパティを使って行います。これらの設定は、直接ビルドスクリプト上で設定することが可能です。
例えばプロクシのホストの為に
System.setProperty('http.proxyHost', 'www.somehost.org')と設定できます。
あるいは、ビルドのルートディレクトリ上 又は Gradleホームディレクトリ上にある gradle.propertiesファイルにそれらの値を設定できます。
例20.1 HTTPプロクシの設定Configuring an HTTP proxy
gradle.properties
systemProp.http.proxyHost=www.somehost.org systemProp.http.proxyPort=8080 systemProp.http.proxyUser=userid systemProp.http.proxyPassword=password systemProp.http.nonProxyHosts=*.nonproxyrepos.com|localhost
There are separate settings for HTTPS.
HTTPS設定の分離
例20.2 HTTPSプロクシの設定Configuring an HTTPS proxy
gradle.properties
systemProp.https.proxyHost=www.somehost.org systemProp.https.proxyPort=8080 systemProp.https.proxyUser=userid systemProp.https.proxyPassword=password systemProp.https.nonProxyHosts=*.nonproxyrepos.com|localhost
We could not find a good overview for all possible proxy settings. One place to look are the constants in a file from the Ant project. Here's a link to the Subversion view. The other is a Networking Properties page from the JDK docs. If anyone knows of a better overview, please let us know via the mailing list.
使用可能な全てのプロクシ設定を概観できる良い資料については残念ながら発見することができませんでした。一つの情報源は、Antプロジェクトのファイルに定義された定数です。 Subversionへのリンク を載せておきます。他には、JDKドキュメントに ネットワーク設定値のページ がありました。 その他、もっと良い資料をご存知であれば、メーリングリストでお知らせください。
If your proxy requires NTLM authentication, you may need to provide the authentication domain as well as the username and password. There are 2 ways that you can provide the domain for authenticating to a NTLM proxy: NTLM認証が必要なプロクシを使う場合、ユーザ名とパスワードだけでなく認証ドメインを設定する必要があります。ドメインを設定する方法には以下の二つがあります。
- Set the
http.proxyUsersystem property to a value likedomain/usernamehttp.proxyUserに、domain/usernameのように値を設定する。 - Provide the authentication domain via the
http.auth.ntlm.domainsystem property. システムプロパティhttp.auth.ntlm.domainに認証ドメインを設定する。
Gradle at its core intentionally provides very little for real world automation. All of the useful
features, like the ability to compile Java code, are added by plugins.
Plugins add new tasks (e.g. JavaCompile), domain objects (e.g.
SourceSet), conventions (e.g. Java source is located at
src/main/java) as well as extending core objects and objects from other plugins.
Gradleのコア部分には、実際の自動化に役に立つような機能は含まれていません。
これは意図的なもので、Javaのコードをコンパイルしたりといった便利な機能は、全てプラグインにより追加されます。
プラグインは、コア部分のオブジェクトや他のプラグインのオブジェクトを拡張するだけでなく、新しいタスク(JavaCompileなど)やドメインオブジェクト(SourceSetなど)、規約(Javaのコードはsrc/main/javaに置く)、などをGradleに追加します。
In this chapter we will discuss how to use plugins and the terminology and concepts surrounding plugins.
この章では、プラグインを使う方法、プラグインまわりの用語や概念について議論します。
There are two general types of plugins in Gradle, script plugins and binary plugins.
Script plugins are additional build scripts that further configure the build and usually implement a declarative approach to
manipulating the build. They are typically used within a build although they can be externalized and accessed from a remote
location. Binary plugins are classes that implement the Plugin interface and adopt a programmatic
approach to manipulating the build. Binary plugins can reside within a build script, within the project hierarchy or externally
in a plugin jar.
Plugins are said to be applied, which is done via the Project.apply() method.
プラグインの、いわゆる適用は、Project.apply()メソッドで行います。
Script plugins can be applied from a script on the local filesystem or at a remote location. Filesystem locations are relative to the project directory, while remote script locations are specified with an HTTP URL. Multiple script plugins (of either form) can be applied to a given build.
Core plugins register a short name. In the above case, we are using the short name
‘java’ to apply the JavaPlugin.
Plugins also have a plugin id that takes a fully qualified
form like com.github.foo.bar, although some legacy plugins may still utilize
the short, unqualified form.
This method can also accept a class to identify the plugin:
The JavaPlugin symbol in the above sample refers to the the JavaPlugin.
This class does not strictly need to be import as the org.gradle.api.plugins package is automatically imported in all build scripts
(see 付録E IDE対応の現状と、IDEによらない開発支援Existing IDE Support and how to cope without it). Furthermore, it is not necessary to append .class to identify a class literal in Groovy as it is in Java.
The application of plugins is idempotent. That is, a plugin can be applied multiple times. If the plugin has previously been applied, any further applications will have no effect.
A plugin is simply any class that implements the Plugin interface. Gradle provides
the core plugins as part of its distribution so simply applying the plugin as above is all you need to do.
However, non-core binary plugins need to be available to the build classpath before they can be applied. This can
be achieved in a number of ways, including:
- Defining the plugin as an inline class declaration inside a build script.
- Defining the plugin as a source file under the buildSrc directory in the project.
- Including the plugin from an external jar defined as a buildscript dependency (see 「ビルドスクリプトで外部ライブラリを使うときの依存関係設定External dependencies for the build script」).
- Including the plugin from the plugin portal using the plugins DSL (see 「Applying plugins with the plugins DSL」).
For more on defining your own plugins, see 59章カスタムプラグインの作成Writing Custom Plugins.
The plugins DSL is currently incubating. Please be aware that the DSL and other configuration may change in later Gradle versions.
The new plugins DSL provides a more succinct and convenient way to declare plugin dependencies. It works with the
new Gradle plugin portal to provide easy access to both core and community
plugins. The plugins script block configures an instance of PluginDependenciesSpec.
プラグインは、自分自身を示す短縮名を保持、公開しています。
上の例では、短縮名'java'を使ってJavaPluginを適用しています。
We could also have used the following syntax:
以下は短縮名を使わなかった場合の例です。
To apply a community plugin from the portal, the fully qualified plugin id must be used:
No further configuration is necessary. Specifically, there is no need to configure the buildscript classpath. Gradle will resolve the plugin in the plugin portal, locate it, and make it available to the build.
See PluginDependenciesSpec for more information on using the Plugin DSL.
Gradle has a vibrant community of plugin developers who contribute plugins for a wide variety of capabilities. The Gradle plugin portal provides an interface for searching and exploring community plugins.
また、プラグインの作り方は59章カスタムプラグインの作成Writing Custom Pluginsに詳しく記載されています。
Applying a plugin to the project allows the plugin to extend the project's capabilities. It can do things such as:
プラグインを適用することで、そのプロジェクトの機能を拡張することができます。例えば、
- Add tasks to the project (e.g. compile, test) プロジェクトにタスクを追加する(compileやtestなど)。
- Pre-configure added tasks with useful defaults. タスクに、便利なデフォルト値を事前に設定しておく。
- Add dependency configurations to the project (see 「依存関係のコンフィグレーション Dependency configurations」). 依存関係のコンフィギュレーションをプロジェクトに追加する(「依存関係のコンフィグレーション Dependency configurations」参照)。
- Add new properties and methods to existing type via extensions. 既存の型に新しいプロパティやメソッドを追加する。
Let's check this out:
次の例を見てください。
例21.7 プラグインにより追加されたタスク
build.gradle
apply plugin: 'java'
task show << {
println relativePath(compileJava.destinationDir)
println relativePath(processResources.destinationDir)
}gradle -q show の出力
> gradle -q show build/classes/main build/resources/main
The Java plugin has added a compileJava task and a processResources task
to the project and configured the destinationDir property of both of these tasks.
Javaプラグインは、compileJavaタスクとprocessResourceタスクをプロジェクトに追加し、それぞれのタスクにdestinationDirプロパティを設定しています。
Plugins can pre-configure the project in smart ways to support convention-over-configuration. Gradle provides mechanisms and sophisticated support and it's a key ingredient in powerful-yet-concise build scripts.
プラグインは、CoC(設定より規約)をというスマートな方法をサポートするため、プロジェクトを事前に設定しておくことができます。 Gradleにはこのメカニズムと洗練されたサポートがあり、パワフルかつ簡潔なビルドスクリプトを記述するためのカギになっています。
We saw in the example above that the Java plugins adds a task named compileJava that has
a property named destinationDir (that configures where the compiled Java source should be placed).
The Java plugin defaults this property to point to build/classes/main in the project directory.
This is an example of convention-over-configuration via a reasonable default.
先ほどの例、JavaプラグインがcompileJavaタスクを追加し、そこにdestinationDirプロパティ(コンパイルしたソースが出力される場所)を追加したコードを思い出してください。
Javaプラグインは、デフォルトでこのプロパティが、プロジェクトディレクトリのbuild/classes/mainを指すよう設定します。これは、合理的なデフォルト値を設定するCoCの一例です。
We can change this property simply by giving it a new value.
このプロパティは、新しい値を設定するだけで簡単に変更できます。
例21.8 プラグインのデフォルトを変更する
build.gradle
apply plugin: 'java' compileJava.destinationDir = file("$buildDir/output/classes") task show << { println relativePath(compileJava.destinationDir) }
gradle -q show の出力
> gradle -q show build/output/classes
However, it's likely that the compileJava task is not the only task that needs to know where
the class files are.
ただ、クラスファイルの出力場所が関係するタスクは、おそらくcompileJavaタスクだけではないでしょう。
The Java plugin adds the concept of source sets (see SourceSet)
to describe the aspects of a set of source files, one aspect being where the class files should be written to when they are compiled.
The Java plugin maps the destinationDir property of the compileJava task to this aspect of the source set.
Javaプラグインは、プロジェクトにソースセットという概念を追加します(SourceSet参照)。
ソースセットは、ソースコード一式を示す概念であり、それらがコンパイルされた際にクラスファイルが書き出される場所を示す概念でもあります。
Javaプラグインは、compileJavaタスクのdestinationDirプロパティを、ソースセットが示す出力場所にマップしているのです。
We can change where the class files are written via the source set.
クラスファイルの書き出される場所を、ソースセットで変更することができます。
例21.9 プラグインの規約オブジェクト
build.gradle
apply plugin: 'java' sourceSets.main.output.classesDir = file("$buildDir/output/classes") task show << { println relativePath(compileJava.destinationDir) }
gradle -q show の出力
> gradle -q show build/output/classes
In the example above, we applied the Java plugin which, among other things, did the following:
この例で、Javaプラグインは以下のようなことを含む様々な処理を行っています。
All of this happened during the “apply plugin: "java"” step. In the example above, we changed
the desired location of the class files after this conventional configuration had been performed. Notice by the output with the example
that the value for compileJava.destinationDir also changed to reflect the configuration change.
この全てが、apply plugin: "java"のステップで行われています。例では、規定の設定が行われた後、クラスファイルの場所を変更しました。
compileJava.destinationDirの値が、設定の変更を反映して変わっていることに注目してください。
Consider the case where another task needs to consume the class files. If this task is configured to use the value from
sourceSets.main.output.classesDir, then changing it in this location will update this
new task in addition to the compileJava task whenever it is changed.
別のタスクが、クラスファイルを使用するケースを考えてください。そのタスクが、クラスファイルの場所をsourceSets.main.output.classesDirを参照して取得するようになっていれば、ソースセットを変更するだけでcompileJavaとそのタスク、両方の設定が更新されます。
This ability to configure properties of objects to reflect the value of another object's task at all times (i.e. even when it changes) is known as “convention mapping”. It allows Gradle to provide conciseness through convention-over-configuration and sensible defaults yet not require complete reconfiguration if a conventional default needs to be changed. Without this, in the example above, we would have had to reconfigure every object that needs to work with the class files.
他のタスクの設定値をいつでも(つまり、変更されたときでさえ)反映するよう、オブジェクトのプロパティを設定できるこの方法は、規約マッピングとして知られています。 この方法により、GradleはCoCと合理的なデフォルト値による簡潔さを達成しています。また、規定のデフォルト値を変更する場合も一部のオブジェクトを設定するだけでよくなっています。 もしこの方法を採用していなければ、クラスファイルの設定をするのに全てのオブジェクトを変更してまわらなければならなかったところです。
This chapter aims to serve as an introduction to plugins and Gradle and the role they play. For more information on the inner workings of plugins, see 59章カスタムプラグインの作成Writing Custom Plugins.
この章は、プラグインと、プラグインがGradleで果たしている役割について簡単に紹介するためのものです。 プラグインの内部動作について、さらに詳しく知るには、59章カスタムプラグインの作成Writing Custom Pluginsを参照してください。There are a number of plugins included in the Gradle distribution. These are listed below.
Gradleの配布物にはいくつかのプラグインが同梱されています。以下にその一覧を掲載します。
These plugins add support for various languages which can be compiled for and executed in the JVM.
これらのプラグインは、Gradleに様々な言語サポートを追加します。JVMに向けたコンパイルやJVM上でのプログラム実行などを行います。
表22.1 言語プラグインLanguage plugins
| Plugin Id プラグインID | Automatically applies 自動適用 | Works with 協調して動作 | Description 説明 |
java
|
java-base
|
- |
Adds Java compilation, testing and bundling capabilities to a project. It serves as the basis for many of the other Gradle plugins. See also 7章JavaクイックスタートJava Quickstart. Javaのコンパイル、テスト、バンドル機能をプロジェクトに追加します。また、このプラグインは、他の様々なプラグインのベース機能として使用されています。7章JavaクイックスタートJava Quickstartも参照してください。 |
groovy
|
java,
groovy-base
|
- |
Adds support for building Groovy projects. See also 9章GroovyクイックスタートGroovy Quickstart. Groovyプロジェクトのビルド機能を追加します。9章GroovyクイックスタートGroovy Quickstartも参照してください。 |
scala
|
java,
scala-base
|
- |
Adds support for building Scala projects. Scalaプロジェクトのビルド機能を追加します。 |
antlr
|
java
|
- |
Adds support for generating parsers using Antlr. Antlrを使ったパーサーの生成をサポートします。 |
These plugins add support for various languages:
これらのプラグインは、以下のような様々な言語のサポートを追加します。
表22.2 言語プラグイン Language plugins
| Plugin Id プラグインID | Automatically applies 自動適用 | Works with 協調して動作 | Description 説明 |
assembler
|
- | - |
Adds native assembly language capabilities to a project. |
c
|
- | - |
Adds C source compilation capabilities to a project. |
cpp
|
- | - |
Adds C++ source compilation capabilities to a project. |
objective-c
|
- | - |
Adds Objective-C source compilation capabilities to a project. |
objective-cpp
|
- | - |
Adds Objective-C++ source compilation capabilities to a project. |
windows-resources
|
- | - |
Adds support for including Windows resources in native binaries. |
These plugins provide some integration with various runtime technologies.
これらのプラグインは、様々なランタイムをプロジェクトに統合して使用できるようにします。
表22.3 統合プラグインIntegration plugins
| Plugin Id プラグインID | Automatically applies 自動適用 | Works with 協調して動作 | Description 説明 |
application
|
java
|
- |
Adds tasks for running and bundling a Java project as a command-line application. プロジェクトをコマンドラインアプリケーションとしてビルド、実行するためのタスクを追加します。 |
ear
|
- |
java
|
Adds support for building J2EE applications. J2EEアプリケーションのビルド機能を追加します。 |
jetty
|
war
|
- |
Deploys your web application to a Jetty web container embedded in the build. See also 10章WebアプリケーションクイックスタートWeb Application Quickstart. 組み込みのJettyウェブコンテナに、アプリケーションをデプロイできるようにします。10章WebアプリケーションクイックスタートWeb Application Quickstartも参照してください。 |
maven
|
- | java,
war
|
Adds support for publishing artifacts to Maven repositories. Mavenリポジトリにアーティファクトを公開できるようにします。 |
osgi
|
java-base
|
java
|
Adds support for building OSGi bundles. OSGiバンドルのビルドをサポートします。 |
war
|
java
|
- |
Adds support for assembling web application WAR files. See also 10章WebアプリケーションクイックスタートWeb Application Quickstart. ウェブアプリケーションのWARファイルをビルドできるようにします。See also 10章WebアプリケーションクイックスタートWeb Application Quickstartも参照してください。 |
These plugins provide some integration with various runtime technologies.
これらのプラグインは、様々なランタイムをプロジェクトに統合して使用できるようにします。
表22.4 試験的な統合プラグイン Incubating integration plugins
| Plugin Id プラグインID | Automatically applies 自動適用 | Works with 協調して動作 | Description 説明 |
distribution
|
- | - |
Adds support for building ZIP and TAR distributions. ZIPおよびTARの配布物をビルドできるようにします。 |
java-library-distribution
|
java, distribution |
- |
Adds support for building ZIP and TAR distributions for a Java library. JavaライブラリをZIPおよびTARの配布物としてビルドできるようにします。 |
ivy-publish
|
- | java, war |
This plugin provides a new DSL to support publishing artifacts to Ivy repositories, which improves on the existing DSL. Ivyリポジトリへアーティファクトを公開できるようにします。DSLが既存のものから新しく改善されています。 |
maven-publish
|
- | java, war |
This plugin provides a new DSL to support publishing artifacts to Maven repositories, which improves on the existing DSL. Mavenリポジトリへアーティファクトを公開できるようにします。DSLが既存のものから新しく改善されています。 |
These plugins provide help with your software development process.
これらのプラグインは、ソフトウェアの開発プロセスを支援します。
表22.5 ソフトウェア開発プラグイン Software development plugins
| Plugin Id プラグインID | Automatically applies 自動適用 | Works with 協調して動作 | Description 説明 |
announce
|
- | - |
Publish messages to your favourite platforms, such as Twitter or Growl. TwitterやGrowlなど、任意のプラットフォーム上にメッセージを発行します。 |
build-announcements
|
announce | - |
Sends local announcements to your desktop about interesting events in the build lifecycle. ビルドライフサイクルの各種イベントのうち、指定したものについてデスクトップ上にローカルで通知します。 |
checkstyle
|
java-base
|
- |
Performs quality checks on your project's Java source files using Checkstyle and generates reports from these checks. Checkstyleを使ってJavaソースコードの品質をチェックし、レポートを生成します。 |
codenarc
|
groovy-base
|
- |
Performs quality checks on your project's Groovy source files using CodeNarc and generates reports from these checks. CodeNarcを使ってGroovyソースコードの品質をチェックし、レポートを生成します。 |
eclipse
|
- | java,groovy,
scala
|
Generates files that are used by Eclipse IDE, thus making it possible to import the project into Eclipse. See also 7章JavaクイックスタートJava Quickstart. Eclipse IDEが使用するファイルを生成し、プロジェクトをEclipseにインポートできるようにします。7章JavaクイックスタートJava Quickstartも参照してください。 |
eclipse-wtp
|
- | ear,
war
|
Does the same as the eclipse plugin plus generates eclipse WTP (Web Tools Platform) configuration files. After importing to eclipse your war/ear projects should be configured to work with WTP. See also 7章JavaクイックスタートJava Quickstart. eclipseプラグインが生成するファイルに加え、eclipse WTP (Web Tools Platform)の設定ファイルも生成します。 eclipseにインポートすれば、war/earプロジェクトがWTPで認識されるよう設定されているはずです。7章JavaクイックスタートJava Quickstartも参照してください。 |
findbugs
|
java-base
|
- |
Performs quality checks on your project's Java source files using FindBugs and generates reports from these checks. FindBugsを使ってプロジェクトに含まれるJavaソースコードの品質をチェックし、レポートを生成します。 |
idea
|
- |
java
|
Generates files that are used by Intellij IDEA IDE, thus making it possible to import the project into IDEA. Intellij IDEA IDEが使用するファイルを生成し、プロジェクトをIDEAにインポートできるようにします。 |
jdepend
|
java-base
|
- |
Performs quality checks on your project's source files using JDepend and generates reports from these checks. JDependを使ってソースコードの品質をチェックし、レポートを生成します。 |
pmd
|
java-base
|
- |
Performs quality checks on your project's Java source files using PMD and generates reports from these checks. PMDを使ってJavaソースコードの品質をチェックし、レポートを生成します。 |
project-report
|
reporting-base
|
- |
Generates reports containing useful information about your Gradle build. Gradleビルドに関する有用な情報が載ったレポートを生成します。 |
signing
|
base | - |
Adds the ability to digitally sign built files and artifacts. ビルドしたファイルとアーティファクトにデジタル署名を行う機能を追加します。 |
sonar
|
- | java-base, java, jacoco |
Provides integration with the
Sonar
code quality platform. Superceeded by the Sonarコード品質プラットフォームとの連携機能を提供します。今は後継として |
These plugins provide help with your software development process.
これらのプラグインは、ソフトウェアの開発プロセスを支援します。
表22.6 ソフトウェア開発プラグイン Software development plugins
| Plugin Id プラグインID | Automatically applies 自動適用 | Works with 協調して動作 | Description 説明 |
build-dashboard
|
reporting-base | - |
Generates build dashboard report. |
build-init
|
wrapper | - |
Adds support for initializing a new Gradle build. Handles converting a Maven build to a Gradle build. |
cunit
|
- | - |
Adds support for running CUnit tests. |
jacoco
|
reporting-base | java |
Provides integration with the JaCoCo code coverage library for Java. |
sonar-runner
|
- | java-base, java, jacoco |
Provides integration with the
Sonar
code quality platform. Supersedes the |
visual-studio
|
- | native language plugins |
Adds integration with Visual Studio. |
wrapper
|
- | - |
Adds a |
java-gradle-plugin
|
java |
Assists with development of Gradle plugins by providing standard plugin build configuration and validation. |
These plugins form the basic building blocks which the other plugins are assembled from. They are available for you to use in your build files, and are listed here for completeness. However, be aware that they are not yet considered part of Gradle's public API. As such, these plugins are not documented in the user guide. You might refer to their API documentation to learn more about them.
これらのプラグインは、他のプラグインを組み立てるための基本的なビルド用の部品を構成します。また、ビルドスクリプト内で自分で使うこともできます。ここにその完全な一覧を掲載しました。 しかし、これらのプラグインはまだGradleの正式な公開APIとはなっていないことに注意してください。そのため、ユーザーガイドでは解説されていません。詳細について調べたい際は、APIドキュメントが参考になるかもしれません。
表22.7 ベースプラグイン Base plugins
| Plugin Id プラグインID | Description 説明 |
| base |
Adds the standard lifecycle tasks and configures reasonable defaults for the archive tasks: 一般的なライフサイクルを構成するタスクを追加し、アーカイブタスクにリーズナブルなデフォルト値を設定します。
|
| java-base |
Adds the source sets concept to the project. Does not add any particular source sets. プロジェクトにソースセットの概念を導入します。実際のソースセットは追加されません。 |
| groovy-base |
Adds the Groovy source sets concept to the project. プロジェクトにGroovyソースセットの概念を導入します。 |
| scala-base |
Adds the Scala source sets concept to the project. プロジェクトにScalaソースセットの概念を導入します。 |
| reporting-base |
Adds some shared convention properties to the project, relating to report generation. レポート生成に関するいくつかの一般的な規約プロパティをプロジェクトに追加します。 |
You can find a list of external plugins at the Gradle Plugins site.
サードパーティ製のプラグインはGradleプラグインポータルで見つけることができます。
The Java plugin adds Java compilation along with testing and bundling capabilities to a project. It serves as the basis for many of the other Gradle plugins.
Javaプラグインは、プロジェクトにJavaのコンパイル、テスト、そしてビルド能力を与えます。このプラグインは、他の多くのGradleプラグインの基礎となっています。
To use the Java plugin, include the following in your build script:
Javaプラグインを使うためには、ビルドスクリプトに下記を含めます:
The Java plugin introduces the concept of a source set. A source set is simply a group of source files which are compiled and executed together. These source files may include Java source files and resource files. Other plugins add the ability to include Groovy and Scala source files in a source set. A source set has an associated compile classpath, and runtime classpath.
Javaプラグインはソースセットの概念を導入します。ソースセットは、一緒にコンパイルされ実行されるソースファイルのグループです。このソースファイルには、Javaソースファイルとリソースファイルを含むことができます。他のプラグインは、ソースセットにGroovyやScalaのソースファイルを含めることを可能にします。ソースセットは、それぞれに関連づけられたコンパイル時クラスパスと実行時クラスパスを持ちます。
One use for source sets is to group source files into logical groups which describe their purpose. For example, you might use a source set to define an integration test suite, or you might use separate source sets to define the API and implementation classes of your project.
ソースセットを使うと、ソースファイルを論理的なグループに分割し、それぞれ別個の目的を持たせることもできます。例えば、統合テストスイートやプロジェクトのAPIクラスを定義したり、異なるJavaバージョンでコンパイルする必要があるソースを分離することなどに使うことができます。
The Java plugin defines two standard source sets, called main and test.
The main source set contains your production source code, which is compiled and assembled
into a JAR file. The test source set contains your test source code, which is
compiled and executed using JUnit or TestNG. These can be unit tests, integration tests, acceptance tests,
or any combination that is useful to you.
Javaプラグインは、mainとtestという二つの標準ソースセットを定義します。mainソースセットは、コンパイルされJARファイルを構成する製品ソースコードを含みます。testソースセットは、コンパイルされJUnitやTestNGで実行されるユニットテストコードを含みます。
The Java plugin adds a number of tasks to your project, as shown below.
Javaプラグインは、以下に示すような数多くのタスクをプロジェクトに追加します。
表23.1 Javaプラグイン - タスクJava plugin - tasks
| タスク名Task name | 依存先Depends on | 型Type | 説明Description |
compileJava
|
コンパイル時クラスパスを作り出すすべてのタスク。
compileコンフィギュレーションに含まれる、
プロジェクトの依存関係のためのjarタスクを含む
All tasks which produce the compile classpath. This includes the jar task for
project dependencies included in the compile configuration.
|
JavaCompile |
javacを使って製品Javaソースファイルをコンパイルする Compiles production Java source files using javac. |
processResources
|
- | Copy |
製品リソースを製品クラスディレクトリにコピーする Copies production resources into the production classes directory. |
classes
|
compileJava と processResources。
一部のプラグインはさらにコンパイルタスクを追加する
The compileJava task and the processResources task.
Some plugins add additional compilation tasks.
|
Task |
製品クラスディレクトリを構築する Assembles the production classes directory. |
compileTestJava
|
compile、そしてテストのコンパイル時クラスパスを作り出すすべてのタスク
compile, plus all tasks which produce the test compile classpath.
|
JavaCompile |
javacを使ってテストJavaソースファイルをコンパイルする Compiles test Java source files using javac. |
processTestResources
|
- | Copy |
テストリソースをテストクラスディレクトリにコピーする Copies test resources into the test classes directory. |
testClasses
|
compileTestJava と processTestResources。一部のプラグインはさらにテストコンパイルタスクを追加する
compileTestJava task and processTestResources task.
Some plugins add additional test compilation tasks.
|
Task |
テストクラスディレクトリを構築する Assembles the test classes directory. |
jar
|
compile
|
Jar |
JARファイルを構築する Assembles the JAR file |
javadoc
|
compile |
Javadoc |
Javadocを使って製品JavaソースのAPIドキュメントを生成する Generates API documentation for the production Java source, using Javadoc |
test
|
compile と
compileTest、そしてテストの実行時クラスパスを作り出すすべてのタスク
compile,
compileTest,
plus all tasks which produce the test runtime classpath.
|
Test |
JUnitかTestNGを使ってユニットテストを実行する Runs the unit tests using JUnit or TestNG. |
uploadArchives
|
archivesコンフィギュレーションのアーティファクトを生成するタスク
( jarを含む)
The tasks which produce the artifacts in the archives configuration, including jar.
|
Upload |
archives コンフィギュレーションのアーティファクト(JARファイルを含む)をアップロードする
Uploads artifacts in the archives configuration, including the JAR file. |
clean
|
- | Delete |
プロジェクトのビルドディレクトリを削除するDeletes the project build directory. |
clean
|
- | Delete |
指定したタスクが生成したファイルを削除する。
例えばcleanJarはjarタスクが作ったJARファイルを削除し、cleanTestはtestタスクが作ったテスト結果を削除する。
Deletes files created by specified task. cleanJar
will delete the JAR file created by the jar task, and
cleanTest will delete the test results created by the test task.
|
For each source set you add to the project, the Java plugin adds the following compilation tasks:
Javaプラグインは、プロジェクトに追加されるソースセットの各々について以下のコンパイルタスクを追加します:
表23.2 Javaプラグイン - ソースセットタスクJava plugin - source set tasks
| タスク名Task name | 依存先Depends on | 型Type | 説明Description |
compile
|
このソースセットのコンパイル時クラスパスを作り出すすべてのタスク All tasks which produce the source set's compile classpath. | JavaCompile |
javacを使って特定のソースセットのJavaソースファイルをコンパイルする Compiles the given source set's Java source files using javac. |
process
|
- | Copy |
特定のソースセットのリソースをそのクラスディレクトリにコピーする Copies the given source set's resources into the classes directory. |
|
compile と
process。一部のプラグインはさらにこのソースセットのコンパイルタスクを追加する
The compile task and
the process task.
Some plugins add additional compilation tasks for the source set.
|
Task |
特定のソースセットのクラスディレクトリを構築する Assembles the given source set's classes directory. |
The Java plugin also adds a number of tasks which form a lifecycle for the project:
Javaプラグインは、プロジェクトのライフサイクルを構成する数多くのタスクも追加します:
表23.3 Javaプラグイン - ライフサイクルタスクJava plugin - lifecycle tasks
| タスク名Task name | 依存先Depends on | 型Type | 説明Description |
assemble
|
jarを含む、プロジェクトのすべてのアーカイブタスク。
一部のプラグインはプロジェクトにさらにアーカイブタスクを追加する
All archive tasks in the project, including jar. Some plugins add additional
archive tasks to the project.
|
Task |
プロジェクトのすべてのアーカイブを構築する Assembles all the archives in the project. |
check
|
testを含む、プロジェクトのすべての検証タスク。
一部のプラグインはプロジェクトにさらに検証タスクを追加する
All verification tasks in the project, including test. Some plugins add
additional verification tasks to the project.
|
Task |
プロジェクトのすべての検証タスクを実行する Performs all verification tasks in the project. |
build
|
check と assemble
check and assemble
|
Task |
プロジェクトのフルビルドを実行する Performs a full build of the project. |
buildNeeded
|
build と、testRuntimeコンフィギュレーションのプロジェクトライブラリ依存先すべての
buildNeededタスク
build and buildNeeded tasks in all project lib dependencies of the
testRuntime configuration.
|
Task |
このプロジェクトと、このプロジェクトが依存しているすべてのプロジェクトのフルビルドを実行する。 Performs a full build of the project and all projects it depends on. |
buildDependents
|
build と、testRuntimeコンフィギュレーションのプロジェクトライブラリ依存先がこのプロジェクトであるすべてのプロジェクトの
buildDependentsタスク
build and buildDependents tasks in all projects with a project lib
dependency on this project in a testRuntime configuration.
|
Task |
このプロジェクトと、このプロジェクトに依存しているすべてのプロジェクトのフルビルドを実行する。 Performs a full build of the project and all projects which depend on it. |
build
|
ConfigNameコンフィギュレーションのアーティファクトを作り出すタスク
The tasks which produce the artifacts in configuration ConfigName.
|
Task |
指定されたコンフィギュレーションのアーティファクトを構築する。 このタスクは、Javaプラグインが暗黙的に適用するBaseプラグインにより追加される。 Assembles the artifacts in the specified configuration. The task is added by the Base plugin which is implicitly applied by the Java plugin. |
upload
|
ConfigNameコンフィギュレーションのアーティファクトをアップロードするタスク
The tasks which uploads the artifacts in configuration ConfigName.
|
Upload |
指定されたコンフィギュレーションのアーティファクトを構築しアップロードする。 このタスクは、Javaプラグインが暗黙的に適用するBaseプラグインにより追加される。 Assembles and uploads the artifacts in the specified configuration. The task is added by the Base plugin which is implicitly applied by the Java plugin. |
The following diagram shows the relationships between these tasks.
下の図は、上記のタスク間の関係を示しています。
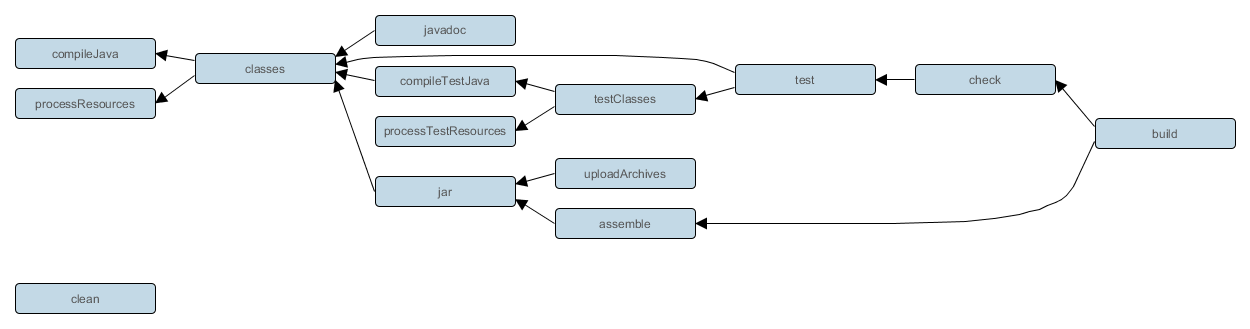
The Java plugin assumes the project layout shown below. None of these directories need exist or have anything in them. The Java plugin will compile whatever it finds, and handles anything which is missing.
Javaプラグインは、以下のようなプロジェクトレイアウトを仮定しています。これらのディレクトリは、存在しなかったり中身が空でもかまいません。Javaプラグインは、見つけたものをコンパイルし、見つからないものには適切に対処します。
表23.4 Javaプラグイン - デフォルトプロジェクトレイアウトJava plugin - default project layout
| ディレクトリDirectory | 意味Meaning | |
src/main/java
|
製品のJavaソースProduction Java source | |
src/main/resources
|
製品のリソースProduction resources | |
src/test/java
|
テストのJavaソースTest Java source | |
src/test/resources
|
テストのリソースTest resources | |
src/
|
特定のソースセットのJavaソースJava source for the given source set | |
src/
|
特定のソースセットのリソースResources for the given source set |
You configure the project layout by configuring the appropriate source set. This is discussed in more detail in the following sections. Here is a brief example which changes the main Java and resource source directories.
プロジェクトのレイアウトは、適切なソースセットを設定することでカスタマイズできます。これについては後続の節でより詳しく説明します。以下に、mainのJavaソースとリソースのソースディレクトリを変更する簡単な例を示します。
例23.2 Javaソースレイアウトのカスタマイズ
build.gradle
sourceSets {
main {
java {
srcDir 'src/java'
}
resources {
srcDir 'src/resources'
}
}
}The Java plugin adds a number of dependency configurations to your project, as shown below. It assigns
those configurations to tasks such as compileJava and test.
Javaプラグインは、以下のような多くの依存関係のコンフィギュレーションをプロジェクトに追加します。
これらのコンフィギュレーションはcompileJavaやtestといったタスクに割り当てられます。
表23.5 Javaプラグイン - 依存関係のコンフィギュレーションJava plugin - dependency configurations
| 名前Name | 拡張元Extends | 利用するタスクUsed by tasks | 意味Meaning |
| compile | - | compileJava | コンパイル時の依存関係 Compile time dependencies |
| runtime | compile | - | 実行時の依存関係 Runtime dependencies |
| testCompile | compile | compileTestJava | テストのコンパイル時の追加依存関係 Additional dependencies for compiling tests. |
| testRuntime | runtime, testCompile | test | テストの実行時の追加依存関係 Additional dependencies for running tests only. |
| archives | - | uploadArchives | このプロジェクトが生成するアーティファクト(jarファイルなど) Artifacts (e.g. jars) produced by this project. |
| default | runtime | - | このプロジェクトに依存するプロジェクトが使用する、デフォルトのコンフィグレーション。アーティファクトと、このプロジェクトが実行時に要求する依存関係が含まれる。 The default configuration used by a project dependency on this project. Contains the artifacts and dependencies required by this project at runtime. |
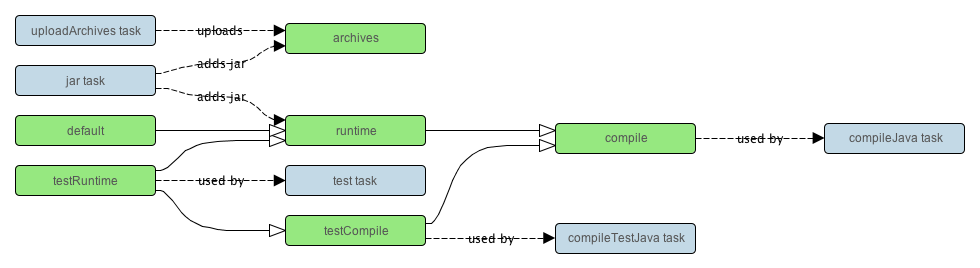
For each source set you add to the project, the Java plugins adds the following dependency configurations:
プロジェクトに追加されたそれぞれのソースセットに対し、Javaプラグインは次の依存関係コンフィグレーションを追加します。
表23.6 Javaプラグイン - ソースセットの依存関係コンフィグレーションJava plugin - source set dependency configurations
| 名前Name | 拡張元Extends | 利用するタスクUsed by tasks | 意味Meaning |
|
- | compileSourceSetJava |
対象ソースセットのコンパイル時依存関係Compile time dependencies for the given source set |
|
|
- | 対象ソースセットの実行時依存関係Runtime time dependencies for the given source set |
The Java plugin adds a number of convention properties to the project, shown below. You can use these properties in your build script as though they were properties of the project object (see 「規約 Conventions」).
Javaプラグインは、以下のような多くの規約プロパティをプロジェクトに追加します。 これらは、ビルドスクリプトの中で、あたかもprojectオブジェクトのプロパティであるかのように使うことができます (「規約 Conventions」参照)。
表23.7 Javaプラグイン - ディレクトリプロパティJava plugin - directory properties
| プロパティ名Property name | 型Type | デフォルト値Default value | 説明Description |
reportsDirName
|
String
|
reports
|
レポートを生成するディレクトリ名。ビルドディレクトリへの相対パス The name of the directory to generate reports into, relative to the build directory. |
reportsDir
|
File (read-only)
|
|
レポートを生成するディレクトリ The directory to generate reports into. |
testResultsDirName
|
String
|
test-results
|
テスト結果の.xmlファイルを生成するディレクトリ名。ビルドディレクトリへの相対パス The name of the directory to generate test result .xml files into, relative to the build directory. |
testResultsDir
|
File (read-only)
|
|
テスト結果の.xmlファイルを生成するディレクトリThe directory to generate test result .xml files into. |
testReportDirName
|
String
|
tests
|
テストレポートを生成するディレクトリ名。レポートディレクトリへの相対パス The name of the directory to generate the test report into, relative to the reports directory. |
testReportDir
|
File (read-only)
|
|
テストレポートを生成するディレクトリ The directory to generate the test report into. |
libsDirName
|
String
|
libs
|
ライブラリを生成するディレクトリ名。ビルドディレクトリへの相対パス The name of the directory to generate libraries into, relative to the build directory. |
libsDir
|
File (read-only)
|
|
ライブラリを生成するディレクトリ The directory to generate libraries into. |
distsDirName
|
String
|
distributions
|
ディストリビューションを生成するディレクトリ名。ビルドディレクトリへの相対パス The name of the directory to generate distributions into, relative to the build directory. |
distsDir
|
File (read-only)
|
|
ディストリビューションを生成するディレクトリ The directory to generate distributions into. |
docsDirName
|
String
|
docs
|
ドキュメントを生成するディレクトリ名。ビルドディレクトリへの相対パス The name of the directory to generate documentation into, relative to the build directory. |
docsDir
|
File (read-only)
|
|
ドキュメントを生成するディレクトリ The directory to generate documentation into. |
dependencyCacheDirName
|
String
|
dependency-cache
|
ソースの依存関係情報をキャッシュするのに使用するディレクトリ名。ビルドディレクトリへの相対パス The name of the directory to use to cache source dependency information, relative to the build directory. |
dependencyCacheDir
|
File (read-only)
|
|
ソースの依存関係情報をキャッシュするのに使用するディレクトリ The directory to use to cache source dependency information. |
表23.8 Javaプラグイン - その他のプロパティJava plugin - other properties
| プロパティ名Property name | 型Type | デフォルト値Default value | 説明Description |
sourceSets
|
SourceSetContainer (read-only) |
非nullNot null | プロジェクトのソースセット Contains the project's source sets. |
sourceCompatibility
|
JavaVersion。
StringやNumberで設定することも可能。例: '1.5' や 1.5
JavaVersion. Can also set using a String or a Number, e.g.
'1.5' or 1.5.
|
Value of the current used JVM | Javaソースのコンパイル時に使用するJavaバージョン互換性 Java version compatibility to use when compiling Java source. |
targetCompatibility
|
JavaVersion。
StringやNumberで設定することも可能。例: '1.5' や 1.5
JavaVersion. Can also set using a String or Number, e.g.
'1.5' or 1.5.
|
|
クラス生成のターゲットJavaバージョン Java version to generate classes for. |
archivesBaseName
|
String
|
|
JARやZIPファイルのようなアーカイブに使用するベース名 The basename to use for archives, such as JAR or ZIP files. |
manifest
|
Manifest |
空のマニフェストan empty manifest | すべてのJARファイルを含むマニフェスト The manifest to include in all JAR files. |
These properties are provided by convention objects of type JavaPluginConvention,
and BasePluginConvention.
これらのプロパティは、JavaPluginConvention、
BasePluginConventionなどの型の規約オブジェクトによって提供されます。
You can access the source sets of a project using the sourceSets property. This
is a container for the project's source sets, of type SourceSetContainer.
There is also a sourceSets { } script block, which you can pass a closure to configure the
source set container. The source set container works pretty much the same way as other containers, such
as tasks.
プロジェクトのソースセットには、sourceSetsプロパティを使ってアクセスすることができます。
これはプロジェクトのソースセットのコンテナで、SourceSetContainer型です。
また、sourceSets()というメソッドもあり、クロージャを渡してソースセットコンテナを設定することができます。
ソースセットコンテナは、tasksのような他のコンテナと同じように働きます。
例23.3 ソースセットへのアクセス
build.gradle
// Various ways to access the main source set println sourceSets.main.output.classesDir println sourceSets['main'].output.classesDir sourceSets { println main.output.classesDir } sourceSets { main { println output.classesDir } } // Iterate over the source sets sourceSets.all { println name }
To configure an existing source set, you simply use one of the above access methods to set the properties of the source set. The properties are described below. Here is an example which configures the main Java and resources directories:
既存のソースセットを設定するには、上記のアクセスメソッドの一つを使って、そのソースセットのプロパティを設定します。 プロパティについては後述します。以下に、mainのJavaソースとリソースディレクトリを設定する例を示します:
例23.4 ソースセットのソースディレクトリの設定
build.gradle
sourceSets {
main {
java {
srcDir 'src/java'
}
resources {
srcDir 'src/resources'
}
}
}The following table lists some of the important properties of a source set.
You can find more details in the API documentation for SourceSet.
以下の表は、ソースセットの重要なプロパティの一覧です。
さらに詳しくは、SourceSetのAPIドキュメントをご覧ください。
表23.9 Javaプラグイン - ソースセットプロパティJava plugin - source set properties
| プロパティ名Property name | 型Type | デフォルト値Default value | 説明Description |
name
|
String (read-only)
|
非nullNot null | このソースセットを識別するための名前 The name of the source set, used to identify it. |
output
|
SourceSetOutput (read-only)
|
Not null | このソースセットに対する出力ファイル。コンパイルされたクラスファイルやリソースを含む。 The output files of the source set, containing its compiled classes and resources. |
output.classesDir
|
File
|
|
このソースセットのクラスを生成するディレクトリ The directory to generate the classes of this source set into. |
output.resourcesDir
|
File
|
|
このソースセットのリソースを生成するディレクトリ The directory to generate the resources of this source set into. |
compileClasspath
|
FileCollection
|
compileコンフィグレーション
compile configuration.
|
このソースセットのソースファイルのコンパイル時クラスパス The classpath to use when compiling the source files of this source set. |
runtimeClasspath
|
FileCollection
|
output + runtimeコンフィグレーション
output + runtime configuration.
|
このソースセットのクラスの実行時クラスパス The classpath to use when executing the classes of this source set. |
java
|
SourceDirectorySet (read-only)
|
非nullNot null |
このソースセットのJavaソースファイル。
Javaソースディレクトリ内の.javaファイルのみを含み、その他のファイルは含まない
The Java source files of this source set. Contains only .java files
found in the Java source directories, and excludes all other files.
|
java.srcDirs
|
Set<File>。
設定には「入力ファイルセットを指定する Specifying a set of input files」で述べる方法ならどれでも使用可
Set<File>. Can set using anything described in 「入力ファイルセットを指定する Specifying a set of input files」.
|
[
|
このソースセットのJavaソースファイルを含むソースディレクトリ The source directories containing the Java source files of this source set. |
resources
|
SourceDirectorySet (read-only)
|
非nullNot null |
このソースセットのリソース。
リソースのみを含み、リソースソースディレクトリ内の.javaファイルは含まない。
Groovyプラグインのような他のプラグインでは、このコレクションから除外されるタイプがさらに追加される。
The resources of this source set. Contains only resources, and excludes any
.java files found in the resource source directories. Other plugins,
such as the Groovy plugin, exclude additional types of files from this collection.
|
resources.srcDirs
|
Set<File>。
設定には「入力ファイルセットを指定する Specifying a set of input files」で述べる方法ならどれでも使用可Set<File>. Can set using anything described in 「入力ファイルセットを指定する Specifying a set of input files」.
|
[
|
このソースセットのリソースを含むソースディレクトリ The source directories containing the resources of this source set. |
allJava
|
SourceDirectorySet (read-only)
|
java
|
このソースセットのすべての.javaファイル。
Groovyプラグインのような一部のプラグインでは、さらに追加のJavaソースファイルがこのコレクションに追加される。
All .java files of this source set. Some plugins, such as the Groovy plugin,
add additional Java source files to this collection.
|
allSource
|
SourceDirectorySet (read-only)
|
resources + java
|
このソースセットのすべてのソースファイル。 すべてのリソースファイルとJavaソースファイルが含まれる。 Groovyプラグインのような一部のプラグインでは、さらに追加のソースファイルがこのコレクションに追加される。 All source files of this source set. This include all resource files and all Java source files. Some plugins, such as the Groovy plugin, add additional source files to this collection. |
To define a new source set, you simply reference it in the sourceSets { } block. Here's an example:
新しいソースセットは、sourceSets { }ブロックの中でそれを参照するだけで定義できます。以下がその例です。:
When you define a new source set, the Java plugin adds some dependency configurations for the source set, as shown in 表23.6「Javaプラグイン - ソースセットの依存関係コンフィグレーションJava plugin - source set dependency configurations」. You can use these configurations to define the compile and runtime dependencies of the source set.
ソースセットを定義すると、Javaプラグインは、そのソースセットのために表23.6「Javaプラグイン - ソースセットの依存関係コンフィグレーションJava plugin - source set dependency configurations」で示した依存関係のコンフィグレーションを追加します。これらのコンフィグレーションを、そのソースセットのコンパイル時や実行時の依存関係を定義するために使うことができます。
例23.6 ソースセットの依存関係定義
build.gradle
sourceSets {
intTest
}
dependencies {
intTestCompile 'junit:junit:4.11'
intTestRuntime 'org.ow2.asm:asm-all:4.0'
}
The Java plugin also adds a number of tasks which assemble the classes for the
source set, as shown in 表23.2「Javaプラグイン - ソースセットタスクJava plugin - source set tasks」. For example, for a source set called
intTest, compiling the classes for this source set is done by
running gradle intTestClasses.
また、Javaプラグインは、表23.2「Javaプラグイン - ソースセットタスクJava plugin - source set tasks」に示したような、 そのソースセットのクラスを構築するためのタスクを追加します。 例えば、intTestというソースセットを追加すると、gradle intTestClassesと実行することでそのソースセットのクラスをコンパイルできるようになります。
例23.7 ソースセットのコンパイル
gradle intTestClasses の出力
> gradle intTestClasses :compileIntTestJava :processIntTestResources :intTestClasses BUILD SUCCESSFUL Total time: 1 secs
Adding a JAR containing the classes of a source set:
ソースセットのクラスを含んだJARを追加します:
Generating Javadoc for a source set:
ソースセットのJavadocを生成します:
例23.9 ソースセットのJavadocを生成
build.gradle
task intTestJavadoc(type: Javadoc) {
source sourceSets.intTest.allJava
}Adding a test suite to run the tests in a source set:
ソースセットに含まれるテストを実行するテストスイートを追加します:
例23.10 ソースセットのテストを実行
build.gradle
task intTest(type: Test) {
testClassesDir = sourceSets.intTest.output.classesDir
classpath = sourceSets.intTest.runtimeClasspath
}The javadoc task is an instance of Javadoc.
It supports the core Javadoc options and the options of the standard doclet described in the
reference documentation
of the Javadoc executable.
For a complete list of supported Javadoc options consult the API documentation of the following classes:
CoreJavadocOptions and StandardJavadocDocletOptions.
javadocタスクはJavadocのインスタンスです。
javadocの主なオプションと、javadocコマンドのリファレンスガイドに記載されている標準docletのオプションをサポートしています。
サポートしているjavadocオプションの完全なリストについては、次のクラスのAPIドキュメントを参照してください:
CoreJavadocOptionsおよびStandardJavadocDocletOptions。
表23.10 Javaプラグイン - JavadocプロパティJava plugin - Javadoc properties
| プロパティ名Property name | 型Type | デフォルト値Default value |
classpath
|
FileCollection |
sourceSets.main.output + sourceSets.main.compileClasspath |
source |
FileTree。
設定には「入力ファイルセットを指定する Specifying a set of input files」で述べる方法ならどれでも使用可
FileTree. Can set using anything described in 「入力ファイルセットを指定する Specifying a set of input files」. |
sourceSets.main.allJava |
destinationDir
|
File |
|
title
|
String |
プロジェクトの名前とバージョン The name and version of the project |
The clean task is an instance of Delete. It
simply removes the directory denoted by its dir
property.
cleanタスクはDeleteのインスタンスです。
dirプロパティで示されるディレクトリを削除します。
表23.11 Javaプラグイン - CleanプロパティJava plugin - Clean properties
| タスクプロパティProperty name | 型Type | デフォルト値Default value |
dir
|
File |
|
The Java plugin uses the Copy task for resource handling. It adds an
instance for each source set in the project. You can find out more about the copy task in
「ファイルをコピーする Copying files」.
Javaプラグインは、リソースの処理にCopyタスクを使います。
プロジェクトの各ソースセットに対して一つのインスタンスを追加します。
copyタスクの詳細については、「ファイルをコピーする Copying files」をご覧ください。
表23.12 Javaプラグイン- processResourcesプロパティJava plugin - ProcessResources properties
| タスクプロパティProperty name | 型Type | デフォルト値Default value |
srcDirs
|
Object。
設定には「入力ファイルセットを指定する Specifying a set of input files」で述べる方法ならどれでも使用可
Object. Can set using anything described in 「入力ファイルセットを指定する Specifying a set of input files」. |
|
destinationDir
|
File。
設定には「ファイルを参照する Locating files」で述べる方法ならどれでも使用可
File. Can set using anything described in 「ファイルを参照する Locating files」. |
|
The Java plugin adds a JavaCompile instance for each
source set in the project. Some of the most common configuration options are shown below.
Javaプラグインは、プロジェクトの各ソースセットに対して一つのJavaCompileインスタンスを追加します。
compileタスクは、実際のコンパイル作業をAntのjavacタスクに委譲します。
Antのjavacタスクの大部分のプロパティが設定可能です。
表23.13 Javaプラグイン - CompileプロパティJava plugin - Compile properties
| タスクプロパティProperty name | 型Type | デフォルト値Default value |
classpath
|
FileCollection |
|
source
|
FileTree。
設定には「入力ファイルセットを指定する Specifying a set of input files」で述べる方法ならどれでも使用可
FileTree. Can set using anything described in 「入力ファイルセットを指定する Specifying a set of input files」. |
|
destinationDir
|
File. |
|
By default, the Java compiler runs in the Gradle process. Setting options.fork to true
causes compilation to occur in a separate process. In the case of the Ant javac task, this means that a new process will be
forked for each compile task, which can slow down compilation. Conversely, Gradle's direct compiler integration (see above) will
reuse the same compiler process as much as possible. In both cases, all fork options specified
with options.forkOptions will be honored.
デフォルトでは、javaコンパイラはGradleプロセス上で実行されます。設定を options.fork を trueにすると、
個別のプロセスでコンパイルを実行します。 Antのjavacタスクを例に挙げると, コンパイルタスクを実行するたびに新しいプロセスが実行される形で
遅延実行させることも可能です。反対に、Gradleのダイレクトコンパイラの利用を有効にした場合 (上記参照) 出来るだけ
同一のプロセスでコンパイルを実行しようとします. 両方利用するケースの場合は、全ての処理実行オプションは
options.forkOptions によって指定されるでしょう。
Starting with Gradle 2.1, it is possible to compile Java incrementally. This feature is still incubating.
See the JavaCompile task for information on how to enable it.
Main goals for incremental compilations are:
- Avoid wasting time compiling source classes that don't have to be compiled. This means faster builds, especially when a change to a source class or a jar does not incur recompilation of many source classes that depend on the changed input.
- Change as few output classes as possible. Classes that don't need to be recompiled remain unchanged in the output directory. An example scenario when this is really useful is using JRebel - the fewer output classes are changed the quicker the jvm can use refreshed classes.
The incremental compilation at a high level:
- The detection of the correct set of stale classes is reliable at some expense of speed. The algorithm uses bytecode analysis and deals gracefully with compiler optimizations (inlining of non-private constants), transitive class dependencies, etc. Example: When a class with a public constant changes, we eagerly compile everything to avoid problems with constants inlined by the compiler. Down the road we will tune the algorithm and caching so that incremental Java compilation can be a default setting for every compile task.
- To make incremental compilation fast, we cache class analysis results and jar snapshots. The initial incremental compilation can be slower due to the cold caches.
The test task is an instance of Test.
It automatically detects and executes all unit tests in the test source set.
It also generates a report once test execution is complete. JUnit and TestNG are both supported.
Have a look at Test for the complete API.
testタスクはTestのインスタンスです。
このタスクは、testソースセットに含まれるすべてのユニットテストを自動的に検出し、実行します。
また、テストの実行が完了するとレポートを生成します。JUnitとTestNGの両方がサポートされています。
完全なAPIについては、Testを見てください。
Tests are executed in a separate JVM, isolated from the main build process. The Test task's
API allows you some control over how this happens.
テストの実行は別のJVMで行われ、メインのビルドプロセスからは分離されます。TestタスクのAPIを使って、テストの実行を制御できます。
There are a number of properties which control how the test process is launched. This includes things such as system properties, JVM arguments, and the Java executable to use.
テストプロセスの起動を制御するための多くのプロパティが用意されています。 これにはシステムプロパティや、JVMへの引数、Java実行コマンドなどが含まれます。
You can specify whether or not to execute your tests in parallel. Gradle provides parallel test execution
by running multiple test processes concurrently. Each test process executes only a single test at a time, so you
generally don't need to do anything special to your tests to take advantage of this.
The maxParallelForks property specifies the maximum number of test processes to run
at any given time. The default is 1, that is, do not execute the tests in parallel.
テストが並列に実行されるかどうかを指定することができます。
Gradleでは、複数のテストプロセスを同時に実行する並列テスト実行が可能です。
各テストプロセスは一度に一つのテストだけを実行するので、通常、これを活用するために何か特別な準備をする必要はありません。
maxParallelForksプロパティで、同時に実行されるテストプロセスの最大個数を指定します。
デフォルトは1で、これはテストが並列実行されないということです。
The test process sets the org.gradle.test.worker system property to a unique
identifier for that test process, which you can use, for example, in files names or other
resource identifiers.
テストプロセスでは、そのテストプロセスの一意な識別子であるorg.gradle.test.workerシステムプロパティが設定されます。
これは例えばファイル名の一部や、その他のリソースの識別子などに利用することができます。
You can specify that test processes should be restarted after it has executed a certain number of
test classes. This can be a useful alternative to giving your test process a very large
heap.
The forkEvery property specifies the
maximum number of test classes to execute in a test process. The default is to execute an unlimited number
of tests in each test process.
一定のテストクラスを実行し終わったら、そのテストプロセスが再起動されるように指定することができます。
これは、テストプロセスに巨大なヒープを割り当てることに対する便利な代替手段になりえます。
forkEveryプロパティは、一つのテストプロセス内で実行されるテストクラスの最大数を指定します。
デフォルトでは各テストプロセスで無制限な数のテストを実行できます。
The task has an ignoreFailures property to control the behavior when tests fail.
The Test task always executes every test that it detects. It stops the build afterwards if ignoreFailures
is false and there are failing tests. The default value of ignoreFailures is false.
このタスクは、テストが失敗したときの振る舞いを制御するignoreFailuresプロパティを持っています。
Testはいつも見つけたテストをすべて実行します。
ignoreFailuresがfalseのとき、失敗したテストがあるとそれ以降のビルドは停止されます。
ignoreFailuresのデフォルト値はfalseです。
The testLogging property allows you to configure which test events are going to be logged and at
which detail level. By default, a concise message will be logged for every failed test. See
TestLoggingContainer for how to tune test logging to your
preferences.
testLoggingプロパティで、どのテストイベントを、どのログレベルでログに出すべきか設定することができます。
デフォルトでは、全ての失敗したテストに対して簡潔なメッセージがログ出力されます。好みに応じてテストログを設定する方法については、TestLoggingContainerを参照してください。
The test task provides a Test.getDebug() property that can be set to launch to make the JVM wait for a
debugger to attach to port 5005 before proceeding with test execution.
This can also be enabled at invocation time via the --debug-jvm task option (since Gradle 1.12).
Starting with Gradle 1.10, it is possible to include only specific tests, based on the test name pattern.
Filtering is a different mechanism than test class inclusion / exclusion that will be described in the next few paragraphs
(-Dtest.single, test.include and friends).
The latter is based on files, e.g. the physical location of the test implementation class.
File-level test selection does not support many interesting scenarios that are possible with test-level filtering.
Some of them Gradle handles now and some will be satisfied in future releases:
- Filtering at the level of specific test methods; executing a single test method
- Filtering based on custom annotations (future)
- Filtering based on test hierarchy; executing all tests that extend ceratain base class (future)
- Filtering based on some custom runtime rule, e.g. particular value of a system property or some static state (future)
Test filtering feature has following characteristic:
- Fully qualified class name or fully qualified method name is supported, e.g. “org.gradle.SomeTest”, “org.gradle.SomeTest.someMethod”
- Wildcard '*' is supported for matching any characters
- Command line option “--tests” is provided to conveniently set the test filter. Especially useful for the classic 'single test method execution' use case. When the command line option is used, the inclusion filters declared in the build script are ignored.
- Gradle tries to filter the tests given the limitations of the test framework API. Some advanced, synthetic tests may not be fully compatible with filtering. However, the vast majority of tests and use cases should be handled neatly.
- Test filtering supersedes the file-based test selection. The latter may be completely replaced in future. We will grow the the test filtering api and add more kinds of filters.
例23.11 Filtering tests in the build script
build.gradle
test {
filter {
//include specific method in any of the tests
includeTestsMatching "*UiCheck"
//include all tests from package
includeTestsMatching "org.gradle.internal.*"
//include all integration tests
includeTestsMatching "*IntegTest"
}
}
For more details and examples please see the TestFilter reference.
Some examples of using the command line option:
gradle test --tests org.gradle.SomeTest.someSpecificFeaturegradle test --tests *SomeTest.someSpecificFeaturegradle test --tests *SomeSpecificTestgradle test --tests all.in.specific.package*gradle test --tests *IntegTestgradle test --tests *IntegTest*ui*gradle someTestTask --tests *UiTest someOtherTestTask --tests *WebTest*ui
Setting a system property of taskName.single = testNamePattern
will only execute tests that match the specified testNamePattern.
The taskName can be a full multi-project path like “:sub1:sub2:test”
or just the task name. The testNamePattern will be used to form an include
pattern of “**/testNamePattern*.class”;.
If no tests with this pattern can be found an exception is thrown. This is to shield you from false security.
If tests of more than one subproject are executed, the pattern is applied to each subproject. An exception
is thrown if no tests can be found for a particular subproject. In such a case you can use the path notation of the
pattern, so that the pattern is applied only to the test task of a specific subproject. Alternatively you can specify the fully
qualified task name to be executed. You can also specify multiple patterns. Examples:
taskName.single = testNamePatternというシステムプロパティを設定すると、指定されたtestNamePatternにマッチするテストだけが実行されます。
taskNameには、":sub1:sub2:test"のような完全なマルチプロジェクトパスか、単なるタスク名が使えます。
testNamePatternは、"**/testNamePattern*.class"という形式のincludesパターンを構成するのに使われます。
このパターンでテストが一つも見つからない場合は例外が発生します。
これは手違いによる偽りの安心を防ぐためです。
複数のサブプロジェクトに対してテストが実行される場合、パターンは各サブプロジェクトに適用されます。
ある一つのサブプロジェクトでテストが見つからなかった場合でも例外が発生します。
このような場合は、パターンのパス記法を使って、パターンが特定のサブプロジェクトのtestタスクだけに適用されるようにできます。
あるいは、完全修飾タスク名を使って実行するタスクを指定することも可能です。
パターンは複数指定することもできます。以下は実例です:
gradle -Dtest.single=ThisUniquelyNamedTest testgradle -Dtest.single=a/b/ testgradle -DintegTest.single=*IntegrationTest integTestgradle -Dtest.single=:proj1:test:Customer buildgradle -DintegTest.single=c/d/ :proj1:integTest
The Test task detects which classes are test classes by inspecting the compiled test classes.
By default it scans all .class files. You can set custom includes / excludes, only those
classes will be scanned. Depending on the test framework used (JUnit / TestNG) the test class detection
uses different criteria.
Testタスクは、コンパイル済みのtestクラスを調べて、どのクラスがテストクラスかを見つけだします。
デフォルトでは、すべての.classファイルがスキャンされます。
カスタムの includes / excludes を設定して、特定のクラスだけをスキャンするようにもできます。
テストクラスの検出には、使用するテストフレームワーク(JUnit / TestNG)によって異なる基準が使われます。
When using JUnit, we scan for both JUnit 3 and 4 test classes. If any of the following criteria match, the class is considered to be a JUnit test class:
JUnitを使っている場合は、JUnit 3と4両方のテストクラスをスキャンします。 以下のいずれかの基準に合致する場合、そのクラスはJUnitのテストクラスだと見なされます:
Class or a super class extends
TestCaseorGroovyTestCaseそのクラスまたはスーパークラスが
TestCaseかGroovyTestCaseをextendsしているClass or a super class is annotated with
@RunWithそのクラスまたはスーパークラスに
@RunWithアノテーションが付いているClass or a super class contain a method annotated with
@Testそのクラスまたはスーパークラスが
@Testアノテーションが付いたメソッドを含んでいる
When using TestNG, we scan for methods annotated with @Test.
TestNGを使っている場合は、@Testアノテーションが付いたメソッドをスキャンします。
Note that abstract classes are not executed. Gradle also scans up the inheritance tree into jar files on the test classpath.
抽象クラスは実行されないことに注意してください。 Gradleは、testクラスパス上のjarファイルに含まれる継承ツリーもスキャンします。
If you don't want to use test class detection, you can disable it by setting
scanForTestClasses to false. This will make the test task only use includes /
excludes to find test classes. If scanForTestClasses is false and no include
/ exclude patterns are specified, the defaults are
“**/*Tests.class”, “**/*Test.class” and
“**/Abstract*.class” for include and exclude, respectively.
上記のテストクラス検出を使いたくないときは、scanForTestClassesをfalseに設定することで、これを無効にすることができます。
この場合、testタスクがテストクラスを探すときにはincludes / excludesだけが使われます。
scanForTestClassesが無効になっていて、かつincludesやexcludesパターンが指定されていないときは、
デフォルトとしてincludesには"**/*Tests.class", "**/*Test.class"、
そしてexcludesには"**/Abstract*.class"が使われます。
JUnit and TestNG allows sophisticated groupings of test methods.
For grouping JUnit test classes and methods JUnit 4.8 introduces the concept of categories.
[16]
The test task allows the specification of the JUnit categories you want to include and exclude.
例23.12 JUnit Categories
build.gradle
test {
useJUnit {
includeCategories 'org.gradle.junit.CategoryA'
excludeCategories 'org.gradle.junit.CategoryB'
}
}The TestNG framework has a quite similar concept. In TestNG you can specify different test groups. [17] The test groups that should be included or excluded from the test execution can be configured in the test task.
例23.13 Grouping TestNG tests
build.gradle
test {
useTestNG {
excludeGroups 'integrationTests'
includeGroups 'unitTests'
}
}The Test task generates the following results by default.
An HTML test report.
The results in an XML format that is compatible with the Ant JUnit report task. This format is supported by many other tools, such as CI servers.
Results in an efficient binary format. The task generates the other results from these binary results.
There is also a stand-alone TestReport task type which can generate the HTML test
report from the binary results generated by one or more Test task instances. To use this task type, you need
to define a destinationDir and the test results to include in the report. Here is a sample which generates a
combined report for the unit tests from subprojects:
例23.14 Creating a unit test report for subprojects
build.gradle
subprojects {
apply plugin: 'java'
// Disable the test report for the individual test task
test {
reports.html.enabled = false
}
}
task testReport(type: TestReport) {
destinationDir = file("$buildDir/reports/allTests")
// Include the results from the `test` task in all subprojects
reportOn subprojects*.test
}You should note that the TestReport type combines the results from multiple test
tasks and needs to aggregate the results of individual test classes. This means that if a given test class is executed by
multiple test tasks, then the test report will include executions of that class, but it can be hard to distinguish individual
executions of that class and their output.
TestNG supports parameterizing test methods, allowing a particular test method to be executed multiple times with different inputs. Gradle includes the parameter values in its reporting of the test method execution.
Given a parameterized test method named aTestMethod that takes two parameters, it will be reported with the name:
aTestMethod(toStringValueOfParam1, toStringValueOfParam2). This makes identifying the parameter values for a
particular iteration easy.
表23.14 Javaプラグイン - テストプロパティJava plugin - test properties
| タスクプロパティProperty name | 型Type | デフォルト値Default value |
testClassesDir |
File |
sourceSets.test.output.classesDir |
classpath |
FileCollection |
sourceSets.test.runtimeClasspath |
testResultsDir |
File |
testResultsDir |
testReportDir |
File |
testReportDir |
testSrcDirs |
List<File> |
sourceSets.test.java.srcDirs |
The jar task creates a JAR file containing the class files and resources of the
project. The JAR file is declared as an artifact in the archives dependency
configuration. This means that the JAR is available in the classpath of a dependent project. If you upload
your project into a repository, this JAR is declared as part of the dependency descriptor. You can learn
more about how to work with archives in 「アーカイブを作成する Creating archives」 and artifact configurations in
52章アーティファクトの公開 Publishing artifacts.
jarタスクは、プロジェクトのクラスファイルとリソースを含んだJARファイルを生成します。このJARファイルはarchivesという依存関係のコンフィギュレーションで、アーティファクトとして宣言されています。
これは、(このプロジェクトに)依存しているプロジェクトのクラスパスでこのJARが利用可能ということです。
プロジェクトをリポジトリにアップロードする場合、このJARは依存関係のディスクリプタの一部として宣言されます。
アーカイブの扱いについては「アーカイブを作成する Creating archives」、アーティファクトの設定については52章アーティファクトの公開 Publishing artifactsで、さらに詳しく学ぶことができます。
Each jar or war object has a manifest
property with a separate instance of Manifest.
When the archive is generated, a corresponding MANIFEST.MF file is written into the
archive.
各jarやwarオブジェクトは、それぞれManifestのインスタンスであるmanifestプロパティを持ちます。
アーカイブが生成されるとき、対応するMANIFEST.MFファイルがアーカイブ内に作成されます。
例23.15 MANIFEST.MFのカスタマイズ
build.gradle
jar {
manifest {
attributes("Implementation-Title": "Gradle",
"Implementation-Version": version)
}
}You can create stand alone instances of a Manifest. You can use that for example,
to share manifest information between jars.
独立したManifestインスタンスを生成することもできます。
これは例えば、複数のjar間でマニフェスト情報を共有する目的などに利用できます。
例23.16 manifestオブジェクトの作成
build.gradle
ext.sharedManifest = manifest {
attributes("Implementation-Title": "Gradle",
"Implementation-Version": version)
}
task fooJar(type: Jar) {
manifest = project.manifest {
from sharedManifest
}
}You can merge other manifests into any Manifest
object. The other manifests might
be either described by a file path or, like in the example above, by a reference to another Manifest object.
Manifestオブジェクトに他のマニフェストをマージすることもできます。
マージ対象のマニフェストは、ファイルパス、または上の例のように別のManifestオブジェクトの参照によって指定できます。
例23.17 特定のアーカイブ用にMANIFEST.MFを分離
build.gradle
task barJar(type: Jar) {
manifest {
attributes key1: 'value1'
from sharedManifest, 'src/config/basemanifest.txt'
from('src/config/javabasemanifest.txt',
'src/config/libbasemanifest.txt') {
eachEntry { details ->
if (details.baseValue != details.mergeValue) {
details.value = baseValue
}
if (details.key == 'foo') {
details.exclude()
}
}
}
}
}Manifests are merged in the order they are declared by the from statement. If
the base manifest and the merged manifest both define values for the same key, the merged manifest wins by default.
You can fully customize the merge behavior by adding eachEntry actions in which
you have access to a ManifestMergeDetails instance for each entry
of the resulting manifest. The merge is not immediately triggered by the from statement. It is done lazily,
either when generating the jar, or by calling writeTo or effectiveManifest
マニフェストはfrom文で宣言された順にマージされます。
元のマニフェストとマージするマニフェストの双方に同じキーを持つ値が定義されている場合、デフォルトではマージするマニフェストのものが有効になります。
マージの振る舞いは、マージで生成されるマニフェストの各エントリに対するManifestMergeDetailsインスタンスにアクセスする、eachEntryアクションを追加することによって自在にカスタマイズ可能です。
マージはfrom文によって即座に実行されるわけではありません。
jarの生成時、またはwriteToや effectiveManifestの呼び出し時に、遅延して実行されます。
You can easily write a manifest to disk.
マニフェストをディスクに書き出すのは簡単です。
How to upload your archives is described in 52章アーティファクトの公開 Publishing artifacts.
作成したアーカイブをアップロードする方法は、52章アーティファクトの公開 Publishing artifactsで説明しています。
[16] The JUnit wiki contains a detailed description on how to work with JUnit categories: https://github.com/junit-team/junit/wiki/Categories.
[17] The TestNG documentation contains more details about test groups: http://testng.org/doc/documentation-main.html#test-groups.
The Groovy plugin extends the Java plugin to add support for Groovy projects. It can deal with Groovy code, mixed Groovy and Java code, and even pure Java code (although we don't necessarily recommend to use it for the latter). The plugin supports joint compilation, which allows you to freely mix and match Groovy and Java code, with dependencies in both directions. For example, a Groovy class can extend a Java class that in turn extends a Groovy class. This makes it possible to use the best language for the job, and to rewrite any class in the other language if needed.
Groovyプラグインは、Javaプラグインを拡張し、Groovyプロジェクトのサポートを追加したものです。 GroovyコードとGroovy/Javaの混合コードをサポートするほか、Javaコードのみのプロジェクトを取り扱うこともできます(Javaコードだけのプロジェクトにこのプラグインを使うことはあまり推奨しませんが)。 また、JavaとGroovyのジョイントコンパイルをサポートしており、GroovyコードとJavaコードを自由に混ぜ合わせたり、お互いに統合させることができます。 例えば、GroovyのクラスはJavaのクラスを継承できますし、更にそのJavaクラスがGroovyクラスを継承していても問題ありません。時々に応じて最適な言語を選択でき、必要なときにはいつでもクラスを別言語で書き直すことができます。
To use the Groovy plugin, include the following in your build script:
Groovyプラグインを使うためには、ビルドスクリプトに下記を含めます:
The Groovy plugin adds the following tasks to the project.
Groovyプラグインは、以下のタスクをプロジェクトに追加します。
表24.1 Groovyプラグイン - タスクGroovy plugin - tasks
| タスク名Task name | 依存先Depends on | 型Type | 説明Description |
compileGroovy |
compileJava |
GroovyCompile |
製品のGroovyソースファイルをコンパイルするCompiles production Groovy source files. |
compileTestGroovy |
compileTestJava |
GroovyCompile |
テストのGroovyソースファイルをコンパイルするCompiles test Groovy source files. |
compile |
compile |
GroovyCompile |
特定のソースセットのGroovyソースファイルをコンパイルするCompiles the given source set's Groovy source files. |
groovydoc |
- | Groovydoc |
製品のGroovyソースファイルのAPIドキュメントを生成するGenerates API documentation for the production Groovy source files. |
The Groovy plugin adds the following dependencies to tasks added by the Java plugin.
Groovyプラグインは、Javaプラグインによって追加されたタスクに以下の依存関係を追加します。
表24.2 Groovyプラグイン - タスクの追加依存関係Groovy plugin - additional task dependencies
| タスク名Task name | 依存先Depends on |
| classes | compileGroovy |
| testClasses | compileTestGroovy |
sourceSetClasses |
compileSourceSetGroovy |
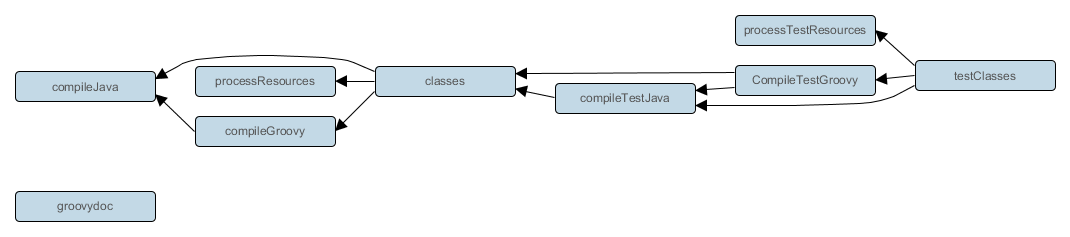
The Groovy plugin assumes the project layout shown in 表24.3「Groovyプラグイン - プロジェクトレイアウトGroovy plugin - project layout」. All the Groovy source directories can contain Groovy and Java code. The Java source directories may only contain Java source code. [18] None of these directories need to exist or have anything in them; the Groovy plugin will simply compile whatever it finds.
Groovyプラグインでは、表24.3「Groovyプラグイン - プロジェクトレイアウトGroovy plugin - project layout」に示したようなプロジェクトレイアウトを想定しています。すべてのGroovyソースディレクトリは、GroovyおよびJavaコードを含むことができます。Javaソースディレクトリは、Javaソースコードだけしか含むことができません。 [19] これらのどのディレクトリも、存在しなかったり、何も含んでいなくてもかまいません。Groovyプラグインは、単純に見つけたディレクトリをコンパイルするだけです。
表24.3 Groovyプラグイン - プロジェクトレイアウトGroovy plugin - project layout
| ディレクトリDirectory | 意味Meaning | |
src/main/java
|
製品のJavaソースProduction Java source | |
src/main/resources
|
製品のリソースProduction resources | |
src/main/groovy
|
製品のGroovyソース。ジョイントコンパイルするJavaソースを含んでもよいProduction Groovy sources. May also contain Java sources for joint compilation. | |
src/test/java
|
テストのJavaソースTest Java source | |
src/test/resources
|
テストのリソースTest resources | |
src/test/groovy
|
テストのGroovyソース。ジョイントコンパイルするJavaソースを含んでもよいTest Groovy sources. May also contain Java sources for joint compilation. | |
src/
|
特定のソースセットのJavaソースJava source for the given source set | |
src/
|
特定のソースセットのリソースResources for the given source set | |
src/
|
特定のソースセットのGroovyソース。ジョイントコンパイルするJavaソースを含んでもよいGroovy sources for the given source set. May also contain Java sources for joint compilation. |
Just like the Java plugin, the Groovy plugin allows you to configure custom locations for Groovy production and test sources.
Javaプラグインと同じように、Groovyプラグインも製品コードやテストコードの場所を変更することができます。
例24.2 Groovyソースレイアウトのカスタマイズ
build.gradle
sourceSets {
main {
groovy {
srcDirs = ['src/groovy']
}
}
test {
groovy {
srcDirs = ['test/groovy']
}
}
}Because Gradle's build language is based on Groovy, and parts of Gradle are implemented in Groovy, Gradle already ships with a Groovy library (2.3.3 as of Gradle 2.0). Nevertheless, Groovy projects need to explicitly declare a Groovy dependency. This dependency will then be used on compile and runtime class paths. It will also be used to get hold of the Groovy compiler and Groovydoc tool, respectively.
Gradleのビルド言語はGroovyをベースにしており、Gradleの一部もGroovyで実装されているので、Gradleには既にGroovyライブラリ(Gradle2.0からは2.3.3)が同梱されています。ですが、Groovyプロジェクトでは明示的にGroovyへの依存関係を宣言しなければなりません。 ここで宣言したGroovyへの依存関係は、コンパイルクラスパスおよび実行時クラスパスに追加されます。さらに、GroovyコンパイラおよびGroovydocツールを取得するのにも使用されます。
If Groovy is used for production code, the Groovy dependency should be added to the compile
configuration:
Groovyが製品コードで使われている場合は、Groovy依存関係はcompileコンフィギュレーションに追加してください。
例24.3 Groovyプラグインの設定
build.gradle
repositories {
    mavenCentral()
}
dependencies {
compile 'org.codehaus.groovy:groovy-all:2.3.6'
}
If Groovy is only used for test code, the Groovy dependency should be added to the testCompile
configuration:
Groovyがテストコードのみで使われている場合は、Groovy依存関係はtestCompileコンフィギュレーションに追加してください。
To use the Groovy library that ships with Gradle, declare a localGroovy() dependency. Note that
different Gradle versions ship with different Groovy versions; as such, using localGroovy() is less
safe then declaring a regular Groovy dependency.
Gradleに同梱されているGroovyを使うには、localGroovy()を依存関係で宣言してください。ただ注意してほしいのは、Gradleのバージョンが異なれば同梱されているGroovyのバージョンも異なる可能性があるということです。localGroovy()は、普通の宣言方法に比べると安全とは言えません。
The Groovy library doesn't necessarily have to come from a remote repository. It could also come from a local
lib directory, perhaps checked in to source control:
Groovyライブラリは、必ずしもリモートのリポジトリから取得しなければならないわけではありません。ローカルのlibディレクトリなどに格納して、ソースコード管理システムにチェックインしたりすることもできます。
例24.6 Groovyをファイル依存関係で設定する
build.gradle
repositories {
flatDir { dirs 'lib' }
}
dependencies {
compile module('org.codehaus.groovy:groovy:1.6.0') {
dependency('asm:asm-all:2.2.3')
dependency('antlr:antlr:2.7.7')
dependency('commons-cli:commons-cli:1.2')
module('org.apache.ant:ant:1.9.3') {
dependencies('org.apache.ant:ant-junit:1.9.3@jar',
'org.apache.ant:ant-launcher:1.9.3')
}
}
}The “module” reference may be new to you. See 51章依存関係の管理 Dependency Management for more information about this and other
information about dependency management.
GroovyCompile and Groovydoc tasks consume Groovy code in two ways: on their classpath,
and on their groovyClasspath. The former is used to locate classes referenced by the source code, and will typically
contain the Groovy library along with other libraries. The latter is used to load and execute the Groovy compiler and Groovydoc tool,
respectively, and should only contain the Groovy library and its dependencies.
GroovyCompileタスクとGroovydocタスクは二つの用途でGroovyを使用します。タスクのclasspathとgroovyClasspathです。前者はソースコードから参照されているクラスを配置するパスで、Groovyライブラリも典型的には他のライブラリと一緒に格納されます。後者はGroovyコンパイラとGroovydocツールをロードして実行するために使用されるパスで、Groovyライブラリとその依存関係のみが配置されていなければなりません。
Unless a task's groovyClasspath is configured explicitly, the Groovy (base) plugin will try to infer it
from the task's classpath. This is done as follows:
groovyClasspathが明示的に設定されていない場合、Groovy(base)プラグインはタスクのclasspathから以下のように設定値を推論しようとします。
-
If a
groovy-all(-indy)Jar is found onclasspath, that jar will be added togroovyClasspath.groovy-all(-indy)のJarがclasspathに見つかれば、そのjarをgroovyClasspathにも追加します。 -
If a
groovy(-indy)jar is found onclasspath, and the project has at least one repository declared, a correspondinggroovy(-indy)repository dependency will be added togroovyClasspath.groovy(-indy)のJarがclasspathに見つかれば、そして少なくとも一つのリポジトリがプロジェクトに設定されていれば、リポジトリから対応するgroovy(-indy)の依存関係を取得してgroovyClasspathに追加します。 - Otherwise, execution of the task will fail with a message saying that
groovyClasspathcould not be inferred. それ以外の場合は、groovyClasspathの推論に失敗した旨のメッセージを出力してタスクは失敗します。
Note that the “-indy” variation of each jar refers to the version with invokedynamic support.
The Groovy plugin does not add any convention properties to the project.
Groovyプラグインは、プロジェクトには規約プロパティを追加しません。
The Groovy plugin adds the following convention properties to each source set in the project. You can use these properties in your build script as though they were properties of the source set object (see 「規約 Conventions」).
Groovyプラグインは、プロジェクトの各ソースセットに以下の規約プロパティを追加します。これらのプロパティは、あたかもソースセットオブジェクトのプロパティであるかのようにビルドスクリプト内で使うことができます(「規約 Conventions」参照)。
表24.4 Groovyプラグイン - ソースセットプロパティGroovy plugin - source set properties
| プロパティ名Property name | 型Type | デフォルト値Default value | 説明Description |
groovy
|
SourceDirectorySet (読取り専用)
SourceDirectorySet (read-only)
|
非null Not null |
このソースセットのGroovyソースファイル。Groovyソースディレクトリにある、すべての.groovyと.javaファイルを含み、その他のタイプのファイルは含まない
The Groovy source files of this source set. Contains all .groovy and
.java files found in the Groovy source directories, and excludes all other
types of files.
|
groovy.srcDirs
|
Set<File>。「入力ファイルセットを指定する Specifying a set of input files」で説明されたものなら何でも設定可能
Set<File>. Can set using anything described in 「入力ファイルセットを指定する Specifying a set of input files」.
|
[
|
このソースセットのGroovyソースファイルを含むソースディレクトリ。ジョイントコンパイルするJavaソースファイルも含む場合がある The source directories containing the Groovy source files of this source set. May also contain Java source files for joint compilation. |
allGroovy
|
FileTree (読取り専用)
FileTree (read-only)
|
非null Not null |
このソースセットの全Groovyソースファイル。Groovyソースディレクトリにある.groovyファイルのみを含む
All Groovy source files of this source set. Contains only the .groovy files
found in the Groovy source directories.
|
These properties are provided by a convention object of type GroovySourceSet.
上記プロパティはGroovySourceSet型の規約オブジェクトにより提供されます。
The Groovy plugin also modifies some source set properties:
また、Groovyプラグインは、いくつかのソースセットプロパティを修正します:
表24.5 Groovyプラグイン - ソースセットプロパティGroovy plugin - source set properties
| プロパティ名Property name | 変更点Change |
allJava
|
Groovyソースディレクトリにあるすべての.javaファイルを追加Adds all .java files found in the Groovy source directories. |
allSource
|
Groovyソースディレクトリにあるすべてのソースファイルを追加Adds all source files found in the Groovy source directories. |
The Groovy plugin adds a GroovyCompile task for
each source set in the project. The task type extends the JavaCompile
task (see 「CompileJavaCompileJava」).
The GroovyCompile task supports most configuration options of the official Groovy compiler.
Groovyプラグインは、プロジェクトの各ソースセットにGroovyCompileタスクを追加します。このタスクはJavaCompileタスクを拡張したものです(「CompileJavaCompileJava」参照)。groovyOptions.useAntがtrueになっていなければ、GradleネイティブのGroovyコンパイラ統合が使用されます。Antベースのコンパイラを使うこともできますが、ほとんどのプロジェクトではネイティブのGroovyコンパイラを使ったほうがいいでしょう。
このGroovyCompileタスクは、公式Groovyコンパイラのオプションをほとんど全てサポートしています。
表24.6 Groovyプラグイン - GroovyCompileプロパティGroovy plugin - GroovyCompile properties
| タスクプロパティTask Property | 型Type | デフォルト値Default Value |
classpath
|
FileCollection |
|
source
|
FileTree。「入力ファイルセットを指定する Specifying a set of input files」で説明されたものなら何でも設定可能FileTree. Can set using anything described in 「入力ファイルセットを指定する Specifying a set of input files」. |
|
destinationDir
|
File. |
|
groovyClasspath
|
FileCollection |
groovy configuration if non-empty; Groovy library found on classpath otherwise |
[18] We are using the same conventions as introduced by Russel Winder's Gant tool (http://gant.codehaus.org).
[19] Russel WinderのGant (http://gant.codehaus.org)が導入したのと同じ規約を使っています。
The Scala plugin extends the Java plugin to add support for Scala projects. It can deal with Scala code, mixed Scala and Java code, and even pure Java code (although we don't necessarily recommend to use it for the latter). The plugin supports joint compilation, which allows you to freely mix and match Scala and Java code, with dependencies in both directions. For example, a Scala class can extend a Java class that in turn extends a Scala class. This makes it possible to use the best language for the job, and to rewrite any class in the other language if needed.
Scalaプラグインは、Javaプラグインを拡張し、Scalaプロジェクトのサポートを追加したものです。 ScalaコードとScala/Javaの混合コードをサポートするほか、Javaコードのみのプロジェクトを取り扱うこともできます(Javaコードだけのプロジェクトにこのプラグインを使うことはあまり推奨しませんが)。 また、JavaとScalaのジョイントコンパイルをサポートしており、ScalaコードとJavaコードを自由に混ぜ合わせたり、お互いに統合させることができます。 例えば、ScalaのクラスはJavaのクラスを継承できますし、更にそのJavaクラスがScalaクラスを継承していても問題ありません。時々に応じて最適な言語を選択でき、必要なときにはいつでもクラスを別言語で書き直すことができます。
To use the Scala plugin, include the following in your build script:
Scalaプラグインを使うには、ビルドスクリプトに以下の行を追加します。
The Scala plugin adds the following tasks to the project.
Scalaプラグインは、プロジェクトに以下のタスクを追加します。
表25.1 Scalaプラグイン - タスク Scala plugin - tasks
| Task name タスク | Depends on 依存先 | Type 型 | Description 説明 |
compileScala |
compileJava |
ScalaCompile |
Compiles production Scala source files. Scalaの製品ソースファイルをコンパイルする。 |
compileTestScala |
compileTestJava |
ScalaCompile |
Compiles test Scala source files. Scalaのテストソースファイルをコンパイルする。 |
compile |
compile |
ScalaCompile |
Compiles the given source set's Scala source files. 指定したソースセットのScalaソースファイルをコンパイルする。 |
scaladoc |
- | ScalaDoc |
Generates API documentation for the production Scala source files. Scala製品ソースファイルのAPIドキュメントを生成する。 |
The Scala plugin adds the following dependencies to tasks added by the Java plugin.
Scalaプラグインは、Javaプラグインによって追加されたタスクに以下の依存関係を追加します。
表25.2 Scalaプラグイン - タスクの追加依存関係 Scala plugin - additional task dependencies
| Task name タスク名 | Depends on 依存先 |
classes
|
compileScala
|
testClasses
|
compileTestScala
|
|
compile
|

The Scala plugin assumes the project layout shown below. All the Scala source directories can contain Scala and Java code. The Java source directories may only contain Java source code. None of these directories need to exist or have anything in them; the Scala plugin will simply compile whatever it finds.
Scalaプラグインは次のようなプロジェクトレイアウトを想定しています。 すべてのScalaソースディレクトリにはScalaだけでなくJavaコードも含めることができますが、JavaソースディレクトリにはJavaコードしか含めることができません。 また、これらのどのディレクトリも、存在しなかったり、何も含んでいなくてもかまいません。Scalaプラグインは、単純に見つけたディレクトリをコンパイルするだけです。
表25.3 Scalaプラグイン Scala plugin - project layout
| Directory ディレクトリ | Meaning 意味 | |
src/main/java
|
製品のJavaソースProduction Java source | |
src/main/resources
|
製品のリソースProduction resources | |
src/main/scala
|
Production Scala sources. May also contain Java sources for joint compilation. 製品のScalaソース。ジョイントコンパイルするJavaソースを含んでもよい | |
src/test/java
|
テストのJavaソースTest Java source | |
src/test/resources
|
テストのリソースTest resources | |
src/test/scala
|
Test Scala sources. May also contain Java sources for joint compilation. テストのScalaソース。ジョイントコンパイルするJavaソースを含んでもよい | |
src/
|
特定のソースセットのJavaソースJava source for the given source set | |
src/
|
特定のソースセットのリソースResources for the given source set | |
src/
|
Scala sources for the given source set. May also contain Java sources for joint compilation. 特定のソースセットのScalaソース。ジョイントコンパイルするJavaソースを含んでもよい |
Just like the Java plugin, the Scala plugin allows you to configure custom locations for Scala production and test sources.
Javaプラグインと同じように、Scalaプラグインも製品コードやテストコードの場所を変更することができます。
例25.2 Scalaソースレイアウトのカスタマイズ
build.gradle
sourceSets {
main {
scala {
srcDirs = ['src/scala']
}
}
test {
scala {
srcDirs = ['test/scala']
}
}
}
Scala projects need to declare a scala-library dependency. This dependency will then be used on compile and
runtime class paths. It will also be used to get hold of the Scala compiler and Scaladoc tool, respectively.
Scalaプロジェクトでは、scala-libraryへの依存関係を宣言する必要があります。
この依存関係は、Scalaコードをコンパイルしたり実行したりする際のクラスパスに追加されるほか、ScalaコンパイラおよびScaladocツールを取得する際にも使用されます。
[20]
If Scala is used for production code, the scala-library dependency should be added to the
compile configuration:
Scalaが製品コードで使われている場合は、scala-libraryへの依存関係はcompileコンフィグレーションに追加してください。
例25.3 製品コードに使うScalaへの依存関係の宣言
build.gradle
repositories {
mavenCentral()
}
dependencies {
compile 'org.scala-lang:scala-library:2.11.1'
}
If Scala is only used for test code, the scala-library dependency should be added to the testCompile
configuration:
Scalaがテストコードのみで使われている場合は、scala-libraryへの依存関係はtestCompileコンフィグレーションに追加してください。
例25.4 テストコードに使うScalaへの依存関係の宣言
build.gradle
dependencies {
testCompile "org.scala-lang:scala-library:2.11.1"
}
The ScalaCompile and ScalaDoc tasks consume Scala code in two ways: on their classpath,
and on their scalaClasspath. The former is used to locate classes referenced by the source code, and will typically
contain scala-library along with other libraries. The latter is used to load and execute the Scala compiler
and Scaladoc tool, respectively, and should only contain the scala-compiler library and its dependencies.
ScalaCompileタスクとScalaDocタスクは二つの用途でScalaを使用します。タスクのclasspathとscalaClasspathです。前者はソースコードから参照されているクラスを配置するパスで、scala-libraryも典型的には他のライブラリと一緒に格納されます。後者はScalaコンパイラとScaladocツールをロードして実行するために使用されるパスで、scala-compilerライブラリとその依存関係のみが配置されていなければなりません。
Unless a task's scalaClasspath is configured explicitly, the Scala (base) plugin will try to infer it
from the task's classpath. This is done as follows:
scalaClasspathが明示的に設定されていない場合、Scala(base)プラグインはタスクのclasspathから以下のように設定値を推論しようとします。
- If a
scala-libraryJar is found onclasspath, and the project has at least one repository declared, a correspondingscala-compilerrepository dependency will be added toscalaClasspath.scala-libraryのJarがclasspathに見つかれば、そして少なくとも一つのリポジトリがプロジェクトに設定されていれば、リポジトリから対応するscala-compilerの依存関係を取得してscalaClasspathに追加します。 - Otherwise, execution of the task will fail with a message saying that
scalaClasspathcould not be inferred. それ以外の場合は、scalaClasspathの推論に失敗した旨のメッセージを出力してタスクは失敗します。
The Scala plugin does not add any convention properties to the project.
Scalaプラグインは、プロジェクトに規約プロパティを追加しません。
The Scala plugin adds the following convention properties to each source set in the project. You can use these properties in your build script as though they were properties of the source set object (see 「規約 Conventions」).
Scalaプロジェクトの各ソースセットに以下の規約プロパティを追加します。これらのプロパティは、あたかもソースセットオブジェクトのプロパティであるかのようにビルドスクリプト内で使うことができます(「規約 Conventions」参照)
表25.4 Scalaプラグイン - ソースセットプロパティ Scala plugin - source set properties
| Property name プロパティ名 | Type 型 | Default value デフォルト値 | Description 説明 |
scala
|
SourceDirectorySet (read-only読取り専用)
|
Not null 非null |
The Scala source files of this source set. Contains all .scala and
.java files found in the Scala source directories, and excludes all other
types of files.
このソースセットのScalaソースファイル。Scalaソースディレクトリにある、すべての.scalaと.javaファイルを含み、その他のタイプのファイルは含まない
|
scala.srcDirs
|
Set<File>. Can set using anything described in 「入力ファイルセットを指定する Specifying a set of input files」.
「入力ファイルセットを指定する Specifying a set of input files」で説明されたものなら何でも設定可能
|
[
|
The source directories containing the Scala source files of this source set. May also contain Java source files for joint compilation. このソースセットのScalaソースファイルを含むソースディレクトリ。ジョイントコンパイルするJavaソースファイルも含む場合がある |
allScala
|
FileTree (read-only読取り専用)
|
Not null 非null |
All Scala source files of this source set. Contains only the .scala files
found in the Scala source directories.
このソースセットの全Scalaソースファイル。Scalaソースディレクトリにある.scalaファイルのみを含む
|
These convention properties are provided by a convention object of type ScalaSourceSet.
これらの規約プロパティはScalaSourceSet型の規約オブジェクトにより提供されます。
The Scala plugin also modifies some source set properties:
また、Scalaプラグインはいくつかのソースセットプロパティを修正します。
表25.5 Scalaプラグイン Scala plugin - source set properties
| Property name プロパティ名 | Change 変更点 |
allJava
|
Adds all .java files found in the Scala source directories. Scalaソースディレクトリにあるすべての.javaファイルを追加 |
allSource
|
Adds all source files found in the Scala source directories. Scalaソースディレクトリにあるすべてのファイルを追加 |
The Scala plugin includes support for fsc,
the Fast Scala Compiler. fsc runs in a separate daemon process and can speed up
compilation significantly.
Scalaプラグインには、fsc、Fast Scala Compilerのサポートが含まれています。
例25.5 Fast Scala Compilerを有効にする
build.gradle
compileScala {
scalaCompileOptions.useCompileDaemon = true
// optionally specify host and port of the daemon:
scalaCompileOptions.daemonServer = "localhost:4243"
}
Note that fsc expects to be restarted whenever the contents of its
compile class path change. (It does detect changes to the compile class path itself.) This makes it
less suitable for multi-project builds.
ただし、次の点に注意してください。fscは、コンパイル時のクラスパスに含まれるもの(訳注:jarなど)が変更される度に再起動させる必要があります。(コンパイル時クラスパス自体の変更は検知されますが)。
このため、マルチプロジェクトとの相性は悪くなります。
When scalaCompileOptions.fork is set to true, compilation will take place
in an external process. The Ant based compiler
(scalaCompileOptions.useAnt = true) will fork a new process for every invocation of the ScalaCompile task,
and does not fork by default. The Zinc based compiler (scalaCompileOptions.useAnt = false) will leverage
the Gradle compiler daemon, and does so by default.
scalaCompileOptions.forkオプションがtrueにセットされていると、コンパイル処理は外部プロセスで実行されます。
フォーク処理の詳細はどのコンパイラを使用するかにより異なり、Antベースのコンパイラを使用する場合は(scalaCompileOptions.useAnt = true)、ScalaCompileタスクが実行される度に新しいプロセスがフォークされます。また、デフォルトではフォークされません。
Zincベースのコンパイラを使う場合(scalaCompileOptions.useAnt = false)、Gradleのコンパイラデーモンを使用してコンパイルされます。Antベースのコンパイラと異なり、こちらがデフォルトの処理です。
Memory settings for the external process default to defaults of the JVM. To adjust memory settings,
configure the scalaCompileOptions.forkOptions property as needed:
外部プロセスのメモリ設定は、デフォルトではJVMのデフォルト値が使用されます。メモリ設定を調整するには、scalaCompileOptions.forkOptionsを必要に応じて設定してください。
例25.6 メモリ設定の調整
build.gradle
tasks.withType(ScalaCompile) {
configure(scalaCompileOptions.forkOptions) {
memoryMaximumSize = '1g'
jvmArgs = ['-XX:MaxPermSize=512m']
}
}
By compiling only classes whose source code has changed since the previous compilation, and classes affected by these changes, incremental compilation can significantly reduce Scala compilation time. It is particularly effective when frequently compiling small code increments, as is often done at development time.
前回コンパイルしたときからの変更差分、およびそれにより影響を受けるクラスのみを再コンパイルすることで、Scalaのコンパイル時間を大幅に減らすことができます。 これは、コードを小さく変更して頻繁にコンパイルするようなとき、開発中にはしばしばそういうことがありますが、そのような場面では特に有用です。
The Scala plugin now supports incremental compilation by integrating with Zinc,
a standalone version of sbt's incremental Scala compiler. To switch the
ScalaCompile task from the default Ant based compiler to the new Zinc based compiler, set
scalaCompileOptions.useAnt to false:
Scalaプラグインは、Zincという、sbtのインクリメンタルScalaコンパイラのスタンドアローン版を統合することでインクリメンタルコンパイルをサポートしています。
例25.7 Zincベースのコンパイラを有効にする
build.gradle
tasks.withType(ScalaCompile) {
scalaCompileOptions.useAnt = false
}
Except where noted in the API documentation, the Zinc based compiler supports exactly the same configuration options as the Ant based compiler. Note, however, that the Zinc compiler requires Java 6 or higher to run. This means that Gradle itself has to be run with Java 6 or higher.
APIドキュメントに記載されている部分を除き、ZincベースのコンパイラはAntベースのコンパイラと全く同じ設定オプションをサポートします。 ただ、ZincコンパイラはJava6以上のバージョンを必要とするので注意してください。これは、Gradle自身もJava6以上で動かさなくてはならないことを意味します。
The Scala plugin adds a configuration named zinc to resolve the Zinc library and its dependencies.
Gradle will have a default version of the Zinc library, but if you want to override the
Zinc version that Gradle uses, add an explicit dependency like “com.typesafe.zinc:zinc:0.1.4”.
Regardless of which Zinc version is used, Zinc will always use the Scala compiler found on the scalaTools configuration.
Scalaプラグインは、zincという名前のコンフィグレーションを追加し、Zincライブラリとその依存関係を解決するために使用します。
Gradleがデフォルトで使用するZincのバージョンをオーバーライドするには、Zincへの依存関係(例えば、zinc "com.typesafe.zinc:zinc:0.1.4")を明示的に指定してください。
どのバージョンのZincが使用されているかにかかわらず、Zincは常にscalaToolsコンフィグレーションに含まれるScalaコンパイラを使用します。
Just like Gradle's Ant based compiler, the Zinc based compiler supports joint compilation of Java and Scala code. By default, all Java and Scala code
under src/main/scala will participate in joint compilation. With the Zinc based compiler, even Java code will be compiled incrementally.
Antベースのコンパイラ同様、ZincベースのコンパイラもJavaとScalaのジョイントコンパイルをサポートします。
デフォルトでは、src/main/scalaにある全てのJavaとScalaのコードがジョイントコンパイルに使用されます。Zincベースのコンパイラは、たとえJavaコードでもインクリメンタルにコンパイルできます。
Incremental compilation requires dependency analysis of the source code. The results of this analysis are stored in the file designated
by scalaCompileOptions.incrementalOptions.analysisFile (which has a sensible default). In a multi-project build, analysis
files are passed on to downstream ScalaCompile tasks to enable incremental compilation across project boundaries. For
ScalaCompile tasks added by the Scala plugin, no configuration is necessary to make this work. For other
ScalaCompile tasks that you might add, the property scalaCompileOptions.incrementalOptions.publishedCode needs to be configured to point
to the classes folder or Jar archive by which the code is passed on to compile class paths of downstream ScalaCompile tasks.
Note that if publishedCode is not set correctly, downstream tasks may not recompile code affected by upstream changes,
leading to incorrect compilation results.
インクリメンタルコンパイルを行うには、ソースコードを解析する必要があります。解析結果は、scalaCompileOptions.incrementalOptions.analysisFile(適切なデフォルト値が設定されています)で指定されたファイルに保存されます。
マルチプロジェクトの場合、この解析ファイルは下流のScalaCompileタスクに渡されるので、プロジェクトをまたいでのインクリメンタルコンパイルが可能です。
Scalaプラグインにより追加されたScalaCompileタスクはデフォルトでそのように動作するので、追加の設定は必要ありません。
その他のScalaCompileタスクでこの動作を有効にするには、scalaCompileOptions.incrementalOptions.publishedCodeが適切なクラスフォルダやJarアーカイブを指すように設定し、下流のタスクのコンパイルクラスパスにコードを渡す必要があります。
publishedCodeが正しく設定されていない場合、上流のソースが変更されても下流のタスクの再コンパイルが適切に動かず、コンパイル結果も正しくなりませんので注意してください。
Due to the overhead of dependency analysis, a clean compilation or a compilation after a larger code change may take longer than with the Ant based compiler. For CI builds and release builds, we currently recommend to use the Ant based compiler.
解析処理に伴うオーバーヘッドにより、クリーンコンパイルや大規模な変更を行った後のコンパイルは、Antベースのコンパイラより長い時間を要するかもしれません。インテグレーションサーバーでのビルドやリリースビルドの際は、今のところAntベースのコンパイラを推奨します。
Note that Zinc's Nailgun based daemon mode is not supported. Instead, we plan to enhance Gradle's own compiler daemon to stay alive across Gradle invocations, reusing the same Scala compiler. This is expected to yield another significant speedup for Scala compilation.
ZincのNailgunベースのデーモンモードには対応していません。代わりに、Gradle自身のコンパイラデーモンを拡張し、Gradle実行間で同じScalaコンパイラを再利用できるようにする予定です。デーモンモードにより、Scalaコンパイルが更にスピードアップすることが期待されます。
When the Eclipse plugin encounters a Scala project, it adds additional configuration to make the project work with Scala IDE out of the box. Specifically, the plugin adds a Scala nature and dependency container.
When the IDEA plugin encounters a Scala project, it adds additional configuration to make the project work with IDEA out of the box. Specifically, the plugin adds a Scala facet and a Scala compiler library that matches the Scala version on the project's class path.
The War plugin extends the Java plugin to add support for assembling web application WAR files. It disables the default JAR archive generation of the Java plugin and adds a default WAR archive task.
War プラグインは WEB アプリケーションの WAR ファイルを生成できるように Java プラグインを拡張したものです。 Java プラグインの 標準の JAR ファイルは生成されなくなり、WAR アーカイブ タスクが追加されます。
To use the War plugin, include the following in your build script:
War プラグインを使うためには、ビルドスクリプトに下記を含めます:
The War plugin adds the following tasks to the project.
War プラグインは 次のタスクをプロジェクトに追加します。
表26.1 War プラグイン - タスクWar plugin - tasks
| タスク名Task name | 依存先Depends on | 型Type | 説明Description |
war
|
compile
|
War |
WAR ファイルを生成します。Assembles the application WAR file. |
The War plugin adds the following dependencies to tasks added by the Java plugin.
War プラグインは Java プラグインで追加されたタスクに対し、次の依存関係を追加します。
表26.2 War プラグイン - 追加されたタスクの依存関係War plugin - additional task dependencies
| タスク名Task name | 依存先Depends on |
| assemble | war |

表26.3 War プラグイン - プロジェクトレイアウトWar plugin - project layout
| ディレクトリDirectory | 意味Meaning |
src/main/webapp
|
WEB アプリケーションソースWeb application sources |
The War plugin adds two dependency configurations named providedCompile and
providedRuntime. Those two configurations have the same scope as the respective
compile and runtime configurations, except that they are not added to
the WAR archive. It is important to note that those provided configurations work
transitively. Let's say you add commons-httpclient:commons-httpclient:3.0 to any of the
provided configurations. This dependency has a dependency on commons-codec.
Because this is a “provided” configuration, this means that neither of these dependencies will be added to your
WAR, even if the commons-codec library is an explicit dependency of your compile
configuration. If you don't want this transitive behavior, simply declare your provided
dependencies like commons-httpclient:commons-httpclient:3.0@jar.
War プラグインは providedCompile と providedRuntime の2つの依存構成を追加します。
これらの構成は WAR アーカイブには追加されないという点を除けば、それぞれ compile、runtime
と同じスコープを持ちます。
provided 構成が推移的に機能することは特筆すべき点です。
そうですね。例えば provided 構成の何れかに commons-httpclient:commons-httpclient:3.0 を追加したとします。
この依存ライブラリは commons-codec に依存します。
これは、たとえ、commons-codec が compile 構成に依存していることが明らかであったとしても
WAR ファイルには httpclient も commons-codec も追加されないことを意味します。
もし、この推移的な挙動を望まないのであれば、単純に commons-httpclient:commons-httpclient:3.0@jar を
dependencies の provided 構成に定義してください。
表26.4 War プラグイン - ディレクトリプロパティWar plugin - directory properties
| プロパティ名Property name | 型Type | デフォルト値Default value | 説明Description |
webAppDirName
|
String
|
src/main/webapp
|
WEB アプリケーションソースディレクトリの名前、プロジェクトディレクトリからの相対パス The name of the web application source directory, relative to the project directory. |
webAppDir
|
File (読取専用)(read-only)
|
|
WEB アプリケーションソースディレクトリ The web application source directory. |
>These properties are provided by a WarPluginConvention
convention object.
これらのプロパティは WarPluginConvention オブジェクトによって提供されています。
>The default behavior of the War task is to copy the content of src/main/webapp
to the root of the archive. Your webapp directory may of course contain a
WEB-INF sub-directory, which may contain a web.xml file.
Your compiled classes are compiled to WEB-INF/classes. All the dependencies of the
runtime
[21]
configuration are copied to WEB-INF/lib.
The War class in the API documentation has additional useful information.
Here is an example with the most important customization options:
以下は最も重要なカスタマイズ例です。
例26.2 Customization of war plugin
build.gradle
configurations {
moreLibs
}
repositories {
flatDir { dirs "lib" }
mavenCentral()
}
dependencies {
compile module(":compile:1.0") {
dependency ":compile-transitive-1.0@jar"
dependency ":providedCompile-transitive:1.0@jar"
}
providedCompile "javax.servlet:servlet-api:2.5"
providedCompile module(":providedCompile:1.0") {
dependency ":providedCompile-transitive:1.0@jar"
}
runtime ":runtime:1.0"
providedRuntime ":providedRuntime:1.0@jar"
testCompile "junit:junit:4.11"
moreLibs ":otherLib:1.0"
}
war {
from 'src/rootContent' // adds a file-set to the root of the archive
webInf { from 'src/additionalWebInf' } // adds a file-set to the WEB-INF dir.
classpath fileTree('additionalLibs') // adds a file-set to the WEB-INF/lib dir.
classpath configurations.moreLibs // adds a configuration to the WEB-INF/lib dir.
webXml = file('src/someWeb.xml') // copies a file to WEB-INF/web.xml
}Of course one can configure the different file-sets with a closure to define excludes and includes.
もちろん、excludes と includes を定義したクロージャを使って異なるファイルセットを設定することもできます。
The Ear plugin adds support for assembling web application EAR files. It adds a default EAR archive task. It doesn't require the Java plugin, but for projects that also use the Java plugin it disables the default JAR archive generation.
EarプラグインはWebアプリケーションのEARファイルアセンブリサポートを追加します。 Javaプラグインは必須ではありませんが、Javaプラグインを利用するプロジェクトに対してはデフォルトのJARアーカイブ生成を無効にします。
To use the Ear plugin, include the following in your build script:
Earプラグインを使うには、ビルドスクリプトに以下を含めてください:
The Ear plugin adds the following tasks to the project.
Earプラグインはプロジェクトに以下のタスクを追加します。
表27.1 Earプラグイン - タスクEar plugin - tasks
| タスク名Task name | 依存先Depends on | 型Type | 説明Description |
ear
|
compile(Javaプラグインが同時に適用されている場合のみ)(only if the Java plugin is also applied)
|
Ear |
アプリケーションのEARファイルをアセンブルAssembles the application EAR file. |
The Ear plugin adds the following dependencies to tasks added by the base plugin.
Earプラグインはベースプラグインが追加したタスクに以下の依存関係を追加します。
表27.2 Earプラグイン - タスク依存関係の追加Ear plugin - additional task dependencies
| タスク名Task name | 依存先Depends on |
| assemble | ear |
表27.3 Earプラグイン - プロジェクトレイアウトEar plugin - project layout
| ディレクトリDirectory | 意味Meaning |
src/main/application
|
META-INFディレクトリなどのEarリソースEar resources, such as a META-INF directory |
The Ear plugin adds two dependency configurations: deploy and
earlib. All dependencies in the deploy configuration are
placed in the root of the EAR archive, and are not transitive. All dependencies in the
earlib configuration are placed in the 'lib' directory in the EAR archive and
are transitive.
Earプラグインは2つの依存関係コンフィグレーションを追加します: deployおよびearlib
deployコンフィグレーションにおけるすべての依存関係はEARアーカイブのルートに配置され、それらは推移的ではありません。
earlibコンフィグレーションにおけるすべての依存関係はEARアーカイブの'lib'ディレクトリに配置され、推移的です。
表27.4 Earプラグイン - ディレクトリプロパティEar plugin - directory properties
| プロパティ名Property name | 型Type | デフォルト値Default value | 説明Description |
appDirName
|
String
|
src/main/application
|
アプリケーションのソースディレクトリ名(プロジェクトディレクトリに対する相対パス)The name of the application source directory, relative to the project directory. |
libDirName
|
String
|
lib
|
生成されたEARに含まれるlibディレクトリ名The name of the lib directory inside the generated EAR. |
deploymentDescriptor
|
org.gradle.plugins.ear.descriptor.DeploymentDescriptor
|
デプロイメントディスクリプター、デフォルトは通常application.xml
A deployment descriptor with sensible defaults named application.xml
|
application.xmlなど、デプトイメントディスクリプタファイルを生成するためのメタデータ。
このファイルが既にappDirName/META-INFに存在している場合は既存のファイルの内容が利用され、ear.deploymentDescriptorでの設定内容は無視される。
Metadata to generate a deployment descriptor file, e.g. application.xml.
If this file already exists in the appDirName/META-INF then the existing file contents will be used and
the explicit configuration in the ear.deploymentDescriptor will be ignored.
|
These properties are provided by a EarPluginConvention
convention object.
これらのプロパティは規約オブジェクトEarPluginConventionが提供します。
The default behavior of the Ear task is to copy the content of src/main/application
to the root of the archive. If your application directory doesn't contain a
META-INF/application.xml deployment descriptor then one will be generated for you.
Earタスクのデフォルトのふるまいは、src/main/applicationの内容をアーカイブのルートにコピーすることです。
applicationディレクトリがデプロイメントディスクリプタMETA-INF/application.xmlを含まない場合は、生成してくれます。
The Ear class in the API documentation has additional useful information.
Earも参照してみてください。
Here is an example with the most important customization options:
最も重要なカスタマイズオプションを使う例はこちらです:
例27.2 Earプラグインのカスタマイズ
build.gradle
apply plugin: 'ear' apply plugin: 'java' repositories { mavenCentral() } dependencies { // The following dependencies will be the ear modules and // will be placed in the ear root deploy project(':war') // The following dependencies will become ear libs and will // be placed in a dir configured via the libDirName property earlib group: 'log4j', name: 'log4j', version: '1.2.15', ext: 'jar' } ear { appDirName 'src/main/app' // use application metadata found in this folder // put dependent libraries into APP-INF/lib inside the generated EAR libDirName 'APP-INF/lib' deploymentDescriptor { // custom entries for application.xml: // fileName = "application.xml" // same as the default value // version = "6" // same as the default value applicationName = "customear" initializeInOrder = true displayName = "Custom Ear" // defaults to project.name // defaults to project.description if not set description = "My customized EAR for the Gradle documentation" // libraryDirectory = "APP-INF/lib" // not needed, above libDirName setting does this // module("my.jar", "java") // won't deploy as my.jar isn't deploy dependency // webModule("my.war", "/") // won't deploy as my.war isn't deploy dependency securityRole "admin" securityRole "superadmin" withXml { provider -> // add a custom node to the XML provider.asNode().appendNode("data-source", "my/data/source") } } }
You can also use customization options that the Ear
task provides, such as from and metaInf.
fromやmetaInfといった、Earタスクが提供するカスタマイズオプションも利用できます。
You may already have appropriate settings in a application.xml file and want
to use that instead of configuring the ear.deploymentDescriptor section of the
build script. To accommodate that goal, place the META-INF/application.xml in
the right place inside your source folders (see the appDirName property). The
file contents will be used and the explicit configuration in the ear.deploymentDescriptor will be ignored.
ear.deploymentDescriptorセクションで設定するかわりに、既にapplication.xmlがあって、それを使いたいとしましょう。
そのためにはMETA-INF/application.xmlをソースフォルダ内の適切な場所に配置します(appDirNameプロパティを参照)。
既存のファイルの内容が利用され、ear.deploymentDescriptorの設定内容は無視されます。
The Jetty plugin extends the War plugin to add tasks which allow you to deploy your web application to a Jetty web container embedded in the build.
JettyプラグインはWarプラグインを拡張し、あなたのWEBアプリケーションをJettyコンテナにビルドしてデプロイできるタスクを追加したものです
To use the Jetty plugin, include the following in your build script:
Jettyプラグインを使うためには、ビルドスクリプトに下記を含めます:
The Jetty plugin defines the following tasks:
Jettyプラグインは、以下のタスクを定義します。
表28.1 Jettyプラグイン - タスクJetty plugin - tasks
| タスク名Task name | 依存先Depends on | 型Type | 説明Description |
jettyRun
|
compile
|
JettyRun |
Jettyのインスタンスを開始し、webアプリケーションをデプロイしますStarts a Jetty instance and deploys the exploded web application to it. |
jettyRunWar
|
war
|
JettyRunWar |
Jettyのインスタンスを開始し、WARファイルをデプロイしますStarts a Jetty instance and deploys the WAR to it. |
jettyStop
|
- | JettyStop |
Jettyのインスタンスを停止しますStops the Jetty instance. |
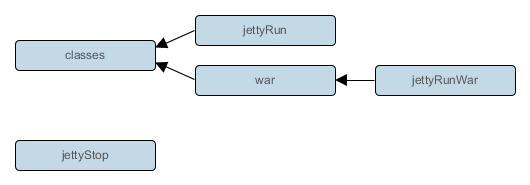
The Jetty plugin uses the same layout as the War plugin.
Jettyプラグインは、Warプラグインと同じレイアウトを使用します。
The Jetty plugin does not define any dependency configurations.
Jettyプラグインは、依存関係を定義しません。
The Jetty plugin defines the following convention properties:
Jettyプラグインは、規約プロパティに従って定義されます。
表28.2 Jettyプラグイン - プロパティJetty plugin - properties
| プロパティ名Property name | 型Type | デフォルト値Default value | 説明Description |
contextPath
|
String
|
WAR file base name | The application deployment location within the Jetty container. |
httpPort
|
Integer
|
8080
|
JettyのHTTPリクエストの待受けTCPポートThe TCP port which Jetty should listen for HTTP requests on. |
stopPort
|
Integer
|
null
|
Jettyの管理者リクエストの待受けTCPポートThe TCP port which Jetty should listen for admin requests on. |
stopKey
|
String
|
null
|
停止要求時にJettyに渡す文字列キーThe key to pass to Jetty when requesting it to stop. |
These properties are provided by a JettyPluginConvention
convention object.
上記プロパティはJettyPluginConvention型の規約オブジェクトにより提供されます。
The Checkstyle plugin performs quality checks on your project's Java source files using Checkstyle and generates reports from these checks.
Checkstyleプラグインは Checkstyleを使用して、あなたのプロジェクトのJavaソースファイルの品質チェックを行ないます。 そして、これらのチェック結果から結果レポートを生成します。
To use the Checkstyle plugin, include the following in your build script:
Checkstyleプラグインを使うためには、ビルドスクリプトに下記を含めます:
The plugin adds a number of tasks to the project that perform the quality checks. You can execute the checks by running gradle check.
このプラグインは、品質チェックを行なうプロジェクトへの多くのタスクを加えます。 貴方はタスク実行時にチェック処理を実行させることが出来ます。 gradle check.
The Checkstyle plugin adds the following tasks to the project:
Checkstyleプラグインは、以下のタスクをプロジェクトに追加します:
表29.1 Checkstyleプラグイン - タスクCheckstyle plugin - tasks
| タスク名Task name | 依存先Depends on | 型Type | 説明Description |
checkstyleMain
|
classes |
Checkstyle |
製品のJavaソースを対象にCheckstyleを実行します。Runs Checkstyle against the production Java source files. |
checkstyleTest
|
testClasses |
Checkstyle |
テストのJavaソースを対象にCheckstyleを実行します。Runs Checkstyle against the test Java source files. |
checkstyle
|
|
Checkstyle |
特定のソースセットで指定されたJavaソースを対象にCheckstyleを実行します。Runs Checkstyle against the given source set's Java source files. |
The Checkstyle plugin adds the following dependencies to tasks defined by the Java plugin.
Checkstyleプラグインは、Javaプラグインによって追加されたタスクに以下の依存関係を追加します。
表29.2 Checkstyleプラグイン - タスクの追加依存関係Checkstyle plugin - additional task dependencies
| タスク名Task name | 依存先Depends on |
check |
全てのCheckstyleタスクは、checkstyleMain と checkstyleTestを含みます。All Checkstyle tasks, including checkstyleMain and checkstyleTest. |
The Checkstyle plugin expects the following project layout:
Checkstyleプラグインは、以下のようなプロジェクトレイアウトを想定しています:
表29.3 Checkstyle プラグイン - プロジェクトレイアウトCheckstyle plugin - project layout
| ファイル File |
意味 Meaning |
config/checkstyle/checkstyle.xml
|
Checkstyle の設定ファイル Checkstyle configuration file |
The Checkstyle plugin adds the following dependency configurations:
Checkstyleプラグインは、以下の依存関係設定を追加します。
表29.4 Checkstyleプラグイン - 依存関係設定
Checkstyle plugin - dependency configurations
| 名前 Name |
意味 Meaning |
checkstyle
|
Checkstyleのライブラリを使用します。 The Checkstyle libraries to use |
See the CheckstyleExtension class in the API documentation.
The CodeNarc plugin performs quality checks on your project's Groovy source files using CodeNarc and generates reports from these checks.
CodeNarcプラグインは CodeNarcを使用して、あなたのプロジェクトのGroovyソースファイルの品質チェックを行ないます。 そして、これらのチェック結果から結果レポートを生成します。
To use the CodeNarc plugin, include the following in your build script:
CodeNarcプラグインを使うためには、ビルドスクリプトに下記を含めます:
The plugin adds a number of tasks to the project that perform the quality checks. You can execute the checks by running gradle check.
このプラグインは、品質チェックを行なうプロジェクトへの多くのタスクを加えます。 貴方はタスク実行時にチェック処理を実行させることが出来ます。 gradle check.
The CodeNarc plugin adds the following tasks to the project:
CodeNarcプラグインを使うためには、ビルドスクリプトに下記を含めます:
表30.1 CodeNarcプラグイン - タスクCodeNarc plugin - tasks
| タスク名Task name | 依存先Depends on | 型Type | 説明Description | |
codenarcMain
|
- | CodeNarc |
製品のGroovyソースを対象にCodeNarcを実行します。Runs CodeNarc against the production Groovy source files. | |
codenarcTest
|
- | CodeNarc |
Runs CodeNarc against the test Groovy source files. | テストのGroovyソースを対象にCodeNarcを実行します。Runs Checkstyle against the test Groovy source files. |
codenarc
|
- | CodeNarc |
特定のソースセットで指定されたGroovyソースを対象にCodeNarcを実行します。Runs CodeNarc against the given source set's Groovy source files. |
The CodeNarc plugin adds the following dependencies to tasks defined by the Groovy plugin.
CodeNarcプラグインは、Groovyプラグインによって追加されたタスクに以下の依存関係を追加します。
表30.2 CodeNarcプラグイン - タスクの追加依存関係CodeNarc plugin - additional task dependencies
| タスク名Task name | 依存先Depends on |
check |
全てのCodeNarcタスクは、codenarcMain と codenarcTestを含みます。All CodeNarc tasks, including codenarcMain and codenarcTest. |
The CodeNarc plugin expects the following project layout:
CodeNarcプラグインは、以下のようなプロジェクトレイアウトを想定しています:
表30.3 CodeNarc プラグイン - プロジェクトレイアウトCodeNarc plugin - project layout
| ファイル File |
意味 Meaning |
config/codenarc/codenarc.xml
|
CodeNarc の設定ファイル CodeNarc configuration file |
The CodeNarc plugin adds the following dependency configurations:
CodeNarcプラグインは、以下の依存関係設定を追加します。
表30.4 CodeNarcプラグイン - 依存関係設定
CodeNarc plugin - dependency configurations
| 名前 Name |
意味 Meaning |
codenarc
|
CodeNarcのライブラリを使用します。 The CodeNarc libraries to use |
The FindBugs plugin performs quality checks on your project's Java source files using FindBugs and generates reports from these checks.
FindBugsプラグインは FindBugsを使用して、あなたのプロジェクトのJavaソースファイルの品質チェックを行ないます。 そして、これらのチェック結果から結果レポートを生成します。
To use the FindBugs plugin, include in the following your build script:
FindBugsプラグインを使うためには、ビルドスクリプトに下記を含めます:
The plugin adds a number of tasks to the project that perform the quality checks. You can execute the checks by running gradle check.
このプラグインは、品質チェックを行なうプロジェクトへの多くのタスクを加えます。 貴方はタスク実行時にチェック処理を実行させることが出来ます。 gradle check.
The FindBugs plugin adds the following tasks to the project:
FindBugsプラグインは、以下のタスクをプロジェクトに追加します:
表31.1 FindBugsプラグイン - タスクFindBugs plugin - tasks
| タスク名Task name | 依存先Depends on | 型Type | 説明Description |
findbugsMain
|
classes |
FindBugs |
製品のJavaソースを対象にFindBugsを実行します。Runs FindBugs against the production Java source files. |
findbugsTest
|
testClasses |
FindBugs |
テストのJavaソースを対象にFindBugsを実行します。Runs FindBugs against the test Java source files. |
findbugs
|
|
FindBugs |
特定のソースセットで指定されたJavaソースを対象にFindBugsを実行します。Runs FindBugs against the given source set's Java source files. |
The FindBugs plugin adds the following dependencies to tasks defined by the Java plugin.
FindBugsプラグインは、Javaプラグインによって追加されたタスクに以下の依存関係を追加します。
表31.2 FindBugsプラグイン - タスクの追加依存関係FindBugs plugin - additional task dependencies
| タスク名Task name | 依存先Depends on |
check |
全てのFindBugsタスクは、findbugsMain と findbugsTestを含みます。All FindBugs tasks, including findbugsMain and findbugsTest. |
The FindBugs plugin adds the following dependency configurations:
FindBugsプラグインは、以下の依存関係設定を追加します。
表31.3 FindBugsプラグイン - 依存関係設定
FindBugs plugin - dependency configurations
| 名前 Name |
意味 Meaning |
findbugs
|
FindBugsのライブラリを使用します。 The FindBugs libraries to use |
The JDepend plugin performs quality checks on your project's source files using JDepend and generates reports from these checks.
JDependプラグインは JDependを使用して、あなたのプロジェクトのJavaソースファイルの品質チェックを行ないます。 そして、これらのチェック結果から結果レポートを生成します。
To use the JDepend plugin, include the following in your build script:
JDependプラグインを使うためには、ビルドスクリプトに下記を含めます:
The plugin adds a number of tasks to the project that perform the quality checks. You can execute the checks by running gradle check.
このプラグインは、品質チェックを行なうプロジェクトへの多くのタスクを加えます。 貴方はタスク実行時にチェック処理を実行させることが出来ます。 gradle check.
The JDepend plugin adds the following tasks to the project:
JDependプラグインは、以下のタスクをプロジェクトに追加します:
表32.1 JDependプラグイン - タスクJDepend plugin - tasks
| タスク名Task name | 依存先Depends on | 型Type | 説明Description |
jdependMain
|
classes |
JDepend |
製品のJavaソースを対象にJDependを実行します。Runs JDepend against the production Java source files. |
jdependTest
|
testClasses |
JDepend |
テストのJavaソースを対象にJDependを実行します。Runs JDepend against the test Java source files. |
jdepend
|
|
JDepend |
特定のソースセットで指定されたJavaソースを対象にJDependを実行します。Runs JDepend against the given source set's Java source files. |
The JDepend plugin adds the following dependencies to tasks defined by the Java plugin.
JDependプラグインは、Javaプラグインによって追加されたタスクに以下の依存関係を追加します。
表32.2 JDependプラグイン - タスクの追加依存関係JDepend plugin - additional task dependencies
| タスク名Task name | 依存先Depends on |
check |
全てのJDependタスクは、jdependMain と jdependTestを含みます。All JDepend tasks, including jdependMain and jdependTest. |
The JDepend plugin adds the following dependency configurations:
JDependプラグインは、以下の依存関係設定を追加します。
表32.3 JDependプラグイン - 依存関係設定
JDepend plugin - dependency configurations
| 名前 Name |
意味 Meaning |
jdepend
|
JDependのライブラリを使用します。 The JDepend libraries to use |
The PMD plugin performs quality checks on your project's Java source files using PMD and generates reports from these checks.
PMDプラグインは PMDを使用して、あなたのプロジェクトのJavaソースファイルの品質チェックを行ないます。 そして、これらのチェック結果から結果レポートを生成します。
To use the PMD plugin, include the following in your build script:
PMDプラグインを使うためには、ビルドスクリプトに下記を含めます:
The plugin adds a number of tasks to the project that perform the quality checks. You can execute the checks by running gradle check.
このプラグインは、品質チェックを行なうプロジェクトへの多くのタスクを加えます。 貴方はタスク実行時にチェック処理を実行させることが出来ます。 gradle check.
The PMD plugin adds the following tasks to the project:
PMDプラグインは、以下のタスクをプロジェクトに追加します:
表33.1 PMDプラグイン - タスクPMD plugin - tasks
| タスク名Task name | 依存先Depends on | 型Type | 説明Description |
pmdMain
|
- | Pmd |
製品のJavaソースを対象にPMDを実行します。Runs PMD against the production Java source files. |
pmdTest
|
- | Pmd |
テストのJavaソースを対象にPMDを実行します。Runs PMD against the test Java source files. |
pmd
|
- | Pmd |
特定のソースセットで指定されたJavaソースを対象にPMDを実行します。Runs PMD against the given source set's Java source files. |
The PMD plugin adds the following dependencies to tasks defined by the Java plugin.
PMDプラグインは、Javaプラグインによって追加されたタスクに以下の依存関係を追加します。
表33.2 PMDプラグイン - タスクの追加依存関係PMD plugin - additional task dependencies
| タスク名Task name | 依存先Depends on |
check |
全てのPMDタスクは、pmdMain と pmdTestを含みます。All PMD tasks, including pmdMain and pmdTest. |
The PMD plugin adds the following dependency configurations:
PMDプラグインは、以下の依存関係設定を追加します。
表33.3 PMDプラグイン - 依存関係設定
PMD plugin - dependency configurations
| 名前 Name |
意味 Meaning |
pmd
|
PMDのライブラリを使用します。 The PMD libraries to use |
The JaCoCo plugin is currently incubating. Please be aware that the DSL and other configuration may change in later Gradle versions.
The JaCoCo plugin provides code coverage metrics for Java code via integration with JaCoCo.
To get started, apply the JaCoCo plugin to the project you want to calculate code coverage for.
If the Java plugin is also applied to your project, a new task named
jacocoTestReport
is created that depends on the
test
task.
The report is available at
$buildDir/reports/jacoco/test
The JaCoCo plugin adds a project extension named jacoco of type JacocoPluginExtension,
which allows configuring defaults for JaCoCo usage in your build.
Example 34.2. Configuring JaCoCo plugin settings
build.gradle
jacoco {
toolVersion = "0.7.1.201405082137"
reportsDir = file("$buildDir/customJacocoReportDir")
}Table 34.1. Gradle defaults for JaCoCo properties
| Property | Gradle default |
| reportsDir | “$buildDir/reports/jacoco”
|
The
JacocoReport
task can be used to generate code coverage reports in different formats.
It implements the standard Gradle type Reporting and exposes a report container of
type JacocoReportsContainer.
Example 34.3. Configuring test task
build.gradle
jacocoTestReport {
reports {
xml.enabled false
csv.enabled false
html.destination "${buildDir}/jacocoHtml"
}
}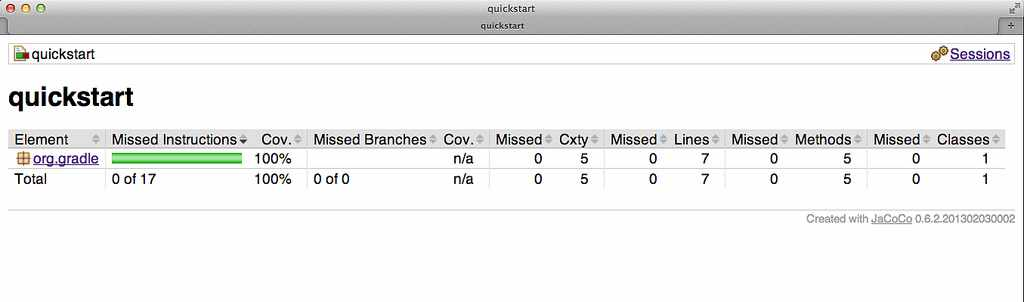 |
The JaCoCo plugin adds a
JacocoTaskExtension
extension to all tasks of type
Test.
This extension allows the configuration of the JaCoCo specific properties of the test task.
Example 34.4. Configuring test task
build.gradle
test {
jacoco {
append = false
destinationFile = file("$buildDir/jacoco/jacocoTest.exec")
classDumpFile = file("$buildDir/jacoco/classpathdumps")
}
}Table 34.2. Default values of the JaCoCo Task extension
| Property | Gradle default |
| enabled | true |
| destPath | $buildDir/jacoco
|
| append | true |
| includes | [] |
| excludes | [] |
| excludeClassLoaders | [] |
| sessionId |
auto-generated
|
| dumpOnExit |
true
|
| output |
Output.FILE
|
| address |
-
|
| port |
-
|
| classDumpPath |
-
|
| jmx |
false
|
While all tasks of type
Test
are automatically enhanced to provide coverage information when the java plugin has been applied,
any task that implements JavaForkOptions can be enhanced by the JaCoCo plugin.
That is, any task that forks Java processes can be used to generate coverage information.
For example you can configure your build to generate code coverage using the application plugin.
Example 34.5. Using application plugin to generate code coverage data
build.gradle
apply plugin: "application" apply plugin: "jacoco" mainClassName = "org.gradle.MyMain" jacoco { applyTo run } task applicationCodeCoverageReport(type:JacocoReport){ executionData run sourceSets sourceSets.main }
ノート: 本例のソースコードは、Gradleのバイナリ配布物またはソース配布物に含まれています。以下の場所をご参照ください。samples/testing/jacoco/application
Example 34.6. Coverage reports generated by applicationCodeCoverageReport
Build layout
application/
build/
jacoco/
run.exec
reports/jacoco/applicationCodeCoverageReport/html/
index.htmlFor projects that also apply the Java Plugin, The JaCoCo plugin automatically adds the following tasks:
Table 34.3. JaCoCo plugin - tasks
| Task name | Depends on | Type | Description |
jacocoTestReport
|
- |
JacocoReport
|
Generates code coverage report for the test task. |
The JaCoCo plugin adds the following dependency configurations:
Table 34.4. JaCoCo plugin - dependency configurations
| Name | Meaning |
jacocoAnt
|
The JaCoCo Ant library used for running the
JacocoReport
and
JacocoMerge
tasks.
|
jacocoAgent
|
The JaCoCo agent library used for instrumenting the code under test. |
You may wish to use the new Sonar Runner Plugin instead of this plugin. In particular, only the Sonar Runner plugin supports Sonar 3.4 and higher.
このプラグインの代わりに、新しくできたSonnar Runnerを使いたくなる場面もあるかもしれません。 特に、Sonar3.4以上をサポートしているのはSonar Runnerプラグインだけです。
The Sonar plugin provides integration with Sonar,
a web-based platform for monitoring code quality. The plugin adds a sonarAnalyze task
that analyzes the project to which the plugin is applied, as well as its subprojects. The results are stored in
the Sonar database. The plugin is based on the Sonar Runner
and requires Sonar 2.11 or higher.
Sonarプラグインは、コード品質モニタリングのためのWebベースのプラットフォームであるSonarとの統合機能を提供します。
プラグインにより追加されるsonarAnalyzeタスクは、プラグインが適用されたプロジェクト、およびそのサブプロジェクトを解析することができます。結果はSonarデータベースに格納されます。
このプラグインはベースにSonar Runnerが使われていて、Sonar 2.11以上を必要とします。
The sonarAnalyze task is a standalone task that needs to be executed explicitly
and doesn't depend on any other tasks. Apart from source code, the task also analyzes class files
and test result files (if available). For best results, it is therefore recommended to run a full
build before the analysis. In a typical setup, analysis would be performed once per day on a build server.
sonarAnalyzeタスクは明示的に実行する必要のあるスタンドアロンタスクで、
他のいかなるタスクにも依存しません。
ソースコードだけでなく、タスクはクラスファイルと(可能であれば)テスト結果ファイルも解析します。
そのため、最大限の結果を得るために、解析の前にフルビルドを実行することが推奨されます。
典型的なセットアップでは、解析はビルドサーバー上で1日1回実行されるようにします。
At a minimum, the Sonar plugin has to be applied to the project.
必要最小限、Sonarプラグインがプロジェクトに適用されている必要があります。
Unless Sonar is run locally and with default settings, it is necessary to configure connection settings for the Sonar server and database.
Sonarがデフォルト設定でローカル実行されるのでなければ、Sonarサーバーとデータベースへの接続設定も必要になります。
例35.2 Sonar接続設定のコンフィグレーション
build.gradle
sonar {
server {
url = "http://my.server.com"
}
database {
url = "jdbc:mysql://my.server.com/sonar"
driverClassName = "com.mysql.jdbc.Driver"
username = "Fred Flintstone"
password = "very clever"
}
}Alternatively, some or all connection settings can be set from the command line (see 「コマンドラインでSonarの設定を行う Configuring Sonar Settings from the Command Line」).
代わりに、いくつかの、または全ての接続設定をコマンドラインで設定することもできます(「コマンドラインでSonarの設定を行う Configuring Sonar Settings from the Command Line」参照)。Project settings determine how the project is going to be analyzed. The default configuration works well for analyzing standard Java projects and can be customized in many ways.
プロジェクト設定によって、プロジェクトをどのように解析するのかが決まります。 標準的なJavaプロジェクトに対してはデフォルト設定で事が足りますが、さまざまな方法でカスタマイズも可能です。
例35.3 Sonarプロジェクト設定のコンフィグレーション
build.gradle
sonar {
project {
coberturaReportPath = file("$buildDir/cobertura.xml")
}
}
The sonar, server, database, and project
blocks in the examples above configure objects of type SonarRootModel,
SonarServer, SonarDatabase,
and SonarProject, respectively. See their API documentation for further information.
サンプルのsonar、server、database、およびproject
ブロックは、それぞれコンフィグレーションオブジェクト
SonarRootModel、
SonarServer、
SonarDatabase、
およびSonarProjectに対応します。
詳細はAPIドキュメントを参照してください。
The Sonar plugin is capable of analyzing a whole project hierarchy at once. This yields a hierarchical view in the Sonar web interface with aggregated metrics and the ability to drill down into subprojects. It is also faster than analyzing each project separately.
Sonarプラグインはプロジェクト階層全体を一度に解析する機能をもちます。 集約されたメトリクスとサブプロジェクトへのドリルダウン機能を含む階層ビューをSonarのWebインターフェースに生成でき、 個別のプロジェクトごとに解析を行うよりも高速でもあります。
To analyze a project hierarchy, the Sonar plugin needs to be applied to the top-most project of the hierarchy.
Typically (but not necessarily) this will be the root project. The sonar block
in that project configures an object of type SonarRootModel.
It holds all global configuration, most importantly server and database connection settings.
プロジェクト階層を解析するには、Sonarプラグインを階層の最上位のプロジェクトに適用する必要があります。
これは、典型的には(必須ではないですが)ルートプロジェクトです。
そのプロジェクトのsonarブロックが
SonarRootModel型のオブジェクトを構成します。
これはすべてのグローバルコンフィグレーションを保持しますが、
最も重要なのはサーバーとデータベース接続設定です。
例35.4 マルチプロジェクトビルドにおけるグローバルコンフィグレーション
build.gradle
apply plugin: "sonar" sonar { server { url = "http://my.server.com" } database { url = "jdbc:mysql://my.server.com/sonar" driverClassName = "com.mysql.jdbc.Driver" username = "Fred Flintstone" password = "very clever" } }
Each project in the hierarchy has its own project configuration. Common values can be set from a parent build script.
階層の各プロジェクトは独自のプロジェクトコンフィグレーションを持ちます。 共通の値は親のビルドスクリプトから設定可能です。
例35.5 マルチプロジェクトビルドにおける共通のプロジェクトコンフィグレーション
build.gradle
subprojects {
sonar {
project {
sourceEncoding = "UTF-8"
}
}
}The sonar block in a subproject configures an object of type SonarProjectModel.
サブプロジェクトのsonarブロックは
SonarProjectModel型のオブジェクトを構成します.
Projects can also be configured individually. For example, setting the skip property to true
prevents a project (and its subprojects) from being analyzed. Skipped projects will not be displayed in the Sonar web interface.
プロジェクトを個別に構成することもできます。
例えば、skipプロパティをtrueに設定することで、
プロジェクト(およびそのサブプロジェクト)を解析対象から除外することができます。
スキップされたプロジェクトはSonar Webインターフェースには表示されません。
例35.6 マルチプロジェクトビルドにおけるプロジェクト個別コンフィグレーション
build.gradle
project(":project1") {
sonar {
project {
skip = true
}
}
}Another typical per-project configuration is the programming language to be analyzed. Note that Sonar can only analyze one language per project.
プロジェクト単位のコンフィグレーションでもう一つ典型的なのは、解析対象のプログラム言語です。 Sonarはプロジェクトあたり一つの言語しか解析できないことに注意してください。
例35.7 解析対象の言語のコンフィグレーション
build.gradle
project(":project2") { sonar { project { language = "groovy" } } }
When setting only a single property at a time, the equivalent property syntax is more succinct:
一度に単一のプロパティしか設定しないときは、等価なプロパティの文法はより簡潔になります:
By default, the Sonar plugin will analyze the production sources in the main source set and
the test sources in the test source set. This works independent of the project's source directory layout.
Additional source sets can be added as needed.
デフォルトでは、Sonarプラグインはmainソースセットのプロダクションソースと、
testソースセットのテストソースを解析します。
これはプロジェクトのソースディレクトリレイアウトとは独立して動作します。
ソースセットは必要に応じて追加できます。
例35.9 カスタムソースセットの解析
build.gradle
sonar.project {
sourceDirs += sourceSets.custom.allSource.srcDirs
testDirs += sourceSets.integTest.allSource.srcDirs
}
To analyze code written in a language other than Java, install the corresponding
Sonar plugin, and set
sonar.project.language accordingly:
Java以外の言語で書かれたコードを解析するには、対応するSonarプラグインをインストールして、次のようにsonar.project.languageを設定してください。
As of Sonar 3.4, only one language per project can be analyzed. You can, however, set a different language for each project in a multi-project build.
Sonarでは、バージョン3.4現在、一プロジェクトにつき一つの言語の解析しかできません。しかし、マルチプロジェクトで、それぞれのプロジェクトに異なる言語を設定することはできます。
Eventually, most configuration is passed to the Sonar code analyzer in the form of key-value pairs known as Sonar properties.
The SonarProperty annotations in the API documentation show how properties
of the plugin's object model get mapped to the corresponding Sonar properties. The Sonar plugin offers hooks to post-process Sonar
properties before they get passed to the code analyzer. The same hooks can be used to add additional properties which aren't covered
by the plugin's object model.
最終的には、コンフィグレーションのほとんどは、
Sonarプロパティとして知られるkey-valueペアの形でSonarコードアナライザに渡されます。
プラグインのオブジェクトモデルのプロパティが対応するSonarプロパティにどのようにしてマップされるかは、
APIドキュメントのSonarPropertyアノテーションが示してます。
Sonarプラグインは、Sonarプロパティがコードアナライザに渡される前の後処理のためのフックを提供します。
このフックは、プラグインのオブジェクトモデルがカバーしていないプロパティを追加するためにも利用できます。
For global Sonar properties, use the withGlobalProperties hook on SonarRootModel:
グローバルSonarプロパティに対しては、SonarRootModelのwithGlobalPropertiesフックを利用してください:
例35.11 カスタムグローバルプロパティ設定
build.gradle
sonar.withGlobalProperties { props ->
props["some.global.property"] = "some value"
// non-String values are automatically converted to Strings
props["other.global.property"] = ["foo", "bar", "baz"]
}For per-project Sonar properties, use the withProjectProperties hook on SonarProject:
プロジェクト毎のSonarプロパティに対しては、SonarProjectのwithProjectPropertiesフックを利用してください:
例35.12 カスタムプロジェクトプロパティ設定
build.gradle
sonar.project.withProjectProperties { props ->
props["some.project.property"] = "some value"
// non-String values are automatically converted to Strings
props["other.project.property"] = ["foo", "bar", "baz"]
}
A list of available Sonar properties can be found in the Sonar documentation.
Note that for most of these properties, the Sonar plugin's object model has an equivalent property, and it isn't necessary to use a withGlobalProperties
or withProjectProperties hook. For configuring a third-party Sonar plugin, consult the plugin's documentation.
使用できるSonarプロパティはSonarのドキュメントで調べることができます。
ただし、これらのプロパティのほとんどはプラグインのオブジェクトモデルに対応するプロパティがあり、withGlobalPropertiesやwithProjectPropertiesフックを使って設定する必要はありません。
サードパーティのSonarプラグインに対しては、それらのドキュメントを参照してください。
The following properties can alternatively be set from the command line, as task parameters of the sonarAnalyze task.
A task parameter will override any corresponding value set in the build script.
次に示すプロパティは、sonarAnalyzeタスクのパラメーターとしてコマンドラインからでも設定できます。
タスクパラメーターは、ビルドスクリプト内の対応する値を全て上書きします。
server.urldatabase.urldatabase.driverClassNamedatabase.usernamedatabase.passwordshowSqlshowSqlResultsverboseforceAnalysis
Here is a complete example:
以下に使用例を示します。
gradle sonarAnalyze --server.url=http://sonar.mycompany.com --database.password=myPassword --verbose
If you need to set other properties from the command line, you can use system properties to do so:
他の値をコマンドラインから設定する必要がある場合は、システムプロパティが使用できます。
例35.13 カスタムのコマンドラインプロパティを実装する
build.gradle
sonar.project {
language = System.getProperty("sonar.language", "java")
}However, keep in mind that it is usually best to keep configuration in the build script and under source control.
ただ、たいていの場合は設定値をビルドスクリプトに格納し、ソースコード管理システムで管理するのが一番良い方法だということは頭に留めておいてください。
The Sonar plugin adds the following tasks to the project.
Sonarプラグインはプロジェクトに以下のタスクを追加します。
表35.1 Sonarプラグイン - タスク Sonar plugin - tasks
| タスク名 Task name | 依存先 Depends on | タイプ Type | 説明 Description |
sonarAnalyze |
- | SonarAnalyze |
プロジェクト階層全体を解析し、結果をSonarデータベースに格納。 Analyzes a project hierarchy and stores the results in the Sonar database. |
The Sonar Runner plugin is currently incubating. Please be aware that the DSL and other configuration may change in later Gradle versions.
It is intended that this plugin will replace the older Sonar Plugin in a future Gradle version.
The Sonar Runner plugin provides integration with Sonar, a web-based platform for monitoring code quality. It is based on the Sonar Runner, a Sonar client component that analyzes source code and build outputs, and stores all collected information in the Sonar database. Compared to using the standalone Sonar Runner, the Sonar Runner plugin offers the following benefits:
- Automatic provisioning of Sonar Runner
The ability to execute the Sonar Runner via a regular Gradle task makes it available anywhere Gradle is available (developer build, CI server, etc.), without the need to manually download, setup, and maintain a Sonar Runner installation.
- Dynamic configuration from Gradle build scripts
All of Gradle's scripting features can be leveraged to configure Sonar Runner as needed.
- Extensive configuration defaults
Gradle already has much of the information needed for Sonar Runner to successfully analyze a project. By preconfiguring the Sonar Runner based on that information, the need for manual configuration is reduced significantly.
The default version of the Sonar Runner used by the plugin is 2.3, which makes it compatible with Sonar 3.0 and higher. For compatibility with Sonar versions earlier than 3.0, you can configure the use of an earlier Sonar Runner version (see Section 36.4, “Specifying the Sonar Runner version”).
To get started, apply the Sonar Runner plugin to the project to be analyzed.
Assuming a local Sonar server with out-of-the-box settings is up and running, no further mandatory configuration is required.
Execute gradle sonarRunner and wait until the build has completed, then open the web page indicated
at the bottom of the Sonar Runner output. You should now be able to browse the analysis results.
Before executing the sonarRunner task, all tasks producing output to be analysed by Sonar need to be executed.
Typically, these are compile tasks, test tasks, and code coverage tasks. To meet these needs, the plugins adds a task dependency
from sonarRunner on test if the java plugin is applied. Further task dependencies can be
added as needed.
The Sonar Runner plugin adds a SonarRunnerRootExtension extension to the project and a
SonarRunnerExtension extension to its subprojects,
which allows you to configure the Sonar Runner via key/value pairs known as Sonar properties. A typical base line configuration
includes connection settings for the Sonar server and database.
Example 36.2. Configuring Sonar connection settings
build.gradle
sonarRunner {
sonarProperties {
property "sonar.host.url", "http://my.server.com"
property "sonar.jdbc.url", "jdbc:mysql://my.server.com/sonar"
property "sonar.jdbc.driverClassName", "com.mysql.jdbc.Driver"
property "sonar.jdbc.username", "Fred Flintstone"
property "sonar.jdbc.password", "very clever"
}
}Alternatively, Sonar properties can be set from the command line. See 「コマンドラインでSonarの設定を行う Configuring Sonar Settings from the Command Line」 for more information.
For a complete list of standard Sonar properties, consult the Sonar documentation. If you happen to use additional Sonar plugins, consult their documentation.
In addition to set Sonar properties, the SonarRunnerRootExtension extension allows the configuration of the Sonar Runner version and
the JavaForkOptions of the forked Sonar Runner process.
The Sonar Runner plugin leverages information contained in Gradle's object model to provide smart defaults for many of the standard Sonar properties.
The defaults are summarized in the tables below. Notice that additional defaults are provided for projects that have the java-base
or java plugin applied. For some properties (notably server and database connection settings), determining a suitable default
is left to the Sonar Runner.
Table 36.1. Gradle defaults for standard Sonar properties
| Property | Gradle default |
| sonar.projectKey | “$project.group:$project.name” (for root project of analysed hierarchy; left to Sonar Runner otherwise) |
| sonar.projectName | project.name |
| sonar.projectDescription | project.description |
| sonar.projectVersion | project.version |
| sonar.projectBaseDir | project.projectDir |
| sonar.working.directory | “$project.buildDir/sonar” |
| sonar.dynamicAnalysis | “reuseReports” |
Table 36.2. Additional defaults when java-base plugin is applied
| Property | Gradle default |
| sonar.java.source | project.sourceCompatibility |
| sonar.java.target | project.targetCompatibility |
Table 36.3. Additional defaults when java plugin is applied
| Property | Gradle default |
| sonar.sources | sourceSets.main.allSource.srcDirs (filtered to only include existing directories) |
| sonar.tests | sourceSets.test.allSource.srcDirs (filtered to only include existing directories) |
| sonar.binaries | sourceSets.main.runtimeClasspath (filtered to only include directories) |
| sonar.libraries | sourceSets.main.runtimeClasspath (filtering to only include files; rt.jar added if necessary) |
| sonar.surefire.reportsPath | test.testResultsDir (if the directory exists) |
| sonar.junit.reportsPath | test.testResultsDir (if the directory exists) |
Table 36.4. Additional defaults when jacoco plugin is applied
| Property | Gradle default |
| sonar.jacoco.reportPath | jacoco.destinationFile |
By default, version 2.3 of the Sonar Runner is used.
To specify an alternative version, set the SonarRunnerRootExtension.getToolVersion() property
of the sonarRunner extension of the project the plugin was applied to to the desired version.
This will result in the Sonar Runner dependency org.codehaus.sonar.runner:sonar-runner-dist:«toolVersion» being used as the Sonar Runner.
Example 36.3. Configuring Sonar runner version
build.gradle
sonarRunner {
toolVersion = '2.3' // default
}The Sonar Runner is capable of analyzing whole project hierarchies at once. This yields a hierarchical view in the Sonar web interface, with aggregated metrics and the ability to drill down into subprojects. Analyzing a project hierarchy also takes less time than analyzing each project separately.
To analyze a project hierarchy, apply the Sonar Runner plugin to the root project of the hierarchy.
Typically (but not necessarily) this will be the root project of the Gradle build. Information pertaining to the
analysis as a whole, like server and database connections settings, have to be configured in the sonarRunner
block of this project. Any Sonar properties set on the command line also apply to this project.
Example 36.4. Global configuration settings
build.gradle
sonarRunner {
sonarProperties {
property "sonar.host.url", "http://my.server.com"
property "sonar.jdbc.url", "jdbc:mysql://my.server.com/sonar"
property "sonar.jdbc.driverClassName", "com.mysql.jdbc.Driver"
property "sonar.jdbc.username", "Fred Flintstone"
property "sonar.jdbc.password", "very clever"
}
}
Configuration shared between subprojects can be configured in a subprojects block.
Example 36.5. Shared configuration settings
build.gradle
subprojects {
sonarRunner {
sonarProperties {
property "sonar.sourceEncoding", "UTF-8"
}
}
}
Project-specific information is configured in the sonarRunner block
of the corresponding project.
Example 36.6. Individual configuration settings
build.gradle
project(":project1") { sonarRunner { sonarProperties { property "sonar.language", "grvy" } } }
To skip Sonar analysis for a particular subproject, set sonarRunner.skipProject to true.
Example 36.7. Skipping analysis of a project
build.gradle
project(":project2") {
sonarRunner {
skipProject = true
}
}By default, the Sonar Runner plugin passes on the project's main source set as production sources, and the
project's test source set as test sources. This works regardless of the project's source directory layout.
Additional source sets can be added as needed.
Example 36.8. Analyzing custom source sets
build.gradle
sonarRunner {
sonarProperties {
properties["sonar.sources"] += sourceSets.custom.allSource.srcDirs
properties["sonar.tests"] += sourceSets.integTest.allSource.srcDirs
}
}
To analyze code written in a language other than Java, you'll need to set sonar.project.language accordingly.
However, note that your Sonar server has to have the Sonar plugin
that handles that programming language.
Example 36.9. Analyzing languages other than Java
build.gradle
sonarRunner {
sonarProperties {
property "sonar.language", "grvy" // set language to Groovy
}
}As of Sonar 3.4, only one language per project can be analyzed. It is, however, possible to analyze a different language for each project in a multi-project build.
Let's take a closer look at the sonarRunner.sonarProperties {} block. As we have already seen in the examples,
the property() method allows you to set new properties or override existing ones. Furthermore, all properties that have
been configured up to this point, including all properties preconfigured by Gradle, are available via the properties
accessor.
Entries in the properties map can be read and written with the usual Groovy syntax. To facilitate their manipulation,
values still have their “idiomatic” type (File, List, etc.). After the sonarProperties block
has been evaluated, values are converted to Strings as follows: Collection values are (recursively) converted to comma-separated Strings,
and all other values are converted by calling their toString() method.
Because the sonarProperties block is evaluated lazily, properties of Gradle's object model can be safely referenced
from within the block, without having to fear that they have not yet been set.
Sonar Properties can also be set from the command line, by setting a system property named exactly like the Sonar property in question. This can be useful when dealing with sensitive information (e.g. credentials), environment information, or for ad-hoc configuration.
gradle sonarRunner -Dsonar.host.url=http://sonar.mycompany.com -Dsonar.jdbc.password=myPassword -Dsonar.verbose=true
While certainly useful at times, we do recommend to keep the bulk of the configuration in a (versioned) build script, readily available to everyone.
A Sonar property value set via a system property overrides any value set in a build script (for the same property). When
analyzing a project hierarchy, values set via system properties apply to the root project of the analyzed hierarchy.
Each system property starting with ""sonar." will taken into account for the sonar runner setup.
The Sonar Runner is executed in a forked process.
This allows fine grained control over memory settings, system properties etc. just for the Sonar Runner process.
The forkOptions property of the sonarRunner extension of the project that applies the sonar-runner plugin
(Usually the rootProject but not necessarily) allows the process configuration to be specified.
This property is not available in the SonarRunnerExtension extension applied to the subprojects.
Example 36.10. setting custom Sonar Runner fork options
build.gradle
sonarRunner {
forkOptions {
maxHeapSize = '512m'
}
}
For a complete reference about the available options, see JavaForkOptions.
The Sonar Runner plugin adds the following tasks to the project.
Table 36.5. Sonar Runner plugin - tasks
| Task name | Depends on | Type | Description |
sonarRunner |
- | SonarRunner |
Analyzes a project hierarchy and stores the results in the Sonar database. |
The OSGi plugin provides a factory method to create an
OsgiManifest object. OsgiManifest extends
Manifest. To learn more
about generic manifest handling, see 「ManifestManifest」. If the Java plugins is applied, the OSGi plugin
replaces the manifest object of the default jar with an OsgiManifest object. The replaced manifest
is merged into the new one.
OSGiプラグインは
OsgiManifest オブジェクトを生成するためのファクトリメソッドを提供します。 OsgiManifest は
Manifest を継承しています。一般的な manifest 操作に関しての詳細については、
「ManifestManifest」 を参照してください。 Javaプラグインが適用されている場合、OSGiプラグインはデフォルトのjarのmanifestオブジェクトを OsgiManifest オブジェクトに置き換えます。 置き換えられたmanifestは新しいmanifestにマージされます。
The OSGi plugin makes heavy use of Peter Kriens BND tool.
OSGiプラグインは Peter Kriens の BND tool を大いに活用しています。
To use the OSGi plugin, include the following in your build script:
OSGiプラグインを使うためには、ビルドスクリプトに以下のコードを追加します:
The OSGi plugin adds the following convention object: OsgiPluginConvention
OSGiプラグインは以下の規約オブジェクトを追加します: OsgiPluginConvention
The OSGi plugin does not add any convention properties to the project.
OSGiプラグインはプロジェクトに規約プロパティを追加しません。
The OSGi plugin adds the following methods. For more details, see the API documentation of the convention object.
OSGiプラグインは以下の規約メソッドを追加します。詳細については規約オブジェクトのAPIドキュメントを参照してください。
表37.1 OSGiメソッドOSGi methods
| メソッドMethod | 戻り値Return Type | 説明Description |
| osgiManifest() |
OsgiManifest
|
OsgiManifestオブジェクトを返す。Returns an OsgiManifest object. |
| osgiManifest(Closure cl) |
OsgiManifest
|
クロージャによって構成されたOsgiManifestオブジェクトを返す。Returns an OsgiManifest object configured by the closure. |
The classes in the classes dir are analyzed regarding their package dependencies and the packages they expose.
Based on this the Import-Package and the Export-Package values of the
OSGi Manifest are calculated. If the classpath contains jars with an OSGi bundle, the bundle
information is used to specify version information for the Import-Package
value. Beside the explicit properties of the OsgiManifest object you can add instructions.
classesディレクトリにあるクラスのパッケージ依存関係と公開するパッケージが解析され、その情報に基づいてOSGi Manifestの Import-Package と Export-Package の値が決定されます。
クラスパスにOSGiバンドル形式のjarがある場合、Import-Packageの値を決定するためにバンドルの情報が参照されます。
OsgiManifest オブジェクトに明示的にinstructionプロパティを追加することでメタデータを追加できます。
例37.2 OSGiのMANIFEST.MFファイルの設定
build.gradle
jar {
manifest { // the manifest of the default jar is of type OsgiManifest
name = 'overwrittenSpecialOsgiName'
instruction 'Private-Package',
'org.mycomp.package1',
'org.mycomp.package2'
instruction 'Bundle-Vendor', 'MyCompany'
instruction 'Bundle-Description', 'Platform2: Metrics 2 Measures Framework'
instruction 'Bundle-DocURL', 'http://www.mycompany.com'
}
}
task fooJar(type: Jar) {
manifest = osgiManifest {
instruction 'Bundle-Vendor', 'MyCompany'
}
}The first argument of the instruction call is the key of the property. The other arguments form the value.
They are joined by Gradle with the , separator. To learn more about the available
instructions have a look at the BND tool.
instruction の第1引数にはプロパティのキー、第2引数には値を指定します。
それらはGradleによって , で結合されます。
利用可能な instruction の詳細については BND tool を参照してください。
The Eclipse plugin generates files that are used by the Eclipse IDE, thus making it possible to import the project into Eclipse ( - - ). Both external dependencies (including associated source and Javadoc files) and project dependencies are considered.
Eclipse プラグインは Eclipse IDE が利用するファイルを生成し、 ( - - で) Eclipse 内にプロジェクトをインポートできるようにします。 外部依存関係 (ソースと Javadoc も含む) とプロジェクト依存関係の両方が考慮されます。
Since version 1.0-milestone-4 of Gradle, the WTP-generating code was refactored into a separate plugin called eclipse-wtp.
So if you are interested in WTP integration then only apply the eclipse-wtp plugin. Otherwise applying the eclipse plugin is enough.
This change was requested by Eclipse users who take advantage of the war or ear plugins,
but who don't use Eclipse WTP. Internally, the eclipse-wtp plugin also applies the eclipse plugin so you don't need to apply both of those plugins.
1.0-milestone-4 以降、WTP生成コードはリファクタリングされ、eclipse-wtp プラグインに分離されました。
もしWTP が必要であれば、eclipse-wtp プラグインを適用するだけです。必要でなければ、eclipse プラグインを適用するだけでよいです。
この変更は WTP を利用せずに war プラグインや ear プラグインだけを利用するという Eclipse ユーザの要望によるものです。
eclipse-wtp プラグインは 内部的に eclipse プラグインも適用するので 両方を適用する必要はありません。
What exactly the Eclipse plugin generates depends on which other plugins are used:
Eclipse プラグインが何を生成するかは どのプラグインと一緒に利用するかで決まります。
表38.1 Eclipse プラグインの振舞いEclipse plugin behavior
| プラグインPlugin | 説明Description |
| なしNone | 最小構成の .project ファイルを生成します。
Generates minimal .project file. |
| Java | Java の構成を .project ファイルに追加します。
.classpath ファイルと JDT 設定ファイルを生成します。
Adds Java configuration to .project.
Generates .classpath and JDT settings file. |
| Groovy | Groovy の構成を.project ファイルに追加します。
Adds Groovy configuration to .project file. |
| Scala | Adds Scala support to .project and .classpath files. |
| War | WEBアプリケーションのサポートを.projectファイルと.classpathファイルに追加します。
eclipse-wtp プラグインを適用している場合のみ WTP 設定ファイルを生成します。
Adds web application support to .project file.
Generates WTP settings files only if eclipse-wtp plugin was applied. |
| Ear |
EAR アプリケーションのサポートを .project ファイルに追加します。
eclipse-wtp プラグインを適用している場合のみ WTP 設定ファイルを生成します。
Adds ear application support to .project file.
Generates WTP settings files only if eclipse-wtp plugin was applied. |
The Eclipse plugin is open to customization and provides a standardized set of hooks for adding and removing content from the generated files.
Eclipseプラグインは、カスタマイズが容易なように作られています。 生成されたファイルに内容を追加したり削除したりするための、標準化されたフックが用意されています。
To use the Eclipse plugin, include this in your build script:
Eclipseプラグインを使う為には、ビルドスクリプトに下記を含めます:
The Eclipse plugin adds a number of tasks to your projects. The main tasks that you will use
are the eclipse and cleanEclipse tasks.
Eclipseプラグインは多くのタスクをプロジェクトに追加しますが、主に利用するのは eclipse と cleanEclipse
タスクだけです。
The Eclipse plugin adds the tasks shown below to a project.
Eclipseプラグインはプロジェクトに以下のタスクを追加します。
表38.2 Eclipse プラグイン - タスクEclipse plugin - tasks
| タスク名Task name | 依存先Depends on | 型Type | 説明Description |
eclipse
|
eclipseProject, eclipseClasspath, eclipseJdt,
eclipseWtpComponent, cleanEclipseWtpFacet |
Task |
Eclipseの全ての設定ファイルを生成します。 Generates all Eclipse configuration files |
cleanEclipse
|
cleanEclipseProject, cleanEclipseClasspath, cleanEclipseJdt,
cleanEclipseWtpComponent, cleanEclipseWtpFacet
|
Delete |
Eclipseの全ての設定ファイルを削除します。 Removes all Eclipse configuration files |
cleanEclipseProject
|
-
|
Delete |
.projectファイルを生成します。
Generates the .project file. |
cleanEclipseClasspath
|
-
|
Delete |
.classpathファイルを生成します。
Generates the .classpath file. |
cleanEclipseJdt
|
-
|
Delete |
.settings/org.eclipse.jdt.core.prefsファイルを削除します。
Removes the .settings/org.eclipse.jdt.core.prefs file. |
cleanEclipseWtpComponent
|
-
|
Delete |
.settings/org.eclipse.wst.common.componentファイルを削除します。
Removes the .settings/org.eclipse.wst.common.component file. |
cleanEclipseWtpFacet
|
-
|
Delete
|
.settings/org.eclipse.wst.common.componentファイルを削除します。
Removes the .settings/org.eclipse.wst.common.component file.
|
eclipseProject
|
-
|
GenerateEclipseProject |
.projectファイルを生成します。
Generates the .project file. |
eclipseClasspath
|
-
|
GenerateEclipseClasspath |
.classpathファイルを生成します。
Generates the .classpath file. |
eclipseJdt
|
-
|
GenerateEclipseJdt |
.settings/org.eclipse.jdt.core.prefsファイルを生成します。
Generates the .settings/org.eclipse.jdt.core.prefs file. |
eclipseWtpComponent
|
-
|
GenerateEclipseWtpComponent |
eclipse-wtpが適用されている場合のみ .settings/org.eclipse.wst.common.componentファイルを生成します。
Generates the .settings/org.eclipse.wst.common.component file only if eclipse-wtp plugin was applied. |
eclipseWtpFacet
|
-
|
GenerateEclipseWtpFacet
|
eclipse-wtpが適用されている場合のみ .settings/org.eclipse.wst.common.project.facet.core.xmlファイルを生成します。
Generates the .settings/org.eclipse.wst.common.project.facet.core.xml file only if eclipse-wtp plugin was applied. |
表38.3 Eclipseプラグインの設定 Configuration of the Eclipse plugin
| モデルModel | 参照名Reference name | 説明Description |
EclipseModel
|
eclipse |
DSLにあったやり方でEclipseプラグインの設定が可能なトップレベル要素 Top level element that enables configuration of the Eclipse plugin in a DSL-friendly fashion |
EclipseProject
|
eclipse.project |
プロジェクトの情報を設定できます。 Allows configuring project information |
EclipseClasspath
|
eclipse.classpath |
クラスパスの情報を設定できます。 Allows configuring classpath information |
EclipseJdt
|
eclipse.jdt |
JDT の情報を設定できます。(source/target java互換) Allows configuring jdt information (source/target Java compatibility) |
EclipseWtpComponent
|
eclipse.wtp.component |
eclipse-wtpプラグインを適用した場合のみ、WTPコンポーネントの情報を設定できます。
Allows configuring wtp component information only if eclipse-wtp plugin was applied. |
EclipseWtpFacet
|
eclipse.wtp.facet |
eclipse-wtpプラグインを適用した場合のみ、WTPファセットの情報を設定できます。
Allows configuring wtp facet information only if eclipse-wtp plugin was applied. |
The Eclipse plugin allows you to customize the generated metadata files. The plugin provides a DSL for configuring model objects that model the Eclipse view of the project. These model objects are then merged with the existing Eclipse XML metadata to ultimately generate new metadata. The model objects provide lower level hooks for working with domain objects representing the file content before and after merging with the model configuration. They also provide a very low level hook for working directly with the raw XML for adjustment before it is persisted, for fine tuning and configuration that the Eclipse plugin does not model.
Eclipseプラグインは、生成されるメタデータファイルをカスタマイズできるようになっています。 このプラグインでは、DSLを使ってモデルオブジェクトの設定を行うことができます。このモデルオブジェクトは、Eclipseのプロジェクトを表すものです。 DSLで設定したEclipseのモデルオブジェクトは、既存のXMLメタデータとマージされ、最終的な新しいメタデータが生成されます。 メタデータの内容は、ドメインオブジェクトという形で表現されます。マージ前後にそのドメインオブジェクトを操作する、低レベルなフックも用意されています。 また、さらに低レベルなフックも用意されており、メタデータをファイルに保存する前に、生のXMLデータを直接取り扱うこともできます。 そのフックを使えば、プラグインがモデル化していない設定要素を微調整したり編集したりすることも可能です。
Sections of existing Eclipse files that are also the target of generated content will be amended or overwritten, depending on the particular section. The remaining sections will be left as-is.
既存のEclipseファイルの、対象のセクションだけを生成された内容で変更、もしくは上書きし、それ以外はそのまま残します。
To completely rewrite existing Eclipse files, execute a clean task together with its corresponding generation task,
like “gradle cleanEclipse eclipse” (in that order). If you want to make this
the default behavior, add “tasks.eclipse.dependsOn(cleanEclipse)” to your build script. This makes it
unnecessary to execute the clean task explicitly.
既存の Eclipse ファイルを完全に上書きしたい場合は、対応する生成タスクと一緒に clean タスクも実行します。
例えば gradle cleanEclipse eclipse のように... (もちろん この順番で...)
もし、この動きをデフォルトにしたい場合は、ビルドスクリプトに eclipse.dependsOn(cleanEclipse) を追加します。
そうすれば 明示的に clean タスクを実行する必要はありません。
This strategy can also be used for individual files that the plugin would generate. For instance,
this can be done for the “.classpath” file with “gradle cleanEclipseClasspath eclipseClasspath”.
Complete overwrite works equally well for individual files, for example by executing gradle cleanEclipseClasspath eclipseClasspath.
個々のファイルについても同じように完全に上書きすることができます。例えば、 gradle cleanEclipseClasspath eclipseClasspath のように...
The Eclipse plugin provides objects modeling the sections of the Eclipse files that are generated by Gradle. The generation lifecycle is as follows: Eclipse プラグインは Gradle が生成する Eclipse ファイルのセクションをモデリングしたドメインクラスを提供します。 生成ライフサイクルは次の通りです。
- The file is read; or a default version provided by Gradle is used if it does not exist ファイルが読み込まれる。ファイルが存在しない場合は、Gradleがデフォルトの内容を用意する。
- The
beforeMergedhook is executed with a domain object representing the existing filebeforeMergedフックが実行され、既存の設定内容を表すドメインオブジェクトがフックに引き渡される。 - The existing content is merged with the configuration inferred from the Gradle build or defined explicitly in the eclipse DSL Gradleのビルド内容から推測される、またはEclipse DSLで明示された設定内容と、既存の設定内容がマージされる。
- The
whenMergedhook is executed with a domain object representing contents of the file to be persistedwhenMergedフックが実行され、保存される予定の設定内容を表すドメインオブジェクトがフックに引き渡される。 - The
withXmlhook is executed with a raw representation of the XML that will be persistedwithXmlフックが実行され、保存される予定の生XMLがフックに引き渡される。 - The final XML is persisted 最終的なXMLが保存される。
The following table lists the domain object used for each of the Eclipse model types: 以下は Eclipseモデルの型毎の利用ドメインオブジェクトの一覧表です。
表38.4 高度な構成フックAdvanced configuration hooks
| モデルModel | beforeMerged { arg -> } 引数型argument type |
whenMerged { arg -> } 引数型argument type |
withXml { arg -> } 引数型argument type |
EclipseProject |
Project |
Project |
XmlProvider |
EclipseClasspath |
Classpath |
Classpath |
XmlProvider |
EclipseJdt |
Jdt |
Jdt |
|
EclipseWtpComponent |
WtpComponent |
WtpComponent |
XmlProvider |
EclipseWtpFacet |
WtpFacet |
WtpFacet |
XmlProvider |
A complete overwrite causes all existing content to be discarded,
thereby losing any changes made directly in the IDE. Alternatively, the beforeMerged hook makes it possible
to overwrite just certain parts of the existing content. The following example removes all existing dependencies
from the Classpath domain object:
完全に上書きしてしまうと 既存の内容を全て破棄してしまいます。
それにより IDE で直接変更した内容が消されてしまいます。beforeMerged フックを使えば 既存の内容の一部だけを上書きすることができます。
次の例は 存在する全ての依存関係を classpath ドメインオブジェクトから削除します。
例38.2 classpath の一部を上書き
build.gradle
eclipse.classpath.file {
beforeMerged { classpath ->
classpath.entries.removeAll { entry -> entry.kind == 'lib' || entry.kind == 'var' }
}
}
The resulting .classpath file will only contain Gradle-generated dependency entries, but
not any other dependency entries that may have been present in the original file. (In the case of dependency entries,
this is also the default behavior.) Other sections of the .classpath file will be either left as-is or merged.
The same could be done for the natures in the .project file:
この例で生成された .classpath ファイルには Gradleによって生成された依存関係のエントリしか含みません。
元のファイルにあった他の依存関係のエントリは全く含みません。(依存関係のエントリの場合はこれがデフォルトの振る舞いです。)
.classpathファイルの他のセクションは そのまま残るかマージされるでしょう。
.project ファイルの ネーチャーでも同様です。
例38.3 project の一部を上書き
build.gradle
eclipse.project.file.beforeMerged { project ->
project.natures.clear()
}
The whenMerged hook allows to manipulate the fully populated domain objects. Often this is the
preferred way to customize Eclipse files. Here is how you would export all the dependencies of an Eclipse project:
例38.4 依存関係のエクスポート
build.gradle
eclipse.classpath.file {
whenMerged { classpath ->
classpath.entries.findAll { entry -> entry.kind == 'lib' }*.exported = false
}
}
whenMergedフックは完全にデータが設定されたドメインオブジェクトを操作することができます。
これは Eclipse のファイルをカスタマイズするのにはよい方法です。
以下は Eclipse プロジェクトの全ての依存関係をエクスポートする方法です:
例38.5 依存関係のエクスポート
build.gradle
eclipse.classpath.file {
whenMerged { classpath ->
classpath.entries.findAll { entry -> entry.kind == 'lib' }*.exported = false
}
}
The withXmlhook allows to manipulate the in-memory XML representation just before the file gets written to disk.
Although Groovy's XML support makes up for a lot, this approach is less convenient than manipulating the domain objects.
In return, you get total control over the generated file, including sections not modeled by the domain objects.
例38.6 XML のカスタマイズ
build.gradle
apply plugin: 'eclipse-wtp' eclipse.wtp.facet.file.withXml { provider -> provider.asNode().fixed.find { it.@facet == 'jst.java' }.@facet = 'jst2.java' }
withXmlフックはディスクに書き出される直前のメモリ内の XML 表現を操作することができます。
ただ、Groovy の XML サポートがいろいろと補ってくれたとしても、このアプローチはドメインオブジェクトを操作するほど便利ではありません。
その代わりに、生成されたファイルを通して全ての操作が可能です。もちろん、ドメインオブジェクトにモデル化されなかったセクションも含みます。
例38.7 XML のカスタマイズCustomizing the XML
build.gradle
apply plugin: 'eclipse-wtp' eclipse.wtp.facet.file.withXml { provider -> provider.asNode().fixed.find { it.@facet == 'jst.java' }.@facet = 'jst2.java' }
The IDEA plugin generates files that are used by IntelliJ IDEA, thus making it possible to open the project from IDEA ( - ). Both external dependencies (including associated source and Javadoc files) and project dependencies are considered.
IDEAプラグインは、IntelliJ IDEAが使用するファイルを生成し、プロジェクトをIDEA( - )で開けるようにします。 外部依存関係(関連するソースやjavadocファイルを含む)とプロジェクト依存関係についても考慮されています。
What exactly the IDEA plugin generates depends on which other plugins are used:
IDEAプラグインが実際に生成するものは、使用されているプラグインによって異なります。
表39.1 IDEAプラグインの振る舞い IDEA plugin behavior
| Plugin プラグイン | Description 説明 |
| None なし | Generates an IDEA module file. Also generates an IDEA project and workspace file if the project is the root project. IDEAモジュールファイルを生成する。プロジェクトがルートプロジェクトだった場合は、IDEAプロジェクトとワークスペースファイルも生成する。 |
| Java | Adds Java configuration to the module and project files. モジュールファイルとプロジェクトファイルに、Javaの設定を追加する。 |
One focus of the IDEA plugin is to be open to customization. The plugin provides a standardized set of hooks for adding and removing content from the generated files.
IDEAプラグインで重視されているものの一つがカスタマイズ性です。生成するファイルに内容を追加したり削除したりするためのフックが標準化されて提供されています。
To use the IDEA plugin, include this in your build script:
IDEAプラグインを使うには、ビルドスクリプトに次の行を追加します。
The IDEA plugin adds a number of tasks to your project. The main tasks that you will use
are the idea and cleanIdea tasks.
IDEAプラグインは、プロジェクトにいくつかのタスクを追加します。主に使うものはideaタスクとcleanIdeaタスクでしょう。
The IDEA plugin adds the tasks shown below to a project.
Notice that the clean task does not depend on the cleanIdeaWorkspace task.
This is because the workspace typically contains a lot of user specific temporary data and it is not desirable to manipulate it outside IDEA.
IDEAプラグインはプロジェクトに以下のタスクを追加します。
cleanタスクがcleanIdeaWorkspaceタスクに依存していないことに注意してください。
ワークスペースにはユーザーごとの一時データが多く含まれており、一般的にはIDEAの外からは操作されたくないものだからです。
表39.2 IDEAプラグイン - タスク IDEA plugin - Tasks
| Task name タスク名 | Depends on 依存先 | Type 型 | Description 説明 |
idea
|
ideaProject, ideaModule, ideaWorkspace |
- |
Generates all IDEA configuration files 全てのIDEA設定ファイルを生成する。 |
cleanIdea
|
cleanIdeaProject, cleanIdeaModule
|
Delete |
Removes all IDEA configuration files IDEAの設定ファイルを全て削除する。 |
cleanIdeaProject
|
-
|
Delete |
Removes the IDEA project file IDEAのプロジェクトファイルを削除する。 |
cleanIdeaModule
|
-
|
Delete |
Removes the IDEA module file IDEAのモジュールファイルを削除する。 |
cleanIdeaWorkspace
|
-
|
Delete |
Removes the IDEA workspace file IDEAのワークスペースファイルを削除する。 |
ideaProject
|
-
|
GenerateIdeaProject |
Generates the .ipr file. This task is only added to the root project. .iprファイルを生成する。このタスクはルートプロジェクトのみに追加されます。 |
ideaModule
|
-
|
GenerateIdeaModule |
Generates the .iml file .imlファイルを作成する。 |
ideaWorkspace
|
-
|
GenerateIdeaWorkspace |
Generates the .iws file. This task is only added to the root project. .iwsファイルを生成する。このタスクはルートプロジェクトのみに追加されます。 |
表39.3 IDEAプラグインの設定 Configuration of the idea plugin
| Model モデル | Reference name 参照名 | Description 説明 |
IdeaModel
|
idea |
Top level element that enables configuration of the idea plugin in a DSL-friendly fashion DSLフレンドリーな方法でIDEAプラグインの設定を行うための、最上位レベルの要素 |
IdeaProject
|
idea.project |
Allows configuring project information プロジェクト情報の設定ができる |
IdeaModule
|
idea.module |
Allows configuring module information モジュールの設定ができる |
IdeaWorkspace
|
idea.workspace |
Allows configuring the workspace XML ワークスペースXMLの設定ができる |
The IDEA plugin provides hooks and behavior for customizing the generated content.
The workspace file can effectively only be manipulated via the withXml hook
because its corresponding domain object is essentially empty.
IDEAプラグインには、生成される内容をカスタマイズするためのフックと特徴があります。
なお、ワークスペースファイルは、対応するドメインオブジェクトが実質的に空なので、withXmlフックを使用しないと効果的に操作できません。
The tasks recognize existing IDEA files, and merge them with the generated content.
IDEAプラグインのタスクは、既存のIDEAファイルを検知し、生成された内容をそれにマージします。
Sections of existing IDEA files that are also the target of generated content will be amended or overwritten, depending on the particular section. The remaining sections will be left as-is.
既存のIDEAファイルのセクションのうち、生成される内容の対象になっているものは、セクションごとに修正、または上書きされます。 それ以外のセクションはそのまま残されます。
To completely rewrite existing IDEA files, execute a clean task together with its corresponding generation task,
like "gradle cleanIdea idea" (in that order). If you want to make this
the default behavior, add "tasks.idea.dependsOn(cleanIdea)" to your build script. This makes it
unnecessary to execute the clean task explicitly.
既存のIDEAファイルを完全に上書きするには、クリーンタスクを、対応する生成タスクと一緒に使用してください。例えば、gradle cleanIdea ideaをこの順序で使用します。
デフォルトでそのように動作させたいのであれば、tasks.idea.dependsOn(cleanIdea)というコードをビルドスクリプトに追加してください。明示的にクリーンタスクを実行する必要がなくなります。
This strategy can also be used for individual files that the plugin would generate. For instance,
this can be done for the “.iml” file with “gradle cleanIdeaModule ideaModule”.
この戦略はプラグインが生成する個々のファイルに対しても適用可能で、例えば
“.iml”ファイルに対して" gradle cleanIdeaModule ideaModule"のようにできます。
The plugin provides objects modeling the sections of the metadata files that are generated by Gradle. The generation lifecycle is as follows:
このプラグインでは、様々なオブジェクトにより生成されるメタデータファイルの各セクションを表現します。 メタデータファイルを生成する際のライフサイクルは次のとおりです。
- The file is read; or a default version provided by Gradle is used if it does not exist ファイルが読み込まれる。ファイルが存在しない場合は、Gradleがデフォルトの内容を用意する。
- The
beforeMergedhook is executed with a domain object representing the existing filebeforeMergedフックが実行され、既存の設定内容を表すドメインオブジェクトがフックに引き渡される。 - The existing content is merged with the configuration inferred from the Gradle build or defined explicitly in the eclipse DSL Gradleのビルド内容から推測される、またはDSLで明示された設定内容と、既存の設定内容がマージされる。
- The
whenMergedhook is executed with a domain object representing contents of the file to be persistedwhenMergedフックが実行され、保存される予定の設定内容を表すドメインオブジェクトがフックに引き渡される。 - The
withXmlhook is executed with a raw representation of the XML that will be persistedwithXmlフックが実行され、保存される予定の生XMLがフックに引き渡される。 - The final XML is persisted 最終的なXMLが保存される。
The following table lists the domain object used for each of the model types:
各モデルで使われるドメインオブジェクトは、次の表の通りです。
表39.4 IDEAプラグインフック Idea plugin hooks
| Model モデル | beforeMerged { arg -> } argument type 引数の型 |
whenMerged { arg -> } argument type 引数の型 |
withXml { arg -> } argument type 引数の型 |
IdeaProject |
Project |
Project |
XmlProvider |
IdeaModule |
Module |
Module |
XmlProvider |
IdeaWorkspace |
Workspace |
Workspace |
XmlProvider |
A complete rewrite causes all existing content to be discarded,
thereby losing any changes made directly in the IDE. The beforeMerged hook makes it possible
to overwrite just certain parts of the existing content. The following example removes all existing dependencies
from the Module domain object:
完全な上書きは、既存の内容を全て破棄するので、IDEで直接行った変更も失われてしまいます。
beforeMergedフックを使うと、既存の内容のうち特定の部分だけを上書きすることができます。
次の例では、Moduleドメインオブジェクトから、既存の依存関係を全て削除しています。
例39.2 モジュールの部分的な上書き
build.gradle
idea.module.iml {
beforeMerged { module ->
module.dependencies.clear()
}
}
The resulting module file will only contain Gradle-generated dependency entries, but
not any other dependency entries that may have been present in the original file. (In the case of dependency entries,
this is also the default behavior.) Other sections of the module file will be either left as-is or merged.
The same could be done for the module paths in the project file:
結果として生成されるモジュールファイルには、Gradleが生成した依存関係のエントリのみが含まれており、元のファイルにあった他のエントリは含まれていません(依存関係エントリの場合、これがデフォルトの動作でもあります)。
そして、モジュールファイルの別のセクションはそのまま、またはマージされた状態で残されます。
同じことはプロジェクトファイルのモジュールパスを使用しても実現可能です。
例39.3 プロジェクトの部分的な上書き
build.gradle
idea.project.ipr {
beforeMerged { project ->
project.modulePaths.clear()
}
}
The whenMerged hook allows you to manipulate the fully populated domain objects. Often this is the
preferred way to customize IDEA files. Here is how you would export all the dependencies of an IDEA module:
whenMergedフックを使うと、読み込まれた全てのドメインオブジェクトを操作できます。
IDEAファイルをカスタマイズするときは、多くの場合このフックを使うのが好ましい方法です。例えば、IDEAモジュールの全ての依存関係をエクスポートするには、以下のようにします。
例39.4 Export Dependencies
build.gradle
idea.module.iml {
whenMerged { module ->
module.dependencies*.exported = true
}
}
The withXmlhook allows you to manipulate the in-memory XML representation just before the file gets written to disk.
Although Groovy's XML support makes up for a lot, this approach is less convenient than manipulating the domain objects.
In return, you get total control over the generated file, including sections not modeled by the domain objects.
withXmlフックを使うと、メモリ内のXMLデータを、ファイルに書き出される直前に操作できます。
GroovyのXMLサポートで大幅にフォローされるものの、このアプローチはドメインオブジェクトを操作する方法ほど便利ではありません。
その代わり、ドメインオブジェクトで表現されないような部分も含め、生成されるファイルの全てを制御することができます。
例39.5 XMLをカスタマイズする
build.gradle
idea.project.ipr {
withXml { provider ->
provider.node.component
.find { it.@name == 'VcsDirectoryMappings' }
.mapping.@vcs = 'Git'
}
}
The paths of the dependencies in the generated IDEA files are absolute. If you manually define a path variable
pointing to the Gradle dependency cache, IDEA will automatically replace the absolute dependency paths with
this path variable. you can configure this path variable via the “idea.pathVariables” property,
so that it can do a proper merge without creating duplicates.
生成されるIDEAファイルでは、依存関係が絶対パスで保存されます。
しかし、Gradleキャッシュを場所を参照するパス変数を定義すれば、IDEAは依存関係の絶対パスをそのパス変数で自動的に置き換えます。
そのようなパス変数を使いたい場合は、idea.pathVariablesを使って変数を設定してください。それにより、重複なしで正しくマージを行うこともできます。
The ANTLR plugin extends the Java plugin to add support for generating parsers using ANTLR.
ANTLRプラグインはJavaプラグインを拡張して、ANTLRを利用したパーサーの生成に対するサポートを追加します。
To use the ANTLR plugin, include in your build script:
ANTLRプラグインを使うには、ビルドスクリプトに以下を含めます:
The ANTLR plugin adds a number of tasks to your project, as shown below.
ANTLRプラグインは以下に示すいくつかのタスクをプロジェクトに追加します。
表40.1 ANTLR plugin - タスク ANTLR plugin - tasks
| タスク名 Task name | 依存先 Depends on | タイプ Type | 説明 Description |
generateGrammarSource
|
- | AntlrTask |
すべてのプロダクションANTLRグラマーに対するソースファイルを生成。 Generates the source files for all production ANTLR grammars. |
generateTestGrammarSource
|
- | AntlrTask |
すべてのテストANTLRグラマーに対するソースファイルを生成。 Generates the source files for all test ANTLR grammars. |
generate
|
- | AntlrTask |
指定されたソースセットですべてのANTLRグラマーに対するソースファイルを生成。 Generates the source files for all ANTLR grammars for the given source set. |
The ANTLR plugin adds the following dependencies to tasks added by the Java plugin.
ANTLRプラグインはJavaプラグインによって追加されたタスクに以下の依存関係を追加します。
表40.2 ANTLR plugin - 追加のタスク依存関係 ANTLR plugin - additional task dependencies
| タスク名 Task name | 依存先 Depends on |
| compileJava | generateGrammarSource |
| compileTestJava | generateTestGrammarSource |
compileSourceSetJava |
generateSourceSetGrammarSource |
表40.3 ANTLRプラグイン - プロジェクトレイアウト ANTLR plugin - project layout
| ディレクトリ Directory | 意味 Meaning |
src/main/antlr
|
プロダクションANTLRグラマーファイル Production ANTLR grammar files. |
src/test/antlr
|
テストANTLRグラマーファイル Test ANTLR grammar files. |
src/
|
指定されたソースセットに対するANTLRグラマーファイル ANTLR grammar files for the given source set. |
The ANTLR plugin adds an antlr dependency configuration. You use this to declare the
ANTLR dependency that you wish to use.
ANTLRプラグインは依存性コンフィグレーションantlrを追加します。
これは利用したいANTLRのバージョンを宣言するのに使えます。
例40.2 ANTLRバージョン宣言
build.gradle
repositories {
mavenCentral()
}
dependencies {
antlr 'antlr:antlr:2.7.7'
}The ANTLR plugin does not add any convention properties.
ANTLRプラグインはいかなる規約プロパティも追加しません。
The ANTLR plugin adds the following properties to each source set in the project.
ANTLRプラグインはプロジェクトのソースセット毎に以下のプロパティを追加します。
表40.4 ANTLRプラグイン - ソースセットプロパティ ANTLR plugin - source set properties
| プロパティ名 Property name | タイプ Type | デフォルト値 Default value | 説明 Description |
antlr
|
SourceDirectorySet (read-only)
|
Not null |
このソースセットのANTLRグラマーファイル。
ANTLRソースディレクトリにあるすべての .g を含み、それ以外のタイプのファイルをすべて除外。
The ANTLR grammar files of this source set. Contains all .g found in the ANTLR
source directories, and excludes all other types of files.
|
antlr.srcDirs
|
Set<File>。「入力ファイルセットを指定する Specifying a set of input files」で説明した任意のパターンが設定可能。
Set<File>. Can set using anything described in 「入力ファイルセットを指定する Specifying a set of input files」.
|
[
|
このソースセットのANTLRグラマーファイルを含むソースディレクトリ。 The source directories containing the ANTLR grammar files of this source set. |
The Project report plugin adds some tasks to your project which generate reports containing useful
information about your build. These tasks generate the same content that you get by executing the tasks, dependencies, and
properties tasks from the command line (see 「ビルドに関する情報を取得するObtaining information about your build」).
In contrast to the command line reports, the report plugin generates the reports into a file. There is also an
aggregating task that depends on all report tasks added by the plugin.
プロジェクトレポートプラグインは、ビルドに関する有益な情報を含むレポートを生成するタスクをプロジェクトに追加します。
これらのタスクは、gradle tasks、gradle dependencies およびgradle propertiesによるコマンドラインレポートとまったく同じ内容を生成します
(「ビルドに関する情報を取得するObtaining information about your build」を参照)。
コマンドラインレポートとは対照的に、レポートプラグインはレポートをファイルに出力します。
プラグインによって追加されたすべてのレポートタスクに依存する集約タスクもあります。
We plan to add much more to the existing reports and create additional ones in future releases of Gradle.
Gradleの将来のリリースではもっと多くの情報をレポートに追加する予定です。
To use the Project report plugin, include the following in your build script:
プロジェクトレポートプラグインを使うには、ビルドスクリプトに以下を含めます:
apply plugin: 'project-report'The project report plugin defines the following tasks:
プロジェクトレポートプラグインは以下のタスクを定義しています:
表41.1 プロジェクトレポートプラグイン - タスク Project report plugin - tasks
| タスク名 Task name | 依存先 Depends on | タイプ Type | 説明 Description |
dependencyReport
|
- | DependencyReportTask |
プロジェクト依存関係レポートを生成します。Generates the project dependency report. |
htmlDependencyReport
|
- | HtmlDependencyReportTask |
Generates an HTML dependency and dependency insight report for the project or a set of projects. |
propertyReport
|
- | PropertyReportTask |
プロジェクトプロパティレポートを生成します。Generates the project property report. |
taskReport
|
- | TaskReportTask |
プロジェクトタスクレポートを生成します。Generates the project task report. |
projectReport
|
dependencyReport, propertyReport, taskReport, htmlDependencyReport
|
Task |
すべてのプロジェクトレポートを生成します。Generates all project reports. |
The project report plugin does not require any particular project layout.
プロジェクトレポートプラグインは特定のプロジェクトレイアウトを要求しません。
The project report plugin does not define any dependency configurations.
プロジェクトレポートプラグインはいかなる依存関係コンフィグレーションも定義しません。
The project report defines the following convention properties:
プロジェクトレポートプラグインは以下の規約プロパティを定義します:
表41.2 プロジェクトレポートプラグイン - 規約プロパティ Project report plugin - convention properties
| プロパティ名 Property name | タイプ Type | デフォルト値 Default value | 説明 Description |
reportsDirName
|
String
|
reports
|
レポートを生成するディレクトリ名。ビルドディレクトリへの相対パス The name of the directory to generate reports into, relative to the build directory. |
reportsDir
|
File (read-only)
|
|
レポートを生成するディレクトリ The directory to generate reports into. |
projects
|
Set<Project>
|
プラグイン適用先プロジェクトからなる1要素のSet
A one element set with the project the plugin was applied to.
|
レポート生成対象のプロジェクト The projects to generate the reports for. |
projectReportDirName
|
String
|
project
|
プロジェクトレポート生成先ディレクトリ名、reportsディレクトリからの相対パス The name of the directory to generate the project report into, relative to the reports directory. |
projectReportDir
|
File (read-only)
|
|
プロジェクトレポート生成先ディレクトリ The directory to generate the project report into. |
These convention properties are provided by a convention object of type ProjectReportsPluginConvention.
規約プロパティは ProjectReportsPluginConvention 型の規約オブジェクトによって提供されます。
The Gradle announce allows to send custom announcements during a build. The following notification systems are supported: 通知プラグインを使うと、ビルド実行中に通知を送信することができます。以下の通知システムがサポートされています。
- notify-send (Ubuntu)
- Snarl (Windows)
- Growl (Mac OS X)
To use the announce plugin, apply it to your build script:
通知プラグインを使うには、まずビルドスクリプトにプラグインを適用してください。
Next, configure your notification service(s) of choice (see table below for which configuration properties are available):
次に、選んだ通知方法に応じて設定を行います。設定用のプロパティについては、以下のテーブルを参照してください。
Finally, send announcements with the announce method:
最後に、announceメソッドで通知を送信します。
Example 42.3. 通知プラグインを使用する
build.gradle
task helloWorld << {
println "Hello, world!"
}
helloWorld.doLast {
announce.announce("helloWorld completed!", "twitter")
announce.announce("helloWorld completed!", "local")
}The announce method takes two String arguments: The message to be sent, and the notification
service to be used. The following table lists supported notification services and their configuration properties.
announceメソッドは二つの引数を取ります。一つは通知メッセージで、もう一つは使用する通知用サービスです。
サポートされている通知用サービスとその設定値は以下の通りです。
Table 42.1. 通知プラグイン対応サービス Announce Plugin Notification Services
| Notification Service 通知サービス | Operating System オペレーティングシステム | Configuration Properties 設定プロパティ | Further Information 備考 |
| Any 何でも | username, password | ||
| snarl | Windows | ||
| growl | Mac OS X | ||
| notify-send | Ubuntu | Requires the notify-send package to be installed. Use sudo apt-get install libnotify-bin
to install it. notify-sendパッケージをインストールする必要があります。sudo apt-get install libnotify-binを実行してインストールしてください。 |
|
| local | Windows, Mac OS X, Ubuntu | Automatically chooses between snarl, growl, and notify-send depending on the current operating system. snarl、growl、notify-sendの中から、オペレーティングシステムに応じて自動的に選択します。 |
The build announcements plugin is currently incubating. Please be aware that the DSL and other configuration may change in later Gradle versions.
ビルド通知プラグインはまだ試験的なプラグインです。DSLやその他設定が後のバージョンで変更される可能性もありますので注意してください。
The build announcements plugin uses the announce plugin to send local announcements on important events in the build.
ビルド通知プラグインは、通知プラグインを使って、ビルドで重要なイベントが発生したときにローカル上で通知します。
To use the build announcements plugin, include in your build script:
ビルド通知プラグインを使うには、ビルドスクリプトに以下を含めます:
That's it. If you want to tweak where the announcements go, you can configure the announce plugin to change the local announcer.
通知先を調整したい場合は、通知プラグインのコンフィグレーションでローカル通知機能を切り替えられます。
You can also apply the plugin from an init script:
また、初期化スクリプトを使ってプラグインを適用することもできます:
The distribution plugin is currently incubating. Please be aware that the DSL and other configuration may change in later Gradle versions.
The distribution plugin facilitates building archives that serve as distributions of the project. Distribution archives typically contain the executable application and other supporting files, such as documentation.
To use the distribution plugin, include the following in your build script:
The plugin adds an extension named “distributions” of type DistributionContainer to the project.
It also creates a single distribution in the distributions container extension named “main”.
If your build only produces one distribution you only need to configure this distribution (or use the defaults).
You can run “gradle distZip” to package the main distribution as a ZIP, or “gradle distTar” to create
a TAR file.
The files will be created at “$buildDir/distributions/$project.name-$project.version.«ext»
You can run “gradle installDist” to assemble the uncompressed distribution into “$buildDir/install/main
The Distribution plugin adds the following tasks to the project:
Table 44.1. Distribution plugin - tasks
For each extra distribution set you add to the project, the distribution plugin adds the following tasks:
Table 44.2. Multiple distributions - tasks
| Task name | Depends on | Type | Description |
|
-
|
Zip
|
Creates a ZIP archive of the distribution contents |
|
-
|
Tar
|
Creates a TAR archive of the distribution contents |
install
|
-
|
Sync
|
Assembles the distribution content and installs it on the current machine |
Example 44.2. Adding extra distributions
build.gradle
apply plugin: 'distribution' version = '1.2' distributions { custom {} }
This will add following tasks to the project:
- customDistZip
- customDistTar
- installCustomDist
Given that the project name is “myproject” and version “1.2”, running “gradle customDistZip” will produce a
ZIP file named “myproject-custom-1.2.zip”.
Running “gradle installCustomDist” will install the distribution contents into “$buildDir/install/custom
All of the files in the “src/” directory will automatically be included in the distribution.
You can add additional files by configuring the $distribution.name/distDistribution object that is part of the container.
Example 44.3. Configuring the main distribution
build.gradle
apply plugin: 'distribution' distributions { main { baseName = 'someName' contents { from { 'src/readme' } } } }
In the example above, the content of the “src/readme” directory will be included in the distribution
(along with the files in the “src/dist/main” directory which are added by default).
The “baseName” property has also been changed. This will cause the distribution archives to be created with a different name.
The Gradle application plugin extends the language plugins with common application related tasks. It allows running and bundling applications for the jvm.
Gradle アプリケーション プラグインは言語プラグインを一般的なアプリケーションの関連タスクで拡張しています。 JVM 用アプリケーションの実行 及び ビルドが可能です。
To use the application plugin, include in your build script:
アプリケーション プラグインを使うためには、ビルドスクリプトに下記を含めます:
To define the main-class for the application you have to set the mainClassName property as shown below
アプリケーションのメインクラスを定義するには、次のように mainClassName プロパティを設定するだけでよいです。
Then, you can run the application by running gradle run. Gradle will take care of building the application classes,
along with their runtime dependencies, and starting the application with the correct classpath.
You can launch the application in debug mode with gradle run --debug-jvm (see JavaExec.setDebug()).
あとは gradle run を実行するだけで、アプリケーションを実行することができます。
Gradle は アプリケーションクラスのビルドから 実行時の依存解決、 適切なクラスパスでのアプリケーションの起動まで全て面倒みてくれます。
The plugin can also build a distribution for your application. The distribution will package up the runtime dependencies of the application
along with some OS specific start scripts. All files stored in src/dist will be added to the root of the
distribution. You can run gradle installApp to create an image of the application in
build/install/. You can run projectNamegradle distZip to create a
ZIP containing the distribution.
このプラグインではアプリケーション用のディストリビューションをビルドすることもできます。
ディストリビューションには OS 依存の起動スクリプトと一緒に アプリケーションの実行時の依存ライブラリもパッケージングされます。
gradle install で build/install/ 配下に
アプリケーションイメージを生成することができます。
projectNamegradle distZip で ディストリビューションを含む ZIP ファイルを生成することができます。
If your Java application requires a specific set of JVM settings or system properties, you can configure the applicationDefaultJvmArgs property.
These JVM arguments are applied to the run task and also considered in the generated start scripts of your distribution.
例45.3 Configure default JVM settings
build.gradle
applicationDefaultJvmArgs = ["-Dgreeting.language=en"]The Application plugin adds the following tasks to the project.
アプリケーション プラグインは 次のタスクをプロジェクトに追加します。
表45.1 アプリケーション プラグイン - タスクApplication plugin - tasks
| タスク名Task name | 依存先Depends on | 型Type | 説明Description |
run
|
classes
|
JavaExec |
アプリケーションを起動します。Starts the application. |
startScripts
|
jar
|
CreateStartScripts |
プロジェクトを JVM アプリケーションとして実行するための OS 依存スクリプトを生成します。 Creates OS specific scripts to run the project as a JVM application. |
installApp
|
jar, startScripts
|
Sync |
指定したディレクトリ配下にアプリケーションをインストールします。 Installs the application into a specified directory. |
distZip
|
jar, startScripts
|
Zip |
実行ライブラリと OS 依存スクリプトを含んだ 完全なディストリビューション ZIP アーカイブを生成します。 Creates a full distribution ZIP archive including runtime libraries and OS specific scripts. |
distTar
|
jar, startScripts
|
Tar |
実行ライブラリとOS依存スクリプトを含んだ完全なディストリビューションTARアーカイブを生成します。 Creates a full distribution TAR archive including runtime libraries and OS specific scripts. |
The application plugin adds some properties to the project, which you can use to configure its behaviour. See Project.
アプリケーション プラグインは いくつかのプロパティをプロジェクトに追加します。そのプロパティを設定すれば挙動が変えられます。詳しくは Project を参照してください。
One of the convention properties added by the plugin is applicationDistribution which is a CopySpec.
This specification is used by the installApp and distZip tasks as the specification of what is to be
included in the distribution. In addition to copying the start scripts to the bin dir and necessary jars to lib
in the distribution, all of the files from the src/dist directory are also copied. To include any static files in the
distribution, simply arrange them in the src/dist directory.
このプラグインは、applicationDistributionというCopySpec型の規約プロパティを追加します。
これは、installAppタスクとdistZipタスクにより何がディストリビューションに含められるのか、その仕様を定義したものです。
実行用スクリプトをディストリビューションのbinディレクトリに、必要なjarをlibにコピーするほか、src/distディレクトリにある全てのファイルをコピーします。
何らかの静的ファイルをディストリビューションに含めたい場合は、単にsrc/distディレクトリにそれらのファイルを置くだけで大丈夫です。
If your project generates files to be included in the distribution, e.g. documentation, you can add these files to the distribution by adding to the
applicationDistribution copy spec.
あるプロジェクトが、ディストリビューションに含めるファイル(例えばドキュメントなど)を生成する、といったケースもあります。
そのような場合、applicationDistributionコピー仕様を追加することで、ファイルをディストリビューションに追加することができます。
例45.4 他タスクの出力をアプリケーションのディストリビューションに含める
build.gradle
task createDocs {
def docs = file("$buildDir/docs")
outputs.dir docs
doLast {
docs.mkdirs()
new File(docs, "readme.txt").write("Read me!")
}
}
applicationDistribution.from(createDocs) {
into "docs"
}By specifying that the distribution should include the task's output files (see 「タスクの入力物と出力物を宣言するDeclaring a task's inputs and outputs」), Gradle knows that the task that produces the files must be invoked before the distribution can be assembled and will take care of this for you.
ディストリビューションにタスクの出力(「タスクの入力物と出力物を宣言するDeclaring a task's inputs and outputs」参照)を格納するように指定すると、 Gradleは、ディストリビューションを作成する前にそのタスクを実行しなければならないのだと判断し、その作業を引き受けてくれます。
例45.5 ディストリビューションのファイルを自動的に作成する
gradle distZip の出力
> gradle distZip :createDocs :compileJava :processResources UP-TO-DATE :classes :jar :startScripts :distZip BUILD SUCCESSFUL Total time: 1 secs
The Java library distribution plugin is currently incubating. Please be aware that the DSL and other configuration may change in later Gradle versions.
The Java library distribution plugin adds support for building a distribution ZIP for a Java library. The distribution contains the JAR file for the library and its dependencies.
To use the Java library distribution plugin, include the following in your build script:
Example 46.1. Using the Java library distribution plugin
build.gradle
apply plugin: 'java-library-distribution'To define the name for the distribution you have to set the baseName property as shown below:
Example 46.2. Configure the distribution name
build.gradle
distributions {
main{
baseName = 'my-name'
}
}The plugin builds a distribution for your library. The distribution will package up the runtime dependencies of the library.
All files stored in src/main/dist will be added to the root of the archive distribution. You can run
“gradle distZip” to create a ZIP file containing the distribution.
The Java library distribution plugin adds the following tasks to the project.
Table 46.1. Java library distribution plugin - tasks
| Task name | Depends on | Type | Description |
distZip
|
jar
|
Zip
|
Creates a full distribution ZIP archive including runtime libraries. |
All of the files from the src/dist directory are copied. To include any static files in the distribution, simply arrange
them in the src/dist directory, or add them to the content of the distribution.
Example 46.3. Include files in the distribution
build.gradle
distributions {
main {
baseName = 'my-name'
contents {
from { 'src/dist' }
}
}
}The Build Init plugin is currently incubating. Please be aware that the DSL and other configuration may change in later Gradle versions.
The Gradle Build Init plugin can be used to bootstrap the process of creating a new Gradle build. It supports creating brand new projects of different types as well as converting existing builds (e.g. An Apache Maven build) to be Gradle builds.
Gradle plugins typically need to be
applied
to a project before they can be used (see 「プラグインの適用 Applying plugins」).
The Build Init plugin is an automatically applied plugin, which means you do not need to apply it explicitly.
To use the plugin, simply execute the task named
init
where you would like to create the Gradle build.
There is no need to create a “stub”
build.gradle
file in order to apply the plugin.
It also leverages the
wrapper
task from the Wrapper plugin (see Chapter 48, Wrapper Plugin),
which means that the Gradle Wrapper will also be installed into the project.
The plugin adds the following tasks to the project:
The
init
supports different build setup types. The type is specified by supplying a
--type
argument value. For example, to create a Java library project simply execute:
gradle init --type java-library.
If a
--type
parameter is not supplied, Gradle will attempt to infer the type from the environment. For example, it will
infer a type value of “pom” if it finds a
pom.xml
to convert to a Gradle build.
If the type could not be inferred, the type “basic” will be used.
All build setup types include the setup of the Gradle Wrapper.
The “pom” type can be used to convert an Apache Maven build to a Gradle build.
This works by converting the POM to one or more Gradle files.
It is only able to be used if there is a valid “pom.xml”
file in the directory that the
init
task is invoked in. This type will be automatically inferred if such a file exists.
The Maven conversion implementation was inspired by the maven2gradle tool that was originally developed by Gradle community members.
The conversion process has the following features:
- Uses effective POM and effective settings (support for POM inheritance, dependency management, properties)
- Supports both single module and multimodule projects
- Supports custom module names (that differ from directory names)
- Generates general metadata - id, description and version
- Applies maven, java and war plugins (as needed)
- Supports packaging war projects as jars if needed
- Generates dependencies (both external and inter-module)
- Generates download repositories (inc. local Maven repository)
- Adjusts Java compiler settings
- Supports packaging of sources and tests
- Supports TestNG runner
- Generates global exclusions from Maven enforcer plugin settings
The “java-library” build init type is not inferable. It must be explicitly specified.
It has the following features:
- Uses the “
java” plugin - Uses the “
mavenCentral” dependency repository - Uses JUnit for testing
- Has directories in the conventional locations for source code
- Contains a sample class and unit test, if there are no existing source or test files
The “scala-library” build init type is not inferable. It must be explicitly specified.
It has the following features:
- Uses the “
scala” plugin - Uses the “
mavenCentral” dependency repository - Uses Scala 2.10
- Uses ScalaTest for testing
- Has directories in the conventional locations for source code
- Contains a sample scala class and an associated ScalaTest test suite, if there are no existing source or test files
The “groovy-library” build init type is not inferable. It must be explicitly specified.
It has the following features:
- Uses the “
groovy” plugin - Uses the “
mavenCentral” dependency repository - Uses Groovy 2.x
- Uses Spock testing framework for testing
- Has directories in the conventional locations for source code
- Contains a sample Groovy class and an associated Spock specification, if there are no existing source or test files
The wrapper plugin is currently incubating. Please be aware that the DSL and other configuration may change in later Gradle versions.
The Gradle wrapper plugin allows the generation of Gradle wrapper files by adding a Wrapper
task, that generates all files needed to run the build using the Gradle Wrapper.
Details about the Gradle Wrapper can be found in 62章Gradleラッパー The Gradle Wrapper.
Without modifying the build.gradle file, the wrapper plugin can be auto-applied to the root project of the current build by running
“gradle wrapper” from the command line. This applies the plugin if no task named wrapper is already defined in the build.
The wrapper plugin adds the following tasks to the project:
Table 48.1. Wrapper plugin - tasks
| Task name | Depends on | Type | Description |
wrapper
|
- | Wrapper |
Generates Gradle wrapper files. |
The build dashboard plugin is currently incubating. Please be aware that the DSL and other configuration may change in later Gradle versions.
The Build Dashboard plugin can be used to generate a single HTML dashboard that provides a single point of access to all of the reports generated by a build.
To use the Build Dashboard plugin, include the following in your build script:
Applying the plugin adds the buildDashboard task to your project.
The task aggregates the reports for all tasks that implement the Reporting
interface from all projects in the build.
It is typically only applied to the root project.
The buildDashboard task does not depend on any other tasks. It will only aggregate the reporting tasks that are independently
being executed as part of the build run. To generate the build dashboard, simply include this task in the list of tasks to execute.
For example, “gradle buildDashboard build” will generate a dashboard for all of the reporting tasks that are dependents of the build task.
The Build Dashboard plugin adds the following task to the project:
Table 49.1. Build Dashboard plugin - tasks
| Task name | Depends on | Type | Description |
buildDashboard
|
- | GenerateBuildDashboard |
Generates build dashboard report. |
The Build Dashboard plugin does not define any dependency configurations.
You can influence the location of build dashboard plugin generation via ReportingExtension.
The Java Gradle plugin development plugin is currently incubating. Please be aware that the DSL and other configuration may change in later Gradle versions.
The Java Gradle Plugin development plugin can be used to assist in the development of Gradle plugins. It automatically applies
the Java plugin, adds the gradleApi() dependency to the compile configuration
and performs validation of plugin metadata during jar task execution.
To use the Java Gradle Plugin Development plugin, include the following in your build script:
Example 50.1. Using the Java Gradle Plugin Development plugin
build.gradle
apply plugin: 'java-gradle-plugin'
Applying the plugin automatically applies the Java plugin and adds the
gradleApi() dependency to the compile configuration. It also decorates the jar
task with validations.
The following validations are performed:
- There is a plugin descriptor defined for the plugin.
- The plugin descriptor contains an
implementation-classproperty. - The
implementation-classproperty references a valid class file in the jar.
Any failed validations will result in a warning message.
Dependency management is a critical feature of every build, and Gradle has placed an emphasis on offering first-class dependency management that is both easy-to-understand and compatible with a wide variety of approaches. If you are familiar with the approach used by either Maven or Ivy you will be delighted to learn that Gradle is fully compatible with both approaches in addition to being flexible enough to support fully-customized approaches.
依存関係の管理は、あらゆるビルドで決定的に重要になる機能です。Gradleも、理解しやすく、既存の様々な管理方法との互換性も備えるような、最高の管理機能を提供することを重視してきました。 Gradleの管理機能はとても柔軟でカスタマイズ性の高いものですが、MavenやIvyでの管理に慣れ親しんできたなら、加えてMaven、Ivy双方と完全な互換性を保っていることはとても嬉しい利点となるはずです。
Here are the major highlights of Gradle's support for dependency management:
Gradleの依存関係管理機能で特筆すべき点を挙げると、
Transitive dependency management: Gradle gives you full control of your project's dependency tree.
推移的な依存関係の管理: Gradleは、プロジェクトの依存関係ツリー全体を完全にコントロールできます。
Support for non-managed dependencies: If your dependencies are simply files in version control or a shared drive, Gradle provides powerful functionality to support this.
未管理の依存関係もサポート: プロジェクトの依存ファイルを単純にバージョン管理システムや共有ドライブに格納したい場合も、Gradleはそれをサポートする強力な機能を持っています。
Support for custom dependency definitions.: Gradle's Module Dependencies give you the ability to describe the dependency hierarchy in the build script.
依存関係定義のカスタマイズをサポート: Gradleでは、依存関係の階層構造をビルドスクリプトで直接定義できます。
A fully customizable approach to Dependency Resolution: Gradle provides you with the ability to customize resolution rules making dependency substitution easy.
非常にカスタマイズ性の高い依存関係の解決方法: Gradleでは依存関係を解決する際のルールをカスタマイズでき、簡単に依存関係を差し替えることができます。
Full Compatibility with Maven and Ivy: If you have defined dependencies in a Maven POM or an Ivy file, Gradle provides seamless integration with a range of popular build tools.
Maven、Ivyとの完全な互換性: 既にMavenのPOMやIvyファイルで依存関係を定義しているかもしれません。Gradleは人気のある様々なビルドツールとシームレスに連携できます。
Integration with existing dependency management infrastructure: Gradle is compatible with both Maven and Ivy repositories. If you use Archiva, Nexus, or Artifactory, Gradle is 100% compatible with all repository formats.
既存の依存関係管理インフラとの連携: Gradleは、Maven、Ivyどちらの形式のリポジトリとも互換性があります。既にArchivaやNexus、Artifactoryなどを使用されているかもしれませんが、Gradleはそれらのリポジトリと100%の互換性を持っています。
With hundreds of thousands of interdependent open source components each with a range of versions and incompatibilities, dependency management has a habit of causing problems as builds grow in complexity. When a build's dependency tree becomes unwieldy, your build tool shouldn't force you to adopt a single, inflexible approach to dependency management. A proper build system has to be designed to be flexible, and Gradle can handle any situation.
現在無数に存在するオープンソースライブラリは、それぞれ互いに依存し合っていて、さらにバージョンや互換性の有無も様々なので、ビルドが複雑さを増すにつれて依存関係が問題を引き起こすことが増えてきます。ビルドの依存関係が扱いにくくなってきたとき、ツールによって柔軟性のない一つの管理方法に縛り付けられるようなことがあってはいけません。正しいビルドシステムは柔軟にできていなければならず、Gradleにしてもあらゆるシチュエーションに自在に対応できるようになっています。
Dependency management can be particularly challenging during a migration from one build system to another. If you are migrating from a tool like Ant or Maven to Gradle, you may be faced with some difficult situations. For example, one common pattern is an Ant project with version-less jar files stored in the filesystem. Other build systems require a wholesale replacement of this approach before migrating. With Gradle, you can adapt your new build to any existing source of dependencies or dependency metadata. This makes incremental migration to Gradle much easier than the alternative. On most large projects, build migrations and any change to development process is incremental because most organizations can't afford to stop everything and migrate to a build tool's idea of dependency management.
依存関係の管理で特に問題が発生しやすいのは、あるビルドシステムから別のビルドシステムへ移行するときです。 AntやMavenからGradleへ移行する際には、難しい問題に突き当たることがあるかもしれません。 例えば、よくあるAntプロジェクトですが、バージョンのないjarファイルがファイルシステムに置かれていたりすることがあります。この場合、移行先のビルドシステムによっては、管理方法を完全に置き換える必要が出てくるかもしれません。 一方Gradleでは、依存関係をどこから、どんなメタデータで取得していたとしても、新しいビルドでそれを変更する必要はありません。これにより、段階的にビルドシステムを移行することが他のツールに比べて容易になっているのです。大規模プロジェクトでは、ビルドにしてもその他のあらゆる開発プロセスにしても、段階的に移行していく場合がほとんどです。全てを止めてビルドツール固有の考え方へ依存関係管理を移行している余裕など、ほとんどの組織にはないからです。
Even if your project is using a custom dependency management system or something like an Eclipse .classpath file as master data for dependency management, it is very easy to write a Gradle plugin to use this data in Gradle. For migration purposes this is a common technique with Gradle. (But, once you've migrated, it might be a good idea to move away from a .classpath file and use Gradle's dependency management features directly.)
プロジェクトが独自の方法で依存関係を管理していたとしても、例え依存関係のマスターデータにEclipseの.classpathを使っているようなプロジェクトであったとしても、Gradleでそのデータを使うためのプラグインを書くのはとても簡単な作業です。マイグレーションのためであれば、こうしたテクニックを使うことはGradleではごく普通のことです(ただ、移行が完了した後は、.classpathを使うのは止めてGradleの依存関係管理機能を直接使うのが良いとは思いますが)。
It is ironic that in a language known for its rich library of open source components that Java has no concept of libraries or versions. In Java, there is no standard way to tell the
JVM that you are using version 3.0.5 of Hibernate, and there is no standard way to say that
foo-1.0.jar
depends on bar-2.0.jar. This has led to external solutions often based on build tools. The most popular ones at the moment are Maven and Ivy. While Maven provides a
complete build system, Ivy focuses solely on dependency management.
Javaはその豊富なオープンソースライブラリで知られる言語ですが、皮肉なことにライブラリやバージョンといった概念が存在しません。
Javaでは、JVMに、今使っているものがHibernateのバージョン3.0.5であると伝える標準的な方法はありませんし、foo-1.0.jarがbar-2.0.jarに依存していると伝える方法も標準では存在しないのです。
このため、これを実現するための様々なソリューションがサードパーティにより考案されてきました。また、ビルドツールに組み込まれることもよくあります。現在もっとも有名なものがMavenであり、Ivyです。Mavenがビルドシステムの機能全体を備えているのに対し、Ivyは依存関係の管理のみに焦点を当てています。
Both tools rely on descriptor XML files, which contain information about the dependencies of a particular jar. Both also use repositories where the actual jars are placed together with their descriptor files, and both offer resolution for conflicting jar versions in one form or the other. Both have emerged as standards for solving dependency conflicts, and while Gradle originally used Ivy under the hood for its dependency management. Gradle has replaced this direct dependency on Ivy with a native Gradle dependency resolution engine which supports a range of approaches to dependency resolution including both POM and Ivy descriptor files.
どちらのツールも、ある特定のjarファイルについて、その依存関係の情報をXML形式のディスクリプタに定義して使用します。また、リポジトリに実際のjarファイルをディスクリプタファイルと一緒に配置したり、jarのバージョンが競合したときに様々な形でそれを解決する手段を備えている点も同様です。 どちらも依存関係を解決するための標準的な方法となっており、Gradleも最初は依存関係管理機能の水面下でIvyを使用していました。 Gradleは、今ではそのように直接Ivyに依存するのではなく、Gradle独自の依存関係解決エンジンを使用しています。このエンジンは、POMおよびIvyディスクリプタによる管理方法を含め様々な方法に対応しています。
While Gradle has strong opinions on dependency management, the tool gives you a choice between two options: follow recommended best practices or support any kind of pattern you can think of. This section outlines the Gradle project's recommended best practices for managing dependencies.
Gradleは依存関係の管理についてとても強固な指針を持ってはいますが、ユーザーには二つのオプションを提示しています。すなわち、Gradleの推奨するベストプラクティスに従うか、自分の考えたパターン(どんなものでも構いません)をサポートするビルドを書くかです。 この節では、Gradle Projectが推奨する依存関係管理のベストプラクティスについて概要を記載します。
No matter what the language, proper dependency management is important for every project. From a complex enterprise application written in Java depending on hundreds of open source libraries to the simplest Clojure application depending on a handful of libraries, approaches to dependency management vary widely and can depend on the target technology, the method of application deployment, and the nature of the project. Projects bundled as reusable libraries may have different requirements than enterprise applications integrated into much larger systems of software and infrastructure. Despite this wide variation of requirements, the Gradle project recommends that all projects follow this set of core rules:
開発言語にかかわらず、依存関係を正しく管理することはあらゆるプロジェクトで大事なファクターです。 数百ものオープンソースライブラリに依存した複雑なエンタープライズJavaアプリケーションから、わずかなライブラリのみを使った単純なClojureのアプリケーションまで、依存関係を管理するといってもその方法はとても幅広く、対象となる技術、アプリケーションのデプロイ方法、アプリケーションの性質などによっても違ってきます。 例えば、再配布して使用されることを想定したライブラリプロジェクトの場合、巨大なソフトウェアやインフラのシステムに組み込まれるエンタープライズアプリケーションとはまた別の管理が必要になるかもしれません。しかし、要求されることは様々であっても、Gradle Projectでは全てのプロジェクトで以下の指針に従うことを推奨しています。
The version of a library must be part of the filename. While the version of a jar is usually in the Manifest file, it isn't readily apparent when you are inspecting a
project. If someone asks you to look at a collection of 20 jar files, which would you prefer? A collection of files with names like commons-beanutils-1.3.jar
or a collection of files with names like spring.jar? If dependencies have file names with version numbers you can quickly identify the versions of
your dependencies.
ライブラリのバージョンはファイル名で簡単に分かるようになっていなければなりません。jarのバージョンは、たいていの場合マニフェストファイルに記述されていますが、それではプロジェクトを調査しているときに手軽に見ることができません。
もし、20個のjarファイルがズラッと並べられて、これを見てほしいと言われたら、どちらがいいと思いますか? つまり、commons-beanutils-1.3.jarのようなファイル群と、spring.jarのようなファイル群と、どちらの方がわかりやすいと思いますか?
ファイル名にバージョン番号が付いていれば、プロジェクトが依存しているjarのバージョンを簡単に、迅速に特定できます。
If versions are unclear you can introduce subtle bugs which are very hard to find. For example there might be a project which uses Hibernate 2.5. Think about a developer who decides to install version 3.0.5 of Hibernate on her machine to fix a critical security bug but forgets to notify others in the team of this change. She may address the security bug successfully, but she also may have introduced subtle bugs into a codebase that was using a now-deprecated feature from Hibernate. Weeks later there is an exception on the integration machine which can't be reproduced on anyone's machine. Multiple developers then spend days on this issue only finally realising that the error would have easy to uncover if they knew that Hibernate had been upgraded from 2.5 to 3.0.5.
不明瞭なバージョンは、発見するのが非常に難しい、微妙なバグに繋がります。 例えば、Hibernate2.5を使っているプロジェクトがあるとしましょう。Hibernate3.0.5にアップグレードして、致命的なセキュリティのバグを修正したと想定してください。しかし、彼女はチームメンバーにそのことを知らせるのを忘れてしまいました。彼女はセキュリティのバグを上手く修正したかもしれませんが、同時にコードベースに小さなバグを混入させてしまったかもしれません。最新版のライブラリで非推奨となった機能を使っていた場合などです。 数週間後、インテグレーションサーバーで例外が発生します。しかし他のマシンでは再現しません。結果、Hibernateが2.5から3.0.2にアップグレードされていたというだけの問題に、多くの開発者が何日もかけることになるのです。
Versions in jar names increase the expressiveness of your project and make them easier to maintain. This practice also reduces the potential for error.
jarのファイル名にバージョン付けすることは、プロジェクトの表現性を高め、メンテナンスを簡単にします。また、潜在的なエラーを減らすことにも繋がるのです。
Transitive dependency management is a technique that enables your project to depend on libraries which, in turn, depend on other libraries. This recursive pattern of transitive dependencies results in a tree of dependencies including your project's first-level dependencies, second-level dependencies, and so on. If you don't model your dependencies as a hierarchical tree of first-level and second-level dependencies it is very easy to quickly lose control over an assembled mess of unstructured dependencies. Consider the Gradle project itself, while Gradle only has a few direct, first-level dependencies, when Gradle is compiled it needs more than one hundred dependencies on the classpath. On a far larger scale, Enterprise projects using Spring, Hibernate, and other libraries, alongside hundreds or thousands of internal projects, can result in very large dependency trees.
推移的な依存関係の管理とは、プロジェクトがあるライブラリに依存しているとき、その依存ライブラリがさらに別のライブラリに依存することを可能にする技術のことです。 このように推移的な依存関係が再帰的に発生すると、プロジェクトが直接依存する第一層の依存、それが依存する第二層の依存、といったふうに、依存関係のツリー構造が構築されることになります。 階層的にモデリングされていない依存関係は、構造化されないまま複雑にふくれあがり、簡単に制御を失ってしまうでしょう。 Gradle自身のことを考えてみても、Gradleプロジェクト自体は直接の、つまり第一層の依存関係はそう多くはありませんが、プロジェクトのコンパイル時には100以上の依存関係をクラスパスに含める必要があります。 さらに規模が大きくなれば、例えばSpring、Hibernate、その他のライブラリを使うエンタープライズプロジェクトともなれば、それに伴い数百、数千の依存プロジェクトが非常に大きな依存関係ツリーを構築することになります。
When these large dependency trees need to change, you'll often have to solve some dependency version conflicts. Say one open source library needs one version of a logging library and a another uses an alternative version. Gradle and other build tools all have the ability to resolve this dependency tree and resolve conflicts, but what differentiates Gradle is the control it gives you over transitive dependencies and conflict resolution.
このように依存関係ツリーが巨大になってくると、それを修正する際、バージョンの競合が発生しやすくなり、その解決に追われることが増えてきます。 例えば、あるバージョンのロギングライブラリを必要としているオープンソースライブラリがあるとしましょう。この場合、そのロギングライブラリの別のバージョンを要求するライブラリを使用すると、バージョンの競合が発生します。Gradleやその他のビルドツールは全て、このようなバージョン競合を解決する手段を備えています。Gradleでは、さらにその解決方法を細かく制御することもできます。
While you could try to manage this problem manually, you will quickly find that this approach doesn't scale. If you want to get rid of a first level dependency you really can't be sure which other jars you should remove. A dependency of a first level dependency might also be a first level dependency itself, or it might be a transitive dependency of yet another first level dependency. If you try to manage transitive dependencies yourself, the end of the story is that your build becomes brittle: no one dares to change your dependencies because the risk of breaking the build is too high. The project classpath becomes a complete mess, and, if a classpath problem arises, hell on earth invites you for a ride.
これらの問題を、手で何とかしようと頑張ることはできるかもしれませんが、すぐにそうした方法には拡張性がないことに気づくでしょう。 例えば、第一層、直接の依存関係を取り除きたいとなったとき、関連する他のjarも削除して良いものかどうか、分からなくなってしまいます。 削除しようとする依存関係の依存ライブラリだと思っていたjarが、それ自身第一層の依存関係に含まれているかもしれませんし、別の依存関係から参照されている可能性もあります。 自分で、手で推移的な依存関係を管理しようとすれば、その行き着く先は壊れやすく脆いビルドです。 思い切ってそのプロジェクトの依存関係を変更しようなどという人はどこにもいません。ビルドを壊してしまうリスクがあまりに高すぎるからです。 プロジェクトのクラスパスはいつか完全にめちゃくちゃになって、ひとたびそのクラスパスで問題が発生すれば地獄のような状況に陥ることでしょう。
Gradle offers you different ways to express first-level and transitive dependencies. With Gradle you can mix and match approaches; for example, you could store your jars in an SCM without XML descriptor files and still use transitive dependency management.
Gradleは、直接の依存関係および推移的な依存関係を表現するための手段を複数用意しています。複数のアプローチを混ぜたり、組み合わせて使うことも可能です。例えば、jarを、XMLのディスクリプタなしでソースコード管理システムに直接格納することができますし、その場合でも推移的な依存関係はそのまま管理していくことができます。
Conflicting versions of the same jar should be detected and either resolved or cause an exception. If you don't use transitive dependency management, version conflicts are undetected and the often accidental order of the classpath will determine what version of a dependency will win. On a large project with many developers changing dependencies, successful builds will be few and far between as the order of dependencies may directly affect whether a build succeeds or fails (or whether a bug appears or disappears in production).
同じjar間でバージョンの競合が検出された場合、それを解決するか、エラーを発生させなければなりません。ここでもし推移的な依存関係を管理していなければ、バージョン競合は検出できず、クラスパス内で偶然そうなっただけのjarの順序がどのバージョンを優先するか決定することになります。 たくさんの開発者が依存関係を変更しているような巨大プロジェクトの場合、依存関係の順序がビルドの成否(またはプロダクション環境でバグが発生するかどうか)に直接影響するような状態では、上手くいくビルドはほとんどなくなってしまうでしょう。
If you haven't had to deal with the curse of conflicting versions of jars on a classpath, here is a small anecdote of the fun that awaits you. In a large project with 30 submodules, adding a dependency to a subproject changed the order of a classpath, swapping Spring 2.5 for an older 2.4 version. While the build continued to work, developers were starting to notice all sorts of surprising (and surprisingly awful) bugs in production. Worse yet, this unintentional downgrade of Spring introduced several security vulnerabilities into the system, which now required a full security audit throughout the organization.
もしクラスパスのバージョンが競合するという不幸に苦しんだことがないようでしたら、あなたを待ち受ける愉快な逸話を一つ紹介しましょう。 30のサブモジュールからなるある巨大なプロジェクトがありました。ここにあるサブモジュールに依存関係を追加したところ、クラスパスの順序が変わり、Spring2.5が古いバージョンの2.4に置き換わってしまったのです。 ビルドはまだ正常に動き続けているのに、開発者たちは無数の驚くような、というか驚くくらいひどいバグをプロダクション環境で見つけ始めます。 さらに悪いことに、この意図しないSpringのダウングレードはいくつかのセキュリティ的な脆弱性をシステムに招き、組織全体があらゆるセキュリティ監査を受けることになりました。
In short, version conflicts are bad, and you should manage your transitive dependencies to avoid them. You might also want to learn where conflicting versions are used and consolidate on a particular version of a dependency across your organization. With a good conflict reporting tool like Gradle, that information can be used to communicate with the entire organization and standardize on a single version. If you think version conflicts don't happen to you, think again. It is very common for different first-level dependencies to rely on a range of different overlapping versions for other dependencies, and the JVM doesn't yet offer an easy way to have different versions of the same jar in the classpath (see 「Javaにおける依存関係管理 Dependency management and Java」).
要するに、バージョンの競合は悪いことなので、それを避けるために推移的な依存関係は管理しなければならないのです。 また、競合したバージョンが組織全体で何処で使われているのか調べ、一つのバージョンに統一したいという場合について考えると、Gradleのような競合に関する優秀なレポートを作成できるツールがあれば、組織全体でのコミュニケーション、および一つのバージョンへの標準化などに役立つはずです。 もしバージョン競合など自分には起こるわけがないと思っているようでしたら、どうかもう一度考え直してみてください。 第一層の依存関係が、更に別のライブラリに依存していて、それが他の依存関係とバージョンが競合しているというのは非常に良くあることです。 また、JVMには同じjarの違うバージョンをクラスパスで共存させられるような簡単な方法がありません(「Javaにおける依存関係管理 Dependency management and Java」参照)。
Gradle offers the following conflict resolution strategies:
Gradleでは、バージョン競合を解決するための戦略として以下のものを用意しています。
- Newest: The newest version of the dependency is used. This is Gradle's default strategy, and is often an appropriate choice as long as versions are backwards-compatible. もっとも新しいバージョンの依存関係を使用します。これはGradleのデフォルトの戦略で、バージョン間で上位互換性が保たれている限り、この戦略を選択するのが多くの場合適切です。
- Fail: A version conflict results in a build failure. This strategy requires all version conflicts to be resolved explicitly in the build script. See
ResolutionStrategyfor details on how to explicitly choose a particular version. バージョンが競合した場合、ビルドを失敗させます。この戦略は、ビルドスクリプトで全てのバージョン競合をユーザーが明示的に解決することを強制します。 特定のバージョンを明示的に選択する方法についてはResolutionStrategyを参照してください。
While the strategies introduced above are usually enough to solve most conflicts, Gradle provides more fine-grained mechanisms to resolve version conflicts:
上記の戦略で大抵の場合はほとんどの競合を解決できますが、Gradleはさらに微調整を行うためのメカニズムを備えています。
- Configuring a first level dependency as forced. This approach is useful if the dependency in conflict is already a first level dependency.
See examples in
DependencyHandler. プロジェクトが直接依存する第一層の依存関係をforcedとして強制できます。 これは、競合した依存関係が第一層の依存関係だったときに便利なアプローチです。 例についてはDependencyHandlerを参照してください。 - Configuring any dependency (transitive or not) as forced. This approach is useful if the dependency in conflict is a transitive dependency.
It also can be used to force versions of first level dependencies.
See examples in
ResolutionStrategy依存関係は、第一層のものか推移的なものかにかかわらずとにかくforcedとして強制することもできます。 これは、推移的な依存関係で競合が発生してしまったときに便利なアプローチです。 また、第一層の依存関係も、前述の方法でなくこちらの方法で強制させることもできます。 例についてはResolutionStrategyを参照してください。 - Dependency resolve rules are an incubating feature introduced in Gradle 1.4 which give you fine-grained control over the version selected for a particular dependency. 依存関係解決ルールというGradle1.4で導入された試験的な機能があり、特定の依存関係において選択されるバージョンを細かく調整することができます。
To deal with problems due to version conflicts, reports with dependency graphs are also very helpful. Such reports are another feature of dependency management.
バージョン競合により発生する様々な問題に対応するときには、依存関係グラフを表示するレポートも非常に有用です。依存関係管理の機能として、Gradleはそのようなレポート機能も備えています。
There are many situations when you want to use the latest version of a particular dependency, or the latest in a range of versions. This can be a requirement during development, or
you may be developing a library that is designed to work with a range of dependency versions. You can easily depend on these constantly changing dependencies by using a
dynamic version. A dynamic version can be either a version range (e.g. 2.+) or it can be a placeholder for the latest version available
(e.g. latest.integration).
あるモジュールについて、常に最新版を使いたい、またはある範囲においての最新版を使いたいといった場面がよくあります。
例えば、開発作業中や、ある範囲のバージョンのライブラリと協調して動作するよう設計されたライブラリを開発しているときなどです。
この種の、絶えず変更されるような依存関係は、動的バージョンを使うと簡単に参照することができます。
動的バージョンは、バージョンの範囲で指定すること(2.+など)も、使用できる最新版を表すプレースホルダで指定すること(latest.integrationなど)もできます。
Alternatively, sometimes the module you request can change over time, even for the same version. An example of this type of changing module
is a Maven SNAPSHOT module, which always points at the latest artifact published. In other words, a standard Maven snapshot is a module that never stands still
so to speak, it is a “changing module”.
また、要求しているモジュールのバージョンそのものは変わらないのに、中身だけが変更されていく場合もあります。このような変更性モジュールの典型的な例は、MavenのSNAPSHOTモジュールです。このモジュールは、公開された最新のモジュールを常にポイントし続けます。
言い換えれば、標準的なMavenのスナップショットは静的な状態にとどまっているものではありません。それがつまり、「変更性モジュール」です。
The main difference between a dynamic version and a changing module is that when you resolve a dynamic version, you'll get the real, static version as the module name. When you resolve a changing module, the artifacts are named using the version you requested, but the underlying artifacts may change over time.
動的バージョンと変更性モジュールの主な違いは、モジュール名に付加されるバージョンです。動的バージョンが静的な、実際のバージョンに変換されて付加されるのに対し、変更性モジュールは要求したバージョン名がそのまま付加されます。その上で、モジュールの中身が時間が経つにつれて変わっていくのです。
By default, Gradle caches dynamic versions and changing modules for 24 hours. You can override the default cache modes using command
line options. You can change the cache expiry times in your build using the resolution strategy (see 「依存関係キャッシュ制御の微調整 Fine-tuned control over dependency caching」).
デフォルトでは、Gradleは動的バージョンと変更性モジュールのキャッシュを24時間保持します。デフォルトに使用される値はコマンドラインオプションで変更できます。
また、ビルド時の実際のキャッシュの有効期限は解決戦略を使って設定できます(「依存関係キャッシュ制御の微調整 Fine-tuned control over dependency caching」参照)。
In Gradle dependencies are grouped into configurations. Configurations have a name, a number of other properties, and they can extend each other. Many Gradle plugins add pre-defined configurations to your project. The Java plugin, for example, adds some configurations to represent the various classpaths it needs. see 「依存関係の管理Dependency management」 for details. Of course you can add custom configurations on top of that. There are many use cases for custom configurations. This is very handy for example for adding dependencies not needed for building or testing your software (e.g. additional JDBC drivers to be shipped with your distribution).
Gradleでは、依存関係は「コンフィギュレーション」によりグループ化されます。コンフィギュレーションは名前(name)といくつかのプロパティを持っていて、それらを別のコンフィギュレーションから継承することもできます。 Gradleプラグインの多くが、独自のコンフィグレーションを事前に定義してプロジェクトに追加します。 たとえば、Javaプラグインは、いくつかのコンフィグレーションをプロジェクトに追加して、必要とされる様々なクラスパスを表現します。詳しくは「依存関係の管理Dependency management」をご参照ください。 もちろん、定義済みのものだけでなく、自分でコンフィギュレーションを定義して追加することも可能です。このような独自コンフィギュレーションには様々な使い道があります。身近な例として、ソフトウェアのビルドやテストには必要ない依存関係を追加する場合(配布物に同梱するオプションのJDBCドライバなど)が挙げられます。
A project's configurations are managed by a configurations object. The closure you pass to
the configurations object is applied against its API. To learn more about this API have a look at
ConfigurationContainer.
プロジェクトのコンフィギュレーションはconfigurationsオブジェクトで管理されています。このオブジェクトに渡したクロージャは、configurationsのAPIに対して適用されます。
APIの詳細についてはConfigurationContainerをご参照ください。
To define a configuration:
コンフィギュレーションを定義するには、
To access a configuration:
コンフィギュレーションにアクセスするには、
例51.2 コンフィギュレーションへのアクセス
build.gradle
println configurations.compile.name
println configurations['compile'].nameTo configure a configuration:
コンフィギュレーションの設定を変更するには、
例51.3 コンフィギュレーションの設定変更
build.gradle
configurations {
compile {
description = 'compile classpath'
transitive = true
}
runtime {
extendsFrom compile
}
}
configurations.compile {
description = 'compile classpath'
}There are several different types of dependencies that you can declare:
定義できる依存関係にはいくつかの種類があります。
表51.1 依存関係の種類 Dependency types
| Type 種類 | Description 説明 |
| External module dependency 外部モジュール依存関係 | A dependency on an external module in some repository. どこかのリポジトリにある外部モジュールへの依存関係 |
| Project dependency プロジェクト依存関係 | A dependency on another project in the same build. 同じビルドに含まれる別プロジェクトへの依存関係 |
| File dependency ファイル依存関係 | A dependency on a set of files on the local filesystem. ローカルファイルシステム上のファイル群への依存関係 |
| Client module dependency クライアントモジュール依存関係 | A dependency on an external module, where the artifacts are located in some repository but the module meta-data is specified by the local build. You use this kind of dependency when you want to override the meta-data for the module. どこかのリポジトリにあるアーティファクトへ依存しているが、そのモジュールのメタデータは手元のビルドで定義する際に使用する。この依存関係を使うと、モジュールのもともとのメタデータを上書きすることができる。 |
| Gradle API dependency Gradle APIへの依存関係 | A dependency on the API of the current Gradle version. You use this kind of dependency when you are developing custom Gradle plugins and task types. 現在使用しているバージョンのGradleが持つAPIへの依存関係。Gradleのカスタムプラグインやカスタムタスクを開発するときにこの種類の依存関係を使用します。 |
| Local Groovy dependency ローカルGroovy依存関係 | A dependency on the Groovy version used by the current Gradle version. You use this kind of dependency when you are developing custom Gradle plugins and task types. 現在使用中のGradleで使われているGroovyへの依存関係。これもGradleのカスタムプラグインやカスタムタスクを作る際に使用します。 |
External module dependencies are the most common dependencies. They refer to a module in an external repository.
外部モジュール依存関係は、もっともポピュラーな種類の依存関係です。このタイプの依存関係は、外部リポジトリにあるモジュールを参照します。
例51.4 モジュール依存関係
build.gradle
dependencies {
runtime group: 'org.springframework', name: 'spring-core', version: '2.5'
runtime 'org.springframework:spring-core:2.5',
'org.springframework:spring-aop:2.5'
runtime(
[group: 'org.springframework', name: 'spring-core', version: '2.5'],
[group: 'org.springframework', name: 'spring-aop', version: '2.5']
)
runtime('org.hibernate:hibernate:3.0.5') {
transitive = true
}
runtime group: 'org.hibernate', name: 'hibernate', version: '3.0.5', transitive: true
runtime(group: 'org.hibernate', name: 'hibernate', version: '3.0.5') {
transitive = true
}
}See the DependencyHandler class in the API documentation
for more examples and a complete reference.
より多くの例と完全なリファレンスはDependencyHandlerを参照してください。
Gradle provides different notations for module dependencies. There is a string notation and
a map notation. A module dependency has an API which allows for further configuration. Have a look at
ExternalModuleDependency
to learn all about the API.
This API provides properties and configuration methods. Via the string notation you can define a subset
of the properties. With the map notation you can define all properties. To have access to the complete API,
either with the map or with the string notation, you can assign a single dependency to a configuration
together with a closure.
Gradleはモジュール依存関係を定義するために二つの記法を用意しています。文字列記法とマップ記法です。モジュール依存関係は、実際には非常に多くの設定を可能にするAPIを持っています。ExternalModuleDependencyも併せてご覧ください。
このAPIはプロパティとメソッドを公開しており、文字列記法ではプロパティのうち一部を指定することができます。
マップ記法を使うと全てのプロパティにアクセスできます。全てのAPIにアクセスするには、文字列記法、マップ記法どちらでも構いませんが、依存するモジュールを一つだけ指定して、そこに一緒にクロージャを渡します。
If you declare a module dependency, Gradle looks for a module descriptor file (pom.xml or
ivy.xml) in the repositories. If such a module descriptor file exists, it is parsed and the artifacts of
this module (e.g. hibernate-3.0.5.jar) as well as its dependencies (e.g. cglib) are downloaded. If no such
module descriptor file exists, Gradle looks for a file called hibernate-3.0.5.jar
to retrieve. In Maven, a module can have one and only one artifact. In Gradle and Ivy, a module can have multiple artifacts.
Each artifact can have a different set of dependencies.
モジュール依存関係が宣言されていると、Gradleは対応するモジュールディスクリプタファイル(pom.xmlまたはivy.xml)をリポジトリに探しに行きます。結果、ディスクリプタファイルが見つかった場合は、それをパースし、指定されているアーティファクト(hibernate-3.0.5.jarなど)および推移的依存関係(cglibなど)をダウンロードします。
ディスクリプタファイルが見つからなければ、Gradleは今度はhibernate-3.0.5.jarという名前のファイルを探して取得しようとします。
Mavenのモジュールは、アーティファクトを一つしか持つことができません。GradleとIvyは一つのモジュールが複数のアーティファクトを持つことができます。それらのアーティファクトは、それぞれ別の依存関係を持っています。
As mentioned earlier, a Maven module has only one artifact. Hence, when your project depends on a Maven module, it's obvious what its artifact is.
With Gradle or Ivy, the case is different. Ivy's dependency descriptor (ivy.xml) can declare multiple artifacts.
For more information, see the Ivy reference for ivy.xml.
In Gradle, when you declare a dependency on an Ivy module, you actually declare a dependency on the default configuration of that module.
So the actual set of artifacts (typically jars) you depend on is the set of artifacts that are associated with the
default configuration of that module. Here are some situations where this matters:
前述のように、Mavenのモジュールはアーティファクトを一つしか持てません。そのため、プロジェクトが依存しているモジュールがMavenのモジュールだった場合、そのアーティファクトは明らかです。
しかし、GradleやIvyの場合は違います。Ivyの依存関係モデル(ivy.xml)では、一つのモジュールに複数のアーティファクトを宣言できるからです。
詳細についてはivy.xmlのリファレンスを参照してください。
Gradleでivyモジュールへ依存していることを宣言したとき、実際にはそのモジュールのdefaultコンフィギュレーションへの依存関係を宣言しています。
つまり、プロジェクトが実際に依存しているアーティファクト(典型的にはjar)は、モジュールのdefaultコンフィギュレーションに格納された全アーティファクトです。
このことが重要になるのは、以下のような場合です。
- The
defaultconfiguration of a module contains undesired artifacts. Rather than depending on the whole configuration, a dependency on just the desired artifacts is declared.defaultコンフィグレーションに、不必要なアーティファクトが含まれている場合。この場合、defaultコンフィグレーション全てに依存するのではなく、必要なアーティファクトへの依存関係のみを宣言します。 - The desired artifact belongs to a configuration other than
default. That configuration is explicitly named as part of the dependency declaration. 必要なアーティファクトがdefaultコンフィグレーション以外のコンフィグレーションに含まれている場合。この場合、そのコンフィグレーションを依存関係の宣言で明示的に指定します。
There are other situations where it is necessary to fine-tune dependency declarations.
Please see the DependencyHandler class in the API documentation for examples and a complete reference for declaring dependencies.
依存関係の宣言を微調整しなければならないようなシチュエーションはまだまだあります。
その他の例や依存関係宣言の完全なリファレンスについてはDependencyHandlerをご覧ください。
As said above, if no module descriptor file can be found, Gradle by default
downloads a jar with the name of the module. But sometimes, even if the repository contains module descriptors, you want to download only the artifact jar, without
the dependencies.
上記のように、モジュールのディスクリプタファイルが見つからなかった場合、Gradleはデフォルトでモジュールの名前を基にjarファイルをダウンロードします。
しかし、リポジトリにディスクリプタファイルがあるアーティファクトでも、場合によってはjarのみをダウンロードしたいというケースもあります。
[22]
And sometimes you want to download a zip from a repository, that does not have module descriptors. Gradle provides an artifact only
notation for those use cases - simply prefix the extension that you want to be downloaded with '@' sign:
その他にも、ディスクリプタファイルを持たないリポジトリからzipファイルをダウンロードしたいという場合などもあり、Gradleはそのようなケースのためにアーティファクトオンリー記法というものをサポートしています。書き方は簡単で、ダウンロードしたいものの拡張子を「@」で指定するだけです。
例51.5 アーティファクトオンリー記法
build.gradle
dependencies {
runtime "org.groovy:groovy:2.2.0@jar"
runtime group: 'org.groovy', name: 'groovy', version: '2.2.0', ext: 'jar'
}
An artifact only notation creates a module dependency which downloads only the artifact file with the specified extension. Existing module descriptors are ignored.
アーティファクトオンリー記法は、指定した拡張子のファイルのみをダウンロードする、というモジュール依存関係を作成します。ディスクリプタがあっても無視されます。
The Maven dependency management has the notion of classifiers. Mavenには分類子(classifiers)という記法があります。 [23] Gradle supports this. To retrieve classified dependencies from a Maven repository you can write: Gradleでもこの記法をサポートしています。Mavenリポジトリから分類子つきの依存関係を取得するには、次のように記述します。
例51.6 分類子付きの依存関係
build.gradle
compile "org.gradle.test.classifiers:service:1.0:jdk15@jar" otherConf group: 'org.gradle.test.classifiers', name: 'service', version: '1.0', classifier: 'jdk14'
As can be seen in the first line above, classifiers can be used together with the artifact only notation.
上記の一行目にあるように、分類子は明示的に拡張子を指定して(アーティファクトオンリー記法で)使うこともできます。
It is easy to iterate over the dependency artifacts of a configuration:
コンフィグレーションに含まれる依存アーティファクトの一覧は簡単に列挙できます。
例51.7 あるコンフィグレーションの内部を列挙する
build.gradle
task listJars << {
configurations.compile.each { File file -> println file.name }
}gradle -q listJars の出力
> gradle -q listJars hibernate-core-3.6.7.Final.jar antlr-2.7.6.jar commons-collections-3.1.jar dom4j-1.6.1.jar hibernate-commons-annotations-3.2.0.Final.jar hibernate-jpa-2.0-api-1.0.1.Final.jar jta-1.1.jar slf4j-api-1.6.1.jar
Client module dependencies allow you to declare transitive dependencies directly in the build script. They are a replacement for a module descriptor in an external repository.
クライアントモジュール依存関係を使うと、モジュールの推移的な依存関係をビルドスクリプトの中で直接定義できます。これは外部リポジトリにある実際のモジュールディスクリプタの代わりに使用されます。
例51.8 クライアントモジュール依存関係 - 推移的な依存関係
build.gradle
dependencies {
runtime module("org.codehaus.groovy:groovy:2.3.6") {
dependency("commons-cli:commons-cli:1.0") {
transitive = false
}
module(group: 'org.apache.ant', name: 'ant', version: '1.9.3') {
dependencies "org.apache.ant:ant-launcher:1.9.3@jar",
"org.apache.ant:ant-junit:1.9.3"
}
}
}This declares a dependency on Groovy. Groovy itself has dependencies. But Gradle does
not look for an XML descriptor to figure them out but gets the information from the build file. The
dependencies of a client module can be normal module dependencies or artifact dependencies or another
client module. Also look at the API documentation for the ClientModule class.
この例では、Groovyに依存していることが宣言されています。Groovyは、それ自身別の依存関係を持っているのですが、ここではGradleはXMLディスクリプタではなく、ビルドスクリプト内の定義を見てGroovyの推移的な依存関係を決定します。
クライアントモジュールの依存関係としては、普通のモジュール依存関係の他、アーティファクトオンリー記法、また別のクライアントモジュール依存関係も使うことができます。APIドキュメントClientModuleも参考にしてください。
In the current release client modules have one limitation. Let's say your project is a library and you want this library to be uploaded to your company's Maven or Ivy repository. Gradle uploads the jars of your project to the company repository together with the XML descriptor file of the dependencies. If you use client modules the dependency declaration in the XML descriptor file is not correct. We will improve this in a future release of Gradle.
現在、クライアントモジュールには一つの制限があります。プロジェクトがライブラリをビルドするもので、そのライブラリを社内のMavenやIvyリポジトリにアップロードしたいとします。GradleはプロジェクトのjarをXMLディスクリプタファイルと一緒に社内リポジトリにアップロードするわけですが、クライアントモジュールを使っているとそのディスクリプタの依存関係宣言が正しいものにならないのです。将来のバージョンで修正される予定です。
Gradle distinguishes between external dependencies and dependencies on projects which are part of the same multi-project build. For the latter you can declare Project Dependencies.
Gradleでは、外部モジュール依存関係と、マルチプロジェクト内で別のプロジェクトを参照する依存関係は明確に区別されます。 後者はプロジェクト依存関係として宣言します。
For more information see the API documentation for
ProjectDependency.
APIドキュメントProjectDependencyに詳しい情報が記載されています。
Multi-project builds are discussed in 57章マルチプロジェクトのビルドMulti-project Builds.
また、マルチプロジェクトについては、57章マルチプロジェクトのビルドMulti-project Buildsで詳述されています。
File dependencies allow you to directly add a set of files to a configuration, without first adding them to a repository. This can be useful if you cannot, or do not want to, place certain files in a repository. Or if you do not want to use any repositories at all for storing your dependencies.
ファイル依存関係は、前もってファイルをリポジトリに格納することなく、直接コンフィギュレーションに追加することを可能にします。これは、何らかの理由であるファイルをリポジトリに置けない、または置きたくない場合に有用です。また、依存関係の保存先としてリポジトリを一切使いたくないという場合もこの依存関係が便利です。
To add some files as a dependency for a configuration, you simply pass a file collection as a dependency:
方法も簡単で、単にファイルコレクションを依存関係としてコンフィギュレーションに渡すだけです。
例51.10 ファイル依存関係
build.gradle
dependencies {
runtime files('libs/a.jar', 'libs/b.jar')
runtime fileTree(dir: 'libs', include: '*.jar')
}File dependencies are not included in the published dependency descriptor for your project. However, file dependencies are included in transitive project dependencies within the same build. This means they cannot be used outside the current build, but they can be used with the same build.
ファイル依存関係は、公開されるディスクリプタファイルには含まれません。しかし、同じビルド内から参照された場合、その推移的な依存関係としては使用されます。 つまり、ファイル依存関係は、そのビルドの外部からは使用されませんが、同じビルド内のプロジェクトからは使用される、ということです。
You can declare which tasks produce the files for a file dependency. You might do this when, for example, the files are generated by the build.
ファイル依存関係では、どのタスクがファイルを生成するのか宣言することができます。依存ファイルがビルドで作成される場合などで使用されることがあります。
例51.11 生成されるファイルへの依存関係
build.gradle
dependencies {
compile files("$buildDir/classes") {
builtBy 'compile'
}
}
task compile << {
println 'compiling classes'
}
task list(dependsOn: configurations.compile) << {
println "classpath = ${configurations.compile.collect {File file -> file.name}}"
}gradle -q list の出力
> gradle -q list compiling classes classpath = [classes]
You can declare a dependency on the API of the current version of Gradle by using the DependencyHandler.gradleApi()
method. This is useful when you are developing custom Gradle tasks or plugins.
DependencyHandler.gradleApi()メソッドを使うと、そのビルドで使用しているGradleのAPIへ依存していることを宣言できます。
Gradleのカスタムタスクやプラグインを開発しているときによく使われます。
You can declare a dependency on the Groovy that is distributed with Gradle by using the DependencyHandler.localGroovy()
method. This is useful when you are developing custom Gradle tasks or plugins in Groovy.
DependencyHandler.localGroovy()を使うと、Gradleに同梱されているGroovyへの依存関係を宣言できます。
これもGradleのカスタムタスクやプラグインを開発しているときによく使われます。
You can exclude a transitive dependency either by configuration or by dependency:
コンフィギュレーション単位、または依存関係単位で、特定の推移的な依存関係を除外することができます。
例51.14 推移的な依存関係の除外
build.gradle
configurations {
compile.exclude module: 'commons'
all*.exclude group: 'org.gradle.test.excludes', module: 'reports'
}
dependencies {
compile("org.gradle.test.excludes:api:1.0") {
exclude module: 'shared'
}
}If you define an exclude for a particular configuration, the excluded transitive dependency will be filtered for all
dependencies when resolving this configuration or any inheriting configuration.
If you want to exclude a transitive dependency from all your
configurations you can use the Groovy spread-dot operator to express this in a concise way, as shown in the example.
When defining an exclude, you can specify either only the organization or only the module name or both.
Also look at the API documentation of the Dependency and Configuration classes.
コンフィギュレーションに対してある依存関係を除外すると、そのコンフィギュレーション、および全ての継承コンフィギュレーションに含まれる全依存関係に対して推移的依存関係がフィルターされます。
また、全てのコンフィギュレーションにまとめて除外設定を適用したい場合は、例にあるようにGroovyの展開ドット演算子を使うと簡潔に記述できます。
除外設定は、organizationのみを指定することもできますし、モジュール名やその両方で指定しても構いません。
APIドキュメントのDependencyやConfigurationを参照してみてください。
Not every transitive dependency can be excluded - some transitive dependencies might be essential for correct runtime behavior of the application. Generally, one can exclude transitive dependencies that are either not required by runtime or that are guaranteed to be available on the target environment/platform.
全ての推移的な依存関係が除外できるとは限りません。アプリケーションの動作に必須な依存関係もあります。 一般的には、実行時に使われることがないものや、対象環境やプラットフォームでそれが使えると保証できているような場合には、その依存関係を除外することができます。
Should you exclude per-dependency or per-configuration? It turns out that in the majority of cases you want to use the per-configuration exclusion. Here are some typical reasons why one might want to exclude a transitive dependency. Bear in mind that for some of these use cases there are better solutions than exclusions! 除外設定は、依存関係単位かコンフィギュレーション単位、どちらで設定するべきでしょうか? ほとんどの場合は、コンフィギュレーション単位で設定することになるでしょう。 推移的な依存関係を除外したいと考える、代表的な理由を挙げてみます。 なお、これらの中には、依存関係を除外してしまうよりも優れた解決手段があるものもあります。頭に留めておいてください!
- The dependency is undesired due to licensing reasons. ライセンス上の理由により、その依存関係を除外したい
- The dependency is not available in any of remote repositories. いずれかのリモートリポジトリで、その依存関係が使用できない
- The dependency is not needed for runtime. 実行時にその依存関係が不要
- The dependency has a version that conflicts with a desired version. For that use case please refer to 「バージョン競合の解決 Resolve version conflicts」
and the documentation on
ResolutionStrategyfor a potentially better solution to the problem. その依存関係のバージョンが競合していて欲しいバージョンの依存関係が取得できない。この場合、除外設定よりも優れた方法があるかもしれません。「バージョン競合の解決 Resolve version conflicts」やResolutionStrategyを参照してみてください。
Basically, in most of the cases excluding the transitive dependency should be done per configuration. This way the dependency declaration is more explicit. It is also more accurate because a per-dependency exclude rule does not guarantee the given transitive dependency does not show up in the configuration. For example, some other dependency, which does not have any exclude rules, might pull in that unwanted transitive dependency. 基本的には、ほとんどのケースでコンフィギュレーション単位の除外設定を使うべきです。これにより、依存関係の宣言がより明示的で正確なものになります。依存関係単位で除外ルールを設定しても、その依存関係が必ずしもコンフィギュレーションから取り除かれるとは限らないからです。 例えば、除外ルールを適用していない別の依存関係が、除外したはずの依存関係を引っ張ってきてしまうかもしれません。
Other examples of dependency exclusions can be found in the reference for the ModuleDependency or
DependencyHandler classes.
リファレンスには、除外設定の他の例も記載されています。ModuleDependencyやDependencyHandlerを見てみてください。
All attributes for a dependency are optional, except the name. Which attributes are required for actually finding dependencies in the repository will depend on the repository type. See 「リポジトリ Repositories」. For example, if you work with Maven repositories, you need to define the group, name and version. If you work with filesystem repositories you might only need the name or the name and the version.
依存関係宣言の属性は、nameを除いて全てオプションです。ただ、実際にリポジトリから依存関係を見つけてくる際にどんな情報が必要になるのかは、リポジトリの種類により異なります。「リポジトリ Repositories」を参照してください。 例えば、Mavenリポジトリを使うときは、組織名、モジュール名、およびバージョンを指定する必要があります。一方、ただのファイルシステムをリポジトリにしている場合は、必要なのはモジュール名だけかもしれません。
例51.15 依存関係のオプション属性
build.gradle
dependencies {
runtime ":junit:4.10", ":testng"
runtime name: 'testng'
}You can also assign collections or arrays of dependency notations to a configuration:
また、依存関係定義のコレクションや属性をコンフィギュレーションに割り当てることもできます。
例51.16 依存関係定義のコレクション、配列
build.gradle
List groovy = ["org.codehaus.groovy:groovy-all:2.3.6@jar", "commons-cli:commons-cli:1.0@jar", "org.apache.ant:ant:1.9.3@jar"] List hibernate = ['org.hibernate:hibernate:3.0.5@jar', 'somegroup:someorg:1.0@jar'] dependencies { runtime groovy, hibernate }
In Gradle a dependency can have different configurations (as your project can have different configurations). If you don't specify anything explicitly, Gradle uses the default configuration of the dependency. For dependencies from a Maven repository, the default configuration is the only possibility anyway. If you work with Ivy repositories and want to declare a non-default configuration for your dependency you have to use the map notation and declare:
Gradleでは、依存先のモジュールが複数のコンフィギュレーションを公開していることがあります(自分のプロジェクトでも様々なコンフィギュレーションを定義できたことを思い出してください)。 特に明示しないかぎり、Gradleはその依存関係のdefaultコンフィギュレーションを使用します。 Mavenリポジトリではdefaultコンフィギュレーションが使用できる唯一のコンフィギュレーションなのでいいのですが、Ivyリポジトリを使う場合、default以外のコンフィギュレーションを参照するときはマップ記法で次のように指定しなければなりません。
例51.17 依存するコンフィギュレーションの指定
build.gradle
dependencies {
runtime group: 'org.somegroup', name: 'somedependency', version: '1.0', configuration: 'someConfiguration'
}To do the same for project dependencies you need to declare:
プロジェクト依存関係で同じことをするには、次のように定義する必要があります。
例51.18 依存するプロジェクトのコンフィギュレーション
build.gradle
dependencies {
compile project(path: ':api', configuration: 'spi')
}You can generate dependency reports from the command line (see 「プロジェクトの依存関係一覧Listing project dependencies」). With the help of the Project report plugin (see 41章プロジェクトレポートプラグインThe Project Report Plugin) such a report can be created by your build.
Gradleには、依存関係に関するレポートを生成できるコマンドが用意されています(「プロジェクトの依存関係一覧Listing project dependencies」参照)。 また、プロジェクトレポートプラグイン(41章プロジェクトレポートプラグインThe Project Report Plugin)を使えば、ビルドのタスクでそのレポートを作成することもできます。
Since Gradle 1.2 there is also a new programmatic API to access the resolved dependency information.
The dependency reports (see the previous paragraph) are using this API under the covers.
The API lets you walk the resolved dependency graph and provides information about the dependencies.
In future releases the API will grow to provide more information about the resolution result.
For more information about the API please refer to the Javadocs on
ResolvableDependencies.getResolutionResult().
Potential usages of the ResolutionResult API:
Gradle1.2からは、解決した依存関係に関する情報に、プログラム的にアクセスできるAPIもあります。
先ほど述べた依存関係のレポートを作成するときも、水面下でこのAPIが使用されています。
このAPIを使えば、解決した依存関係グラフを走査したり、情報を取得したりすることが可能です。
また、近くこのAPIを更に拡張し、解決結果についてもっと情報を取得できるようにする予定です。
APIについての詳細はJavadoc(ResolvableDependencies.getResolutionResult())を参照してください。
API(ResolutionResult)の使い道として考えられるのは、
- Creation of advanced dependency reports tailored to your use case. 自分のユースケースに適した、もっと踏み込んだレポートを作成するため
- Enabling the build logic to make decisions based on the content of the dependency graph. 依存関係グラフの中身に応じて処理を切り替えるようなビルドロジックを実装するため
For the examples below we have the following dependencies setup:
例えば、次のような依存関係をセットアップしたとします。
例51.19 Configuration.copy
build.gradle
configurations {
sealife
alllife
}
dependencies {
sealife "sea.mammals:orca:1.0", "sea.fish:shark:1.0", "sea.fish:tuna:1.0"
alllife configurations.sealife
alllife "air.birds:albatross:1.0"
}The dependencies have the following transitive dependencies:
このセットアップにおける推移的な依存関係は、以下の通りです。
shark-1.0 -> seal-2.0, tuna-1.0
orca-1.0 -> seal-1.0
tuna-1.0 -> herring-1.0
You can use the configuration to access the declared dependencies or a subset of those:
このコンフィギュレーションを使って、宣言された依存関係やその一部にアクセスできます。
例51.20 宣言した依存関係にアクセスする
build.gradle
task dependencies << {
configurations.alllife.dependencies.each { dep -> println dep.name }
println()
configurations.alllife.allDependencies.each { dep -> println dep.name }
println()
configurations.alllife.allDependencies.findAll { dep -> dep.name != 'orca' }
.each { dep -> println dep.name }
}gradle -q dependencies の出力
> gradle -q dependencies albatross albatross orca shark tuna albatross shark tuna
The dependencies task returns only the dependencies belonging explicitly to the configuration.
The allDependencies task includes the dependencies from extended configurations.
dependenciesはコンフィギュレーションに明示的に属しているもののみを返します。allDependenciesは継承したコンフィギュレーションに含まれるものも返します。
To get the library files of the configuration dependencies you can do:
コンフィギュレーションの依存関係として設定されているライブラリファイルを取得するには、次のようにします。
例51.21 Configuration.files
build.gradle
task allFiles << {
configurations.sealife.files.each { file ->
println file.name
}
}gradle -q allFiles の出力
> gradle -q allFiles orca-1.0.jar shark-1.0.jar tuna-1.0.jar herring-1.0.jar seal-2.0.jar
Sometimes you want the library files of a subset of the configuration dependencies (e.g. of a single dependency).
コンフィギュレーションに属する依存関係のうち、一部の依存関係のみ、例えば一つの依存関係のみライブラリファイルを取得したいときもあります。
例51.22 フィルター付きConfiguration.files
build.gradle
task files << {
configurations.sealife.files { dep -> dep.name == 'orca' }.each { file ->
println file.name
}
}gradle -q files の出力
> gradle -q files orca-1.0.jar seal-2.0.jar
The Configuration.files method always retrieves all artifacts of the whole
configuration. It then filters the retrieved files by specified dependencies. As you can see in the example, transitive dependencies are included.
Configuration.filesメソッドは、常にそのコンフィギュレーション全体から全てのアーティファクトを返すので、ここでは依存関係を指定してフィルターしました。例にあるように、推移的な依存関係も対象に含まれます。
You can also copy a configuration. You can optionally specify that only a subset of dependencies from the original configuration
should be copied. The copying methods come in two flavors. The copy method copies only the dependencies belonging explicitly to the configuration. The
copyRecursive method copies all the dependencies, including the dependencies from extended configurations.
コンフィギュレーションはコピーすることもできます。さらに、元のコンフィギュレーションから一部の依存関係のみコピーすることもできます。
コピー用のメソッドは二つ用意されており、copyメソッドは明示的にコンフィギュレーションに属している依存関係のみコピーします。もう一つのcopyRecursiveメソッドは継承元のコンフィギュレーションに含まれる依存関係もすべてコピーします。
例51.23 Configuration.copy
build.gradle
task copy << {
configurations.alllife.copyRecursive { dep -> dep.name != 'orca' }
.allDependencies.each { dep -> println dep.name }
println()
configurations.alllife.copy().allDependencies
.each { dep -> println dep.name }
}gradle -q copy の出力
> gradle -q copy albatross shark tuna albatross
It is important to note that the returned files of the copied configuration are often but not always the same than the returned files of the dependency subset of the original configuration. In case of version conflicts between dependencies of the subset and dependencies not belonging to the subset the resolve result might be different.
注意するべきなのは、コピーされたコンフィギュレーションから返される依存関係が、常にオリジナルのコンフィギュレーションのサブセットになるとは限らないという点です。 「コピーされたサブセット」と、「コピーされなかった残りのサブセット」の間でバージョンの競合がある場合、依存関係の解決結果が異なることがあります。
例51.24 Configuration.copy vs. Configuration.files
build.gradle
task copyVsFiles << {
configurations.sealife.copyRecursive { dep -> dep.name == 'orca' }
.each { file -> println file.name }
println()
configurations.sealife.files { dep -> dep.name == 'orca' }
.each { file -> println file.name }
}gradle -q copyVsFiles の出力
> gradle -q copyVsFiles orca-1.0.jar seal-1.0.jar orca-1.0.jar seal-2.0.jar
In the example above, orca has a dependency on seal-1.0 whereas shark has a dependency onseal-2.0. The original configuration
has therefore a version conflict which is resolved to the newer seal-2.0 version. The files method therefore returns seal-2.0 as a
transitive dependency oforca. The copied configuration only has orca as a dependency and therefore there is no version conflict and seal-1.0
is returned as a transitive dependency.
上の例では、orcaがseal-1.0に依存しており、sharkはseal-2.0に依存しています。なので、オリジナルのコンフィギュレーションではバージョンの競合が発生しているわけです。
そのため、この依存関係はより新しいバージョンであるseal-2.0に解決され、推移的な依存関係としてseal-2.0が表示されています。
一方、コピー先のコンフィギュレーションにはorcaしか含まれていません。そのためバージョンの競合は発生しておらず、推移的な依存関係としてseal-1.0が表示されているのです。
Once a configuration is resolved it is immutable. Changing its state or the state of one of its dependencies will cause an exception. You can always copy a resolved configuration. The copied configuration is in the unresolved state and can be freshly resolved.
一度解決されたコンフィギュレーションは不変(immutable)です。 その状態を変更したり、コンフィギュレーション内の依存関係の状態を変更したりすると例外が発生します。一方でコンフィギュレーションのコピーはいつでも可能です。コピーされたコンフィギュレーションは未解決状態であり、解決処理を新規に行うことができます。
To learn more about the API of the configuration class see the API documentation:
Configuration.
ConfigurationクラスのAPIをさらに詳しく知りたいときは、APIドキュメント(Configuration)をご参照ください。
Gradle repository management, based on Apache Ivy, gives you a lot of freedom regarding repository layout and retrieval policies. Additionally Gradle provides various convenience method to add pre-configured repositories.
Gradleのリポジトリ管理機能は、Apache Ivyをベースにしたもので、リポジトリのレイアウトや参照方法を自在に定義できます。さらに、Gradleにはあらかじめ様々なリポジトリが定義されており、それらを簡単にプロジェクトに設定することができます。
You may configure any number of repositories, each of which is treated independently by Gradle. If Gradle finds a module descriptor in a particular repository, it will attempt to download all of the artifacts for that module from the same repository. Although module meta-data and module artifacts must be located in the same repository, it is possible to compose a single repository of multiple URLs, giving multiple locations to search for meta-data files and jar files.
リポジトリはいくつでも定義できますが、Gradleからはそれぞれが独立して取り扱われます。 あるリポジトリでモジュールのディスクリプタが見つかれば、Gradleはそのモジュールのアーティファクトを全て同じリポジトリからダウンロードしようとします。 つまり、モジュールのメタデータと全てのアーティファクトは同じリポジトリになければなりません。しかし、一つのリポジトリを複数のURLから構成し、メタデータとjarファイルを様々な場所から探してこれるようにすることは可能です。
There are several different types of repositories you can declare:
宣言できるリポジトリには、以下のものがあります。
表51.2 リポジトリの種類 Repository types
| Type 種類 | Description 説明 |
| Maven central repository Mavenセントラルリポジトリ | A pre-configured repository that looks for dependencies in Maven Central. Mavenセントラルにある依存関係を探すための定義済みリポジトリ |
| Maven JCenter repository Maven JCenterリポジトリ | A pre-configured repository that looks for dependencies in Bintray's JCenter. BintrayのJCenterにある依存関係を探すための定義済みリポジトリ |
| Maven local repository Mavenローカルリポジトリ | A pre-configured repository that looks for dependencies in the local Maven repository. Mavenのローカルリポジトリにある依存関係を探すための定義済みリポジトリ |
| Maven repository Mavenリポジトリ | A Maven repository. Can be located on the local filesystem or at some remote location. Mavenリポジトリ。ローカルファイルシステムまたはリモートに配置できる。 |
| Ivy repository Ivyリポジトリ | An Ivy repository. Can be located on the local filesystem or at some remote location. Ivyリポジトリ。ローカルファイルシステムまたはリモートに配置できる。 |
| Flat directory repository フラットディレクトリリポジトリ | A simple repository on the local filesystem. Does not support any meta-data formats. ローカルファイルシステム上のシンプルなリポジトリ。メタデータは一切サポートされない。 |
Maven and Ivy repositories support the use of various transport protocols. At the moment the following protocols are supported:
表51.3 Repository transport protocols
| Type | Authentication schemes |
file |
none |
http |
username/password |
https |
username/password |
sftp |
username/password |
To define a repository use the repositories configuration block. Within the repositories closure,
a Maven repository is declared with maven. An Ivy repository is declared with ivy. The transport protocol
is part of the URL definition for a repository. The following build script demonstrates how to create a HTTP-based Maven and Ivy repository:
例51.25 Declaring a Maven and Ivy repository
build.gradle
repositories {
maven {
url "http://repo.mycompany.com/maven2"
}
ivy {
url "http://repo.mycompany.com/repo"
}
}If authentication is required for a repository, the relevant credentials can be provided. The following example shows how to provide username/password-based authentication for SFTP repositories:
例51.26 Providing credentials to a Maven and Ivy repository
build.gradle
repositories {
maven {
url "sftp://repo.mycompany.com:22/maven2"
credentials {
username 'user'
password 'password'
}
}
ivy {
url "sftp://repo.mycompany.com:22/repo"
credentials {
username 'user'
password 'password'
}
}
}To add the central Maven 2 repository (http://repo1.maven.org/maven2) simply add this to your build script: Maven2のセントラルリポジトリ(http://repo1.maven.org/maven2)は、次のように簡単に追加できます。
Now Gradle will look for your dependencies in this repository.
Warning: Be aware that the central Maven 2 repository is HTTP only and HTTPS is not supported. If you need a public HTTPS enabled central repository, you can use the JCenter public repository (see 「Maven JCenterリポジトリ Maven JCenter repository」).
これで、Gradleはこのリポジトリから依存関係を探すようになります。
Bintray's JCenter is an up-to-date collection of all popular Maven OSS artifacts, including artifacts published directly to Bintray.
BintrayのJCenterには、Bintrayに直接公開されたアーティファクトだけでなく、ポピュラーなMaven上のOSSライブラリが全て集められ、随時更新されています。
To add the JCenter Maven repository (https://jcenter.bintray.com) simply add this to your build script: JCenter Mavenリポジトリ(https://jcenter.bintray.com)は、次のように簡単に追加できます。
Now Gradle will look for your dependencies in the JCenter repository. jcenter() uses HTTPS to connect to the repository.
If you want to use HTTP you can configure jcenter():
これで、GradleはJCenterリポジトリから依存関係を探すようになります。 jcenter() uses HTTPS to connect to the repository.
If you want to use HTTP you can configure jcenter():
例51.29 Using Bintrays's JCenter with HTTP
build.gradle
repositories {
jcenter {
url "http://jcenter.bintray.com/"
}
}To use the local Maven cache as a repository you can do:
Mavenのローカルキャッシュをリポジトリとして使うには、次のようにします。
Gradle uses the same logic as Maven to identify the location of your local Maven cache. If a local repository location is defined in a settings.xml, this location
will be used. The settings.xml in USER_HOME/.m2settings.xml
in M2_HOME/confsettings.xml is available, Gradle uses the default location
USER_HOME/.m2/repository
Gradleは、Mavenが使っているのと同じロジックでローカルキャッシュの場所を決定します。 もしローカルリポジトリの場所がsettings.xmlで定義されていれば、そこが使用されます。 USER_HOME/.m2settings.xmlは、M2_HOME/confsettings.xmlよりも優先されます。 使用できるsettings.xmlがなければ、デフォルトのUSER_HOME/.m2/repository
For adding a custom Maven repository you can do:
カスタムのMavenリポジトリを追加するには、次のようにします。
例51.31 カスタムMavenリポジトリを追加する
build.gradle
repositories {
maven {
url "http://repo.mycompany.com/maven2"
}
}Sometimes a repository will have the POMs published to one location, and the JARs and other artifacts published at another location. To define such a repository, you can do:
POMとJARなどのアーティファクトを別々の場所に配置するようなリポジトリもあります。このようなリポジトリを設定するには、次のようにします
例51.32 JARファイル用の追加リポジトリを設定する
build.gradle
repositories {
maven {
// Look for POMs and artifacts, such as JARs, here
url "http://repo2.mycompany.com/maven2"
// Look for artifacts here if not found at the above location
artifactUrls "http://repo.mycompany.com/jars"
artifactUrls "http://repo.mycompany.com/jars2"
}
}Gradle will look at the first URL for the POM and the JAR. If the JAR can't be found there, the artifact URLs are used to look for JARs.
Gradleは、最初のURLを、POMとJARを探すために使用します。JARがそこで見つからなかった場合は、アーティファクトURLを使ってJARを探しに行きます。
To access a Maven repository which uses basic authentication, you specify the username and password to use when you define the repository:
BASIC認証で保護されたMavenリポジトリにアクセスするには、リポジトリ定義でユーザー名とパスワードを指定します。
例51.33 パスワード保護されたMavenリポジトリへのアクセス
build.gradle
repositories {
maven {
credentials {
username 'user'
password 'password'
}
url "http://repo.mycompany.com/maven2"
}
}It is advisable to keep your username and password in gradle.properties rather than directly in the build file.
ユーザー名、パスワードは、ビルドファイルに直接指定するのではなく、gradle.propertiesに外出しすることを推奨します。
If you want to use a (flat) filesystem directory as a repository, simply type:
ファイルシステム上の(フラットな)ディレクトリをリポジトリとして使用したい場合は、単に次のようにタイプしてください。
例51.34 フラットディレクトリ・リゾルバ
build.gradle
repositories {
flatDir {
dirs 'lib'
}
flatDir {
dirs 'lib1', 'lib2'
}
}This adds repositories which look into one or more directories for finding dependencies. If you only work with flat directory resolvers you don't need to set all attributes of a dependency. See 「オプション属性 Optional attributes」
これで、依存関係を取得するリポジトリとして複数のディレクトリが追加されました。 このフラットディレクトリ・リゾルバのみ使うのであれば、依存関係定義ですべての属性を定義する必要はありません。「オプション属性 Optional attributes」をご参照ください。
You can specify that your repository conforms to the Ivy or Maven default layout by using a named layout.
例51.36 Ivy repository with named layout
build.gradle
repositories {
ivy {
url "http://repo.mycompany.com/repo"
layout "maven"
}
}
Valid named layout values are 'gradle' (the default), 'maven' and 'ivy'.
See IvyArtifactRepository.layout() in the API documentation for details of these named layouts.
To define an Ivy repository with a non-standard layout, you can define a pattern layout for the repository:
標準的でないレイアウトのIvyリポジトリを使うには、リポジトリのパターンレイアウトを定義します。
例51.37 パターンレイアウトを指定したIvyリポジトリ
build.gradle
repositories {
ivy {
url "http://repo.mycompany.com/repo"
layout "pattern", {
artifact "[module]/[revision]/[type]/[artifact].[ext]"
}
}
}Optionally, a repository with pattern layout can have its 'organisation' part laid out in Maven style, with
forward slashes replacing dots as separators. For example, the organisation my.company would then be represented as my/company.
オプションとして、パターンレイアウトを定義する際、「organisation」部分をMavenスタイルに展開し、ドットの代わりにスラッシュを用いるようにできます。 例えば、my.companyという組織名はmy/companyと表現されます。
例51.38 Maven互換レイアウトのIvyリポジトリ
build.gradle
repositories {
ivy {
url "http://repo.mycompany.com/repo"
layout "pattern", {
artifact "[organisation]/[module]/[revision]/[artifact]-[revision].[ext]"
m2compatible = true
}
}
}
Valid named layout values are 'gradle' (the default), 'maven' and 'ivy'.
See IvyArtifactRepository.layout() in the API documentation for details of these named layouts.
To define an Ivy repository which fetches Ivy files and artifacts from different locations, you can use the pattern layout with separate patterns to use to locate the Ivy files and artifacts:
例51.39 Ivy repository with pattern layout
build.gradle
repositories {
ivy {
url "http://repo.mycompany.com/repo"
layout "pattern", {
artifact "[module]/[revision]/[type]/[artifact].[ext]"
}
}
}To define an Ivy repository which fetches Ivy files and artifacts from different locations, you can define separate patterns to use to locate the Ivy files and artifacts:
Each artifact or ivy specified for a repository adds an additional pattern to use.
The patterns are used in the order that they are defined.
例51.40 Ivy repository with multiple custom patterns
build.gradle
repositories {
ivy {
url "http://repo.mycompany.com/repo"
layout "pattern", {
artifact "3rd-party-artifacts/[organisation]/[module]/[revision]/[artifact]-[revision].[ext]"
artifact "company-artifacts/[organisation]/[module]/[revision]/[artifact]-[revision].[ext]"
ivy "ivy-files/[organisation]/[module]/[revision]/ivy.xml"
}
}
}Optionally, a repository with pattern layout can have its 'organisation' part laid out in Maven style, with
forward slashes replacing dots as separators. For example, the organisation my.company would then be represented as my/company.
例51.41 Ivy repository with Maven compatible layout
build.gradle
repositories {
ivy {
url "http://repo.mycompany.com/repo"
layout "pattern", {
artifact "[organisation]/[module]/[revision]/[artifact]-[revision].[ext]"
m2compatible = true
}
}
}To access an Ivy repository which uses basic authentication, you specify the username and password to use when you define the repository:
BASIC認証で保護されたIvyリポジトリへアクセスするには、リポジトリ定義の際にユーザー名とパスワードを指定します。
例51.42 パスワードで保護されたIvyリポジトリ
build.gradle
repositories {
ivy {
url 'http://repo.mycompany.com'
credentials {
username 'user'
password 'password'
}
}
}To access a repository:
リポジトリ定義にアクセスするには、
例51.43 リポジトリ定義へのアクセス
build.gradle
println repositories.localRepository.name
println repositories['localRepository'].nameTo configure a repository:
リポジトリの設定を変更するには、
例51.44 リポジトリの設定変更
build.gradle
repositories {
flatDir {
name 'localRepository'
}
}
repositories {
localRepository {
dirs 'lib'
}
}
repositories.localRepository {
dirs 'lib'
}Gradle, thanks to Ivy under its hood, is extremely flexible regarding repositories:
Gradleは、水面下でIvyを使っているおかげで、リポジトリに関しては非常に高い柔軟性を持っています。たとえば、
There are many options for the protocol to communicate with the repository (e.g. filesystem, http, ssh, sftp ...)
リポジトリとの通信プロトコル(ファイルシステム、http、ssh、等々)がたくさん用意されている
The protocol sftp currently only supports username/password-based authentication.
Each repository can have its own layout.
一つ一つのリポジトリが、それぞれ独自のレイアウトを持つことができる
Let's say, you declare a dependency on the junit:junit:3.8.2 library.
Now how does Gradle find it in the repositories? Somehow the dependency information has to be mapped to a
path. In contrast to Maven, where this path is fixed, with Gradle you can define a pattern that defines
what the path will look like. Here are some examples:
junit:junit:3.8.2へ依存していることを定義したとしましょう。このとき、Gradleはどのようにしてリポジトリからjunitを探すのでしょうか。そのためには、なんとかしてこの依存関係情報をファイルパスに変換する必要があります。Mavenではその変換方法は変更できませんが、Gradleではパスをどのように決定するか、そのパターンを自分で定義できます。たとえば、
[24]
// Maven2 レイアウト (Maven2と互換性があるとマークすれば、組織(グループ)フォルダは組織名のドットに従ってサブフォルダに分割される) someroot/[organisation]/[module]/[revision]/[module]-[revision].[ext] // 典型的なIvyリポジトリレイアウト(組織フォルダがサブフォルダに分割されない) someroot/[organisation]/[module]/[revision]/[type]s/[artifact].[ext] // シンプルなレイアウト(組織名は使用せず、フォルダをネストしない) someroot/[artifact]-[revision].[ext]
To add any kind of repository (you can pretty easy write your own ones) you can do:
上記のどのリポジトリも、以下のようにして参照できます。
例51.45 カスタムリポジトリの定義
build.gradle
repositories {
ivy {
ivyPattern "$projectDir/repo/[organisation]/[module]-ivy-[revision].xml"
artifactPattern "$projectDir/repo/[organisation]/[module]-[revision](-[classifier]).[ext]"
}
}An overview of which Resolvers are offered by Ivy and thus also by Gradle can be found here. With Gradle you just don't configure them via XML but directly via their API.
Ivyで(つまりGradleで)どんなリゾルバを使えるかはここで見ることができます。Gradleでは、XMLを経由することなく直接これらのAPIを操作できます。
Gradle takes your dependency declarations and repository definitions and attempts to download all of your dependencies by a process called dependency resolution. Below is a brief outline of how this process works.
Gradleは、ビルドスクリプトの依存関係宣言とリポジトリ定義を読み込み、依存関係解決と呼ばれる処理によって依存関係を全てダウンロードしようと試みます。以下に、その処理がどのように進むか、概要を記載しました。
Given a required dependency, Gradle first attempts to resolve the module for that dependency. Each repository is inspected in order, searching first for a module descriptor file (POM or Ivy file) that indicates the presence of that module. If no module descriptor is found, Gradle will search for the presence of the primary module artifact file indicating that the module exists in the repository.
必要な依存関係が指示されると、Gradleはまず、リポジトリを順に検査して、その依存関係のモジュールを解決しようとします。 モジュールディスクリプタファイル(POMまたはIvyファイル)が見つかれば、リポジトリにモジュールがあると判断します。ディスクリプタファイルが見つからない場合は、デフォルトのモジュールアーティファクトファイルがあるかどうかでモジュールの有無を判断します。
If the dependency is declared as a dynamic version (like
1.+), Gradle will resolve this to the newest available static version (like1.2) in the repository. For Maven repositories, this is done using themaven-metadata.xmlfile, while for Ivy repositories this is done by directory listing.もし、依存関係が動的バージョン(
1.+のような)で指定されていれば、Gradleは動的バージョンを、リポジトリ内の最新の静的バージョン(1.2など)に解決します。この処理は、Mavenリポジトリに対してはmaven-metadata.xmlファイルを使って行われ、Ivyリポジトリの場合はディレクトリ内の一覧表示が使用されます。If the module descriptor is a POM file that has a parent POM declared, Gradle will recursively attempt to resolve each of the parent modules for the POM.
モジュールディスクリプタが、親POMの宣言を含む
POMファイルだった場合、GradleはPOMの親モジュールを再帰的に解決しようとします。
Once each repository has been inspected for the module, Gradle will choose the 'best' one to use. This is done using the following criteria: 全てのリポジトリでモジュールの調査が終わると、Gradleはそれらのリポジトリの中から、使うのに「最も良い」リポジトリを選択します。どれが最良かは以下の基準で決定されます。
- For a dynamic version, a 'higher' static version is preferred over a 'lower' version. 動的バージョンに関しては、なるべく新しい静的バージョンが使用できるリポジトリが好ましい。
- Modules declared by a module descriptor file (Ivy or POM file) are preferred over modules that have an artifact file only. モジュールディスクリプタ(ivyやpomファイル)で宣言されているモジュールは、アーティファクトファイルしかないモジュールよりも好ましい。
- Modules from earlier repositories are preferred over modules in later repositories. 早く見に行ったリポジトリのほうが、後のリポジトリよりも優先される。
When the dependency is declared by a static version and a module descriptor file is found in a repository, there is no need to continue searching later repositories and the remainder of the process is short-circuited.
依存関係が静的バージョンで宣言されており、かつモジュールディスクリプタがリポジトリにあれば、後続のリポジトリを探索する必要はないので、処理を飛ばすことができます。
All of the artifacts for the module are then requested from the same repository that was chosen in the process above.
モジュール内の全アーティファクトを、上記処理で選択したリポジトリと同じリポジトリに取得しに行きます。
In most cases, Gradle's default dependency management will resolve the dependencies that you want in your build. In some cases, however, it can be necessary to tweak dependency resolution to ensure that your build receives exactly the right dependencies.
Gradleの依存関係管理は、ほとんどの場合、デフォルトのままでビルドに必要な依存関係を解決できます。しかし、正しい依存関係を確実に受け取るために、解決処理を調整する必要がある場合もあります。
There are a number of ways that you can influence how Gradle resolves dependencies.
Gradleの依存関係解決処理は、様々な部分で調整可能です。
Forcing a module version tells Gradle to always use a specific version for given dependency (transitive or not), overriding any version specified in a published module descriptor. This can be very useful when tackling version conflicts - for more information see 「バージョン競合の解決 Resolve version conflicts」.
指定した依存関係について、(推移的かどうかにかかわらず)指定したバージョンを使うよう解決処理を設定できます。 依存関係は、グループ名と名前で指定します。この機能は、バージョンの競合に四苦八苦している際にとても便利です。詳細については、「バージョン競合の解決 Resolve version conflicts」を参照してください。
Force versions can also be used to deal with rogue metadata of transitive dependencies.
If a transitive dependency has poor quality metadata that leads to problems at dependency resolution time, you can force Gradle to use a newer, fixed version of this dependency.
For an example, see the ResolutionStrategy class in the API documentation.
Note that 'dependency resolve rules' (outlined below) provide a more powerful mechanism for replacing a broken module dependency. See 「バージョンのブラックリストと差し替え Blacklisting a version with a replacement」.
また、推移的な依存関係のメタデータが壊れている場合もこれで対処できることがあります。推移的な依存関係のメタデータがあまりに低品質で、依存関係を解決する際に問題が発生している場合、モジュールのバージョンを修正された新バージョンに強制できます。ResolutionStrategyの例を参照してください。また、「依存関係解決ルール」は壊れたモジュールを置き換える更に強力な機構を提供します。「バージョンのブラックリストと差し替え Blacklisting a version with a replacement」を参照してください。
A dependency resolve rule is executed for each resolved dependency, and offers a powerful api for manipulating a requested dependency prior to that dependency being resolved. This feature is incubating, but currently offers the ability to change the group, name and/or version of a requested dependency, allowing a dependency to be substituted with a completely different module during resolution.
依存関係解決ルールは、全ての依存関係に対して実行され、要求された依存関係を解決前に操作する強力なAPIを提供します。 この機能は試験的なものですが、要求した依存関係のグループ名や名前、バージョンを変更し、解決処理中に依存関係を完全に別のモジュールに差し替えてしまうことが可能です。
Dependency resolve rules provide a very powerful way to control the dependency resolution process, and can be used to implement all sorts of advanced
patterns in dependency management. Some of these patterns are outlined below.
For more information and code samples see the ResolutionStrategy class in the API documentation.
依存関係解決ルールは依存関係をコントロールする非常に強力な手段で、依存関係管理における先進的なパターンを全て実装できます。
いくつかのパターンの概要を以下に紹介します。詳細な情報やコードサンプル等はResolutionStrategyをご参照ください。
Often an organisation publishes a set of libraries with a single version; where the libraries are built, tested and published together. These libraries form a 'releasable unit', designed and intended to be used as a whole. It does not make sense to use libraries from different releasable units together.
組織によっては、いくつかのライブラリをまとめて一つのバージョンでリリースすることがあります。それらのライブラリは、一緒にビルド、テストされ、公開されます。 そのようなライブラリ群は、「リリース可能単位」として構成され、一緒に使用されることが想定されています。一般的に、別々のリリース可能単位を混ぜて使うことは意味がありません。
But it is easy for transitive dependency resolution to violate this contract. For example: しかし、この制限は、推移的な依存関係の中で簡単に破られてしまいます。以下の例をご覧ください。
module-adepends onreleasable-unit:part-one:1.0module-bdepends onreleasable-unit:part-two:1.1
A build depending on both module-a and module-b will obtain different versions of libraries within the releasable unit.
module-aとmodule-bの両方に依存しているビルドがあれば、それぞれのモジュールがリリース可能単位を構成するライブラリの別々のバージョンを取得してしまうでしょう。
Dependency resolve rules give you the power to enforce releasable units in your build. Imagine a releasable unit defined by all libraries that have 'org.gradle' group. We can force all of these libraries to use a consistent version: 依存関係解決ルールを使うと、ビルドで使用するリリース可能単位を強制できます。 'org.gradle'グループに属する全てのライブラリが、あるリリース可能単位を構成していると想像してください。これらのライブラリについては一貫したバージョンを使うよう強制することができます。
例51.46 あるグループのライブラリ全てで一貫したバージョンを使用するよう強制する
build.gradle
configurations.all {
resolutionStrategy.eachDependency { DependencyResolveDetails details ->
if (details.requested.group == 'org.gradle') {
details.useVersion '1.4'
}
}
}
In some corporate environments, the list of module versions that can be declared in gradle builds is maintained and audited externally. Dependency resolve rules provide a neat implementation of this pattern: 社内環境によっては、gradleのビルドで使用できるモジュールのバージョンリストを外部的に監視、維持していることがあります。 依存関係解決ルールはこのようなパターンを簡潔に実装できます。
- In the build script, the developer declares dependencies with the module group and name, but uses a placeholder version, for example: '
default'. ビルドスクリプトでは、使用するモジュールのグループと名前を開発者が記述しますが、バージョンだけは「default」などのプレースホルダで宣言します。 - The 'default' version is resolved to a specific version via a dependency resolve rule, which looks up the version in a corporate catalog of approved modules. 「
default」バージョンは、依存関係解決ルールがある特定のバージョンに置換します。その際、承認されたモジュールの一覧が記載された社内カタログなどを参照します。
This rule implementation can be neatly encapsulated in a corporate plugin, and shared across all builds within the organisation. このルールの実装は、整理して社内プラグインにカプセル化し、組織内の全てのビルドで共有することもできます。
例51.47 独自のバージョニング体制を実装する
build.gradle
configurations.all {
resolutionStrategy.eachDependency { DependencyResolveDetails details ->
if (details.requested.version == 'default') {
def version = findDefaultVersionInCatalog(details.requested.group, details.requested.name)
details.useVersion version
}
}
}
def findDefaultVersionInCatalog(String group, String name) {
//some custom logic that resolves the default version into a specific version
"1.0"
}
Dependency resolve rules provide a mechanism for blacklisting a particular version of a dependency and providing a replacement version. This can be useful if a certain dependency version is broken and should not be used, where a dependency resolve rule causes this version to be replaced with a known good version. One example of a broken module is one that declares a dependency on a library that cannot be found in any of the public repositories, but there are many other reasons why a particular module version is unwanted and a different version is preferred.
依存関係解決ルールを使って、あるモジュールの特定のバージョンをブラックリストに指定し、バージョンを差し替えるような機構を実装できます。 これは、あるモジュールにおいて特定のバージョンが壊れていて使いたくないという場合に有用で、そのバージョンを依存関係解決処理が引っ張ってきてしまったときにそれを感知し、優良だと分かっている別のバージョンに差し替えることができます。 一例を挙げると、どこの公開リポジトリにも存在しないライブラリに依存しているようなモジュールは「壊れたモジュール」だと言えます。しかし、その他にもあるバージョンは使いたくない、別のバージョンを使いたいという理由はたくさんあるでしょう。
In example below, imagine that version 1.2.1 contains important fixes and should always be used in preference to 1.2.
The rule provided will enforce just this: any time version 1.2 is encountered it will be replaced with 1.2.1.
Note that this is different from a forced version as described above, in that any other versions of this module would not be affected.
This means that the 'newest' conflict resolution strategy would still select version 1.3 if this version was also pulled transitively.
以下の例では、バージョン1.2.1に重要な修正が含まれていて、1.2ではなく必ずそちらを使いたい、という状況を想定しています。
例のルールは、単にバージョン1.2を見つけたら必ず1.2.1に差し替えられるということを保証しているだけですが、注目すべき点は、これが上の方で述べたバージョンの強制とは異なるということです。ここでは、1.2以外の全てのバージョンはそのまま受け入れられます。
例えばバージョン1.3もどこかで推移的に引っ張られている場合、競合解決戦略「newest」によりバージョン1.3が選択されるでしょう。
例51.48 バージョンのブラックリスト指定と差し替
build.gradle
configurations.all {
resolutionStrategy.eachDependency { DependencyResolveDetails details ->
if (details.requested.group == 'org.software' && details.requested.name == 'some-library' && details.requested.version == '1.2') {
//prefer different version which contains some necessary fixes
details.useVersion '1.2.1'
}
}
}
At times a completely different module can serve as a replacement for a requested module dependency.
Examples include using 'groovy' in place of 'groovy-all', or using 'log4j-over-slf4j' instead of 'log4j'.
Starting with Gradle 1.5 you can make these substitutions using dependency resolve rules:
要求されたモジュールを、全く異なる別モジュールに差し替えることができる場合もあります。
例にあるのは、「groovy-all」から「groovy」への差し替えと「log4j」から「log4j-over-slf4j」への差し替えです。
Gradle1.5から、このような置き換えも依存関係解決ルールで可能になりました。
例51.49 解決時に依存関係のグループ名や名前を変更する
build.gradle
configurations.all {
resolutionStrategy.eachDependency { DependencyResolveDetails details ->
if (details.requested.name == 'groovy-all') {
//prefer 'groovy' over 'groovy-all':
details.useTarget group: details.requested.group, name: 'groovy', version: details.requested.version
}
if (details.requested.name == 'log4j') {
//prefer 'log4j-over-slf4j' over 'log4j', with fixed version:
details.useTarget "org.slf4j:log4j-over-slf4j:1.7.7"
}
}
}
A good example when a new library replaced a legacy one is the "google-collections" -> "guava" migration. The team that created google-collections decided to change the module name from "com.google.collections:google-collections" into "com.google.guava:guava". This a legal scenario in the industry: teams need to be able to change the names of products they maintain, including the module coordinates. Renaming of the module coordinates has impact on conflict resolution.
To explain the impact on conflict resolution, let's consider the "google-collections" -> "guava" scenario. It may happen that both libraries are pulled into the same dependency graph. For example, "our" project depends on guava but some of our dependencies pull in a legacy version of google-collections. This can cause runtime errors, for example during test or application execution. Gradle does not automatically resolve the google-collections VS guava conflict because it is not considered as a "version conflict". It's because the module coordinates for both libraries are completely different and conflict resolution is activated when "group" and "name" coordinates are the same but there are different versions available in the dependency graph (for more info, please refer to the section on conflict resolution). Traditional remedies to this problem are:
- Declare exclusion rule to avoid pulling in "google-collections" to graph. It is probably the most popular approach.
- Avoid dependencies that pull in legacy libraries.
- Upgrade the dependency version if the new version no longer pulls in a legacy library.
- Downgrade to "google-collections". It's not recommended, just mentioned for completeness.
Traditional approaches work but they are not general enough. For example, an organisation wants to resolve the google-collections VS guava conflict resolution problem in all projects. Starting from Gradle 2.2 it is possible to declare that certain module was replaced by other. This enables organisations to include the information about module replacement in the corporate plugin suite and resolve the problem holistically for all Gradle-powered projects in the enterprise.
例51.50 Declaring module replacement
build.gradle
dependencies {
components {
module("com.google.collections:google-collections").replacedBy("com.google.guava:guava")
}
}
For more examples and detailed API, please refer to the DSL reference for ComponentMetadataHandler.
What happens when we declare that "google-collections" are replaced by "guava"? Gradle can use this information for conflict resolution. Gradle will consider every version of "guava" newer/better than any version of "google-collections". Also, Gradle will ensure that only guava jar is present in the classpath / resolved file list. Please note that if only "google-collections" appears in the dependency graph (e.g. no "guava") Gradle will not eagerly replace it with "guava". Module replacement is an information that Gradle uses for resolving conflicts. If there is no conflict (e.g. only "google-collections" or only "guava" in the graph) the replacement information is not used.
Currently it is not possible to declare that certain modules is replaced by a set of modules. However, it is possible to declare that multiple modules are replaced by a single module.
Gradle's Ivy repository implementations support the equivalent to Ivy's dynamic resolve mode. Normally, Gradle will use the rev attribute for each dependency
definition included in an ivy.xml file. In dynamic resolve mode, Gradle will instead prefer the revConstraint attribute over the
rev attribute for a given dependency definition. If the revConstraint attribute is not present, the rev attribute is used
instead.
GradleのIvyレポジトリ実装は、Ivyの動的解決モードと同等のものをサポートしています。通常、Gradleは依存関係についてivy.xmlファイルで定義されているrev属性を使用しますが、動的解決モードでは、Gradleはrev属性の代わりにrevConstraint属性を優先して使用します。revConstraintが未定義の時はrev属性を使用します。
To enable dynamic resolve mode, you need to set the appropriate option on the repository definition. A couple of examples are shown below. Note that dynamic resolve mode is only
available for Gradle's Ivy repositories. It is not available for Maven repositories, or custom Ivy DependencyResolver implementations.
動的解決モードを有効にするには、リポジトリ定義に適切なオプションを設定する必要があります。いくつかの例を以下に挙げます。動的解決モードは、Gradle組み込みのIvyリポジトリ定義でしか使用できないことに注意してください。Mavenリポジトリや独自DependencyResolver実装のIvyリポジトリでは使用できません。
例51.51 動的解決モードを有効にする
build.gradle
// Can enable dynamic resolve mode when you define the repository repositories { ivy { url "http://repo.mycompany.com/repo" resolve.dynamicMode = true } } // Can use a rule instead to enable (or disable) dynamic resolve mode for all repositories repositories.withType(IvyArtifactRepository) { resolve.dynamicMode = true }
Each module (also called component) has metadata associated with it, such as its group, name, version, dependencies, and so on. This metadata typically originates in the module's descriptor. Metadata rules allow certain parts of a module's metadata to be manipulated from within the build script. They take effect after a module's descriptor has been downloaded, but before it has been selected among all candidate versions. This makes metadata rules another instrument for customizing dependency resolution.
One piece of module metadata that Gradle understands is a module's status scheme. This concept, also known from Ivy, models the different
levels of maturity that a module transitions through over time. The default status scheme, ordered from least to most mature status, is integration,
milestone, release. Apart from a status scheme, a module also has a (current) status, which must be one of
the values in its status scheme. If not specified in the (Ivy) descriptor, the status defaults to integration for Ivy modules and Maven snapshot modules,
and release for Maven modules that aren't snapshots.
A module's status and status scheme are taken into consideration when a latest version selector is resolved. Specifically, latest.someStatus
will resolve to the highest module version that has status someStatus or a more mature status. For example, with the default status scheme in place,
latest.integration will select the highest module version regardless of its status (because integration is the least mature status),
whereas latest.release will select the highest module version with status release. Here is what this looks like in code:
例51.52 'Latest' version selector
build.gradle
dependencies {
config1 "sea.fish:tuna:latest.integration"
config2 "sea.fish:tuna:latest.release"
}
task listFish << {
configurations.config1.each { println it.name }
println()
configurations.config2.each { println it.name}
}gradle -q listFish の出力
> gradle -q listFish tuna-1.5.jar tuna-1.4.jar
The next example demonstrates latest selectors based on a custom status scheme declared in a module metadata rule:
例51.53 Custom status scheme
build.gradle
dependencies {
config3 "air.birds:albatross:latest.silver"
components {
eachComponent { ComponentMetadataDetails details ->
if (details.id.group == "air.birds") {
details.statusScheme = ["bronze", "silver", "gold", "platinum"]
}
}
}
}
task listBirds << {
configurations.config3.each { println it.name }
}gradle -q listBirds の出力
> gradle -q listBirds albatross-2.0.jar
Gradle can also create component metadata rules utilizing Ivy-specific metadata for modules resolved from an Ivy repository.
Values from the Ivy descriptor are made available via the IvyModuleDescriptor interface.
例51.54 Ivy component metadata rule
build.gradle
dependencies {
components {
eachComponent { ComponentMetadataDetails details, IvyModuleDescriptor ivyModule ->
if (details.id.group == 'my.org' && ivyModule.branch == 'testing') {
details.changing = true
}
}
}
}Component selection rules define how versions should be selected when multiple versions are available that match a given set of coordinates. Rules are applied against every available version and allow the version to be explicitly rejected by rule. This allows Gradle to select alternate versions when the alternate version is not known in advance.
Rules are configured via the ComponentSelectionRules object. Each rule configured
will be called with a ComponentSelection object as an argument which contains information
about the version being requested and the candidate version being considered.
Calling ComponentSelection.reject() causes the given candidate version to be explicitly rejected,
in which case the candidate will not be considered for the selector.
The following example shows a rule that disallows a particular version of a module but allows the default version selection rules to
choose the next best candidate. If the version requested was 1.+, and versions 1.1, 1.0.1 and 1.0 were
available, it would reject 1.1 and select the next newest version available (1.0.1).
例51.55 Component selection rule
build.gradle
configurations {
rejectConfig {
resolutionStrategy {
componentSelection {
// Accept the highest version matching the requested version that isn't '1.1'
all { ComponentSelection selection ->
if (selection.candidate.group == 'org.sample' && selection.candidate.module == 'api' && selection.candidate.version == '1.1') {
selection.reject("version 1.1 is broken for 'org.sample:api'")
}
}
}
}
}
}Note that version selection is applied starting with the highest version first. The version selected will be the first version found that all component selection rules accept. A version is considered accepted if a rule does not explicitly reject it.
Similarly, rules can be targeted at specific modules. Modules must be specified in the form of "group:module".
例51.56 Component selection rule with module target
build.gradle
configurations {
targetConfig {
resolutionStrategy {
componentSelection {
module("org.sample:api") { ComponentSelection selection ->
if (selection.candidate.version == "1.1") {
selection.reject("known bad version")
}
}
}
}
}
}
Component selection rules can also consider component metadata when selecting a version. Possible metadata arguments that can be considered are
ComponentMetadata and IvyModuleDescriptor.
例51.57 Component selection rule with metadata
build.gradle
configurations {
rejectConfig {
resolutionStrategy {
componentSelection {
// Reject any versions with a status of 'experimental'
all { ComponentSelection selection, ComponentMetadata metadata ->
if (selection.candidate.group == 'org.sample' && selection.candidate.module == 'api') {
if (metadata.status == 'experimental') {
selection.reject("don't use experimental candidates of 'org.sample:api'")
}
}
}
// Accept the highest version with a branch of 'testing' or a status of 'milestone'
all { ComponentSelection selection, IvyModuleDescriptor descriptor, ComponentMetadata metadata ->
if (selection.candidate.group == 'org.sample' && selection.candidate.module == 'api') {
if (descriptor.branch != 'testing' && metadata.status != 'milestone') {
selection.reject("'org.sample:api' must have testing branch or milestone status")
}
}
}
}
}
}
}
Note that a ComponentSelection argument is always required when
declaring a component selection rule but the metadata arguments are optional.
Gradle contains a highly sophisticated dependency caching mechanism, which seeks to minimise the number of remote requests made in dependency resolution, while striving to guarantee that the results of dependency resolution are correct and reproducible.
Gradleは、非常に洗練された依存関係のキャッシング機構を持っており、依存関係の解決の際、リモートまでリクエストを飛ばす回数を最小限に抑えるようにしています。 また、その際、依存関係解決の正確性、再現性を最大限保証できるような仕組みを備えています。
The Gradle dependency cache consists of 2 key types of storage:
Gradleの依存関係キャッシュは、二種類のストレージで構成されています。
A file-based store of downloaded artifacts, including binaries like jars as well as raw downloaded meta-data like POM files and Ivy files. The storage path for a downloaded artifact includes the SHA1 checksum, meaning that 2 artifacts with the same name but different content can easily be cached.
ダウンロードされたアーティファクトを保存する、ファイルベースのストレージ。pomファイルやivyファイルのようなダウンロード済みの生メタデータだけでなく、jarなどのバイナリも格納される。 ダウンロード済みのアーティファクトを保存するストレージパスには、SHA1のチェックサムが含まれているので、同名の別アーティファクトも簡単にキャッシュできる。
A binary store of resolved module meta-data, including the results of resolving dynamic versions, module descriptors, and artifacts.
解決済みのメタデータを保存するバイナリストレージ。動的バージョン、モジュールのディスクリプタやアーティファクトなどの解決結果が格納される。
Separating the storage of downloaded artifacts from the cache metadata permits us to do some very powerful things with our cache that would be difficult with a transparent, file-only cache layout.
メタデータのキャッシュとダウンロードしたアーティファクトを別のストレージに分けることで、ファイルのみの透過的なキャッシュレイアウトでは困難な、強力な機能を実現できます。
The Gradle cache does not allow the local cache to hide problems and create other mysterious and difficult to debug behavior that has been a challenge with many build tools. This new behavior is implemented in a bandwidth and storage efficient way. In doing so, Gradle enables reliable and reproducible enterprise builds.
Gradleのキャッシュでは、ローカルキャッシュによって問題が隠蔽されるようなことはありませんし、多くのビルドツールで直面してきたような不可解でデバッグ困難な動作をすることもありません。 また、その実装は帯域、ストレージ双方において効率的なものです。それにより、Gradleはエンタープライズでのビルドに必要な信頼性、再現性を達成しているのです。
Gradle keeps a record of various aspects of dependency resolution in binary format in the metadata cache. The information stored in the metadata cache includes: Gradleは、依存関係を解決した結果を様々な観点から記録し、バイナリ形式でメタデータ・キャッシュに保存します。 メタデータ・キャッシュに保存される情報には以下のようなものがあります。
- The result of resolving a dynamic version (e.g.
1.+) to a concrete version (e.g.1.2). (1.+のような)動的バージョンを具体的なバージョン(1.2など)に解決したその結果。 - The resolved module metadata for a particular module, including module artifacts and module dependencies. それぞれのモジュールの解決済みメタデータ。モジュールのアーティファクトや依存関係など。
- The resolved artifact metadata for a particular artifact, including a pointer to the downloaded artifact file. それぞれのアーティファクトの、解決済みメタデータ。ダウンロードしたファイルへのポインタを含む。
- The absence of a particular module or artifact in a particular repository, eliminating repeated attempts to access a resource that does not exist. あるモジュールやアーティファクトがリポジトリに無いことを記録し、存在しないリソースに繰り返しアクセスしに行くことを防ぐ。
Every entry in the metadata cache includes a record of the repository that provided the information as well as a timestamp that can be used for cache expiry. メタデータ・キャッシュの全てのエントリには、リポジトリに関する記録が含まれていて、キャッシュの有効期限を制御したりするのに使われるタイムスタンプなどの情報を取得できるようになっています。
As described above, for each repository there is a separate metadata cache. A repository is identified by its URL, type and layout. If a module or artifact has not been previously resolved from this repository, Gradle will attempt to resolve the module against the repository. This will always involve a remote lookup on the repository, however in many cases no download will be required (see「アーティファクトの再利用 Artifact reuse」, below).
前述の通り、リポジトリにはそれぞれ独立したメタデータ・キャッシュが存在します。リポジトリはURL、種別、レイアウトにより別のリポジトリと区別されます。 もしそのリポジトリから、あるモジュールやアーティファクトをまだ解決したことがない場合、Gradleはリポジトリに対してモジュールを解決しに行きます。これは常にリポジトリに対するリモート・ルックアップを伴うわけですが、ほとんどのケースではダウンロードまでは要求されません(後述の「「アーティファクトの再利用 Artifact reuse」」を参照してください)。
Dependency resolution will fail if the required artifacts are not available in any repository specified by the build, even if the local cache has a copy of this artifact which was retrieved from a different repository. Repository independence allows builds to be isolated from each other in an advanced way that no build tool has done before. This is a key feature to create builds that are reliable and reproducible in any environment.
ビルドで指定されたどのリポジトリにも要求されたアーティファクトがない場合、たとえ別のリポジトリのキャッシュにそのアーティファクトがあったとしても、依存関係の解決は失敗します。 リポジトリの独立性を保つことで、それぞれのビルドも高度に独立したものにしているのです。これは、従来のビルドツールにはない特徴で、あらゆる環境で高い信頼性と再現性を持つビルドを構築するためのキーとなります。
Before downloading an artifact, Gradle tries to determine the checksum of the required artifact by downloading the sha file associated with that artifact. If the checksum can be retrieved, an artifact is not downloaded if an artifact already exists with the same id and checksum. If the checksum cannot be retrieved from the remote server, the artifact will be downloaded (and ignored if it matches an existing artifact).
アーティファクトをダウンロードする前に、Gradleは、そのアーティファクトに結びついたshaファイルをダウンロードして、アーティファクトのチェックサムを決定しようとします。 チェックサムをダウンロードできれば、そして既に同じIDとチェックサムを持つアーティファクトが存在すれば、ダウンロードは行われません。 チェックサムをリモートサーバーから取得できない場合、アーティファクトは常にダウンロードされます(既知のアーティファクトとマッチするかどうかは無視されます)。
As well as considering artifacts downloaded from a different repository, Gradle will also attempt to reuse artifacts found in the local Maven Repository. If a candidate artifact has been downloaded by Maven, Gradle will use this artifact if it can be verified to match the checksum declared by the remote server.
Gradleは、別のリポジトリからダウンロードされたアーティファクトだけでなく、Mavenのローカルリポジトリにあるアーティファクトも再利用しようとします。候補のアーティファクトが既にMavenによりダウンロードされたことがあれば、リモートサーバーで宣言されたチェックサムで検証してからそれらを再利用します。
It is possible for different repositories to provide a different binary artifact in response to the same artifact identifier. This is often the case with Maven SNAPSHOT artifacts, but can also be true for any artifact which is republished without changing it's identifier. By caching artifacts based on their SHA1 checksum, Gradle is able to maintain multiple versions of the same artifact. This means that when resolving against one repository Gradle will never overwrite the cached artifact file from a different repository. This is done without requiring a separate artifact file store per repository.
同じ識別子でアーティファクトを要求したのに、それぞれのリポジトリが別のバイナリを返すことがあります。良くあるケースがMavenのスナップショットですが、名称を変更せずにアーティファクトを再公開した場合にも同じことが起こります。 Gradleは、SHA1チェックサムに基づいてアーティファクトをキャッシングするので、同じアーティファクトの様々なバージョンを保持することができます。 これはつまり、あるリポジトリからアーティファクトを解決した際、別のリポジトリのファイルキャッシュが上書きされることは決してない、ということでもあります。 これを、それぞれのリポジトリごとに別個にアーティファクトファイルのキャッシュを持つことなく実現できるのです。
The Gradle dependency cache uses file-based locking to ensure that it can safely be used by multiple Gradle processes concurrently. The lock is held whenever the binary meta-data store is being read or written, but is released for slow operations such as downloading remote artifacts.
Gradleの依存関係キャッシュは、並列に実行される複数のGradleプロセスから安全に使用できるよう、ファイルベースのロックを使用します。 このロックは、メタデータバイナリストレージの読み込みや書き込みの際には常に取得されますが、リモートからアーティファクトをダウンロードするときのような、時間のかかる操作の際には解放されます。
The --offline
command line switch tells Gradle to always use dependency modules from the cache, regardless if they are due to be checked again.
When running with offline, Gradle will never attempt to access the network to perform dependency resolution.
If required modules are not present in the dependency cache, build execution will fail.
--offlineオプションを使うと、常にキャッシュされた依存モジュールを使用するようGradleに指示できます。依存モジュールが再検証されることになっていても無視されます。 オフラインで実行されると、Gradleは依存関係を解決するときにネットワークにアクセスしに行くことはありません。 要求されたモジュールが依存関係のキャッシュにない場合は、ビルドは失敗します。
At times, the Gradle Dependency Cache can be out of sync with the actual state of the configured repositories. Perhaps a repository was initially misconfigured,
or perhaps a "non-changing" module was published incorrectly. To refresh all dependencies in the dependency cache, use the
--refresh-dependencies option on the command line.
Gradleの依存関係キャッシュが、設定されたリポジトリの実際の状態と同期が取れていないこともあります。 おそらくは最初のリポジトリ設定が間違っていたか、未変更のモジュールが間違って公開されたのでしょう。キャッシュにある全ての依存関係をリフレッシュするには、コマンドラインで--refresh-dependenciesオプションを使用してください。
The --refresh-dependencies option tells Gradle to ignore all cached entries for resolved modules and artifacts.
A fresh resolve will be performed against all configured repositories, with dynamic versions recalculated, modules refreshed, and artifacts downloaded.
However, where possible Gradle will check if the previously downloaded artifacts are valid before downloading again.
This is done by comparing published SHA1 values in the repository with the SHA1 values for existing downloaded artifacts.
--refresh-dependenciesオプションは、解決済みのモジュールとアーティファクトに対する全てのキャッシュエントリを無視するようGradleに指示します。 対象のリポジトリ全てに対して、新規に解決処理が実行されます。動的バージョンは再取得され、モジュールは再解決され、アーティファクトも再度ダウンロードされます。 ただ、実際にアーティファクトをダウンロードする前に、Gradleは以前ダウンロードしたものが使用できないか確認します。 これは、リポジトリで公開されているSHA1と、ダウンロード済みのアーティファクトのSHA1を比較することで行われます。
You can fine-tune certain aspects of caching using the
ResolutionStrategy
for a configuration.
キャッシングについて、いくつかの動作は設定でResolutionStrategyを使うことで微調整することができます。
By default, Gradle caches dynamic versions for 24 hours. To change how long Gradle will cache the resolved version for a dynamic version, use:
デフォルトでは、Gradleは動的バージョンを24時間キャッシュします。動的バージョンを具体的なバージョンに解決したとき、それをどれだけの長さキャッシュするか制御するには、以下のようにします。
例51.58 動的バージョンのキャッシュ制御
build.gradle
configurations.all {
resolutionStrategy.cacheDynamicVersionsFor 10, 'minutes'
}By default, Gradle caches changing modules for 24 hours. To change how long Gradle will cache the meta-data and artifacts for a changing module, use:
デフォルトでは、Gradleは変更性モジュールを24時間キャッシュします。変更性モジュールのメタデータとアーティファクトをどれだけの長さキャッシュするか制御するには、以下のようにします。
例51.59 変更性モジュールのキャッシュ制御
build.gradle
configurations.all {
resolutionStrategy.cacheChangingModulesFor 4, 'hours'
}For more details, take a look at the API documentation for ResolutionStrategy.
詳しくはAPIドキュメントでResolutionStrategyを参照してください。
Many projects rely on the Maven Central repository. This is not without problems.
多くのプロジェクトがMavenセントラルリポジトリに依存していますが、これが時に問題になることもあります。
The Maven Central repository can be down or can be slow to respond.
Mavenセントラルリポジトリはダウンする可能性もあり、またレスポンスが返るまで長い時間がかかります。
The POM files of many popular projects specify dependencies or other configuration that are just plain wrong (for instance, the POM file of the “
commons-httpclient-3.0” module declares JUnit as a runtime dependency).POMファイルに間違った情報を入れているプロジェクトがたくさんあります(たとえば、
commons-httpclient-3.0はJUnitをruntime依存関係に設定しています)。For many projects there is not one right set of dependencies (as more or less imposed by the POM format).
「ただ一つの正当な依存関係」というものが決められないようなプロジェクトもたくさんあります(つまり、POMのフォーマットのせいで、押しつけられる依存関係が多すぎたり少なすぎたりすることがあります)。
If your project relies on the Maven Central repository you are likely to need an additional custom repository, because:
もしプロジェクトがMavenセントラルリポジトリに依存しているのであれば、カスタムリポジトリを追加する必要があるかもしれません。以下のような場合も考えられるからです。
You might need dependencies that are not uploaded to Maven Central yet.
まだMavenセントラルにアップロードされていない依存関係が必要になった。
You want to deal properly with invalid metadata in a Maven Central POM file.
MavenセントラルのPOMファイルに誤ったメタデータが含まれていた。
You don't want to expose people to the downtimes or slow response of Maven Central, if they just want to build your project.
プロジェクトをビルドしたいと思う人々がいて、彼らをMavenセントラルのダウンタイムや、時折発生する長時間のレスポンスタイムで煩わせたくない。
It is not a big deal to set-up a custom repository, [25] but it can be tedious to keep it up to date. For a new version, you always have to create the new XML descriptor and the directories. Your custom repository is another infrastructure element which might have downtimes and needs to be updated. To enable historical builds, you need to keep all the past libraries, not to mention a backup of these. It is another layer of indirection. Another source of information you have to lookup. All this is not really a big deal but in its sum it has an impact. Repository managers like Artifactory or Nexus make this easier, but most open source projects don't usually have a host for those products. This is changing with new services like Bintray that let developers host and distribute their release binaries using a self-service repository platform. Bintray also supports sharing approved artifacts though the JCenter public repository to provide a single resolution address for all popular OSS Java artifacts (see 「Maven JCenterリポジトリ Maven JCenter repository」). そのリポジトリを最新に保つ作業は単調で退屈なものになりがちです。新しいバージョンが出るたびに、新しいXML設定ファイルとディレクトリを作成しなければなりません。それに、そのカスタムリポジトリもまたダウンしたり、保守する必要があったりするインフラのひとつです。過去のビルドを再現できるようにするには、過去使用したすべてのライブラリをバックアップしておく必要があります。 それは冗長な層が一つ増えるということでもあります。調査しなければならない情報元が増えるということです。一つ一つは本当に大したことではないかもしれませんが、積み重なっていけばやはり問題です。 ArtifactoryやNexusのようなリポジトリマネージャーを使えば、こういった作業も簡単になります。しかし、たとえばオープンソースプロジェクトなどは、普通このようなソフトウェアのホスティング先を持っていません。 ただ、この状況は、Bintrayのような、開発者が自分のバイナリをホストして配布できる新しいサービスのおかげで変わってきています。 Bintrayでは、承認されたアーティファクトをJCenterという公開リポジトリを通じて共有しており、Javaの全てのポピュラーなOSSライブラリを一つのアドレスで取得できるようになっています(「Maven JCenterリポジトリ Maven JCenter repository」参照)。
This is a common reason why many projects prefer to store their libraries in their version control system. This approach is fully supported by Gradle. The libraries can be stored in a flat directory without any XML module descriptor files. Yet Gradle offers complete transitive dependency management. You can use either client module dependencies to express the dependency relations, or artifact dependencies in case a first level dependency has no transitive dependencies. People can check out such a project from your source code control system and have everything necessary to build it.
使用しているライブラリをバージョン管理システムに入れているプロジェクトがありますが、それはこのあたりが理由です。Gradleはこの方法も完全にサポートしています。ライブラリを、XML設定ファイルを一切使用せず、ただローカルディレクトリに入れておくことができるのです。また、その場合でも、Gradleは推移的な依存関係を完全に管理できます。クライアントモジュール依存関係を使って依存関係のグラフを表現したり、推移的な依存関係がない場合は、アーティファクトオンリー記法を使ったりできます。こうしたプロジェクトは、SVNからチェックアウトされた段階で、ビルドに必要なすべてのものがそろっていることになります。
If you are working with a distributed version control system like Git you probably don't want to use the version control system to store libraries as people check out the whole history. But even here the flexibility of Gradle can make your life easier. For example, you can use a shared flat directory without XML descriptors and yet you can have full transitive dependency management, as described above.
Gitのような分散バージョン管理システムを使っている場合は、リポジトリにライブラリを格納したくないかもしれません。ユーザーがリポジトリの履歴をすべてチェックアウトする必要があるからです。しかし、たとえこのような場合でも、Gradleの柔軟性は生活を楽にしてくれます。たとえば、XMLリポジトリなしの共有ディレクトリを使うこともできます。そして、この場合でも上記の方法で推移的な依存関係は完全に管理できるのです。
You could also have a mixed strategy. If your main concern is bad metadata in the POM file and maintaining custom XML descriptors, then Client Modules offer an alternative. However, you can still use Maven2 repo or your custom repository as a repository for jars only and still enjoy transitive dependency management. Or you can only provide client modules for POMs with bad metadata. For the jars and the correct POMs you still use the remote repository.
これらを複合させた戦略をとることもあります。POMファイルの不良メタデータをなんとかしたい、カスタムPOMを使いたいということであれば、クライアントモジュールが一つの選択肢になります。 もちろんjarの取得だけをMaven2リポジトリやカスタムリポジトリから行うこともできますし、推移的な依存関係もそのまま問題なく管理できます。また、不良メタデータを含むPOMのみをクライアントモジュールで置き換えることも可能です。その場合、jarと正しいPOM情報については、今まで通りリモートリポジトリから取得することになります。
There is another way to deal with transitive dependencies without XML descriptor files. You can do this with Gradle, but we don't recommend it. We mention it for the sake of completeness and comparison with other build tools.
The trick is to use only artifact dependencies and group them in lists. This will directly express
your first level dependencies and your transitive dependencies (see 「オプション属性 Optional attributes」).
The problem with this is that Gradle dependency management will see this as specifying all
dependencies as first level dependencies. The dependency reports won't show your real dependency
graph and the compile task uses all dependencies, not just the first level
dependencies. All in all, your build is less maintainable and reliable than it could be when using
client modules, and you don't gain anything.
そのトリックは、アーティファクトオンリー記法を使い、それらをリストでグループ化するというものです。
この方法でも、なにが直接の依存関係で、何が推移的な依存関係なのか、なんとか表現することはできました(「オプション属性 Optional attributes」を参照してください)。
しかし、この方法の欠点は、Gradleの依存関係管理システムが、すべての依存関係を直接の依存関係として取り扱ってしまうことです。依存関係のレポートを出力させても正しい依存関係グラフは出てきませんし、compileタスクでも、直接的な依存関係だけでなく、すべての依存関係が使われてしまうことになります。クライアントモジュールを使った場合に比べると、大抵は保守性も信頼性も落ちてしまいますし、特にその分なにか利点があるわけでもありません。
[22] Gradle supports partial multiproject builds (see57章マルチプロジェクトのビルドMulti-project Builds). Gradleはマルチプロジェクトの部分ビルドをサポートしています(57章マルチプロジェクトのビルドMulti-project Builds参照)。
[23] http://books.sonatype.com/mvnref-book/reference/pom-relationships-sect-project-relationships.html
[24] At http://ant.apache.org/ivy/history/latest-milestone/concept.html you can learn more about ivy patterns. ivyパターンについてはhttp://ant.apache.org/ivy/history/latest-milestone/concept.htmlで詳細な情報を知ることができます。
[25] If you want to shield your project from the downtimes of Maven Central things get more complicated. You probably want to set-up a repository proxy for this. In an enterprise environment this is rather common. For an open source project it looks like overkill. Mavenセントラルのダウンからプロジェクトを防御したい場合は、もう少し複雑になります。 おそらく、そのためにリポジトリのプロキシをセットアップしたくなると思います。 エンタープライズ環境では珍しくないシチュエーションと言えますが、オープンソースプロジェクトの場合は、やりすぎのように思います。
This chapter describes the original publishing mechanism available in Gradle 1.0: in Gradle 1.3 a new mechanism for publishing was introduced. While this new mechanism is incubating and not yet complete, it introduces some new concepts and features that do (and will) make Gradle publishing even more powerful.
この章は、Gradle1.0の段階で使用されている既存の公開システムについて書かれています。Gradle1.3からは、公開処理に新しい仕組みが導入されました。 この仕組みは現在試験的な段階にあり、まだ完成していませんが、Gradleの公開処理をより強力にする新しい概念、機能がいくつか取り入れられる予定です。You can read about the new publishing plugins in Chapter 65, Ivy Publishing (new) and Chapter 66, Maven Publishing (new).
You can read about the new publishing plugins in Chapter 65, Ivy Publishing (new) and Chapter 66, Maven Publishing (new). Please try them out and give us feedback.
新しい公開プラグインについては、Chapter 65, Ivy Publishing (new)およびChapter 66, Maven Publishing (new)に詳しく記載されています。ぜひ試用してみてください。何かあればフィードバックしてもらえると幸いです。
This chapter is about how you declare the outgoing artifacts of your project, and how to work with them (e.g. upload them). We define the artifacts of the projects as the files the project provides to the outside world. This might be a library or a ZIP distribution or any other file. A project can publish as many artifacts as it wants.
この章では、プロジェクトが公開するアーティファクト(成果物)の定義方法と取り扱い(アップロードする方法など)について解説します。ここでいうプロジェクトのアーティファクトとは、外部の世界へ提供するファイルのことを指します。ライブラリやZIPの配布物かもしれませんし、なにか他のファイルかもしれません。一つのプロジェクトから、いくつでも好きなだけアーティファクトを公開することができます。
Like dependencies, artifacts are grouped by configurations. In fact, a configuration can contain both artifacts and dependencies at the same time.
依存関係と同じように、アーティファクトもコンフィギュレーションによってグループ化されます。実際、コンフィギュレーションにはアーティファクトと依存関係、両方を同時に含めることもできます。
For each configuration in your project, Gradle provides the tasks upload and
ConfigurationNamebuild.
[26]
Execution of these tasks will build or upload the artifacts belonging to the respective configuration.
ConfigurationName
Gradleは、プロジェクト内のすべてのコンフィギュレーションに対して、upload タスクとコンフィグレーション名build タスクを提供します。
[27]
これらのタスクを実行すると、対象のコンフィギュレーションに属しているアーティファクトをビルドしたり、アップロードしたりできます。
コンフィグレーション名
表23.5「Javaプラグイン - 依存関係のコンフィギュレーションJava plugin - dependency configurations」 shows the configurations added by the Java plugin. Two of the
configurations are relevant for the usage with artifacts. The archives configuration is the standard
configuration to assign your artifacts to. The Java plugin automatically assigns the default jar to this
configuration. We will talk more about the runtime configuration in 「プロジェクトライブラリについての追記事項More about project libraries」.
As with dependencies, you can declare as many custom configurations as you like and assign artifacts to them.
表23.5「Javaプラグイン - 依存関係のコンフィギュレーションJava plugin - dependency configurations」に、Javaプラグインが追加するコンフィギュレーションの一覧を載せています。これらのうち、アーティファクトを使うに当たって関係があるものは次の二つです。archivesコンフィギュレーションは、プロジェクトのアーティファクトを含めるための標準のコンフィギュレーションです。Javaプラグインは、デフォルトのjarを自動的にこのコンフィギュレーションに追加します。「プロジェクトライブラリについての追記事項More about project libraries」では、runtimeコンフィギュレーションについて詳しく解説します。また、アーティファクトを追加するための独自コンフィギュレーションも、依存関係のコンフィギュレーションと同じようにいくつでも宣言して追加できます。
You can use an archive task to define an artifact:
アーカイブタスクを使ってアーティファクトを宣言できます。
It is important to note that the custom archives you are creating as part of your build are not automatically assigned to any configuration. You have to explicitly do this assignment.
重要なことですが、独自のアーカイブ作成をビルドに組み込んでも、そのアーカイブが自動的になんらかのコンフィグレーションに割り当てられるわけではないことに注目してください。割り当ては、明示的に行う必要があります。
You can also use a file to define an artifact:
アーティファクトは、ファイルで宣言することもできます。
例52.2 アーティファクトをファイルで宣言する
build.gradle
def someFile = file('build/somefile.txt')
artifacts {
archives someFile
}Gradle will figure out the properties of the artifact based on the name of the file. You can customize these properties:
Gradleは、ファイル名を元にアーティファクトのプロパティを決定します。このプロパティは、以下のようにしてカスタマイズすることができます。
例52.3 アーティファクトのカスタマイズ
build.gradle
task myTask(type: MyTaskType) {
destFile = file('build/somefile.txt')
}
artifacts {
archives(myTask.destFile) {
name 'my-artifact'
type 'text'
builtBy myTask
}
}There is a map-based syntax for defining an artifact using a file. The map must include a file entry that
defines the file. The map may include other artifact properties:
ファイルでアーティファクトを宣言する際には、Mapスタイルの文法を使うこともできます。そのMapにはファイルを宣言するfileエントリを含めなければなりません。そのほか、アーティファクトの各プロパティを含めることができます。
例52.4 ファイルでアーティファクトを宣言するMapスタイルの文法
build.gradle
task generate(type: MyTaskType) {
destFile = file('build/somefile.txt')
}
artifacts {
archives file: generate.destFile, name: 'my-artifact', type: 'text', builtBy: generate
}We have said that there is a specific upload task for each configuration. But before you can do an upload, you have to configure the upload task and define where to publish the artifacts to. The repositories you have defined (as described in 「リポジトリ Repositories」) are not automatically used for uploading. In fact, some of those repositories only allow downloading artifacts, not uploading. Here is an example of how you can configure the upload task of a configuration:
先ほど、すべてのコンフィギュレーションにアップロード用のタスクが作成されることを説明しました。しかし、実際にアーティファクトをアップロードするには、どこに公開するかを設定する必要があります。プロジェクトに定義したリポジトリ(「リポジトリ Repositories」)が、勝手にアップロードに使用されることはありません。実際、それらのリポジトリには、ダウンロードしか許していないものもあるでしょう。次の例は、アップロードタスクの設定方法を示すものです。
例52.5 アップロードタスクの設定
build.gradle
repositories {
flatDir {
name "fileRepo"
dirs "repo"
}
}
uploadArchives {
repositories {
add project.repositories.fileRepo
ivy {
credentials {
username "username"
password "pw"
}
url "http://repo.mycompany.com"
}
}
}As you can see, you can either use a reference to an existing repository or create a new repository. As described in 「Ivyリゾルバについて More about Ivy resolvers」, you can use all the Ivy resolvers suitable for the purpose of uploading.
この例のように、定義済みのリポジトリを参照することもできますし、新しくリポジトリ定義を作って追加することもできます。「Ivyリゾルバについて More about Ivy resolvers」のときと同じように、アップロードでもすべてのIvyリポジトリリゾルバを使うことができます。
If an upload repository is defined with multiple patterns, Gradle must choose a pattern to use for uploading each file.
By default, Gradle will upload to the pattern defined by the url parameter, combined with the optional layout parameter.
If no url parameter is supplied, then Gradle will use the first defined artifactPattern for uploading,
or the first defined ivyPattern for uploading Ivy files, if this is set.
アップロード先のリポジトリ定義に複数のレイアウトパターンが含まれている場合、どのパターンに従ってファイルをアップロードするか決定しなければなりません。
デフォルトでは、Gradleはurlパラメーターを参照します。layoutが定義されていれば、それも併せて使用します。
urlパラメーターが未定義の場合は、定義されているartifactPatternのうち最初のものがアップロードに使用され、また、定義されているivyPatternのうち最初のものがivyファイルのアップロードに使用されます。
Uploading to a Maven repository is described in 「Mavenリポジトリとの相互作用Interacting with Maven repositories」.
Mavenリポジトリへのアップロードについては、「Mavenリポジトリとの相互作用Interacting with Maven repositories」をご参照ください。
If your project is supposed to be used as a library, you need to define what are the artifacts of this library
and what are the dependencies of these artifacts. The Java plugin adds a runtime configuration for
this purpose, with the implicit assumption that the runtime dependencies are the dependencies of
the artifact you want to publish. Of course this is fully customizable. You can add your own custom configuration or let the
existing configurations extend from other configurations. You might have a different group of artifacts which have
a different set of dependencies. This mechanism is very powerful and flexible.
プロジェクトがライブラリとして使用される場合、そのライブラリのアーティファクトは何か、アーティファクトが依存しているライブラリは何か、定義しておく必要があります。Javaプラグインは、この目的のためにruntimeというコンフィギュレーションを追加します。これは、公開したいアーティファクトはruntime依存関係に依存しているはずだ、という暗黙的な仮定の上での仕様ですが、もちろんこのあたりの設定は完全にカスタマイズ可能です。独自のコンフィギュレーションを作成してもいいし、既存のコンフィギュレーションの継承元を変えてもいいでしょう。別の依存関係をもつ別のアーティファクトを加えることもできます。このメカニズムは非常に強力で、柔軟性豊かなものです。
If someone wants to use your project as a library, she simply needs to declare which configuration of
the dependency to depend on.
A Gradle dependency offers the configuration property to declare this. If this
is not specified, the default configuration is used (see 「依存するコンフィギュレーションの指定 Dependency configurations」).
Using your project as a library
can either happen from within a multi-project build or by retrieving your project from a repository. In
the latter case, an ivy.xml descriptor in the repository is supposed to contain all the necessary information. If you
work with Maven repositories you don't have the flexibility as described above. For how to publish to a Maven
repository, see the section 「Mavenリポジトリとの相互作用Interacting with Maven repositories」.
誰かがあなたのプロジェクトをライブラリとして使いたいとしましょう。そのときすべきことは、あなたのプロジェクトの内、どのコンフィグレーションに依存するのか指定することだけです。Gradleの依存関係定義では、configurationというプロパティを指定できるようになっています。もしこのプロパティが指定されていなければ、defaultコンフィギュレーションが使用されます(「依存するコンフィギュレーションの指定 Dependency configurations」をご参照ください)。
あるプロジェクトがライブラリとして使われるのには、二つのケースがあります。マルチプロジェクトの中からライブラリとして参照される場合と、リポジトリからプロジェクトを取得する場合です。後者のケースでは、リポジトリにあるivy.xmlが必要な情報を全て含めることになっていますので、Mavenリポジトリを使う場合は先ほど述べたような柔軟性は持てません。Mavenリポジトリへライブラリを公開する方法については、「Mavenリポジトリとの相互作用Interacting with Maven repositories」をご覧ください。
This chapter is a work in progress
この章は執筆途中です。
The Maven plugin adds support for deploying artifacts to Maven repositories.
Mavenプラグインは、Mavenリポジトリへのアーティファクトのデプロイに対するサポートを追加します。
To use the Maven plugin, include the following in your build script:
Mavenプラグインを使うには、ビルドスクリプトに以下を含めます:
The Maven plugin defines the following tasks:
Mavenプラグインは以下のタスクを定義しています:
表53.1 Mavenプラグイン - タスクMaven plugin - tasks
| タスク名Task name | 依存先Depends on | 型Type | 説明Description |
install
|
関連するアーカイブをビルドするすべてのタスク All tasks that build the associated archives. | Upload |
Mavenメタデータの生成を含め、関連するアーティファクトをローカルMavenキャッシュにインストールする。
デフォルトではinstallタスクはarchivesコンフィグレーションに関連付けられる。
このコンフィグレーションのデフォルトでは要素としてJARのみを持つ。
ローカルリポジトリへのインストールに関して詳しく学ぶためには「ローカルリポジトリへのインストールInstalling to the local repository」を参照のこと。
Installs the associated artifacts to the local Maven cache, including Maven metadata generation.
By default the install task is associated with the archives configuration. This
configuration has by default only the default jar as an element. To learn more about installing to the
local repository, see: 「ローカルリポジトリへのインストールInstalling to the local repository」 |
The Maven plugin does not define any dependency configurations.
Mavenプラグインはいかなる依存関係のコンフィグレーションも定義していません。
The Maven plugin defines the following convention properties:
Mavenプラグインは以下の規約プロパティを定義しています:
表53.2 Mavenプラグイン - プロパティMaven plugin - properties
| プロパティ名 Property name | 型 Type | デフォルト値Default value | 説明Description |
pomDirName
|
String
|
poms
|
生成されたPOMを書き出すディレクトリのパス名をビルドディレクトリからの相対パスで指定 The path of the directory to write the generated POMs, relative to the build directory. |
pomDir
|
File (read-only)
|
|
生成されたPOMを書き出すディレクトリ The directory where the generated POMs are written to. |
conf2ScopeMappings
|
|
n/a
|
GradleコンフィグレーションからMavenスコープへのマッピング指示。「依存関係のマッピングDependency mapping」参照。 Instructions for mapping Gradle configurations to Maven scopes. See 「依存関係のマッピングDependency mapping」. |
These properties are provided by a MavenPluginConvention
convention object.
これらのプロパティは規約オブジェクトMavenPluginConventionが提供します。
The maven plugin provides a factory method for creating a POM. This is useful if you need a POM without the context of uploading to a Maven repo.
MavenプラグインはPOM生成のためのファクトリメソッドを提供します。 これはMavenリポジトリへのアップロードを必要としないPOMが必要なときに便利です。
例53.2 スタンドアロンPOMの生成
build.gradle
task writeNewPom << {
pom {
project {
inceptionYear '2008'
licenses {
license {
name 'The Apache Software License, Version 2.0'
url 'http://www.apache.org/licenses/LICENSE-2.0.txt'
distribution 'repo'
}
}
}
}.writeTo("$buildDir/newpom.xml")
}Amongst other things, Gradle supports the same builder syntax as polyglot Maven. To learn more about the Gradle Maven POM object, see
MavenPom. See also: MavenPluginConvention
そのほか、Gradleは多言語Mavenと同じビルダー文法をサポートします。
Gradle Maven POMオブジェクトについてもっと学ぶためには、
MavenPomを参照してください。また、MavenPluginConventionも有用です。
With Gradle you can deploy to remote Maven repositories or install to your local Maven repository. This includes all Maven metadata manipulation and works also for Maven snapshots. In fact, Gradle's deployment is 100 percent Maven compatible as we use the native Maven Ant tasks under the hood.
Gradleでは、リモートMavenリポジトリにデプロイすることも、ローカルMavenリポジトリにインストールすることもできます。 これにはすべてのMavenメタデータの操作が含まれ、Mavenスナップショットに対しても適用できます。 実際、Gradleのデプロイは、ネィティブのMaven Antタスクを内部で利用するのと同じく、100%Maven互換です。
Deploying to a Maven repository is only half the fun if you don't have a POM. Fortunately Gradle can generate this POM for you using the dependency information it has.
もしPOMがないとしたら、Mavenリポジトリへのデプロイは楽しさ半減です。 幸運なことに、GradleはPOM自身の持つ依存関係の情報を用いて、このPOMを生成してくれます
Let's assume your project produces just the default jar file. Now you want to deploy this jar file to a remote Maven repository.
プロジェクトが単にデフォルトのJARファイルを生成するだけだとしましょう。 このJARファイルをリモートMavenリポジトリにデプロイしたいとします。
例53.3 リモートMavenリポジトリへのファイルアップロード
build.gradle
apply plugin: 'maven' uploadArchives { repositories { mavenDeployer { repository(url: "file://localhost/tmp/myRepo/") } } }
That is all. Calling the
uploadArchives
task will generate the POM and deploys the artifact and the POM to the specified repository.
これが全てです。
uploadArchivesタスクを呼び出すことでPOMが生成され、
アーティファクトとPOMが指定されたリポジトリにデプロイされます。
There is more work to do if you need support for other protocols other than file. In
this case the native Maven code we delegate to needs additional libraries. Which libraries are needed depends on what
protocol you plan to use. The available protocols and the corresponding libraries are listed in 表53.3「Mavenデプロイに対するプロトコルJARProtocol jars for Maven deployment」 (those libraries have transitive dependencies which have transitive
dependencies).
[28]
For example, to use the ssh protocol you can do:
file以外のプロトコルをサポートする必要があるなら、他にも少しやるべきことがあります。
この場合、処理を委譲するネィティブMavenコードが追加のライブラリを必要とします。
どのライブラリが必要になるかは、必要なプロトコルによります。
利用可能なプロトコルと対応するライブラリは表53.3「Mavenデプロイに対するプロトコルJARProtocol jars for Maven deployment」にリストアップされています
(推移的な依存関係を持つこれらのライブラリは、さらに推移的な依存関係を持ちます)。
[29]
例えば、SSHプロトコルを使うには次のようにできます:
例53.4 SSH経由でのファイルアップロード
build.gradle
configurations {
deployerJars
}
repositories {
mavenCentral()
}
dependencies {
deployerJars "org.apache.maven.wagon:wagon-ssh:2.2"
}
uploadArchives {
repositories.mavenDeployer {
configuration = configurations.deployerJars
repository(url: "scp://repos.mycompany.com/releases") {
authentication(userName: "me", password: "myPassword")
}
}
}There are many configuration options for the Maven deployer. The configuration is done via a Groovy builder. All the elements of this tree are Java beans. To configure the simple attributes you pass a map to the bean elements. To add bean elements to its parent, you use a closure. In the example above repository and authentication are such bean elements. 表53.4「MavenDeployerのコンフィグレーション要素Configuration elements of the MavenDeployer」 lists the available bean elements and a link to the Javadoc of the corresponding class. In the Javadoc you can see the possible attributes you can set for a particular element.
Mavenデプロイヤーには多くのコンフィグレーションオプションがあります。 コンフィグレーションはGroovyビルダーで行うことができます。 このツリーのすべての要素はJava beansです。 単純な属性を設定するためには、beanの要素にmapを渡してやります。 親要素に別のbean要素を追加するには、クロージャを使います。 上記の例では、repositoryとauthenticationがbean要素です。 利用可能なbean要素と対応するクラスのJavaDocへのリンクは、表53.4「MavenDeployerのコンフィグレーション要素Configuration elements of the MavenDeployer」にリストアップされています。 JavaDocでは特定の要素にセットできる属性を確認できます。
In Maven you can define repositories and optionally snapshot repositories. If no snapshot repository
is defined, releases and snapshots are both deployed to the
repository
element. Otherwise snapshots are deployed to the
snapshotRepository
element.
Mavenではリポジトリに加えて、オプションでスナップショットリポジトリを定義できます。
スナップショットリポジトリが定義されていない場合、
リリースとスナップショットの両方がrepository要素で指定された先にデプロイされます。
そうでない場合は、スナップショットはsnapshotRepository要素で指定された先にデプロイされます。
表53.3 Mavenデプロイに対するプロトコルJARProtocol jars for Maven deployment
| プロトコルProtocol | ライブラリLibrary |
| http | org.apache.maven.wagon:wagon-http:2.2 |
| ssh | org.apache.maven.wagon:wagon-ssh:2.2 |
| ssh-external | org.apache.maven.wagon:wagon-ssh-external:2.2 |
| ftp | org.apache.maven.wagon:wagon-ftp:2.2 |
| webdav | org.apache.maven.wagon:wagon-webdav:1.0-beta-2 |
| file | - |
表53.4 MavenDeployerのコンフィグレーション要素Configuration elements of the MavenDeployer
| 要素Element | Javadoc |
| root |
MavenDeployer
|
| repository | org.apache.maven.artifact.ant.RemoteRepository |
| authentication | org.apache.maven.artifact.ant.Authentication |
| releases | org.apache.maven.artifact.ant.RepositoryPolicy |
| snapshots | org.apache.maven.artifact.ant.RepositoryPolicy |
| proxy | org.apache.maven.artifact.ant.Proxy |
| snapshotRepository | org.apache.maven.artifact.ant.RemoteRepository |
The Maven plugin adds an install task to your project. This task depends on all the archives
task of the archives configuration. It installs those archives to your local Maven repository.
If the default location for the local repository is redefined in a Maven settings.xml, this is
considered by this task.
Mavenプラグインはプロジェクトにinstallタスクを追加します。
このタスクはarchivesコンフィグレーションのすべてのarchivesタスクに依存します。
これらのアーカイブはローカルMavenリポジトリにインストールされます。
もし、ローカルリポジトリの場所がMavenのsettings.xmlで再定義されていたら、このタスクはそれを反映します。
When deploying an artifact to a Maven repository, Gradle automatically generates a POM for it. The
groupId, artifactId, version and packaging
elements used for the POM default to the values shown in the table below. The dependency
elements are created from the project's dependency declarations.
Mavenリポジトリにアーティファクトをデプロイする際、Gradleは自動的にデプロイ用のPOMを生成します。
POMにデフォルトで設定されるgroupId、artifactId、version、packaging要素の値は以下の表を参照してください。
dependency要素は、プロジェクトで宣言されている依存関係設定から作成されます。
表53.5 Maven POM生成のためのデフォルト値 Default Values for Maven POM generation
| Maven Element Maven要素 | Default Value デフォルト値 |
| groupId | project.group |
| artifactId | uploadTask.repositories.mavenDeployer.pom.artifactId (if set) or archiveTask.baseName. |
| version | project.version |
| packaging | archiveTask.extension |
Here, uploadTask and archiveTask refer to the tasks used for uploading and generating the archive,
respectively (for example uploadArchives and jar). archiveTask.baseName defaults
to project.archivesBaseName which in turn defaults to project.name.
ここで、uploadTaskとarchiveTaskは、それぞれ、実際にアーカイブをアップロードするタスクと生成するタスクのことを指しています(例えば、uploadArchivesとjar)。
archiveTask.baseNameのデフォルト値はproject.archivesBaseNameで、そのデフォルト値はproject.nameです。
When you set the “archiveTask.baseName” property to a value other than the default, you'll also have to set
uploadTask.repositories.mavenDeployer.pom.artifactId to the same value. Otherwise, the project at hand may
be referenced with the wrong artifact ID from generated POMs for other projects in the same build.
archiveTask.baseNameをデフォルト以外の値に設定したときは、uploadTask.repositories.mavenDeployer.pom.artifactIdを同じ値に設定することを忘れないでください。
さもないと、近いうちに、同じビルド内の他プロジェクトで生成されたPOMから、プロジェクトが誤ったartifact IDで参照されてしまうかもしれません。
Generated POMs can be found in <buildDir>/poms. They can be further customized via the
MavenPom API. For example, you might want the artifact deployed
to the Maven repository to have a different version or name than the artifact generated by Gradle. To customize these you can do:
生成されたPOMは、<buildDir>/pomsに出力されます。そのPOMは、さらにMavenPom APIでカスタマイズすることができます。
例えば、Mavenにデプロイするアーティファクトには、Gradleで生成するアーティファクトとは別のバージョンと名前を持たせたくなるかもしれません。このようなカスタマイズを行うには、以下のようにします。
例53.5 pomのカスタマイズ
build.gradle
uploadArchives {
repositories {
mavenDeployer {
repository(url: "file://localhost/tmp/myRepo/")
pom.version = '1.0Maven'
pom.artifactId = 'myMavenName'
}
}
}To add additional content to the POM, the pom.project builder can be used. With this builder,
any element listed in the Maven POM reference can be added.
POMに追加的な内容を加えるには、pom.projectビルダーを使います。
このビルダーを使えば、Maven POMリファレンスに載っている全ての要素を追加することができます。
例53.6 ビルダースタイルでpomをカスタマイズする
build.gradle
uploadArchives {
repositories {
mavenDeployer {
repository(url: "file://localhost/tmp/myRepo/")
pom.project {
licenses {
license {
name 'The Apache Software License, Version 2.0'
url 'http://www.apache.org/licenses/LICENSE-2.0.txt'
distribution 'repo'
}
}
}
}
}
}Note: groupId, artifactId, version, and packaging
should always be set directly on the pom object.
注意: groupId、artifactId、versionおよびpackagingは、常にpomオブジェクトに直接設定するべきです。
例53.7 自動生成された内容を変更する
build.gradle
def installer = install.repositories.mavenInstaller
def deployer = uploadArchives.repositories.mavenDeployer
[installer, deployer]*.pom*.whenConfigured {pom ->
pom.dependencies.find {dep -> dep.groupId == 'group3' && dep.artifactId == 'runtime' }.optional = true
}If you have more than one artifact to publish, things work a little bit differently. See 「複数アーティファクトを含むプロジェクトMultiple artifacts per project」.
2つ以上のアーティファクトを公開したい場合は、すこし難しくなります。「複数アーティファクトを含むプロジェクトMultiple artifacts per project」を参照してください。
To customize the settings for the Maven installer (see「ローカルリポジトリへのインストールInstalling to the local repository」), you can do:
Mavenインストーラー(「ローカルリポジトリへのインストールInstalling to the local repository」参照)の設定をカスタマイズするには、次のようにします。
例53.8 Mavenインストーラーのカスタマイズ
build.gradle
install {
repositories.mavenInstaller {
pom.version = '1.0Maven'
pom.artifactId = 'myName'
}
}Maven can only deal with one artifact per project. This is reflected in the structure of the
Maven POM. We think there are many situations where it makes sense to have more than one artifact per
project. In such a case you need to generate multiple POMs. In such a case you have to explicitly declare each artifact
you want to publish to a Maven repository. The MavenDeployer and the MavenInstaller
both provide an API for this:
Mavenはプロジェクトあたり1つのアーティファクトしか扱うことができません。
これはMavenのPOMの構造を反映しています。
我々は、プロジェクトが2つ以上のアーティファクトを含むことが合理的であるシチュエーションも多いと考えています。
この場合、複数のPOMを生成する必要があります。
このような状況では、Mavenリポジトリに発行するそれぞれのアーティファクトを明示的に宣言する必要があります。
MavenDeployerおよびMavenInstallerが、これに対するAPIを提供します:
例53.9 複数POMの生成
build.gradle
uploadArchives {
repositories {
mavenDeployer {
repository(url: "file://localhost/tmp/myRepo/")
addFilter('api') {artifact, file ->
artifact.name == 'api'
}
addFilter('service') {artifact, file ->
artifact.name == 'service'
}
pom('api').version = 'mySpecialMavenVersion'
}
}
}You need to declare a filter for each artifact you want to publish. This filter defines a boolean expression for
which Gradle artifact it accepts. Each filter has a POM associated with it which you can configure.
To learn more about this have a look at PomFilterContainer
and its associated classes.
発行するそれぞれのアーティファクトに対してfilterを宣言する必要があります。
filterではGradleアーティファクトが受け付ける論理式を定義します。
それぞれのfilterは関連付けられたPOMを持ち、コンフィグレーション可能です。
より詳しく学ぶためには、PomFilterContainerおよび関連クラスを参照してください。
The Maven plugin configures the default mapping between the Gradle configurations added by the
Java and War plugin and the Maven scopes. Most
of the time you don't need to touch this and you can safely skip this section. The mapping
works like the following. You can map a configuration to one and only one scope. Different
configurations can be mapped to one or different scopes. You can also assign a priority to a particular
configuration-to-scope mapping. Have a look at
Conf2ScopeMappingContainer
to learn more. To access the mapping configuration you can say:
Mavenプラグインは、JavaプラグインとWarプラグインによって追加されたGradleコンフィグレーションと
Mavenスコープとの間のデフォルトのマッピングを構成します。
ほとんどの場合これに触れる必要はなく、この節は読み飛ばしていただいてかまいません。
マッピングは次のように動作します。
コンフィグレーションはただ一つのスコープにのみマップできます。
異なるコンフィグレーションは一つ、もしくは異なるスコープにマップできます。
特定のコンフィグレーション-スコープマッピングに優先度を割り当てることもできます。
詳しくはConf2ScopeMappingContainerを参照してください。
マッピングコンフィグレーションにアクセスするには次のようにします:
Gradle exclude rules are converted to Maven excludes if possible. Such a conversion is possible if in the Gradle exclude rule the group as well as the module name is specified (as Maven needs both in contrast to Ivy). Per-configuration excludes are also included in the Maven POM, if they are convertible.
Gradleのexcludeルールは、可能であればMavenのexcludeに変換されます。 この変換は、Gradleのexcludeルールにおいてgroupとモジュール名の両方が指定されている場合に可能となります (Ivyとは対照的に、Mavenは両方を必要とするため)。 コンフィグレーション毎のexcludeも、変換可能であればMavenのPOMに含まれます。
The signing plugin adds the ability to digitally sign built files and artifacts. These digital signatures can then be used to prove who built the artifact the signature is attached to as well as other information such as when the signature was generated.
署名プラグインは、ビルドされたファイルやアーティファクトに電子署名を行う機能を追加します。 この電子署名は、いつその署名がされたのかなどの情報だけでなく、署名されたアーティファクトを誰がビルドしたのかを証明するのに使われます。
The signing plugin currently only provides support for generating PGP signatures (which is the signature format required for publication to the Maven Central Repository).
現在署名プラグインがサポートしているのは、PGP署名(Mavenセントラルリポジトリに公開するのに必要な署名形式)の生成のみです。
To use the Signing plugin, include the following in your build script:
署名プラグインを使うには、以下の行をビルドスクリプトに追加します。
In order to create PGP signatures, you will need a key pair (instructions on creating a key pair using the GnuPG tools can be found in the GnuPG HOWTOs). You need to provide the signing plugin with your key information, which means three things:
PGP署名を作成するには、キーペアが必要です(GnuPGツールを使用してキーペアを作成する手順については、GnuPGのHOWTO文書で見つけることができます)。 署名プラグインでは、このキー情報、つまり以下の三つの情報を設定することができます。
The public key ID (an 8 character hexadecimal string).
公開鍵ID(8文字の16進数文字列)
The absolute path to the secret key ring file containing your private key.
秘密鍵を保存したキーリングファイルの絶対パス
The passphrase used to protect your private key.
秘密鍵を保護するパスフレーズ
These items must be supplied as the values of properties signing.keyId,
signing.secretKeyRingFile, and signing.password respectively. Given the personal and private nature of these values, a good practice
is to store them in the user gradle.properties file (described in 「GradleプロパティとシステムプロパティGradle properties and system properties」).
これらの情報は、それぞれsigning.keyId、signing.secretKeyRingFile、signing.passwordというプロジェクトプロパティで設定する必要があります。
良いプラクティスは、ユーザーのgradle.propertiesファイル(「GradleプロパティとシステムプロパティGradle properties and system properties」で解説されています)にこれらを保存することです。
signing.keyId=24875D73 signing.password=secret signing.secretKeyRingFile=/Users/me/.gnupg/secring.gpg
If specifying this information in the user gradle.properties file is not feasible for your environment, you can source the information
however you need to and set the project properties manually.
これらの情報をgradle.propertiesファイルで設定するのが環境の問題で難しい場合は、手動でプロジェクトのプロパティに設定させることも可能です。
import org.gradle.plugins.signing.Sign
gradle.taskGraph.whenReady { taskGraph ->
if (taskGraph.allTasks.any { it instanceof Sign }) {
// Use Java 6's console to read from the console (no good for
// a CI environment)
Console console = System.console()
console.printf "\n\nWe have to sign some things in this build." +
"\n\nPlease enter your signing details.\n\n"
def id = console.readLine("PGP Key Id: ")
def file = console.readLine("PGP Secret Key Ring File (absolute path): ")
def password = console.readPassword("PGP Private Key Password: ")
allprojects { ext."signing.keyId" = id }
allprojects { ext."signing.secretKeyRingFile" = file }
allprojects { ext."signing.password" = password }
console.printf "\nThanks.\n\n"
}
}As well as configuring how things are to be signed (i.e. the signatory configuration), you must also specify what is to be signed. The Signing plugin provides a DSL that allows you to specify the tasks and/or configurations that should be signed.
どのように署名するか(つまり署名者情報の指定)だけでなく、何を署名するかというのも設定しなければなりません。 署名プラグインは、署名すべきタスクやコンフィギュレーションを指定するためのDSLを提供しています。
It is common to want to sign the artifacts of a configuration. For example, the Java plugin
configures a jar to build and this jar artifact is added to the archives configuration.
Using the Signing DSL, you can specify that all of the artifacts of this configuration should be signed.
あるコンフィグレーション内のアーティファクトに対して署名をしたいというのは良くあることです。例えば、Javaプラグインは、jarをビルドするよう定義し、そのjarをアーティファクトとしてarchivesコンフィグレーションに追加します。
署名DSLを使えば、このコンフィグレーションに含まれる全てのアーティファクトに署名するよう設定できるのです。
This will create a task (of type Sign) in your project named “signArchives”,
that will build any archives artifacts (if needed) and then generate signatures for them. The signature files will be placed
alongside the artifacts being signed.
これにより、「signArchives」という名前のタスク(Sign型)が追加されます。
このタスクは、archivesのアーティファクトを全て(必要なら)ビルドし、それからそれらのアーティファクト用に署名を作成します。署名ファイルは、署名されるアーティファクトと一緒に置かれます。
例54.3 コンフィグレーションの出力に署名する
gradle signArchives の出力
> gradle signArchives :compileJava :processResources :classes :jar :signArchives BUILD SUCCESSFUL Total time: 1 secs
In some cases the artifact that you need to sign may not be part of a configuration. In this case you can directly sign the task that produces the artifact to sign.
署名したいものが、コンフィギュレーションに含まれていないというケースもあります。このケースでは、署名するアーティファクトを作成するタスクに対して、直接署名することができます。
例54.4 タスクを署名する
build.gradle
task stuffZip (type: Zip) {
baseName = "stuff"
from "src/stuff"
}
signing {
sign stuffZip
}
This will create a task (of type Sign) in your project named “signStuffZip”,
that will build the input task's archive (if needed) and then sign it. The signature file will be placed
alongside the artifact being signed.
これにより、「signStuffZip」という名前のタスク(Sign型)がプロジェクトに追加されます。
このタスクは、入力物を(必要なら)ビルドしてアーカイブを作成し、それからそのアーカイブに署名します。署名ファイルは、署名されるアーティファクトと一緒に置かれます。
例54.5 タスクの出力に署名する
gradle signStuffZip の出力
> gradle signStuffZip :stuffZip :signStuffZip BUILD SUCCESSFUL Total time: 1 secs
For a task to be “signable”, it must produce an archive of some type. Tasks that do this are the Tar,
Zip, Jar,
War and Ear tasks.
「署名可能」なタスクは、何らかのアーカイブを作成するものに限られます。この種類のタスクには、TarやZip、Jar、War、Earがあります。
A common usage pattern is to only sign build artifacts under certain conditions. For example, you may not wish to sign artifacts for non release versions. To achieve this, you can specify that signing is only required under certain conditions.
よくあるビルドのパターンに、ある特定の条件下に限ってアーティファクトに署名する、というものがあります。例えば、リリースバージョン以外のアーティファクトには署名を付けたくないかもしれません。 これは、署名DSLを必要なロジックで囲めば実現できます。
例54.6 条件付き署名
build.gradle
version = '1.0-SNAPSHOT' ext.isReleaseVersion = !version.endsWith("SNAPSHOT") signing { required { isReleaseVersion && gradle.taskGraph.hasTask("uploadArchives") } sign configurations.archives }
In this example, we only want to require signing if we are building a release version and we are going to publish it. Because we are inspecting the task
graph to determine if we are going to be publishing, we must set the signing.required property to a closure to defer the evaluation. See
SigningExtension.setRequired() for more information.
When specifying what is to be signed via the Signing DSL, the resultant signature artifacts are automatically added to the signatures and
archives dependency configurations. This means that if you want to upload your signatures to your distribution repository along
with the artifacts you simply execute the uploadArchives task as normal.
署名DSLで署名対象を指定すると、生成された署名は自動的にsignaturesコンフィギュレーションとarchivesコンフィギュレーションに追加されます。
つまり、署名をアーティファクトと一緒に配布用リポジトリに公開したい場合は、通常通りただuploadArchivesタスクを実行すればいいということです。
When deploying signatures for your artifacts to a Maven repository, you will also want to sign the published POM file. The signing plugin adds a
signing.signPom() (see: SigningExtension.signPom()) method that can be used in the
beforeDeployment() block in your upload task configuration.
例54.7 Signing a POM for deployment
build.gradle
uploadArchives {
repositories {
mavenDeployer {
beforeDeployment { MavenDeployment deployment -> signing.signPom(deployment) }
}
}
}
When signing is not required and the POM cannot be signed due to insufficient configuration (i.e. no credentials for signing) then the
signPom() method will silently do nothing.
The Gradle support for building native binaries is currently incubating. Please be aware that the DSL and other configuration may change in later Gradle versions.
The various native binary plugins add support for building native software components, such as executables or shared libraries, from code written in C++, C and other languages. While many excellent build tools exist for this space of software development, Gradle offers developers its trademark power and flexibility together with dependency management practices more traditionally found in the JVM development space.
The following source languages are currently supported:
C
C++
Objective-C
Objective-C++
Assembly
Windows resources
Gradle offers the ability to execute the same build using different tool chains. When you build a native binary, Gradle will attempt to locate a tool chain installed on your machine that can build the binary. You can fine tune exactly how this works, see Section 55.14, “Tool chains” for details.
The following tool chains are supported:
| Operating System | Tool Chain | Notes |
| Linux | GCC | |
| Linux | Clang | |
| Mac OS X | XCode | Uses the Clang tool chain bundled with XCode. |
| Windows | Visual C++ | Windows XP and later, Visual C++ 2010 and later. |
| Windows | GCC with Cywin 32 | Windows XP and later. |
| Windows | GCC with MinGW | Windows XP and later. Mingw-w64 is currently not supported. |
The following tool chains are unofficially supported. They generally work fine, but are not tested continuously:
Note that if you are using GCC then you currently need to install support for C++, even if you are not building from C++ source. This caveat will be removed in a future Gradle version.
To build native binaries, you will need to have a compatible tool chain installed:
To build on Windows, install a compatible version of Visual Studio. The native plugins will discover the Visual Studio installations and select the latest version. There is no need to mess around with environment variables or batch scripts. This works fine from a Cygwin shell or the Windows command-line.
Alternatively, you can install Cygwin with GCC or MinGW. Clang is currently not supported.
To build on OS X, you should install XCode. The native plugins will discover the XCode installation using the system PATH.
The native plugins also work with GCC and Clang bundled with Macports. To use one of the Macports tool chains,
you will need to make the tool chain the default using the port select command and add Macports to the system PATH.
To build native binaries using Gradle, your project should define one or more native components. Each component represents either an executable or a library that Gradle should build. A project can define any number of components. Gradle does not define any components by default.
For each component, Gradle defines a source set for each language that the component can be built from. A source set is essentially
just a set of source directories containing source files. For example, when you apply the c plugin and define a library called
helloworld, Gradle will define, by default, a source set containing the C source files in the src/helloworld/c directory.
It will use these source files to build the helloworld library.
This is described in more detail below.
For each component, Gradle defines one or more binaries as output. To build a binary, Gradle will take the source files defined for
the component, compile them as appropriate for the source language, and link the result into a binary file. For an executable component, Gradle can
produce executable binary files. For a library component, Gradle can produce both static and shared library binary files. For example, when you define
a library called helloworld and build on Linux, Gradle will, by default, produce libhelloworld.so and
libhelloworld.a binaries.
In many cases, more than one binary can be produced for a component. These binaries may vary based on the tool chain used to build, the compiler/linker flags supplied, the dependencies provided, or additional source files provided. Each native binary produced for a component is referred to as variant. Binary variants are discussed in detail below.
To build either a static or shared native library, you define a library component in the libraries container. The following sample
defines a library called hello:
A library component is represented using NativeLibrarySpec.
Each library component can produce at least one shared library binary (SharedLibraryBinarySpec)
and at least one static library binary (StaticLibraryBinarySpec).
To build a native executable, you define an executable component in the executables container. The following sample defines
an executable called main:
An executable component is represented using NativeExecutableSpec. Each executable component can
produce at least one executable binary (NativeExecutableBinarySpec).
For each component defined, Gradle adds a FunctionalSourceSet with the same name.
Each of these functional source sets will contain a language-specific source set for each of the languages supported by the project.
For each NativeBinarySpec that can be produced by a build,
a single lifecycle task is constructed that can be used to create that binary, together with a set of other tasks that do the actual
work of compiling, linking or assembling the binary.
| Component Type | Native Binary Type | Lifecycle task | Location of created binary |
NativeExecutableSpec |
NativeExecutableBinarySpec |
|
|
NativeLibrarySpec |
SharedLibraryBinarySpec |
|
|
NativeLibrarySpec |
StaticLibraryBinarySpec |
|
|
For each executable binary produced, the cpp plugin provides an install${binary.name} task,
which creates a development install of the executable, along with the shared libraries it requires.
This allows you to run the executable without needing to install the shared libraries in their final locations.
Gradle provides a report that you can run from the command-line that shows some details about the components and binaries that your
project produces. To use this report, just run gradle components. Below is an example of running this report for
one of the sample projects:
Example 55.3. The components report
gradle components の出力
> gradle components
:components
------------------------------------------------------------
Root project
------------------------------------------------------------
Native library 'hello'
----------------------
Source sets
C++ source 'hello:cpp'
src/hello/cpp
Binaries
Shared library 'hello:sharedLibrary'
build using task: :helloSharedLibrary
platform: current
build type: debug
flavor: default
tool chain: Tool chain 'clang' (Clang)
shared library file: build/binaries/helloSharedLibrary/libhello.dylib
Static library 'hello:staticLibrary'
build using task: :helloStaticLibrary
platform: current
build type: debug
flavor: default
tool chain: Tool chain 'clang' (Clang)
static library file: build/binaries/helloStaticLibrary/libhello.a
Native executable 'main'
------------------------
Source sets
C++ source 'main:cpp'
src/main/cpp
Binaries
Executable 'main:executable'
build using task: :mainExecutable
platform: current
build type: debug
flavor: default
tool chain: Tool chain 'clang' (Clang)
executable file: build/binaries/mainExecutable/main
Note: currently not all plugins register their components, so some components may not be visible here.
BUILD SUCCESSFUL
Total time: 1 secs
Presently, Gradle supports building native binaries from any combination of source languages listed below.
A native binary project will contain one or more named FunctionalSourceSet instances (eg 'main', 'test', etc),
each of which can contain LanguageSourceSets containing source files, one for each language.
C
C++
Objective-C
Objective-C++
Assembly
Windows resources
C++ language support is provided by means of the 'cpp' plugin.
C++ sources to be included in a native binary are provided via a CppSourceSet,
which defines a set of C++ source files and optionally a set of exported header files (for a library).
By default, for any named component the CppSourceSet contains
.cpp source files in src/${name}/cpp,
and header files in src/${name}/headers.
While the cpp plugin defines these default locations for each CppSourceSet,
it is possible to extend or override these defaults to allow for a different project layout.
Example 55.5. C++ source set
build.gradle
sources {
main {
cpp {
source {
srcDir "src/source"
include "**/*.cpp"
}
}
}
}
For a library named 'main', header files in src/main/headers are considered the “public” or “exported” headers.
Header files that should not be exported should be placed inside the src/main/cpp directory (though be aware that
such header files should always be referenced in a manner relative to the file including them).
C language support is provided by means of the 'c' plugin.
C sources to be included in a native binary are provided via a CSourceSet,
which defines a set of C source files and optionally a set of exported header files (for a library).
By default, for any named component the CSourceSet contains
.c source files in src/${name}/c,
and header files in src/${name}/headers.
While the c plugin defines these default locations for each CSourceSet,
it is possible to extend or override these defaults to allow for a different project layout.
Example 55.7. C source set
build.gradle
sources {
hello {
c {
source {
srcDir "src/source"
include "**/*.c"
}
exportedHeaders {
srcDir "src/include"
}
}
}
}
For a library named 'main', header files in src/main/headers are considered the “public” or “exported” headers.
Header files that should not be exported should be placed inside the src/main/c directory (though be aware that
such header files should always be referenced in a manner relative to the file including them).
Assembly language support is provided by means of the 'assembler' plugin.
Assembler sources to be included in a native binary are provided via a AssemblerSourceSet,
which defines a set of Assembler source files.
By default, for any named component the AssemblerSourceSet contains
.s source files under src/${name}/asm.
Objective-C language support is provided by means of the 'objective-c' plugin.
Objective-C sources to be included in a native binary are provided via a ObjectiveCSourceSet,
which defines a set of Objective-C source files.
By default, for any named component the ObjectiveCSourceSet contains
.m source files under src/${name}/objectiveC.
Objective-C++ language support is provided by means of the 'objective-cpp' plugin.
Objective-C++ sources to be included in a native binary are provided via a ObjectiveCppSourceSet,
which defines a set of Objective-C++ source files.
By default, for any named component the ObjectiveCppSourceSet contains
.mm source files under src/${name}/objectiveCpp.
Each binary to be produced is associated with a set of compiler and linker settings, which include command-line arguments as well as macro definitions. These settings can be applied to all binaries, an individual binary, or selectively to a group of binaries based on some criteria.
Example 55.11. Settings that apply to all binaries
build.gradle
binaries.all {
// Define a preprocessor macro for every binary
cppCompiler.define "NDEBUG"
// Define toolchain-specific compiler and linker options
if (toolChain in Gcc) {
cppCompiler.args "-O2", "-fno-access-control"
linker.args "-Xlinker", "-S"
}
if (toolChain in VisualCpp) {
cppCompiler.args "/Zi"
linker.args "/DEBUG"
}
}
Each binary is associated with a particular NativeToolChain, allowing settings to be targeted based on
this value.
It is easy to apply settings to all binaries of a particular type:
Example 55.12. Settings that apply to all shared libraries
build.gradle
// For any shared library binaries built with Visual C++, // define the DLL_EXPORT macro binaries.withType(SharedLibraryBinarySpec) { if (toolChain in VisualCpp) { cCompiler.args "/Zi" cCompiler.define "DLL_EXPORT" } }
Furthermore, it is possible to specify settings that apply to all binaries produced for a particular executable
or library component:
Example 55.13. Settings that apply to all binaries produced for the 'main' executable component
build.gradle
executables {
main {
binaries.all {
if (toolChain in VisualCpp) {
assembler.args "/Zi"
} else {
assembler.args "-g"
}
}
}
}
sources {
i386_masm {
asm(AssemblerSourceSet) {
source.srcDir "src/main/asm_i386_masm"
}
}
i386_gcc {
asm(AssemblerSourceSet) {
source.srcDir "src/main/asm_i386_gcc"
}
}
}
The example above will apply the supplied configuration to all executable binaries built.
Similarly, settings can be specified to target binaries for a component that are of a particular type: eg all shared libraries for the main library component.
Example 55.14. Settings that apply only to shared libraries produced for the 'main' library component
build.gradle
libraries {
main {
binaries.withType(SharedLibraryBinarySpec) {
// Define a preprocessor macro that only applies to shared libraries
cppCompiler.define "DLL_EXPORT"
}
}
}
When using the VisualCpp tool chain, Gradle is able to compile Window Resource (rc)
files and link them into a native binary. This functionality is provided by the 'windows-resources' plugin.
Windows resources to be included in a native binary are provided via a WindowsResourceSet,
which defines a set of Windows Resource source files.
By default, for any named component the WindowsResourceSet contains
.rc source files under src/${name}/rc.
As with other source types, you can configure the location of the windows resources that should be included in the binary.
Example 55.16. Configuring the location of Windows resource sources
build-resource-only-dll.gradle
sources {
helloRes {
rc {
source {
srcDirs "src/hello/rc"
}
exportedHeaders {
srcDirs "src/hello/headers"
}
}
}
}You are able to construct a resource-only library by providing Windows Resource sources with no other language sources, and configure the linker as appropriate:
Example 55.17. Building a resource-only dll
build-resource-only-dll.gradle
libraries {
helloRes {
binaries.all {
rcCompiler.args "/v"
linker.args "/noentry", "/machine:x86"
}
}
}
The example above also demonstrates the mechanism of passing extra command-line arguments to the resource compiler.
The rcCompiler extension is of type PreprocessingTool.
Dependencies for native components are binary libraries that export header files. The header files are used during compilation, with the compiled binary dependency being used during linking and execution.
A set of sources may depend on header files provided by another binary component within the same project. A common example is a native executable component that uses functions provided by a separate native library component.
Such a library dependency can be added to a source set associated with the executable component:
Example 55.18. Providing a library dependency to the source set
build.gradle
sources {
main {
cpp {
lib libraries.hello
}
}
}
Alternatively, a library dependency can be provided directly to the NativeExecutableBinary for the executable.
Example 55.19. Providing a library dependency to the binary
build.gradle
executables {
main {
binaries.all {
// Each executable binary produced uses the 'hello' static library binary
lib libraries.hello.static
}
}
}For a component produced in a different Gradle project, the notation is similar.
Example 55.20. Declaring project dependencies
build.gradle
project(":lib") { apply plugin: "cpp" libraries { main {} } // For any shared library binaries built with Visual C++, // define the DLL_EXPORT macro binaries.withType(SharedLibraryBinarySpec) { if (toolChain in VisualCpp) { cppCompiler.define "DLL_EXPORT" } } } project(":exe") { apply plugin: "cpp" executables { main {} } sources { main { cpp { lib project: ':lib', library: 'main' } } } }
For each executable or library defined, Gradle is able to build a number of different native binary variants. Examples of different variants include debug vs release binaries, 32-bit vs 64-bit binaries, and binaries produced with different custom preprocessor flags.
Binaries produced by Gradle can be differentiated on build type, platform, and flavor. For each of these 'variant dimensions', it is possible to specify a set of available values as well as target each component at one, some or all of these. For example, a plugin may define a range of support platforms, but you may choose to only target Windows-x86 for a particular component.
A build type determines various non-functional aspects of a binary, such as whether debug information is included,
or what optimisation level the binary is compiled with. Typical build types are 'debug' and 'release', but a project
is free to define any set of build types.
If no build types are defined in a project, then a single, default build type called 'debug' is added.
For a build type, a Gradle project will typically define a set of compiler/linker flags per tool chain.
Example 55.22. Configuring debug binaries
build.gradle
binaries.all {
if (toolChain in Gcc && buildType == buildTypes.debug) {
cppCompiler.args "-g"
}
if (toolChain in VisualCpp && buildType == buildTypes.debug) {
cppCompiler.args '/Zi'
cppCompiler.define 'DEBUG'
linker.args '/DEBUG'
}
}
An executable or library can be built to run on different operating systems and cpu architectures, with a variant being
produced for each platform. Gradle defines each OS/architecture combination as a NativePlatform,
and a project may define any number of platforms.
If no platforms are defined in a project, then a single, default platform 'current' is added.
Platform consists of a defined operating system and architecture. As we continue to develop the
native binary support in Gradle, the concept of Platform will be extended to include things like C-runtime version, Windows SDK, ABI, etc.
Sophisticated builds may use the extensibility of Gradle to apply additional attributes to each platform, which can then be queried to
specify particular includes, preprocessor macros or compiler arguments for a native binary.
Example 55.23. Defining platforms
build.gradle
model {
platforms {
x86 {
architecture "x86"
}
x64 {
architecture "x86_64"
}
itanium {
architecture "ia-64"
}
}
}
For a given variant, Gradle will attempt to find a NativeToolChain that is able to build
for the target platform. Available tool chains are searched in the order defined.
See the tool chains section below for more details.
Each component can have a set of named flavors, and a separate binary variant can be produced for each flavor.
While the build type and target platform variant dimensions have a defined meaning in Gradle,
each project is free to define any number of flavors and apply meaning to them in any way.
An example of component flavors might differentiate between 'demo', 'paid' and 'enterprise' editions of the component, where the same set of sources is used to produce binaries with different functions.
Example 55.24. Defining flavors
build.gradle
model {
flavors {
english
french
}
}
libraries {
hello {
binaries.all {
if (flavor == flavors.french) {
cppCompiler.define "FRENCH"
}
}
}
}In the example above, a library is defined with a 'english' and 'french' flavor. When compiling the 'french' variant, a separate macro is defined which leads to a different binary being produced.
If no flavor is defined for a component, then a single default flavor named 'default' is used.
For a default component, Gradle will attempt to create a native binary variant for each and every combination of buildType,
platform and flavor defined for the project. It is possible to override this on a per-component
basis, by specifying the set of targetBuildTypes, targetPlatforms and/or targetFlavors.
Example 55.25. Targeting a component at particular platforms
build.gradle
executables {
main {
targetPlatforms "x86", "x64"
}
}
Here you can see that the TargetedNativeComponent.targetPlatforms() method is used to
select the set of platforms to target for executables.main.
A similar mechanism exists for selecting TargetedNativeComponent.targetBuildTypes()
and TargetedNativeComponent.targetFlavors().
When a set of build types, target platforms, and flavors is defined for a component,
a NativeBinarySpec model element is created for every possible
combination of these. However, in many cases it is not possible to build a particular variant, perhaps because
no tool chain is available to build for a particular platform.
If a binary variant cannot be built for any reason, then the NativeBinarySpec
associated with that variant will not be buildable. It is possible to use this property to create a task
to generate all possible variants on a particular machine.
Example 55.26. Building all possible variants
build.gradle
task buildAllExecutables {
dependsOn binaries.withType(NativeExecutableBinary).matching {
it.buildable
}
}A single build may utilize different tool chains to build variants for different platforms. To this end, the core 'native-binary' plugins will attempt to locate and make available supported tool chains. However, the set of tool chains for a project may also be explicitly defined, allowing additional cross-compilers to be configured as well as allowing the install directories to be specified.
The supported tool chain types are:
Example 55.27. Defining tool chains
build.gradle
model {
toolChains {
visualCpp(VisualCpp) {
// Specify the installDir if Visual Studio cannot be located
// installDir "C:/Apps/Microsoft Visual Studio 10.0"
}
gcc(Gcc) {
// Uncomment to use a GCC install that is not in the PATH
// path "/usr/bin/gcc"
}
clang(Clang)
}
}Each tool chain implementation allows for a certain degree of configuration (see the API documentation for more details).
It is not necessary or possible to specify the tool chain that should be used to build.
For a given variant, Gradle will attempt to locate a NativeToolChain that is able to build
for the target platform. Available tool chains are searched in the order defined.
operatingSystem,
Gradle will find the first available tool chain that can build for the specified architecture.
The core Gradle tool chains are able to target the following architectures out of the box. In each case, the tool chain will target the current operating system. See the next section for information on cross-compiling for other operating systems.
| Tool Chain | Architectures |
| GCC | x86, x86_64 |
| Clang | x86, x86_64 |
| Visual C++ | x86, x86_64, ia-64 |
So for GCC running on linux, the supported target platforms are 'linux/x86' and 'linux/x86_64'. For GCC running on Windows via Cygwin, platforms 'windows/x86' and 'windows/x86_64' are supported. (The Cygwin POSIX runtime is not yet modelled as part of the platform, but will be in the future.)
If no target platforms are defined for a project, then all binaries are built to target a default platform named 'current'.
This default platform does not specify any architecture or operatingSystem value,
hence using the default values of the first available tool chain.
Gradle provides a hook that allows the build author to control the exact set of arguments passed to a tool chain executable. This enables the build author to work around any limitations in Gradle, or assumptions that Gradle makes. The arguments hook should be seen as a 'last-resort' mechanism, with preference given to truly modelling the underlying domain.
Example 55.28. Reconfigure tool arguments
build.gradle
model {
toolChains {
visualCpp(VisualCpp) {
eachPlatform {
cppCompiler.withArguments { args ->
args << "-DFRENCH"
}
}
}
clang(Clang) {
eachPlatform {
cCompiler.withArguments { args ->
Collections.replaceAll(args, "CUSTOM", "-DFRENCH")
}
linker.withArguments { args ->
args.remove "CUSTOM"
}
staticLibArchiver.withArguments { args ->
args.remove "CUSTOM"
}
}
}
}
}
Cross-compiling is possible with the Gcc and Clang tool chains,
by adding support for additional target platforms.
This is done by specifying a target platform for a toolchain. For each target platform a custom configuration can be specified.
Example 55.29. Defining target platforms
build.gradle
model {
toolChains {
gcc(Gcc) {
target("arm"){
cppCompiler.withArguments { args ->
args << "-m32"
}
linker.withArguments { args ->
args << "-m32"
}
}
target("sparc")
}
}
platforms {
arm {
architecture "arm"
}
sparc {
architecture "sparc"
}
}
}
Gradle has the ability to generate Visual Studio project and solution files for the native components defined in your build.
This ability is added by the visual-studio plugin. For a multi-project build, all projects with native components
should have this plugin applied.
When the visual-studio plugin is applied, a task name ${component.name}VisualStudio is created
for each defined component. This task will generate a Visual Studio Solution file for the named component. This solution will include
a Visual Studio Project for that component, as well as linking to project files for each depended-on binary.
The content of the generated visual studio files can be modified via API hooks, provided by the visualStudio
extension. Take a look at the 'visual-studio' sample, or see VisualStudioExtension.getProjects()
and VisualStudioExtension.getSolutions() in the API documentation for more details.
The Gradle cunit plugin provides support for compiling and executing CUnit tests in your native-binary project.
For each NativeExecutableSpec and NativeLibrarySpec
defined in your project, Gradle will create a matching CUnitTestSuiteSpec component,
named ${component.name}Test.
Gradle will create a CSourceSet named 'cunit' for each CUnitTestSuiteSpec component
in the project. This source set should contain the cunit test files for the component sources. Source files can be located in the conventional location
(src/${component.name}Test/cunit) or can be configured like any other source set.
Gradle initialises the CUnit test registry and executes the tests, utilising some generated CUnit launcher sources.
Gradle will expect and call a function with the signature void gradle_cunit_register() that you can use to configure the
actual CUnit suites and tests to execute.
Example 55.30. Registering CUnit tests
suite_operators.c
#include <CUnit/Basic.h>
#include "gradle_cunit_register.h"
#include "test_operators.h"
int suite_init(void) {
return 0;
}
int suite_clean(void) {
return 0;
}
void gradle_cunit_register() {
CU_pSuite pSuiteMath = CU_add_suite("operator tests", suite_init, suite_clean);
CU_add_test(pSuiteMath, "test_plus", test_plus);
CU_add_test(pSuiteMath, "test_minus", test_minus);
}main method since this will clash with the method provided by Gradle.
A CUnitTestSuiteSpec component has an associated
NativeExecutableSpec or NativeLibrarySpec component.
For each NativeBinarySpec configured for the main component, a matching
CUnitTestSuiteBinarySpec will be configured on the test suite component.
These test suite binaries can be configured in a similar way to any other binary instance:
Example 55.31. Registering CUnit tests
build.gradle
binaries.withType(CUnitTestSuiteBinarySpec) {
lib library: "cunit", linkage: "static"
if (flavor == flavors.failing) {
cCompiler.define "PLUS_BROKEN"
}
}CUnitTestSuiteBinarySpec.
For each CUnitTestSuiteBinarySpec, Gradle will create a task to execute this binary,
which will run all of the registered CUnit tests.
Test results will be found in the ${build.dir}/test-results
Example 55.32. Running CUnit tests
build.gradle
apply plugin: "c" apply plugin: "cunit" model { flavors { passing failing } repositories { libs(PrebuiltLibraries) { cunit { headers.srcDir "lib/cunit/2.1-2/include" binaries.withType(StaticLibraryBinary) { staticLibraryFile = file("lib/cunit/2.1-2/lib/" + findCUnitLibForPlatform(targetPlatform)) } } } } } libraries { operators {} } binaries.withType(CUnitTestSuiteBinarySpec) { lib library: "cunit", linkage: "static" if (flavor == flavors.failing) { cCompiler.define "PLUS_BROKEN" } }
ノート: 本例のソースコードは、Gradleのバイナリ配布物またはソース配布物に含まれています。以下の場所をご参照ください。samples/native-binaries/cunit
gradle -q runFailingOperatorsTestCUnitExe の出力
> gradle -q runFailingOperatorsTestCUnitExe There were test failures: 1. /home/user/gradle/samples/native-binaries/cunit/src/operatorsTest/c/test_plus.c:6 - plus(0, -2) == -2 2. /home/user/gradle/samples/native-binaries/cunit/src/operatorsTest/c/test_plus.c:7 - plus(2, 2) == 4
The current support for CUnit is quite rudimentary. Plans for future integration include:
Allow tests to be declared with Javadoc-style annotations.
Improved HTML reporting, similar to that available for JUnit.
Real-time feedback for test execution.
Support for additional test frameworks.
We said earlier, that the core of Gradle is a language for dependency based programming. In Gradle terms this means that you can define tasks and dependencies between tasks. Gradle guarantees that these tasks are executed in the order of their dependencies, and that each task is executed only once. These tasks form a Directed Acyclic Graph. There are build tools that build up such a dependency graph as they execute their tasks. Gradle builds the complete dependency graph before any task is executed. This lies at the heart of Gradle and makes many things possible which would not be possible otherwise.
前述の通り、Gradleというのは言ってしまえば依存性を記述する言語です。Gradleの用語でいえば、タスクとタスク間の依存関係を定義できる言語だということです。Gradleは、定義したタスクが定義した依存性に従って順に、またそれぞれ一回のみ実行されることを保証します。Gradleのタスクは、お互いの依存性により無閉路有向グラフ(DAG)を構築するのです。タスクを実行するときにこのようなタスクグラフを組み立てるビルドツールもありますが、Gradleではまずタスクグラフを完全に構築してからタスクを実行していきます。このことはGradleのもっとも重要な概念であり、このメカニズムによりたくさんのことを可能にしているのです。
Your build scripts configure this dependency graph. Therefore they are strictly speaking build configuration scripts.
ビルドスクリプトは、このタスクグラフを定義します。したがって、ビルドスクリプトとは、厳密にはビルド設定スクリプトだと言えるでしょう。
A Gradle build has three distinct phases.
Gradleには、独立した三つのビルドフェーズがあります。
- 初期化Initialization
Gradle supports single and multi-project builds. During the initialization phase, Gradle determines which projects are going to take part in the build, and creates a
Projectinstance for each of these projects.Gradleはシングルプロジェクト、マルチプロジェクトの双方をサポートします。初期化フェーズでは、どのプロジェクトがビルドに参加しているのか決定し、
Projectインスタンスを生成します。- 設定Configuration
During this phase the project objects are configured. The build scripts of all projects which are part of the build are executed. Gradle 1.4 introduced an incubating opt-in feature called configuration on demand. In this mode, Gradle configures only relevant projects (see 「Configuration on demand」).
プロジェクトのオブジェクトが設定されるフェーズです。ビルドに含まれるすべてのプロジェクトのビルドスクリプトが実行されます。 Gradle1.4で、「オンデマンド設定」という機能が試験的に導入されました。 オンデマンド設定モードでは、Gradleは全てのプロジェクトではなく、実行時に必要なプロジェクトのみ設定します。
- 実行Execution
Gradle determines the subset of the tasks, created and configured during the configuration phase, to be executed. The subset is determined by the task name arguments passed to the gradle command and the current directory. Gradle then executes each of the selected tasks.
設定フェーズで初期化と設定が完了したタスクのうち、実行するべきタスクを抽出して実行します。実行するタスクは、gradleコマンドに引き渡されたタスク名と、コマンドの実行ディレクトリから決定されます。
Beside the build script files, Gradle defines a settings file. The settings file is determined by Gradle
via a naming convention. The default name for this file is settings.gradle. Later in
this chapter we explain how Gradle looks for a settings file.
ビルドスクリプトの他、Gradleではビルドの「設定ファイル」を作成することができます。設定ファイルの場所はGradleの規約により決定され、デフォルトではプロジェクトディレクトリのsettings.gradleです。この設定ファイルをGradleがどのように探すのかについては、後ほど解説します。
The settings file is executed during the initialization phase. A multiproject build must have a
settings.gradle
file in the root project of the multiproject hierarchy. It is required because the
settings file defines which projects are taking part in the multi-project build (see
57章マルチプロジェクトのビルドMulti-project Builds). For a single-project build, a settings file is optional.
Besides defining the included projects, you might need it to add libraries to your build script classpath (see 60章ビルドロジックの体系化Organizing Build Logic). Let's first do some introspection with a single project
build:
設定ファイルは、初期化フェーズで使用されます。マルチプロジェクトの場合、settings.gradleファイルは必須です。ルートとなるプロジェクトに必ず配置しなければなりません。この設定ファイルにより、どのプロジェクトがビルドに参加するか決定するからです(57章マルチプロジェクトのビルドMulti-project Builds参照)。シングルプロジェクトの場合は設定ファイルはなくてもかまいません。ビルドスクリプトのクラスパスにライブラリを追加するときなどはこの設定ファイルを使うこともあるでしょう(60章ビルドロジックの体系化Organizing Build Logic参照)。設定ファイルの読み込み、フェーズ実行の内部動作を、シングルプロジェクトの例を使って見てみます。
例56.1 シングルプロジェクトのビルド
settings.gradle
println 'This is executed during the initialization phase.'build.gradle
println 'This is executed during the configuration phase.' task configured { println 'This is also executed during the configuration phase.' } task test << { println 'This is executed during the execution phase.' } task testBoth { doFirst { println 'This is executed first during the execution phase.' } doLast { println 'This is executed last during the execution phase.' } println 'This is executed during the configuration phase as well.' }
gradle test testBoth の出力
> gradle test testBoth This is executed during the initialization phase. This is executed during the configuration phase. This is also executed during the configuration phase. This is executed during the configuration phase as well. :test This is executed during the execution phase. :testBoth This is executed first during the execution phase. This is executed last during the execution phase. BUILD SUCCESSFUL Total time: 1 secs
For a build script, the property access and method calls are delegated to a project object. Similarly
property access and method calls within the settings file is delegated to a settings object. Look at
Settings class in the API documentation for more information.
ビルドスクリプト内でのプロパティアクセスやメソッド呼び出しは、Projectインスタンスに委譲されますが、それと同様に設定ファイル内でのプロパティアクセス、メソッド呼び出しはsettingsインスタンスに委譲されます。Settingsをご参照ください。
A multi-project build is a build where you build more than one project during a single execution of Gradle. You have to declare the projects taking part in the multiproject build in the settings file. There is much more to say about multi-project builds in the chapter dedicated to this topic (see 57章マルチプロジェクトのビルドMulti-project Builds).
マルチプロジェクトとは、ある一つのプロジェクトをビルドしているときに、関連する別のプロジェクトも呼び出されてビルドされるよう構成されたプロジェクトの集まりです。マルチプロジェクトのビルドにプロジェクトを参加させるには、設定ファイルでそのことを宣言しなくてはなりません。マルチプロジェクトについては、専用の章をもうけて詳しく説明します(57章マルチプロジェクトのビルドMulti-project Builds参照)。
Multi-project builds are always represented by a tree with a single root. Each element in the tree
represents a project. A project has a path which denotes the position
of the project in the multi-project build tree. In most cases the project path is consistent with
the physical location of the project in the file system. However, this behavior is configurable.
The project tree is created in the settings.gradle file.
By default it is assumed that the location of the settings
file is also the location of the root project. But you can redefine the location of the root project
in the settings file.
マルチプロジェクトは、常に、あるプロジェクトをルートにしたプロジェクトのツリー構造となります。
マルチプロジェクト・ツリーを構成するそれぞれのプロジェクトは、自分がツリー内のどこに位置しているかを示すパス情報を持っています。
ほとんどのケースで、そのパス情報は、ファイルシステム上でのプロジェクトの物理的な位置を反映したものになるはずです。
ただし、これは設定で変更することも可能です。
プロジェクト・ツリーは、settings.gradleファイルで作成します。
デフォルトでは、settings.gradleファイルがあるプロジェクトがルートプロジェクトになっていますが、ルートプロジェクトの位置もその設定ファイルで変更可能です。
In the settings file you can use a set of methods to build the project tree. Hierarchical and flat physical layouts get special support.
設定ファイル内では、プロジェクト・ツリーを構築するためのメソッドを使用できます。これらのメソッドでは、プロジェクトを実際に配置するレイアウトとして、階層構造とフラットな構造の二つをサポートしています。
The include method takes project paths as arguments.
The project path is assumed to be equal to the relative physical file system path.
For example, a path 'services:api' is mapped by default to a folder 'services/api'
(relative from the project root). You only need to specify the leaves of the tree.
This means that the inclusion of the path 'services:hotels:api' will result in creating 3 projects:
'services', 'services:hotels' and 'services:hotels:api'.
includeメソッドは、プロジェクトのパスを引数にとります。
このパスは、ファイルシステム上の物理的な相対パスを表したものです。
例えば、'services:api'というパスは、デフォルトでは'services/api'フォルダ(プロジェクトルートからの相対)にマッピングされます。
指定するのは、ツリーの末端となるプロジェクトだけで構いません。
つまり、'services:hotels:api'を指定しただけで3つのプロジェクトが作成されるということです('services'、'services:hotels'、'services:hotels:api')。
The includeFlat method takes directory names as an argument. These directories
need to exist as siblings of the root project directory. The location of these directories
are considered as child projects of the root project in the multi-project tree.
includeFlatメソッドは、ディレクトリ名を引数にとります。これらのディレクトリは、ルートプロジェクトのディレクトリと同じ階層にある隣接ディレクトリでなければなりませんが、マルチプロジェクト・ツリーにおいてはルートプロジェクトの子プロジェクトに設定されます。
The multi-project tree created in the settings file is made up of so called project descriptors. You can modify these descriptors in the settings file at any time. To access a descriptor you can do:
設定ファイルで定義したプロジェクト・ツリーは、プロジェクトディスクリプタと呼ばれる属性を持っています。これらの属性は設定ファイルの中でいつでも変更することができます。ディスクリプタには、以下のようにしてアクセスできます。
Using this descriptor you can change the name, project directory and build file of a project.
ディスクリプタを使用して、プロジェクト名やプロジェクトディレクトリ、プロジェクトのビルドスクリプト名を変更できます。
例56.5 プロジェクトツリーの属性を変更する
settings.gradle
rootProject.name = 'main' project(':projectA').projectDir = new File(settingsDir, '../my-project-a') project(':projectA').buildFileName = 'projectA.gradle'
Look at the ProjectDescriptor class in the API documentation for more information.
ProjectDescriptorをご参照ください。
How does Gradle know whether to do a single or multiproject build? If you trigger a multiproject build
from a directory with a settings file is, things are easy. But Gradle also allows you to execute the
build from within any subproject taking part in the build.
[30]
If you execute Gradle from within a project with no settings.gradle file,
Gradle looks for a settings.gradle file in the following way:
Gradleは、現在ビルドしているものがマルチプロジェクトかシングルプロジェクトか、どうやって知るのでしょう。マルチプロジェクトのビルドを、設定ファイルのあるディレクトリから起動しているなら話は簡単ですが、Gradleはサブプロジェクトのディレクトリからビルドを実行することもできるようになっています。
[31]
Gradleは、settings.gradleのないディレクトリで実行された場合、以下のように動作します。
It looks in a directory called
masterwhich has the same nesting level as the current dir.カレントディレクトリと同階層のディレクトリから
masterという名前のディレクトリを探す。If not found yet, it searches parent directories.
見つからなければ、親階層のディレクトリをたどっていって探す。
If not found yet, the build is executed as a single project build.
見つからなければ、シングルプロジェクトとしてビルドする。
If a
settings.gradlefile is found, Gradle checks if the current project is part of the multiproject hierarchy defined in the foundsettings.gradlefile. If not, the build is executed as a single project build. Otherwise a multiproject build is executed.settings.gradleが見つかれば、Gradleはビルドを実行したプロジェクトがマルチプロジェクトに参加するよう宣言されているかどうか確認する。宣言が確認できればマルチプロジェクトとしてビルドするが、確認できなければ、現在のプロジェクトをシングルプロジェクトとしてビルドする。
What is the purpose of this behavior? Gradle needs to determine whether the project you are in is
a subproject of a multiproject build or not. Of course, if it is a subproject, only the subproject and its
dependent projects are built, but Gradle needs to create the build configuration for the whole multiproject
build (see 57章マルチプロジェクトのビルドMulti-project Builds). You can use the -u
command line option to tell Gradle not to look in the parent hierarchy for a settings.gradle file. The
current project is then always built as a single project build. If the current project contains a
settings.gradle file, the -u option has no meaning. Such a build is always executed as:
なんのためにこのような振る舞いをするのでしょう。今からビルドするプロジェクトは、マルチプロジェクトのうちの一サブプロジェクトでしょうか。それとも、単なるシングルプロジェクトなのでしょうか。Gradleは、それを何とか決定しなくてはなりません。サブプロジェクトだった場合、Gradleはプロジェクト・ツリー全体の設定情報を作成する必要があるからです。ビルド対象がそのサブプロジェクトのみだったとしてもです(57章マルチプロジェクトのビルドMulti-project Builds参照)。-uオプションをつけてGradleを実行すれば、親階層をたどってsettings.gradleを探しに行くことはありません。つまり、(settings.gradleのない)現在ビルドしているプロジェクトは、常にシングルプロジェクトだと認識されるわけです。現在のプロジェクトにsettings.gradleがある場合は、-uをつけても意味はありません。settings.gradleをもつプロジェクトは以下のように処理されます。
a single project build, if the
settings.gradlefile does not define a multiproject hierarchysettings.gradleがマルチプロジェクト・ツリーを定義していない場合はシングルプロジェクトとしてビルドa multiproject build, if the
settings.gradlefile does define a multiproject hierarchy.settings.gradleがマルチプロジェクト・ツリーを定義している場合は、マルチプロジェクトとしてビルド
The automatic search for a settings.gradle file only works for multi-project
builds with a physical hierarchical or flat layout. For a flat layout you must additionally follow the
naming convention described above (“master”). Gradle supports arbitrary physical layouts
for a multiproject build, but for such arbitrary layouts you need to execute the build from the directory
where the settings file is located. For information on how to run partial builds from the root see
「絶対パスによるタスクの実行Running tasks by their absolute path」.
この設定ファイルの探索処理は、プロジェクトのディレクトリ構造が前述した階層レイアウトとフラットレイアウトのどちらかであることを想定したものです。さらに、フラットなレイアウトを採用した場合は、前述したような命名規約(settings.gradleをmasterディレクトリに配置する)に従う必要があります。マルチプロジェクト・ツリーはどんなディレクトリ構造からでも構築できますが、その場合は設定ファイルがあるディレクトリでGradleを実行しなければなりません。ルートプロジェクトからでも、一部のプロジェクトのみビルドすることは可能です。「絶対パスによるタスクの実行Running tasks by their absolute path」をご参照ください。次のリリースでは、コマンドラインから設定ファイルの場所を指定してやることで、サブプロジェクトからの部分ビルドをサポートする予定です。
初期化フェーズでは、ビルドに参加しているすべてのプロジェクトについてProjectオブジェクトが作成されます。シングルプロジェクトの場合はひとつだけ作成され、マルチプロジェクトの場合はSettingsオブジェクトで指定されているすべてのプロジェクトと、ルートプロジェクトのProjectオブジェクトが作成されるのです。作成されたProjectオブジェクトはそれぞれ名前を持っています。デフォルトではプロジェクトのディレクトリ名です。また、ルートプロジェクトをのぞく全てのプロジェクトは親プロジェクトを持っていますし、場合によっては子プロジェクトも設定されているかもしれません。
Gradle creates a Project object for every project taking part in the build. For a multi-project build these are the projects specified in the Settings object (plus the root project). Each project object has by default a name equal to the name of its top level directory, and every project except the root project has a parent project. Any project may have child projects.
For a single project build, the workflow of the after initialization phases are pretty simple. The build script is executed against the project object that was created during the initialization phase. Then Gradle looks for tasks with names equal to those passed as command line arguments. If these task names exist, they are executed as a separate build in the order you have passed them. The configuration and execution for multi-project builds is discussed in 57章マルチプロジェクトのビルドMulti-project Builds.
シングルプロジェクトの場合、初期化フェーズ完了後の処理の流れは非常にシンプルです。まず、初期化フェーズで作成されたプロジェクトのビルドスクリプトが実行されます。それから、Gradleはコマンドライン引数に渡されたタスクを探し、見つかればコマンドライン引数の順に別々に実行されます。マルチプロジェクトにおける設定と実行については、57章マルチプロジェクトのビルドMulti-project Buildsを参照してください。
Your build script can receive notifications as the build progresses through its lifecycle. These notifications generally take two forms: You can either implement a particular listener interface, or you can provide a closure to execute when the notification is fired. The examples below use closures. For details on how to use the listener interfaces, refer to the API documentation.
ビルドスクリプト内では、ビルドがそのライフサイクルに従って進行していくなかで、さまざまな通知を受けとって処理できます。この通知を受けとるには大きく分けて二つの方法があります。ひとつは、特定のリスナーインターフェースを実装する方法、もうひとつは通知を受け取ったときに実行されるクロージャを作成する方法です。ここでは、クロージャを使用する方法について例を見ていきたいと思います。リスナーインターフェースを実装する方法についてはAPIドキュメントをご参照ください。
You can receive a notification immediately before and after a project is evaluated. This can be used to do things like performing additional configuration once all the definitions in a build script have been applied, or for some custom logging or profiling.
Below is an example which adds a test task to each project with the
hasTests property value of true.
プロジェクトが評価される前またはされた後すぐに通知を受け取ることができます。これは、ビルドスクリプトが一通り評価された後、さらに追加の設定処理を行ったり、ロギング処理のカスタマイズやプロファイリングなどで使用されます。
以下の例は、testタスクをhasTestsプロパティを持つすべてのプロジェクトに追加するものです。
例56.6 特定プロパティを持つプロジェクトにタスクを追加する
build.gradle
allprojects {
afterEvaluate { project ->
if (project.hasTests) {
println "Adding test task to $project"
project.task('test') << {
println "Running tests for $project"
}
}
}
}projectA.gradle
hasTests = true
gradle -q test の出力
> gradle -q test Adding test task to project ':projectA' Running tests for project ':projectA'
This example uses method Project.afterEvaluate() to add a closure which is executed
after the project is evaluated.
It is also possible to receive notifications when any project is evaluated. This example performs
some custom logging of project evaluation. Notice that the afterProject notification
is received regardless of whether the project evaluates successfully or fails with an exception.
この例では、Project.afterEvaluate()を使用して、プロジェクト評価後に実行されるクロージャを追加しています。
プロジェクト評価時の通知は、どんなプロジェクトに対しても受け取ることができます。次の例では、カスタムロギング処理をプロジェクト評価時に実行しています。afterProjectが、プロジェクトの評価に成功しても例外で失敗しても通知される点に注目してください。
例56.7 通知
build.gradle
gradle.afterProject {project, projectState ->
if (projectState.failure) {
println "Evaluation of $project FAILED"
} else {
println "Evaluation of $project succeeded"
}
}gradle -q test の出力
> gradle -q test Evaluation of root project 'buildProjectEvaluateEvents' succeeded Evaluation of project ':projectA' succeeded Evaluation of project ':projectB' FAILED
You can also add a ProjectEvaluationListener to the
Gradle to receive these events.
ProjectEvaluationListenerをGradleに追加することでも同様の処理を実現できます。
You can receive a notification immediately after a task is added to a project. This can be used to set some default values or add behaviour before the task is made available in the build file.
The following example sets the srcDir property of each task as it is created.
プロジェクトにタスクが作成されたときに通知を受け取ることができます。この通知は、タスクが使用される前にデフォルト値を設定したり、振る舞いを追加したりするのに使用することができます。
次の例は、作成されたタスクに、随時srcDirプロパティを追加していくものです。
例56.8 すべてのタスクにプロパティ値を設定する
build.gradle
tasks.whenTaskAdded { task ->
task.ext.srcDir = 'src/main/java'
}
task a
println "source dir is $a.srcDir"gradle -q a の出力
> gradle -q a source dir is src/main/java
You can also add an Action to a
TaskContainer to receive these events.
ActionをTaskContainerに追加することでも同様の処理を実現できます。
You can receive a notification immediately after the task execution graph has been populated. We have seen this already in 「DAGによる設定Configure by DAG」.
タスクの実行グラフが用意できたときに通知を受け取ることができます。この例については、「DAGによる設定Configure by DAG」で紹介しました。
You can also add a TaskExecutionGraphListener to the
TaskExecutionGraph to receive these events.
TaskExecutionGraphListenerをTaskExecutionGraphに追加することでも同様の処理を実現できます。
You can receive a notification immediately before and after any task is executed.
タスクが実行される前または実行された後に通知を受け取ることができます。
The following example logs the start and end of each task execution. Notice that the
afterTask notification is received regardless of whether the task completes
successfully or fails with an exception.
次の例では、タスクの実行が開始されたときと終わったときにそれぞれロギングを追加しています。afterTaskが、タスクの実行に成功しても例外で失敗しても通知されていることに注目してください。
例56.9 タスク実行の開始時および終了時にロギングを行う
build.gradle
task ok
task broken(dependsOn: ok) << {
throw new RuntimeException('broken')
}
gradle.taskGraph.beforeTask { Task task ->
println "executing $task ..."
}
gradle.taskGraph.afterTask { Task task, TaskState state ->
if (state.failure) {
println "FAILED"
}
else {
println "done"
}
}gradle -q broken の出力
> gradle -q broken executing task ':ok' ... done executing task ':broken' ... FAILED
You can also use a TaskExecutionListener to the
TaskExecutionGraph to receive these events.
TaskExecutionListenerをTaskExecutionGraphに追加することでも同様の処理を実現できます。
[30] Gradle supports partial multiproject builds (see 57章マルチプロジェクトのビルドMulti-project Builds).
[31] Gradleは、マルチプロジェクトに含まれる一部のプロジェクトのみ部分的にビルドできる(57章マルチプロジェクトのビルドMulti-project Builds参照)
The powerful support for multi-project builds is one of Gradle's unique selling points. This topic is also the most intellectually challenging.
マルチプロジェクトはビルドツールの知恵の絞りどころであり、とてもやりがいのあるテーマです。Gradleはマルチプロジェクトを強力にサポートしていて、ユニークなセールスポイントの一つとなっています。
A multi-project build in gradle consists of one root project, and one or more subprojects that may also have subprojects.
While each subproject could configure itself in complete isolation of the other subprojects, it is common that subprojects share common traits. It is then usually preferable to share configurations among projects, so the same configuration affects several subprojects.
Let's start with a very simple multi-project build. Gradle is a general purpose build tool at its core, so the projects don't have to be Java projects. Our first examples are about marine life.
まず、ごく簡単な例から始めましょう。なんと言ってもGradleは汎用のビルドツールですので、扱うプロジェクトがJavaプロジェクトである必要はありません。 これから例として使用するプロジェクトは、海洋生物に関するものです。
「ビルドフェーズBuild phases」 describes the phases of every Gradle build.
Let's zoom into the configuration and execution phases of a multi-project build.
Configuration here means executing the build.gradle file of a project, which
implies e.g. downloading all plugins that were declared using 'apply plugin'.
By default, the configuration of all projects happens before any task is executed.
This means that when a single task, from a single project is requested,
all projects of multi-project build are configured first.
The reason every project needs to be configured is to support
the flexibility of accessing and changing any part of the Gradle project model.
The Configuration injection feature and access to the complete project model are possible because every project is configured before the execution phase. Yet, this approach may not be the most efficient in a very large multi-project build. There are Gradle builds with a hierarchy of hundreds of subprojects. The configuration time of huge multi-project builds may become noticeable. Scalability is an important requirement for Gradle. Hence, starting from version 1.4 a new incubating 'configuration on demand' mode is introduced.
Configuration on demand mode attempts to configure only projects that are relevant for requested
tasks, i.e. it only executes the build.gradle file of projects that are participating in the build.
This way, the configuration time of a large multi-project build can be reduced.
In the long term, this mode will become the default mode, possibly the only mode for Gradle build execution.
The configuration on demand feature is incubating so not every build is guaranteed to work correctly.
The feature should work very well for multi-project builds that have decoupled projects (「分離されたプロジェクト Decoupled Projects」).
In “configuration on demand” mode, projects are configured as follows:
- The root project is always configured. This way the typical common configuration is supported (allprojects or subprojects script blocks).
- The project in the directory where the build is executed is also configured, but only when Gradle is executed without any tasks. This way the default tasks behave correctly when projects are configured on demand.
- The standard project dependencies are supported and makes relevant projects configured. If project A has a compile dependency on project B then building A causes configuration of both projects.
- The task dependencies declared via task path are supported and cause relevant projects to be configured. Example: someTask.dependsOn(":someOtherProject:someOtherTask")
- A task requested via task path from the command line (or Tooling API) causes the relevant project to be configured. For example, building 'projectA:projectB:someTask' causes configuration of projectB.
Eager to try out this new feature? To configure on demand with every build run see 「gradle.propertiesを使用したビルド環境の構築Configuring the build environment via gradle.properties」. To configure on demand just for a given build please see 付録D Gradle コマンドラインGradle Command Line.
Let's look at some examples with the following project tree. This is a multi-project build with a root project
named water and a subproject named bluewhale.
次のプロジェクトツリーにそってサンプルを見てみましょう。
これはルートプロジェクト「water」と、サブプロジェクトの「bluewhale(シロナガスクジラ)」からなるマルチプロジェクトです。
例57.1 マルチプロジェクト・ツリー - warter & bluewhale プロジェクト
Build layout
water/ build.gradle settings.gradle bluewhale/
ノート: 本例のソースコードは、Gradleのバイナリ配布物またはソース配布物に含まれています。以下の場所をご参照ください。samples/userguide/multiproject/firstExample/water
settings.gradle
include 'bluewhale'And where is the build script for the bluewhale project? In Gradle build scripts are optional.
Obviously for a single project build, a project without a build script doesn't make much sense. For
multiproject builds the situation is different. Let's look at the build script for the water project and
execute it:
で、bluewhaleプロジェクトのビルドスクリプトは何処にあるのでしょう。Gradleでは、ビルドスクリプトは必須ではありません。シングルプロジェクトのビルドではビルドスクリプトのないプロジェクトなどたいした意味はありませんが、マルチプロジェクトの場合そうとは限りません。waterのビルドスクリプトを見てみましょう。
例57.2 water(親プロジェクト)のビルドスクリプト
build.gradle
Closure cl = { task -> println "I'm $task.project.name" }
task hello << cl
project(':bluewhale') {
task hello << cl
}gradle -q hello の出力
> gradle -q hello I'm water I'm bluewhale
Gradle allows you to access any project of the multi-project build from any build script. The Project
API provides a method called project(), which takes a path as an argument and returns
the Project object for this path. The capability to configure a project build from any build script we
call cross project configuration. Gradle implements this via
configuration injection.
Gradleでは、マルチプロジェクトを構成するすべてのプロジェクトに、どのビルドスクリプトからでもアクセスすることができます。ビルドスクリプトではproject()というメソッドを使用でき、引数にプロジェクトへのパスを渡せばProjectオブジェクトを取得できます。つまり、あるプロジェクトを設定しようとしたとき、マルチプロジェクト内どのビルドスクリプトからでもプロジェクトを取得して設定できるのです。このことを、私たちはクロスプロジェクト設定と呼んでいます。Gradleは、この機能を設定のインジェクションを利用して実現します。
We are not that happy with the build script of the water project. It is inconvenient to add the task
explicitly for every project. We can do better. Let's first add another project called
krill to our multi-project build.
waterプロジェクトのビルドスクリプトは、まだ満足できるものではありません。すべてのプロジェクトに手でこのタスクを追加していくのは面倒ですよね。もっといい書き方ができます。krill(オキアミ)プロジェクトをマルチプロジェクトに追加してみましょう。
例57.3 マルチプロジェクトツリー - water, bluewhaleそしてkrill
Build layout
water/ build.gradle settings.gradle bluewhale/ krill/
ノート: 本例のソースコードは、Gradleのバイナリ配布物またはソース配布物に含まれています。以下の場所をご参照ください。samples/userguide/multiproject/addKrill/water
settings.gradle
include 'bluewhale', 'krill'
Now we rewrite the water build script and boil it down to a single line.
waterビルドスクリプトを書き直し、一行で記述するようにします。
例57.4 Waterプロジェクトのビルドスクリプト
build.gradle
allprojects {
task hello << { task -> println "I'm $task.project.name" }
}gradle -q hello の出力
> gradle -q hello I'm water I'm bluewhale I'm krill
Is this cool or is this cool? And how does this work? The Project API provides a property
allprojects
which returns a list with the current project and all its subprojects underneath it. If you call
allprojects
with a closure, the statements of the closure are delegated to the projects associated with
allprojects. You could also do an iteration via allprojects.each, but
that would be more verbose.
素晴らしい。これはどういう原理で動いているのでしょう。プロジェクトAPIはallprojectsというプロパティを提供しており、そのプロパティには現在のプロジェクトと、そのサブプロジェクトのリストが格納されています。 allprojectsをクロージャとともに呼び出せば、クロージャの実行がallprojectsに格納されたすべてのプロジェクトに委譲されます。もちろんallprojectsをeachでループすることもできますが、記述が冗長になってしまいます。
Other build systems use inheritance as the primary means for defining common behavior. We also offer inheritance for projects as you will see later. But Gradle uses configuration injection as the usual way of defining common behavior. We think it provides a very powerful and flexible way of configuring multiproject builds.
他のビルドシステムでは、プロジェクト間の共通設定を行う方法として主に継承を使用します。後ほど紹介するように、Gradleでも同様にプロジェクト間の継承を使用することが出来ますが、Gradleではもっと使いやすい共通設定の定義方法としてこの設定のインジェクションを使用します。設定の継承に比べて、設定を注入する方が柔軟性のある強力な方法だと考えているからです。
Another possibilty for sharing configuration is to use a common external script. See 「外部のビルドスクリプトをプロジェクトに取り込むConfiguring the project using an external build script」 for more information.
The Project API also provides a property for accessing the subprojects only.
プロジェクトAPIはサブプロジェクトのみにアクセスする方法も提供します。
例57.5 サブプロジェクト共通の振る舞いとすべてのプロジェクト共通の振る舞いをそれぞれ定義する
build.gradle
allprojects {
task hello << {task -> println "I'm $task.project.name" }
}
subprojects {
hello << {println "- I depend on water"}
}gradle -q hello の出力
> gradle -q hello I'm water I'm bluewhale - I depend on water I'm krill - I depend on water
You may notice that there are two code snippets referencing the “hello” task.
The first one, which uses the “task” keyword, constructs the task and provides it's base configuration.
The second piece doesn't use the “task” keyword, as it is further configuring the existing “hello” task.
You may only construct a task once in a project, but you may any number of code blocks providing additional configuration.
You can add specific behavior on top of the common behavior. Usually we put the project specific
behavior in the build script of the project where we want to apply this specific behavior. But as we
have already seen, we don't have to do it this way. We could add project specific behavior for the
bluewhale project like this:
共通の振る舞いの上に、それぞれのプロジェクト個別の振る舞いを追加することができます。普通は、プロジェクト個別の振る舞いはそのプロジェクトのビルドスクリプトに記述しますが、いままで見てきたようにかならずそうしなければいけないという訳ではありません。次の例に示すような方法で、サブプロジェクトbluewhaleに個別の振る舞いを追加することもできます。
例57.6 プロジェクト個別の振る舞いを定義する
build.gradle
allprojects {
task hello << {task -> println "I'm $task.project.name" }
}
subprojects {
hello << {println "- I depend on water"}
}
project(':bluewhale').hello << {
println "- I'm the largest animal that has ever lived on this planet."
}gradle -q hello の出力
> gradle -q hello I'm water I'm bluewhale - I depend on water - I'm the largest animal that has ever lived on this planet. I'm krill - I depend on water
As we have said, we usually prefer to put project specific behavior into the build script of this
project. Let's refactor and also add some project specific behavior to the krill
project.
前述のとおり、プロジェクト個別の振る舞いは、普通そのプロジェクトのビルドスクリプトに記述します。リファクタリングし、さらにkrillプロジェクトにも振る舞いを追加してみましょう。
例57.7 krillプロジェクトに個別の振る舞いを定義する
Build layout
water/
build.gradle
settings.gradle
bluewhale/
build.gradle
krill/
build.gradleノート: 本例のソースコードは、Gradleのバイナリ配布物またはソース配布物に含まれています。以下の場所をご参照ください。samples/userguide/multiproject/spreadSpecifics/water
settings.gradle
include 'bluewhale', 'krill'
bluewhale/build.gradle
hello.doLast {
println "- I'm the largest animal that has ever lived on this planet."
}krill/build.gradle
hello.doLast {
println "- The weight of my species in summer is twice as heavy as all human beings."
}build.gradle
allprojects {
task hello << {task -> println "I'm $task.project.name" }
}
subprojects {
hello << {println "- I depend on water"}
}gradle -q hello の出力
> gradle -q hello I'm water I'm bluewhale - I depend on water - I'm the largest animal that has ever lived on this planet. I'm krill - I depend on water - The weight of my species in summer is twice as heavy as all human beings.
To show more of the power of configuration injection, let's add another project
called tropicalFish and add more behavior to the build via the build script of the
water project.
設定のインジェクションが持つもっと大きな力をお見せするために、tropicalFish(熱帯魚)プロジェクトを追加します。このプロジェクトに、waterプロジェクトのビルドスクリプトから振る舞いを定義していきます。
例57.8 プロジェクトに振る舞いを追加する(プロジェクト名によるフィルタリング)
Build layout
water/
build.gradle
settings.gradle
bluewhale/
build.gradle
krill/
build.gradle
tropicalFish/ノート: 本例のソースコードは、Gradleのバイナリ配布物またはソース配布物に含まれています。以下の場所をご参照ください。samples/userguide/multiproject/addTropical/water
settings.gradle
include 'bluewhale', 'krill', 'tropicalFish'
build.gradle
allprojects {
task hello << {task -> println "I'm $task.project.name" }
}
subprojects {
hello << {println "- I depend on water"}
}
configure(subprojects.findAll {it.name != 'tropicalFish'}) {
hello << {println '- I love to spend time in the arctic waters.'}
}gradle -q hello の出力
> gradle -q hello I'm water I'm bluewhale - I depend on water - I love to spend time in the arctic waters. - I'm the largest animal that has ever lived on this planet. I'm krill - I depend on water - I love to spend time in the arctic waters. - The weight of my species in summer is twice as heavy as all human beings. I'm tropicalFish - I depend on water
The configure() method takes a list as an argument and applies the
configuration to the projects in this list.
configure()は引数にリストを取るメソッドで、そのリストに格納されたプロジェクトに設定を適用します。
Using the project name for filtering is one option. Using extra project properties is another. (See 「拡張プロパティ Extra properties」 for more information on extra properties.)
フィルタリングには、プロジェクト名だけでなく拡張プロパティを使うこともできます。(拡張プロパティの詳細については、「拡張プロパティ Extra properties」を参照してください。)
例57.9 プロジェクトに振る舞いを追加する(プロパティによるフィルタリング)
Build layout
water/
build.gradle
settings.gradle
bluewhale/
build.gradle
krill/
build.gradle
tropicalFish/
build.gradleノート: 本例のソースコードは、Gradleのバイナリ配布物またはソース配布物に含まれています。以下の場所をご参照ください。samples/userguide/multiproject/tropicalWithProperties/water
settings.gradle
include 'bluewhale', 'krill', 'tropicalFish'
bluewhale/build.gradle
ext.arctic = true
hello.doLast {
println "- I'm the largest animal that has ever lived on this planet."
}krill/build.gradle
ext.arctic = true
hello.doLast {
println "- The weight of my species in summer is twice as heavy as all human beings."
}tropicalFish/build.gradle
ext.arctic = false
build.gradle
allprojects {
task hello << {task -> println "I'm $task.project.name" }
}
subprojects {
hello {
doLast {println "- I depend on water"}
afterEvaluate { Project project ->
if (project.arctic) { doLast {
println '- I love to spend time in the arctic waters.' }
}
}
}
}gradle -q hello の出力
> gradle -q hello I'm water I'm bluewhale - I depend on water - I'm the largest animal that has ever lived on this planet. - I love to spend time in the arctic waters. I'm krill - I depend on water - The weight of my species in summer is twice as heavy as all human beings. - I love to spend time in the arctic waters. I'm tropicalFish - I depend on water
In the build file of the water project we use an afterEvaluate
notification. This means that the closure we are passing gets evaluated after
the build scripts of the subproject are evaluated. As the property arctic
is set in those build scripts, we have to do it this way. You will find more on this topic in
「依存関係 - なんの依存関係?Dependencies - Which dependencies?」
waterプロジェクトのビルドスクリプトでは、afterEvaluateという宣言文が使用されています。afterEvaluateに引き渡されたクロージャは、そのプロジェクトのビルドスクリプトが評価された後に実行されます。サブプロジェクトのarcticプロパティは、それぞれのプロジェクトのビルドスクリプト内でセットされているので、この方法でarcticプロパティにアクセスする必要があるのです。このトピックは「依存関係 - なんの依存関係?Dependencies - Which dependencies?」で詳しく説明します。
When we executed the hello task from the root project dir, things behaved in an
intuitive way. All the hello tasks of the different projects were executed. Let's switch
to the bluewhale dir and see what happens if we execute Gradle from there.
helloタスクをルートプロジェクトのディレクトリで実行したとき、ビルドは直感に従う、自然な形で実行されました。つまり、サブプロジェクトに定義されたhelloタスクも含め、すべてのhelloタスクが実行されたのです。では、bluewhaleディレクトリでGradleを実行した場合、どのようにビルドが実行されるのでしょうか。
例57.10 サブプロジェクトからビルドを実行する
gradle -q hello の出力
> gradle -q hello I'm bluewhale - I depend on water - I'm the largest animal that has ever lived on this planet. - I love to spend time in the arctic waters.
The basic rule behind Gradle's behavior is simple. Gradle looks down the hierarchy, starting with the
current dir, for tasks with the name
hello
and executes them. One thing is very important to note. Gradle
always
evaluates
every
project of the multi-project build and creates all existing task objects. Then, according to the task name
arguments and the current dir, Gradle filters the tasks which should be executed. Because of Gradle's
cross project configuration every project has to be evaluated before any
task gets executed. We will have a closer look at this in the next section. Let's now have our last marine
example. Let's add a task to bluewhale and krill.
Gradleがビルドを実行するときの基本的なルールは単純なものです。この例では、Gradleはhelloタスクを探して、カレントディレクトリからプロジェクト階層を降りていき、タスクを見つけるとそれを実行するだけです。ただし、非常に重要な注意点が一つあります。Gradleはマルチプロジェクトに参加しているすべてのプロジェクトを常に評価します。ビルドスクリプトに定義されているタスクオブジェクトは、すべて作成されるのです。そのあと、Gradleは実行時にコマンドに引き渡したタスク名と実行ディレクトリによって、実際に実行するタスクをフィルタリングします。Gradleのクロスプロジェクト設定を実現するため、すべてのプロジェクトはタスク実行前に評価されてなければなりません。次の節では、このことについてさらに詳しく見ていきます。さて、これまで作成してきたmarineプロジェクトのbluewhaleとkrillに新しいタスクを追加しましょう。
例57.11 プロジェクトの評価と実行
bluewhale/build.gradle
ext.arctic = true
hello << { println "- I'm the largest animal that has ever lived on this planet." }
task distanceToIceberg << {
println '20 nautical miles'
}krill/build.gradle
ext.arctic = true
hello << {
println "- The weight of my species in summer is twice as heavy as all human beings."
}
task distanceToIceberg << {
println '5 nautical miles'
}gradle -q distanceToIceberg の出力
> gradle -q distanceToIceberg 20 nautical miles 5 nautical miles
Here's the output without the -q option:
-qオプションを外すと、出力結果は以下のようになります。:
例57.12 プロジェクトの評価と実行
gradle distanceToIceberg の出力
> gradle distanceToIceberg :bluewhale:distanceToIceberg 20 nautical miles :krill:distanceToIceberg 5 nautical miles BUILD SUCCESSFUL Total time: 1 secs
The build is executed from the water project. Neither water nor
tropicalFish have a task with the name distanceToIceberg. Gradle does
not care. The simple rule mentioned already above is: Execute all tasks down the hierarchy which have this
name. Only complain if there is no such task!
このビルドはwaterプロジェクトのディレクトリで実行しています。waterプロジェクトもtropicalFishプロジェクトもdistanceToIcebergという名前のタスクは持っていませんが、Gradleはそんなこと気にしません。前述の実行ルールに従って、プロジェクト階層にあるdistanceToIcebergという名前のタスクをすべて実行するだけです。distanceToIcebergタスクが一つもないときだけ警告を出してきます。
As we have seen, you can run a multi-project build by entering any subproject dir and execute the build from there. All matching task names of the project hierarchy starting with the current dir are executed. But Gradle also offers to execute tasks by their absolute path (see also 「プロジェクトとタスクのパスProject and task paths」):
いままで見てきたように、マルチプロジェクトのサブプロジェクトは、プロジェクトのディレクトリに移動して個別にビルドできます。その場合、実行ディレクトリ以下の、指定したタスク名のタスクがすべて実行されます。また、ビルド時にタスクの絶対パスを指定することもできます。ディレクトリを移動しなくても、パスで指定したプロジェクトのタスクのみ実行できるのです。(「プロジェクトとタスクのパスProject and task paths」もご参照ください)
例57.13 絶対パスによるタスクの実行
gradle -q :hello :krill:hello hello の出力
> gradle -q :hello :krill:hello hello I'm water I'm krill - I depend on water - The weight of my species in summer is twice as heavy as all human beings. - I love to spend time in the arctic waters. I'm tropicalFish - I depend on water
The build is executed from the tropicalFish project. We execute the hello
tasks of the water, the krill and the tropicalFish
project. The first two tasks are specified by their absolute path, the last task is executed using the name
matching mechanism described above.
ビルドはtropicalFishプロジェクトのディレクトリで実行されています。上記の例では、ルートプロジェクトwatar、krillプロジェクト、そしてカレントのサブプロジェクトtropicalFishのhelloがそれぞれ実行されます。
A project path has the following pattern: It starts with an optional colon, which denotes the root project. The root project is the only project in a path that is not specified by its name. The rest of a project path is a colon-separated sequence of project names, where the next project is a subproject of the previous project.
The path of a task is simply its project path plus the task name, like “:bluewhale:hello”. Within a project you can address a task of the same project just by its name.
This is interpreted as a relative path.
タスクのパスは、例えば :bluewhale:hello のように、単純にプロジェクトパスにタスク名を加えるだけです。なお、カレントのプロジェクトにあるタスクは、タスク名だけで指定できます。
Originally Gradle has used the
'/'
character as a natural path separator. With the introduction of directory tasks (see 「ディレクトリの作成 Directory creation」) this was no longer possible, as the name of the directory task
contains the
'/'
character.
以前Gradleでは、プロジェクトのパスセパレータとして「/」を使用していました。しかし、このセパレータ文字はdirectoryタスク(「ディレクトリの作成 Directory creation」参照)が導入されたときに廃止されています。directoryタスクのタスク名に、「/」が含まれるためです。
The examples from the last section were special, as the projects had no Execution Dependencies. They had only Configuration Dependencies. The following sections illustrate the differences between these two types of dependencies.
先ほどまでの例は特殊なもので、プロジェクトの間で設定情報は依存関係がありましたが、実行に関しては依存関係がありませんでした。次のセクションでは、これら2つのタイプの依存関係の違いについて説明します。
例57.14 依存関係とビルド実行順序
Build layout
messages/
settings.gradle
consumer/
build.gradle
producer/
build.gradleノート: 本例のソースコードは、Gradleのバイナリ配布物またはソース配布物に含まれています。以下の場所をご参照ください。samples/userguide/multiproject/dependencies/firstMessages/messages
settings.gradle
include 'consumer', 'producer'
consumer/build.gradle
task action << {
println("Consuming message: ${rootProject.producerMessage}")
}producer/build.gradle
task action << {
println "Producing message:"
rootProject.producerMessage = 'Watch the order of execution.'
}gradle -q action の出力
> gradle -q action Consuming message: null Producing message:
This didn't quite do what we want. If nothing else is defined, Gradle executes the task in alphanumeric order.
Therefore, Gradle will execute
“:consumer:action”
before “:producer:action”. Let's try to solve this with a hack and
rename the producer project to “aProducer”.
この例はうまく動作しません。依存関係が定義されていないと、Gradleはタスクをアルファベット順に実行します。
したがって、:consumer(消費者):actionが:producer(供給者):actionより先に実行されてしまうのです。
producerプロジェクトの名前をaProducerに修正すればこの問題を解決することはできます。
例57.15 依存関係とビルド実行順序
Build layout
messages/
settings.gradle
aProducer/
build.gradle
consumer/
build.gradlesettings.gradle
include 'consumer', 'aProducer'
aProducer/build.gradle
task action << {
println "Producing message:"
rootProject.producerMessage = 'Watch the order of execution.'
}consumer/build.gradle
task action << {
println("Consuming message: ${rootProject.producerMessage}")
}gradle -q action の出力
> gradle -q action Producing message: Consuming message: Watch the order of execution.
We can show where this hack doesn't work if we now switch to the consumer dir and
execute the build.
ただ、このハックは簡単に破綻してしまいます。consumerディレクトリに移動して、ビルドしてみましょう。
The problem is that the two
“action”
tasks are unrelated. If you execute the build from the
“messages”
project Gradle executes them both because they have the same name and they are down the hierarchy.
In the last example only one
“action” task
was down the hierarchy and therefore it was the only task that was executed. We need something
better than this hack.
問題はこの二つの“action”タスクが無関係であることです。
確かに、messagesプロジェクトをビルドすればGradleはこの二つのタスクを両方とも実行します。
しかし、それは二つのタスクが同じ名前のタスクであり、両方とも実行ディレクトリ以下にあるからです。
最後の例では一方のタスクが実行ディレクトリから外れたので、片方の“action”タスクしか実行されませんでした。
このハックよりも良い方法が必要です。
例57.17 依存関係を宣言する
Build layout
messages/
settings.gradle
consumer/
build.gradle
producer/
build.gradleノート: 本例のソースコードは、Gradleのバイナリ配布物またはソース配布物に含まれています。以下の場所をご参照ください。samples/userguide/multiproject/dependencies/messagesWithDependencies/messages
settings.gradle
include 'consumer', 'producer'
consumer/build.gradle
task action(dependsOn: ":producer:action") << { println("Consuming message: ${rootProject.producerMessage}") }
producer/build.gradle
task action << {
println "Producing message:"
rootProject.producerMessage = 'Watch the order of execution.'
}gradle -q action の出力
> gradle -q action Producing message: Consuming message: Watch the order of execution.
Running this from the consumer directory gives:
consumerディレクトリでビルドすると、以下のようになります。
例57.18 依存関係を宣言する
gradle -q action の出力
> gradle -q action Producing message: Consuming message: Watch the order of execution.
This is now working better because we have declared that the
“action” task in the “consumer”
project has an
execution dependency
on the “action” task in the
“producer”
project.
consumerプロジェクトの“action”タスクは
producerプロジェクトの“action”タスクに
実行時依存関係を持つことを宣言したことで、事態は改善しました。
Of course, task dependencies across different projects are not limited to tasks with the same name. Let's change the naming of our tasks and execute the build.
もちろん、同じ名前のタスク間でしかプロジェクトをまたぐ依存関係は結べない、ということはありません。 タスクの名前を変えて実行してみたのが、以下の例です。
例57.19 プロジェクトにまたがるタスク間の依存関係
consumer/build.gradle
task consume(dependsOn: ':producer:produce') << { println("Consuming message: ${rootProject.producerMessage}") }
producer/build.gradle
task produce << {
println "Producing message:"
rootProject.producerMessage = 'Watch the order of execution.'
}gradle -q consume の出力
> gradle -q consume Producing message: Consuming message: Watch the order of execution.
Let's see one more example with our producer-consumer build before we enter
Java
land. We add a property to the “producer” project and create a configuration time dependency from
“consumer” to “producer”.
そろそろ実際のJavaでの例をみていきたいと思いますが、その前に、producer-consumerプロジェクトについてもう一つ例を見てみます。ひとつのプロパティをproducerプロジェクトに加えて、consumerプロジェクトから評価順序の依存関係をproducerプロジェクトに作成します。
例57.20 評価順序の依存関係
consumer/build.gradle
def message = rootProject.producerMessage
task consume << {
println("Consuming message: " + message)
}producer/build.gradle
rootProject.producerMessage = 'Watch the order of evaluation.'gradle -q consume の出力
> gradle -q consume Consuming message: null
The default
evaluation
order of projects is alphanumeric (for the same nesting level). Therefore the
“consumer”
project is evaluated before the
“producer”
project and the
“producerMessage”
value is set
after
it is read by the
“consumer”
project. Gradle offers a solution for this.
デフォルトでは、プロジェクトはプロジェクト名のアルファベット順で評価されます。したがって、consumerプロジェクトはproducerプロジェクトの前に評価され、producerプロジェクトのプロパティはconsumerプロジェクトが読みにいった後にセットされてしまうのです。Gradleでは、このような問題に対する解決策を提供しています。
例57.21 評価順序の依存関係 - evaluationDependsOn
consumer/build.gradle
evaluationDependsOn(':producer') def message = rootProject.producerMessage task consume << { println("Consuming message: " + message) }
gradle -q consume の出力
> gradle -q consume Consuming message: Watch the order of evaluation.
The use of the
“evaluationDependsOn” command
results in the evaluation of
the “producer” project
before the
“consumer” project
is evaluated. This example is a bit contrived to show the mechanism. In
this
case there would be an easier solution by reading the key property at execution time.
このevaluationDependsOnコマンドにより、producerプロジェクトがconsumerの前に評価されるようになります。
なお、この例はメカニズムを説明するためのやや不自然なものです。
この場合は実行時にタスク内でプロパティを読みにいった方が早いでしょう。
例57.22 評価順序の依存関係
consumer/build.gradle
task consume << {
println("Consuming message: ${rootProject.producerMessage}")
}gradle -q consume の出力
> gradle -q consume Consuming message: Watch the order of evaluation.
Configuration dependencies are very different from execution dependencies. Configuration dependencies are between projects whereas execution dependencies are always resolved to task dependencies. Also note that all projects are always configured, even when you start the build from a subproject. The default configuration order is top down, which is usually what is needed.
評価順序の依存関係と実行時の依存関係では、大きく異なる点があります。 まず、実行の依存関係は最終的には常にタスク間の依存関係になりますが、評価順序の依存関係はプロジェクト間の依存関係です。 さらに、サブプロジェクトを始点にビルドを開始した場合でも、そのマルチプロジェクトに含まれる全てのプロジェクトが評価されるという違いもあります。 デフォルトでは、ルートプロジェクトからトップダウンでサブプロジェクトに向かって評価されていきます。普通はその順序で評価する必要があるからです。
To change the default configuration order to “bottom up”, use the “evaluationDependsOnChildren()” method instead.
このデフォルトを変更して"ボトムアップ"で評価されるようにするには、かわりに"evaluationDependsOnChildren()"メソッドを使ってください。
On the same nesting level the configuration order depends on the alphanumeric position. The most
common use case is to have multi-project builds that share a common lifecycle (e.g. all projects use the
Java plugin). If you declare with
dependsOn
a
execution dependency
between different projects, the default behavior of this method is to also create a
configuration
dependency between the two projects. Therefore it is likely that you don't have to define configuration
dependencies explicitly.
同じ階層にあるプロジェクトは、プロジェクト名のアルファベット順で評価されます。よく使われるのは、マルチプロジェクトに参加しているプロジェクトの間で、同じビルドサイクルを共有させるときです(すべてのプロジェクトがJavaプラグインを使うなど)。プロジェクト間に実行の依存関係を定義すると、評価順序の依存関係も同様に定義されます。したがって、評価順序の依存関係を明示的に指定することはあまりないかもしれません。
Gradle's multi-project features are driven by real life use cases. One good example consists of two web application projects and a parent project that creates a distribution including the two web applications. [32] For the example we use only one build script and do cross project configuration.
Gradleのマルチプロジェクト機能は、開発現場でのユースケースに基づいて作成されています。ここではそのようなユースケースの例として、二つのWebアプリケーションとそれらの配布物を作成する親プロジェクトを紹介します。 [33] この例では、クロスプロジェクト設定を使って、一つのビルドスクリプトですべてのプロジェクトの設定を行っています。
例57.23 依存関係 - 実生活の例 - クロスプロジェクト設定
Build layout
webDist/
settings.gradle
build.gradle
date/
src/main/java/
org/gradle/sample/
DateServlet.java
hello/
src/main/java/
org/gradle/sample/
HelloServlet.javaノート: 本例のソースコードは、Gradleのバイナリ配布物またはソース配布物に含まれています。以下の場所をご参照ください。samples/userguide/multiproject/dependencies/webDist
settings.gradle
include 'date', 'hello'
build.gradle
allprojects {
apply plugin: 'java'
group = 'org.gradle.sample'
version = '1.0'
}
subprojects {
apply plugin: 'war'
repositories {
mavenCentral()
}
dependencies {
compile "javax.servlet:servlet-api:2.5"
}
}
task explodedDist(dependsOn: assemble) << {
File explodedDist = mkdir("$buildDir/explodedDist")
subprojects.each {project ->
project.tasks.withType(Jar).each {archiveTask ->
copy {
from archiveTask.archivePath
into explodedDist
}
}
}
}We have an interesting set of dependencies. Obviously the
date
and
hello
projects have a
configuration
dependency on webDist, as all the build logic for the webapp projects is injected by
webDist. The
execution
dependency is in the other direction, as
webDist
depends on the build artifacts of
date
and hello. There is even a third dependency.
webDist
has a
configuration
dependency on
date
and
hello
because it needs to know the archivePath. But it asks for this information at
execution time. Therefore we have no circular dependency.
この例は、面白い依存関係を持っています。dateプロジェクトとhelloプロジェクトで定義されているタスクの評価は、明らかにwebDistの評価に依存しています。Webアプリのビルドロジックは、すべてwebDistによって注入されているからです。しかし、実行の依存関係はそれとは逆です。webDistはhelloとdateの成果物を使ってビルドされるからです。さらに、もう一つの依存関係があります。webDistプロジェクトの評価は、dateとhelloの評価に依存しています。なぜなら、それらのプロジェクトのarchivePathプロパティの値を知る必要があるからです。ただ、この問い合わせは実行時に行われていて、依存関係が循環しているわけではありません。
Such and other dependency patterns are daily bread in the problem space of multi-project builds. If a build system does not support these patterns, you either can't solve your problem or you need to do ugly hacks which are hard to maintain and massively impair your productivity as a build master.
この手の依存関係は、マルチプロジェクトのビルドではよく発生します。ビルドシステムがこのような依存関係に対応できなければ、解決できない問題が発生したり、苦し紛れのハックを行うハメになるでしょう。ビルドのメンテナンスが難しくなり、ビルドの管理者として生産性を大きく落としてしまうことになりかねません。
What if one project needs the jar produced by another project in its compile path, and not just the jar but also the transitive dependencies of this jar? Obviously this is a very common use case for Java multi-project builds. As already mentioned in 「プロジェクト依存関係 Project dependencies」, Gradle offers project lib dependencies for this.
あるプロジェクトが、別のプロジェクトの生成するjarをコンパイルするときのクラスパスに必要としていたらどうすればいいのでしょう。さらに、単にjarだけでなく、そのjarが依存する他のライブラリも必要だとしたら? これは、Javaのマルチプロジェクトではいかにもよくありそうなパターンです。「プロジェクト依存関係 Project dependencies」ですでに言及していますが、プロジェクト依存関係はこのようなケースに対応するものです。
例57.24 プロジェクト依存関係
Build layout
java/
settings.gradle
build.gradle
api/
src/main/java/
org/gradle/sample/
api/
Person.java
apiImpl/
PersonImpl.java
services/personService/
src/
main/java/
org/gradle/sample/services/
PersonService.java
test/java/
org/gradle/sample/services/
PersonServiceTest.java
shared/
src/main/java/
org/gradle/sample/shared/
Helper.javaノート: 本例のソースコードは、Gradleのバイナリ配布物またはソース配布物に含まれています。以下の場所をご参照ください。samples/userguide/multiproject/dependencies/java
We have the projects “shared”, “api” and “personService”.
The “personService” project has a lib dependency on the other two projects. The “api” project
has a lib dependency on the “shared” project.
[34]
shared、api、personServiceの三つのプロジェクトがあります。personServiceプロジェクトは他の二つのプロジェクトに依存しています。さらに、apiプロジェクトはsharedプロジェクトに依存しています。
[35]
例57.25 プロジェクト依存関係
settings.gradle
include 'api', 'shared', 'services:personService'
build.gradle
subprojects {
apply plugin: 'java'
group = 'org.gradle.sample'
version = '1.0'
repositories {
mavenCentral()
}
dependencies {
testCompile "junit:junit:4.11"
}
}
project(':api') {
dependencies {
    compile project(':shared')
}
}
project(':services:personService') {
dependencies {
compile project(':shared'), project(':api')
}
}All the build logic is in the
“build.gradle” file of the root project.
[36]
A “lib”
dependency is a special form of an execution dependency. It causes the other project to be built first and
adds the jar with the classes of the other project to the classpath. It also adds the dependencies of the
other project to the classpath. So you can enter the
“api”
directory and trigger a “gradle compile”. First
the “shared” project
is built and then
the “api” project
is built. Project dependencies enable partial multi-project builds.
ビルドロジックはすべてルートプロジェクトのbuild.gradleに記述されています。
[37]
プロジェクト依存関係は、実行依存の別形態といえます。まずあるプロジェクトのビルドを実行し、生成されたクラスをjarに格納して、そのプロジェクトに依存しているプロジェクトのクラスパスに追加するのです。さらに、そのプロジェクトの依存関係も同時にクラスパスに追加します。apiディレクトリに移動して、gradle compileと入力してみましょう。まずsharedがビルドされ、次にapiがビルドされるでしょう。プロジェクト依存はマルチプロジェクトの部分ビルドを可能にします。
If you come from Maven land you might be perfectly happy with this. If you come from Ivy land, you might expect some more fine grained control. Gradle offers this to you:
Mavenを使用されてきた人なら、このことですごく満足できるでしょう。Ivyの経験をお持ちなら、もっと細かい制御を期待するかもしれません。Gradleでは、次のようにします。
例57.26 細かい依存関係の制御
build.gradle
subprojects {
apply plugin: 'java'
group = 'org.gradle.sample'
version = '1.0'
}
project(':api') {
configurations {
spi
}
dependencies {
compile project(':shared')
}
task spiJar(type: Jar) {
baseName = 'api-spi'
dependsOn classes
from sourceSets.main.output
include('org/gradle/sample/api/**')
}
artifacts {
spi spiJar
}
}
project(':services:personService') {
dependencies {
compile project(':shared')
compile project(path: ':api', configuration: 'spi')
testCompile "junit:junit:4.11", project(':api')
}
}The Java plugin adds per default a jar to your project libraries which contains all the classes. In this
example we create an
additional
library containing only the interfaces of the
“api”
project. We assign this library to a new dependency configuration. For the person
service we declare that the project should be compiled only against the
“api”
interfaces but tested with all classes from “api”.
Javaプラグインは、デフォルトではすべてのクラスが含まれたjarをプロジェクトのライブラリとして追加しますが、ここではそれに加えて、apiプロジェクトのインターフェースのみが含まれたライブラリを作成しています。そしてこのライブラリを、新規に作成した、依存関係のコンフィギュレーション(spi)に割り当てています。person serviceをコンパイルするときはインターフェースしか要りませんが、テストをするにはapiからすべてのクラスを持ってくる必要があるのです。
Sometimes you don't want depended on projects to be built when doing a partial build.
To disable the build of the depended on projects you can run Gradle with the -a option.
部分ビルドを実行する際、依存しているプロジェクトはビルドしたくない、という場合もあるかもしれません。依存しているプロジェクトのビルドを無効化するには、-aオプションをつけてプロジェクトをビルドしてください。
With more and more CPU cores available on developer desktops and CI servers, it is important that Gradle is able to fully utilise these processing resources. More specifically, the parallel execution attempts to:
- Reduce total build time for a multi-project build where execution is IO bound or otherwise does not consume all available CPU resources.
- Provide faster feedback for execution of small projects without awaiting completion of other projects.
Although Gradle already offers parallel test execution via Test.setMaxParallelForks()
the feature described in this section is parallel execution at a project level.
Parallel execution is an incubating feature. Please use it and let us know how it works for you.
Parallel project execution allows the separate projects in a decoupled multi-project build to be executed in parallel (see also: 「分離されたプロジェクト Decoupled Projects」). While parallel execution does not strictly require decoupling at configuration time, the long-term goal is to provide a powerful set of features that will be available for fully decoupled projects. Such features include:
- 「Configuration on demand」.
- Configuration of projects in parallel.
- Re-use of configuration for unchanged projects.
- Project-level up-to-date checks.
- Using pre-built artifacts in the place of building dependent projects.
How does parallel execution work? First, you need to tell Gradle to use the parallel mode. You can use the command line argument (付録D Gradle コマンドラインGradle Command Line) or configure your build environment (「gradle.propertiesを使用したビルド環境の構築Configuring the build environment via gradle.properties」). Unless you provide a specific number of parallel threads Gradle attempts to choose the right number based on available CPU cores. Every parallel worker exclusively owns a given project while executing a task. This means that 2 tasks from the same project are never executed in parallel. Therefore only multi-project builds can take advantage of parallel execution. Task dependencies are fully supported and parallel workers will start executing upstream tasks first. Bear in mind that the alphabetical scheduling of decoupled tasks, known from the sequential execution, does not really work in parallel mode. You need to make sure the task dependencies are declared correctly to avoid ordering issues.
Gradle allows any project to access any other project during both the configuration and execution phases. While this provides a great deal of power and flexibility to the build author, it also limits the flexibility that Gradle has when building those projects. For instance, this effectively prevents Gradle from correctly building multiple projects in parallel, configuring only a subset of projects, or from substituting a pre-built artifact in place of a project dependency.
Gradleでは、評価フェーズでも実行フェーズでも、あらゆるプロジェクト間でお互いにアクセスすることができるようになっています。 これはビルドの作成者にとっては非常に強力で柔軟性のある仕様ですが、ビルド時にはGradleの方の柔軟性が制限されることになります。 例を挙げると、強固に結合されたプロジェクトは、Gradleに平行ビルドさせることができませんし、依存プロジェクトの代わりにビルド済みのアーティファクトを使用することもできません。
Two projects are said to be decoupled if they do not directly access each other's project model. Decoupled projects may only interact in terms of declared dependencies: project dependencies (「プロジェクト依存関係 Project dependencies」) and/or task dependencies (「タスクの依存関係Task dependencies」). Any other form of project interaction (i.e. by modifying another project object or by reading a value from another project object) causes the projects to be coupled. The consequence of coupling during the configuration phase is that if gradle is invoked with the 'configuration on demand' option, the result of the build can be flawed in several ways. The consequence of coupling during execution phase is that if gradle is invoked with the parallel option, one project task runs too late to influence a task of a project building in parallel. Gradle does not attempt to detect coupling and warn the user, as there are too many possibilities to introduce coupling.
お互いのプロジェクト・モデルにアクセスしない二つのプロジェクトは、分離されたプロジェクトと呼ばれます。 分離されたプロジェクトでは、お互いのやりとりに依存関係宣言のみを使用します。つまり、プロジェクト依存(「プロジェクト依存関係 Project dependencies」)やタスク依存(「タスクの依存関係Task dependencies」)です。 その他のあらゆるアクセス、例えば他プロジェクトのオブジェクトを変更したり、設定値を読み込んだりといった処理は、全てプロジェクトを結合させます。
A very common way for projects to be coupled is by using configuration injection (「クロスプロジェクト設定Cross project configuration」). It may not be immediately apparent, but using key
Gradle features like the allprojects and subprojects keywords automatically cause your projects to be coupled.
This is because these keywords are used in a build.gradle file, which defines a project. Often this is a “root project” that does nothing more than
define common configuration, but as far as Gradle is concerned this root project is still a fully-fledged project, and by using allprojects
that project is effectively coupled to all other projects. Coupling of the root project to subprojects does not impact 'configuration on demand', but using the
allprojects and subprojects in any subproject's build.gradle file will have an impact.
プロジェクトが結合されるもっとも一般的な状況は、設定のインジェクション(「クロスプロジェクト設定Cross project configuration」)です。
これは直ぐには分かりにくいかもしれませんが、allprojectsやsubprojectsキーワードのような、Gradleの特定の機能を使うと、プロジェクトは自動的に結合されます。
これらのキーワードは、build.gradleファイルで別のプロジェクトを定義するのに使われるからです。
共通設定の定義しかしていないルートプロジェクトもよくありますが、Gradleがルートプロジェクトを、完全な普通のプロジェクトと判断し、さらにallprojectsを使用している限り、プロジェクトは他の全てのプロジェクトと結合されます。
This means that using any form of shared build script logic or configuration injection (allprojects, subprojects, etc.)
will cause your projects to be coupled. As we extend the concept of project decoupling and provide features that take advantage of decoupled projects,
we will also introduce new features to help you to solve common use cases (like configuration injection) without causing your projects to be coupled.
つまり、どんな形であれ、ビルドスクリプトのロジック共有、および設定のインジェクション(allprojectsやsubprojectsなど)は、プロジェクトを結合させるということです。
私たちは、この分離されたプロジェクトという概念を拡張し、有効活用するような機能を追加する予定です。それにより、設定インジェクションなどの機能を、プロジェクトを結合することなく実現できます。
In order to make good use of cross project configuration without running into issues for parallel and 'configuration on demand' options, follow these recommendations:
-
Avoid a subproject's
build.gradlereferencing other subprojects; prefering cross configuration from the root project. - Avoid changing the configuration of other projects at execution time.
The build task of the Java plugin is typically used to compile, test, and perform
code style checks (if the CodeQuality plugin is used) of a single project. In multi-project builds
you may often want to do all of these tasks across a range of projects. The buildNeeded
and buildDependents tasks can help with this.
Javaプラグインのbuildタスクは、シングルプロジェクトをコンパイル、テスト、さらに(CodeQualityプラグインを使っていれば)コードスタイルのチェックも行うという、典型的なビルド処理を実行します。さらに、マルチプロジェクトを構成している場合は、これらのタスクをプロジェクトを横断して実行したい場面もあるでしょう。buildNeededとbuildDependentsはこの用途を助けてくれるものです。
Let's use the project structure shown in 例57.25「プロジェクト依存関係」. In this
example, the “:services:personservice” project depends on both the “:api” and “:shared” projects. The “:api” project also depends on the “:shared” project.
例57.25「プロジェクト依存関係」にあるプロジェクトの構造を使いましょう。この例では:service:personserviceが:apiと:sharedの双方に依存しています。また、:apiは:sharedに依存しています。
Assume you are working on a single project, the “:api” project. You have been making changes, but
have not built the entire project since performing a clean. You want to build any necessary supporting
jars, but only perform code quality and unit tests on the project you have changed.
The build task does this.
シングルプロジェクトの:apiプロジェクトで作業しているとします。:apiに変更を加えましたが、クリーン以降、まだプロジェクト全体のビルドはしていません。jarが必要になってビルドするというとき、コード品質のチェックやユニットテストは自分が変更したプロジェクトでのみ実行したいところです。buildタスクは、まさにこの処理を行います。
例57.27 シングルプロジェクトのビルドとテスト
gradle :api:build の出力
> gradle :api:build :shared:compileJava :shared:processResources :shared:classes :shared:jar :api:compileJava :api:processResources :api:classes :api:jar :api:assemble :api:compileTestJava :api:processTestResources :api:testClasses :api:test :api:check :api:build BUILD SUCCESSFUL Total time: 1 secs
While you are working in a typical development cycle repeatedly building and testing changes to
the “:api” project (knowing that you are only changing files in this one project), you may not want to
even suffer the expense of building “:shared:compile” to see what has changed in the “:shared” project.
Adding the “-a” option will cause Gradle to use cached jars to resolve any project lib
dependencies and not try to re-build the depended on projects.
典型的な開発サイクルでは、:apiプロジェクトに何か変更を加えるたびビルドとテストを繰り返すことになります。このとき、:shared:compileタスクは、ビルドのたび:sharedプロジェクトが変更されていないか確認しに行きます。:apiプロジェクトしか変更していないことが分かっている場合、このコストさえ苦痛かもしれません。-aオプションをつけてビルドすると、依存プロジェクトのライブラリを解決する際、キャッシュされたjarが使用されるので、依存プロジェクトが再ビルドされることありません。
例57.28 シングルプロジェクトの部分ビルドとテスト
gradle -a :api:build の出力
> gradle -a :api:build :api:compileJava :api:processResources :api:classes :api:jar :api:assemble :api:compileTestJava :api:processTestResources :api:testClasses :api:test :api:check :api:build BUILD SUCCESSFUL Total time: 1 secs
If you have just gotten the latest version of source from your version control system which included changes
in other projects that “:api” depends on, you might want to not only build all the projects you depend on,
but test them as well. The buildNeeded task also tests all the projects from the
project lib dependencies of the testRuntime configuration.
今、ちょうど最新のソースをバージョン管理システムから持ってきたとしましょう。:apiが依存しているプロジェクトが変更されていました。このとき、依存先の全プロジェクトについて、ビルドだけでなくテストもしたいと考えるかもしれません。buildNeededタスクは、指定したプロジェクトだけでなく、そのプロジェクトのtestRuntime依存関係に設定されているプロジェクトをすべてテストします。
例57.29 依存プロジェクトのビルドとテスト
gradle :api:buildNeeded の出力
> gradle :api:buildNeeded :shared:compileJava :shared:processResources :shared:classes :shared:jar :api:compileJava :api:processResources :api:classes :api:jar :api:assemble :api:compileTestJava :api:processTestResources :api:testClasses :api:test :api:check :api:build :shared:assemble :shared:compileTestJava :shared:processTestResources :shared:testClasses :shared:test :shared:check :shared:build :shared:buildNeeded :api:buildNeeded BUILD SUCCESSFUL Total time: 1 secs
You also might want to refactor some part of the “:api” project that is used in other projects.
If you make these types of changes, it is not sufficient to test just the “:api”
project, you also need to test all projects that depend on the “:api” project.
The buildDependents task also tests all the projects that have a project lib dependency
(in the testRuntime configuration) on the specified project.
さらに、:apiプロジェクトをリファクタリングする場合のことを考えてみます。:apiプロジェクトは他のプロジェクトから使用されているので、このプロジェクトだけテストしても十分とは言えません。:apiプロジェクトに依存しているすべてのプロジェクトをテストする必要があります。buildDependentsタスクは、指定したプロジェクトだけでなく、そのプロジェクトにtestRuntimeのプロジェクト依存関係を持っているすべてのプロジェクトをテストします。
例57.30 依存されているプロジェクトのビルドとテスト
gradle :api:buildDependents の出力
> gradle :api:buildDependents :shared:compileJava :shared:processResources :shared:classes :shared:jar :api:compileJava :api:processResources :api:classes :api:jar :api:assemble :api:compileTestJava :api:processTestResources :api:testClasses :api:test :api:check :api:build :services:personService:compileJava :services:personService:processResources :services:personService:classes :services:personService:jar :services:personService:assemble :services:personService:compileTestJava :services:personService:processTestResources :services:personService:testClasses :services:personService:test :services:personService:check :services:personService:build :services:personService:buildDependents :api:buildDependents BUILD SUCCESSFUL Total time: 1 secs
Finally, you may want to build and test everything in all projects. Any task you run in the root project folder
will cause that same named task to be run on all the children. So you can just run
“gradle build” to build and test all projects.
最後に、すべてのプロジェクトをビルド、テストしたいと思うことがあるかもしれません。ルートプロジェクトのフォルダーでタスクを実行すれば、全ての子プロジェクトでそのタスクと同名のタスクが実行されます。なので、ただgradle buildと実行すれば大丈夫です。すべてのプロジェクトがビルドされテストされます。
「buildSrcプロジェクトのソースをビルドするBuild sources in the buildSrc project」 tells us that we can place build logic to be compiled and tested in the special buildSrc directory.
In a multi project build, there can only be one buildSrc directory which must be located in the root directory.
Properties and methods declared in a project are inherited to all its subprojects. This is an alternative to configuration injection. But we think that the model of inheritance does not reflect the problem space of multi-project builds very well. In a future edition of this user guide we might write more about this.
プロジェクトで宣言されたプロパティとメソッドは、すべての子プロジェクトに継承されます。これは設定のインジェクションの代替手段となるでしょう。ただ、私たちは継承というモデルはマルチプロジェクトの様々な特質を十分に反映できるものではないと考えています。将来バージョンのユーザーガイドでこのことについて詳しく書くつもりです。
Method inheritance might be interesting to use as Gradle's Configuration Injection does not support methods yet (but will in a future release).
なお、Gradleの設定のインジェクションではまだメソッドを注入することができません(将来のリリースで対応する予定です)。なので、メソッドについては継承を使う価値があるかもしれません。
You might be wondering why we have implemented a feature we obviously don't like that much. One reason is that it is offered by other tools and we want to have the check mark in a feature comparison :). And we like to offer our users a choice.
どうみても継承機能を敬遠しているのに、なんでそんなのを実装したのか不思議に思われるかもしれません。一つの理由は、継承機能が別のビルドツールで提供されているからです。比較表にチェックマークを付けたかったのです(^^)。また、ユーザーには選択肢を用意したかったというのもあります。
Writing this chapter was pretty exhausting and reading it might have a similar effect. Our final message
for this chapter is that multi-project builds with Gradle are usually
not
difficult. There are five elements you need to remember: allprojects,
subprojects, evaluationDependsOn, evaluationDependsOnChildren
and project lib dependencies.
[38]
With those elements, and keeping in mind that Gradle has a distinct configuration and execution phase, you
already have a lot of flexibility. But when you enter steep territory Gradle does not become an obstacle and
usually accompanies and carries you to the top of the mountain.
この章を書くのは非常に疲れました。読むのも疲れるでしょう。最後にひとつだけ、Gradleでマルチプロジェクトを扱うのは決して難しいことではありません。覚えておく必要があるのは次の5つだけです。allproject、subprojects、evaluationDependsOn、evaluationDependsOnChildren、そしてプロジェクト依存関係です。
[39]
この5つ、そしてGradleが設定フェーズと実行フェーズを別個に取り扱うのだということを覚えておけば、あとは多くの場合融通がききます。もし何らかの困難な問題に突き当たったとしても、Gradleが障害になることもなく、逆にあなたを見晴らしのいい山の上に連れて行ってくれるはずです。
[32] The real use case we had, was using http://lucene.apache.org/solr, where you need a separate war for each index you are accessing. That was one reason why we have created a distribution of webapps. The Resin servlet container allows us, to let such a distribution point to a base installation of the servlet container.
[33] 実際のケースではhttp://lucene.apache.org/solrを使っており、warファイルをアクセスするインデックスごとに分割する必要がありました。分散型のウェブアプリケーションを作成したひとつの理由はそれです。サーブレットコンテナResinはそのような分散させたWebアプリケーションを、ベースとなるサーブレットコンテナをポイントするよう設定することができます。
[34]
“services”
is also a project, but we use it just as a container. It has no build script and gets nothing
injected by another build script.
[35] servicesもまたプロジェクトですが、これはただの入れ物です。このプロジェクトにはビルドスクリプトも別のプロジェクトから注入される設定もありません。
[36] We do this here, as it makes the layout a bit easier. We usually put the project specific stuff into the build script of the respective projects.
[37] この例では、ビルドスクリプトの配置を少し簡易化しています。普通は、プロジェクトが指定するものはそのプロジェクトのビルドスクリプトに記述します。
[38] So we are well in the range of the 7 plus 2 Rule :)
[39] マジカルナンバー7±2に収まるナイスな量です
Gradle supports two types of task. One such type is the simple task, where you define the task with an action closure. We have seen these in 6章ビルドスクリプトの基本Build Script Basics. For this type of task, the action closure determines the behaviour of the task. This type of task is good for implementing one-off tasks in your build script.
Gradleは2種類のタスクをサポートしています。 そのひとつは単純タスクで、アクションクロージャでタスクを定義します。 これらは6章ビルドスクリプトの基本Build Script Basicsで説明してきたものです。 このタイプのタスクに対しては、タスクのふるまいはアクションクロージャによって決まります。 このタイプのタスクはビルドスクリプトで1回限りのタスクを実装するのに適しています。
The other type of task is the enhanced task, where the behaviour is built into the task, and the task provides some properties which you can use to configure the behaviour. We have seen these in 15章タスク詳解More about Tasks. Most Gradle plugins use enhanced tasks. With enhanced tasks, you don't need to implement the task behaviour as you do with simple tasks. You simply declare the task and configure the task using its properties. In this way, enhanced tasks let you reuse a piece of behaviour in many different places, possibly across different builds.
もうひとつは拡張タスクで、ふるまいがタスクの中に組み込まれており、ふるまいを制御することのできるプロパティが提供されます。 これらは15章タスク詳解More about Tasksで説明してきたものです。 ほとんどのGradleプラグインは拡張タスクを利用します。 拡張タスクでは、単純タスクのようにふるまいを実装する必要はありません。 単にタスクを宣言し、プロパティを利用してタスクを制御するだけです。 この方法により、拡張タスクではふるまいの断片を多くの場所で再利用したり、場合によっては異なるビルドで横断的に再利用したりできます。
The behaviour and properties of an enhanced task is defined by the task's class. When you declare an enhanced task, you specify the type, or class of the task.
拡張タスクのふるまいやプロパティはタスクのクラスによって定義されます。 拡張タスクを宣言するときは、タスクのタイプやクラスを指定します。
Implementing your own custom task class in Gradle is easy. You can implement a custom task class in pretty much any language you like, provided it ends up compiled to bytecode. In our examples, we are going to use Groovy as the implementation language, but you could use, for example, Java or Scala. In general, using Groovy is the easiest option, because the Gradle API is designed to work well with Groovy.
Gradleで独自のカスタムタスククラスを実装するのは簡単です。 カスタムタスククラスは、最終的にバイトコードにコンパイルされるなら、どんな言語でも好きなもので実装できます。 このサンプルでは実装言語としてGroovyを使いますが、例えばJavaやScalaを使うこともできます。 Gradle APIはGroovyとの親和性が高いように設計されているので、一般論としてGroovyが一番簡単な選択肢ではありますが。
There are several places where you can put the source for the task class.
タスククラスのソースを配置できる箇所はいくつかあります。
- ビルドスクリプトBuild script
You can include the task class directly in the build script. This has the benefit that the task class is automatically compiled and included in the classpath of the build script without you having to do anything. However, the task class is not visible outside the build script, and so you cannot reuse the task class outside the build script it is defined in.
タスククラスをビルドスクリプトに直接含めることができます。 この方法は、特に何もしなくてもタスククラスが自動的にコンパイルされ、ビルドスクリプトのクラスパスに追加されるというメリットがあります。 しかし、タスククラスがビルドスクリプトの外部からは参照できないため、タスククラスを定義しているビルドスクリプトの外部では再利用できません。
buildSrcプロジェクトbuildSrcprojectYou can put the source for the task class in the
rootProjectDir/buildSrc/src/main/groovybuildSrcproject approach separates the task declaration - that is, what the task should do - from the task implementation - that is, how the task does it.タスククラスのソースを
rootProjectDir/buildSrc/src/main/groovybuildSrcプロジェクトを使うアプローチでは、タスクの宣言「タスクが何を実行すべきか」と、タスクの実装「タスクがそれをどうやって実行するか」を分離できます。See 60章ビルドロジックの体系化Organizing Build Logic for more details about the
buildSrcproject.buildSrcプロジェクトの詳細については、60章ビルドロジックの体系化Organizing Build Logicを参照してください。- スタンドアロンプロジェクトStandalone project
You can create a separate project for your task class. This project produces and publishes a JAR which you can then use in multiple builds and share with others. Generally, this JAR might include some custom plugins, or bundle several related task classes into a single library. Or some combination of the two.
タスククラスのために独立したプロジェクトを作ることもできます。 このプロジェクトはJARを生成して発行するので、複数のビルドで利用したり、他のユーザーと共有することができます。 一般に、このJARはカスタムプラグインを含むか、関連するいくつかのタスククラスを単一のライブラリにバンドルする場合があります。 あるいは、その両方の組み合わせです。
In our examples, we will start with the task class in the build script, to keep things simple. Then we will look at creating a standalone project.
サンプルでは、簡単のためにビルドスクリプト内のタスククラスからはじめます。 その後、スタンドアロンプロジェクトについて説明します。
To implement a custom task class, you extend DefaultTask.
カスタムタスククラスを実装するには、DefaultTaskを拡張します。
This task doesn't do anything useful, so let's add some behaviour. To do so, we add a method to the task
and mark it with the TaskAction annotation. Gradle will call the
method when the task executes. You don't have to use a method to define the behaviour for the task. You
could, for instance, call doFirst() or doLast() with a closure in the
task constructor to add behaviour.
このタスクは何の役にも立たないので、ふるまいを追加してみましょう。
そのためには、タスクにメソッドを追加し、TaskActionアノテーションでマークします。
タスクが実行されたときに、Gradleがこのメソッドを呼びます。
タスクのふるまいを定義するには、必ずしもメソッドを使う必要はありません。
例えば、タスクのコンストラクタでクロージャを引数としてdoFirst()やdoLast()を呼ぶことでふるまいを追加することもできます。
例58.2 hello worldタスク
build.gradle
task hello(type: GreetingTask) class GreetingTask extends DefaultTask { @TaskAction def greet() { println 'hello from GreetingTask' } }
gradle -q hello の出力
> gradle -q hello hello from GreetingTask
Let's add a property to the task, so we can customize it. Tasks are simply POGOs, and when you declare a
task, you can set the properties or call methods on the task object. Here we add a greeting
property, and set the value when we declare the greeting task.
タスクにプロパティを追加して、カスタマイズできるようにしてみましょう。
タスクは単純なPOGOsで、タスクを宣言するときにプロパティをセットしたり、タスクオブジェクトのメソッドを呼んだりできます。
ここでは、greetingプロパティを追加して、greetingタスクを宣言するときにその値をセットしています。
例58.3 カスタマイズ可能なhello worldタスク
build.gradle
// Use the default greeting task hello(type: GreetingTask) // Customize the greeting task greeting(type: GreetingTask) { greeting = 'greetings from GreetingTask' } class GreetingTask extends DefaultTask { String greeting = 'hello from GreetingTask' @TaskAction def greet() { println greeting } }
gradle -q hello greeting の出力
> gradle -q hello greeting hello from GreetingTask greetings from GreetingTask
Now we will move our task to a standalone project, so we can publish it and share it with others. This project is simply a Groovy project that produces a JAR containing the task class. Here is a simple build script for the project. It applies the Groovy plugin, and adds the Gradle API as a compile-time dependency.
それでは、タスクをスタンドアロンプロジェクトに移動して、発行したり他ユーザーと共有したりできるようにしてみましょう。 このプロジェクトは単純なGroovyプロジェクトで、タスククラスを含むJARを生成します。 プロジェクトに対する簡単なビルドスクリプトがこちらです。
例58.4 カスタムタスクのビルド
build.gradle
apply plugin: 'groovy'
dependencies {
compile gradleApi()
compile localGroovy()
}ノート: 本例のソースコードは、Gradleのバイナリ配布物またはソース配布物に含まれています。以下の場所をご参照ください。samples/customPlugin/plugin
We just follow the convention for where the source for the task class should go.
タスククラスのソースを配置する場所は規約に従いました。
例58.5 カスタムタスク
src/main/groovy/org/gradle/GreetingTask.groovy
package org.gradle import org.gradle.api.DefaultTask import org.gradle.api.tasks.TaskAction class GreetingTask extends DefaultTask { String greeting = 'hello from GreetingTask' @TaskAction def greet() { println greeting } }
To use a task class in a build script, you need to add the class to the build script's classpath. To
do this, you use a buildscript { } block, as described in 「ビルドスクリプトで外部ライブラリを使うときの依存関係設定External dependencies for the build script」.
The following example shows how you might do this when the JAR containing the task class has been published
to a local repository:
ビルドスクリプトでタスククラスを使うためには、ビルドスクリプトのクラスパスにタスククラスを追加する必要があります。
これを実行するには、「ビルドスクリプトで外部ライブラリを使うときの依存関係設定External dependencies for the build script」で説明されているとおり、buildscript { }ブロックを使います。
次のサンプルでは、タスククラスを含むJARをローカルリポジトリに発行した場合にどのようにすればよいかを示しています:
例58.6 カスタムタスクを別のプロジェクトで使う
build.gradle
buildscript {
repositories {
maven {
url uri('../repo')
}
}
dependencies {
classpath group: 'org.gradle', name: 'customPlugin',
version: '1.0-SNAPSHOT'
}
}
task greeting(type: org.gradle.GreetingTask) {
greeting = 'howdy!'
}You can use the ProjectBuilder class to create
Project instances to use when you test your task class.
タスククラスのテストのために、ProjectBuilderクラスを利用して
Projectのインスタンスを生成することができます。
例58.7 カスタムタスクのテスト
src/test/groovy/org/gradle/GreetingTaskTest.groovy
class GreetingTaskTest { @Test public void canAddTaskToProject() { Project project = ProjectBuilder.builder().build() def task = project.task('greeting', type: GreetingTask) assertTrue(task instanceof GreetingTask) } }
Incremental tasks are an incubating feature.
Since the introduction of the implementation described above (early in the Gradle 1.6 release cycle), discussions within the Gradle community have produced superior ideas for exposing the information about changes to task implementors to what is described below. As such, the API for this feature will almost certainly change in upcoming releases. However, please do experiment with the current implementation and share your experiences with the Gradle community.
The feature incubation process, which is part of the Gradle feature lifecycle (see 付録C 機能のライフサイクル The Feature Lifecycle), exists for this purpose of ensuring high quality final implementations through incorporation of early user feedback.
With Gradle, it's very simple to implement a task that gets skipped when all of it's inputs and outputs are up to date (see 「更新されていないタスクをスキップするSkipping tasks that are up-to-date」). However, there are times when only a few input files have changed since the last execution, and you'd like to avoid reprocessing all of the unchanged inputs. This can be particularly useful for a transformer task, that converts input files to output files on a 1:1 basis.
If you'd like to optimise your build so that only out-of-date inputs are processed, you can do so with an incremental task.
For a task to process inputs incrementally, that task must contain an incremental task action. This is a task action method that contains a
single IncrementalTaskInputs parameter, which indicates to Gradle that the action will process the changed inputs only.
The incremental task action may supply an IncrementalTaskInputs.outOfDate() action for processing any input file that is out-of-date,
and a IncrementalTaskInputs.removed() action that executes for any input file that has been removed since the previous execution.
例58.8 Defining an incremental task action
build.gradle
class IncrementalReverseTask extends DefaultTask { @InputDirectory def File inputDir @OutputDirectory def File outputDir @Input def inputProperty @TaskAction void execute(IncrementalTaskInputs inputs) { println inputs.incremental ? "CHANGED inputs considered out of date" : "ALL inputs considered out of date" inputs.outOfDate { change -> println "out of date: ${change.file.name}" def targetFile = new File(outputDir, change.file.name) targetFile.text = change.file.text.reverse() } inputs.removed { change -> println "removed: ${change.file.name}" def targetFile = new File(outputDir, change.file.name) targetFile.delete() } } }
ノート: 本例のソースコードは、Gradleのバイナリ配布物またはソース配布物に含まれています。以下の場所をご参照ください。samples/userguide/tasks/incrementalTask
For a simple transformer task like this, the task action simply needs to generate output files for any out-of-date inputs, and delete output files for any removed inputs.
A task may only contain a single incremental task action.
When Gradle has history of a previous task execution, and the only changes to the task execution context since that execution are to input files,
then Gradle is able to determine which input files need to be reprocessed by the task.
In this case, the IncrementalTaskInputs.outOfDate() action will be executed for any input file that was added or modified,
and the IncrementalTaskInputs.removed() action will be executed for any removed input file.
However, there are many cases where Gradle is unable to determine which input files need to be reprocessed. Examples include:
- There is no history available from a previous execution.
- You are building with a different version of Gradle. Currently, Gradle does not use task history from a different version.
- An
upToDateWhencriteria added to the task returnsfalse. - An input property has changed since the previous execution.
- One or more output files have changed since the previous execution.
In any of these cases, Gradle will consider all of the input files to be outOfDate.
The IncrementalTaskInputs.outOfDate() action will be executed for every input file, and the
IncrementalTaskInputs.removed() action will not be executed at all.
You can check if Gradle was able to determine the incremental changes to input files with IncrementalTaskInputs.isIncremental().
Given the incremental task implementation above, we can explore the various change scenarios by example. Note that the various mutation tasks ('updateInputs', 'removeInput', etc) are only present for demonstration purposes: these would not normally be part of your build script.
First, consider the IncrementalReverseTask executed against a set of inputs for the first time.
In this case, all inputs will be considered “out of date”:
例58.9 Running the incremental task for the first time
build.gradle
task incrementalReverse(type: IncrementalReverseTask) {
inputDir = file('inputs')
outputDir = file("$buildDir/outputs")
inputProperty = project.properties['taskInputProperty'] ?: "original"
}Build layout
incrementalTask/
build.gradle
inputs/
1.txt
2.txt
3.txtgradle -q incrementalReverse の出力
> gradle -q incrementalReverse ALL inputs considered out of date out of date: 1.txt out of date: 2.txt out of date: 3.txt
Naturally when the task is executed again with no changes, then the entire task is up to date and no files are reported to the task action:
例58.10 Running the incremental task with unchanged inputs
gradle -q incrementalReverse の出力
> gradle -q incrementalReverse
When an input file is modified in some way or a new input file is added, then re-executing the task results in those files being reported to IncrementalTaskInputs.outOfDate():
例58.11 Running the incremental task with updated input files
build.gradle
task updateInputs() << {
file('inputs/1.txt').text = "Changed content for existing file 1."
file('inputs/4.txt').text = "Content for new file 4."
}gradle -q updateInputs incrementalReverse の出力
> gradle -q updateInputs incrementalReverse CHANGED inputs considered out of date out of date: 1.txt out of date: 4.txt
When an existing input file is removed, then re-executing the task results in that file being reported to IncrementalTaskInputs.removed():
例58.12 Running the incremental task with an input file removed
build.gradle
task removeInput() << {
file('inputs/3.txt').delete()
}gradle -q removeInput incrementalReverse の出力
> gradle -q removeInput incrementalReverse CHANGED inputs considered out of date removed: 3.txt
When an output file is deleted (or modified), then Gradle is unable to determine which input files are out of date.
In this case, all input files are reported to the IncrementalTaskInputs.outOfDate() action,
and no input files are reported to the IncrementalTaskInputs.removed() action:
例58.13 Running the incremental task with an output file removed
build.gradle
task removeOutput() << {
file("$buildDir/outputs/1.txt").delete()
}gradle -q removeOutput incrementalReverse の出力
> gradle -q removeOutput incrementalReverse ALL inputs considered out of date out of date: 1.txt out of date: 2.txt out of date: 3.txt
When a task input property is modified, Gradle is unable to determine how this property impacted the task outputs, so all input files are assumed to be out of date.
So similar to the changed output file example, all input files are reported to
the IncrementalTaskInputs.outOfDate() action,
and no input files are reported to the IncrementalTaskInputs.removed() action:
例58.14 Running the incremental task with an input property changed
gradle -q -PtaskInputProperty=changed incrementalReverse の出力
> gradle -q -PtaskInputProperty=changed incrementalReverse ALL inputs considered out of date out of date: 1.txt out of date: 2.txt out of date: 3.txt
A Gradle plugin packages up reusable pieces of build logic, which can be used across many different projects and builds. Gradle allows you to implement your own custom plugins, so you can reuse your build logic, and share it with others.
Gradleプラグインは再利用可能なビルドロジックの断片をパッケージとしてまとめ、異なるプロジェクトやビルドで横断的に使えるようにします。 Gradleは独自のカスタムプラグインの実装手段を提供していますので、独自のビルドロジックを再利用し、他のユーザーと共有することができます。
You can implement a custom plugin in any language you like, provided the implementation ends up compiled as bytecode. For the examples here, we are going to use Groovy as the implementation language. You could use Java or Scala instead, if you want.
カスタムプラグインは、最終的にバイトコードへコンパイルできるなら、どんな言語でもお好みの言語で実装することができます。 このサンプルでは実装言語としてGroovyを使います。 かわりにJavaやScalaを使うこともできますので、お好きにどうぞ。
There are several places where you can put the source for the plugin.
プラグインのソースを配置できる場所はいくつかあります。
- ビルドスクリプトBuild script
You can include the source for the plugin directly in the build script. This has the benefit that the plugin is automatically compiled and included in the classpath of the build script without you having to do anything. However, the plugin is not visible outside the build script, and so you cannot reuse the plugin outside the build script it is defined in.
ビルドスクリプトの中にプラグインのソースを直接含めることができます。 この方法は、特になにもしなくてもプラグインが自動的にコンパイルされ、ビルドスクリプトのクラスパスに追加されるという利点があります。 しかし、プラグインはビルドスクリプトの外部から参照できないため、プラグインが定義されているビルドスクリプトの外部からは再利用できません。
buildSrcプロジェクトbuildSrcprojectYou can put the source for the plugin in the
rootProjectDir/buildSrc/src/main/groovyプラグインのソースを
rootProjectDir/buildSrc/src/main/groovySee 60章ビルドロジックの体系化Organizing Build Logic for more details about the
buildSrcproject.buildSrcプロジェクトの詳細については、60章ビルドロジックの体系化Organizing Build Logicを参照してください。- スタンドアロンプロジェクトStandalone project
You can create a separate project for your plugin. This project produces and publishes a JAR which you can then use in multiple builds and share with others. Generally, this JAR might include some custom plugins, or bundle several related task classes into a single library. Or some combination of the two.
プラグイン用に独立したプロジェクトを作ることができます。 このプロジェクトはJARを生成して発行するので、複数のビルドで利用したり、他のユーザーと共有することができます。 一般的に、このJARはカスタムプラグイン、ないしは関連するいくつかのタスククラスのバンドルする場合があります。 あるいは、その両方の組み合わせです。
In our examples, we will start with the plugin in the build script, to keep things simple. Then we will look at creating a standalone project.
このサンプルでは、簡単のためにビルドスクリプト内のプラグインからはじめます。 その後、スタンドアロンプロジェクトの作り方をみてみましょう。
To create a custom plugin, you need to write an implementation of Plugin.
Gradle instantiates the plugin and calls the plugin instance's Plugin.apply() method when the
plugin is used with a project. The project
object is passed as a parameter, which the plugin can use to configure the project however it needs to.
The following sample contains a greeting plugin, which adds a hello task to the project.
カスタムプラグインを作るには、Pluginの実装を作成する必要があります。
Gradleはプラグインのインスタンスを生成し、プロジェクトでプラグインが利用されるときにプラグインインスタンスのPlugin.apply()メソッドを呼びます。
プロジェクトオブジェクトがパラメータとして渡され、必要に応じてプラグインがプロジェクトを構成するのに使えます。
次のサンプルは、プロジェクトにhelloタスクを追加するgreetingプラグインを含んでいます。
例59.1 カスタムプラグイン
build.gradle
apply plugin: GreetingPlugin class GreetingPlugin implements Plugin<Project> { void apply(Project project) { project.task('hello') << { println "Hello from the GreetingPlugin" } } }
gradle -q hello の出力
> gradle -q hello Hello from the GreetingPlugin
One thing to note is that a new instance of a given plugin is created for each project it is applied to. Also
note that the Plugin class is a generic type. This example has it receiving the
Plugin type as a type parameter. It's possible to write unusual custom
plugins that take different type parameters, but this will be unlikely (until someone figures out more
creative things to do here).
注意すべきは、指定されたプラグインが適用されるプロジェクト毎に、新しいプラグインのインスタンスが生成されることです。Also
note that the Plugin class is a generic type. This example has it receiving the
Plugin type as a type parameter. It's possible to write unusual custom
plugins that take different type parameters, but this will be unlikely (until someone figures out more
creative things to do here).
Let's add a simple extension object to the project. Here we add a greeting extension object to the
project, which allows you to configure the greeting.
プロジェクトにシンプルなextensionオブジェクトを追加してみましょう
ここでは、プロジェクトにextensionオブジェクトgreetingを追加し、greetingタスクを構成可能にしています。
例59.2 カスタムプラグインのextension
build.gradle
apply plugin: GreetingPlugin greeting.message = 'Hi from Gradle' class GreetingPlugin implements Plugin<Project> { void apply(Project project) { // Add the 'greeting' extension object project.extensions.create("greeting", GreetingPluginExtension) // Add a task that uses the configuration project.task('hello') << { println project.greeting.message } } } class GreetingPluginExtension { def String message = 'Hello from GreetingPlugin' }
gradle -q hello の出力
> gradle -q hello Hi from Gradle
In this example, GreetingPluginExtension is a plain old Groovy object with a field called message.
The extension object is added to the plugin list with the name greeting. This object then becomes available as a project property
with the same name as the extension object.
この例では、GreetingPluginExtensionはmessageフィールドを持つPOGO(plain old Groovy object)です。
extensionオブジェクトはgreetingという名前でプラグインリストに追加されます。
このオブジェクトは、extensionオブジェクトと同じ名前のプロジェクトプロパティとして有効になります。
Oftentimes, you have several related properties you need to specify on a single plugin. Gradle adds a configuration closure block for each extension object, so you can group settings together. The following example shows you how this works.
しばしば、ひとつのプラグインに対していくつかの関連したプロパティを指定する必要がある場合があります。 Gradleはそれぞれのextensionオブジェクトに対してコンフィグレーションクロージャブロックを追加するので、 グループの設定をまとめて行うことができます。 次のサンプルは、これがどのように働くのかを示しています。
例59.3 コンフィグレーションクロージャ付きのカスタムプラグイン
build.gradle
apply plugin: GreetingPlugin
greeting {
message = 'Hi'
greeter = 'Gradle'
}
class GreetingPlugin implements Plugin<Project> {
void apply(Project project) {
project.extensions.create("greeting", GreetingPluginExtension)
project.task('hello') << {
println "${project.greeting.message} from ${project.greeting.greeter}"
}
}
}
class GreetingPluginExtension {
String message
String greeter
}gradle -q hello の出力
> gradle -q hello Hi from Gradle
In this example, several settings can be grouped together within the greeting closure.
The name of the closure block in the build script (greeting) needs to match the extension object name.
Then, when the closure is executed, the fields on the extension object will be mapped to the variables within the closure
based on the standard Groovy closure delegate feature.
この例では、greetingクロージャ内にいくつかの設定をグループ化してまとめることができています。
ビルドスクリプトにおけるクロージャブロックの名前(greeting)は、extensionオブジェクトの名前と一致している必要があります。
そして、クロージャが実行されると、Groovyの標準のクロージャ委譲機能に基づいて、extensionオブジェクトのフィールドはクロージャ内の変数にマップされます。
When developing custom tasks and plugins, it's a good idea to be very flexible when accepting input configuration for file locations.
To do this, you can leverage the Project.file() method to resolve values to files as late as possible.
カスタムタスクやプラグインを開発するとき、ファイルロケーションの入力コンフィグレーションを柔軟に行えるようにするのは良いアイデアです。
これを実現するにあたり、ファイルに対する値の解決をなるべく遅らせるためにProject.file()メソッドを活用できます
例59.4 ファイルプロパティの遅延評価
build.gradle
class GreetingToFileTask extends DefaultTask { def destination File getDestination() { project.file(destination) } @TaskAction def greet() { def file = getDestination() file.parentFile.mkdirs() file.write "Hello!" } } task greet(type: GreetingToFileTask) { destination = { project.greetingFile } } task sayGreeting(dependsOn: greet) << { println file(greetingFile).text } ext.greetingFile = "$buildDir/hello.txt"
gradle -q sayGreeting の出力
> gradle -q sayGreeting Hello!
In this example, we configure the greet task destination property as a closure, which is evaluated with
the Project.file() method to turn the return value of the closure into a file object
at the last minute. You will notice that in the example above we specify the greetingFile property value after we have
configured to use it for the task. This kind of lazy evaluation is a key benefit of accepting any value when setting a file property, then
resolving that value when reading the property.
この例では、greetタスクのdestinationプロパティをクロージャで定義したので、
クロージャの戻り値をfileオブジェクトに変換することが必要になる直前にProject.file()メソッドによって評価されます。
上記のサンプルでは、タスクで値を利用するコンフィグレーションを行った後でgreetingFileプロパティの値を指定していることに気づくでしょう。
この種の遅延評価は、ファイルプロパティを設定する際に任意の値を受け入れ、そしてプロパティの読み出し時に値を解決することができるという重要なメリットをもたらします。
Now we will move our plugin to a standalone project, so we can publish it and share it with others. This project is simply a Groovy project that produces a JAR containing the plugin classes. Here is a simple build script for the project. It applies the Groovy plugin, and adds the Gradle API as a compile-time dependency.
それでは、プラグインをスタンドアロンプロジェクトに移動して、発行して他のユーザーと共有できるようにしましょう。 このプロジェクトは、プラグインクラスを含むJARを発行する単なるGroovyプロジェクトです。 プロジェクトに対するシンプルなビルドスクリプトはこのようになります。 Groovyプラグインを適用して、コンパイル時の依存関係としてGradle APIを追加しています。
例59.5 カスタムプラグインに対するビルド
build.gradle
apply plugin: 'groovy'
dependencies {
compile gradleApi()
compile localGroovy()
}ノート: 本例のソースコードは、Gradleのバイナリ配布物またはソース配布物に含まれています。以下の場所をご参照ください。samples/customPlugin/plugin
So how does Gradle find the Plugin implementation? The answer is you need to provide a properties file in the jar's
META-INF/gradle-plugins directory that matches the id of your plugin.
GradleはどのようにしてPluginの実装を探すのでしょうか?
その答えは、JARのMETA-INF/gradle-pluginsディレクトリに、
プラグインのIDに対応するプロパティファイルを提供する必要があるということです。
例59.6 カスタムプラグインに対するワイヤリング
src/main/resources/META-INF/gradle-plugins/org.samples.greeting.properties
implementation-class=org.gradle.GreetingPlugin
Notice that the properties filename matches the plugin id and is placed in the resources folder, and
that the implementation-class property identifies the Plugin implementation class.
プロパティファイルの名前がプラグインIDと一致していてリソースフォルダに配置されていること、
implementation-classプロパティにPluginの実装クラスを指定していることに注意してください。
Plugin ids are fully qualified in a manner similar to Java packages (i.e. a reverse domain name). This helps to avoid collisions and provides a way to group plugins with similar ownership.
Your plugin id should be a combination of components that reflect namespace (a reasonable pointer to you or your organization)
and the name of the plugin it provides. For example if you had a Github account named “foo” and your plugin was named “bar”,
a suitable plugin id might be com.github.foo.bar. Similarly, if the plugin was developed at the baz organization,
the plugin id might be org.baz.bar.
Plugin ids should conform to the following:
- May contain any alphanumeric character, '.', and '-'.
- Must contain at least one '.' character separating the namespace from the name of the plugin.
- Conventionally use a lowercase reverse domain name convention for the namespace.
- Conventionally use only lowercase characters in the name.
org.gradleandcom.gradlewarenamespaces may not be used.- Cannot start or end with a '.' character.
- Cannot contain consecutive '.' characters (i.e. '..').
Although there are conventional similarities between plugin ids and package names, package names are generally more detailed than is necessary for a plugin id. For instance, it might seem reasonable to add “gradle” as a component of your plugin id, but since plugin ids are only used for Gradle plugins, this would be superfluous. Generally, a namespace that identifies ownership and a name are all that are needed for a good plugin id.
If you are publishing your plugin internally for use within your organization, you can publish it like any other code artifact. See the ivy and maven chapters on publishing artifacts.
If you are interested in publishing your plugin to be used by the wider Gradle community, you can publish it to the Gradle plugin portal. This site provides the ability to search for and gather information about plugins contributed by the Gradle community. See the instructions here on how to make your plugin available on this site.
To use a plugin in a build script, you need to add the plugin classes to the build script's classpath. To
do this, you use a “buildscript { }” block, as described in 「ビルドスクリプトで外部ライブラリを使うときの依存関係設定External dependencies for the build script」.
The following example shows how you might do this when the JAR containing the plugin has been published
to a local repository:
ビルドスクリプトでプラグインを使うためには、ビルドスクリプトのクラスパスにプラグインクラスを追加する必要があります。
このために、「ビルドスクリプトで外部ライブラリを使うときの依存関係設定External dependencies for the build script」で説明したように、buildscript { }ブロックが使えます
次のサンプルは、プラグインを含むJARがローカルリポジトリに発行済みのときにこれを行う方法を示しています:
例59.7 別のプロジェクトでカスタムプラグインを使う
build.gradle
buildscript {
repositories {
maven {
url uri('../repo')
}
}
dependencies {
classpath group: 'org.gradle', name: 'customPlugin',
version: '1.0-SNAPSHOT'
}
}
apply plugin: 'org.samples.greeting'Alternatively, if your plugin is published to the plugin portal, you can use the incubating plugins DSL (see 「Applying plugins with the plugins DSL」) to apply the plugin:
例59.8 Applying a community plugin with the plugins DSL
build.gradle
plugins {
id "com.jfrog.bintray" version "0.4.1"
}You can use the ProjectBuilder class to create
Project instances to use when you test your plugin implementation.
プラグイン実装をテストするときには、Projectインスタンスを生成するために
ProjectBuilderクラスが利用できます。
例59.9 カスタムプラグインのテスト
src/test/groovy/org/gradle/GreetingPluginTest.groovy
class GreetingPluginTest { @Test public void greeterPluginAddsGreetingTaskToProject() { Project project = ProjectBuilder.builder().build() project.apply plugin: 'org.samples.greeting' assertTrue(project.tasks.hello instanceof GreetingTask) } }
You can use the incubating Java Gradle Plugin development plugin
to eliminate some of the boilerplate declarations in your build script and provide some basic validations
of plugin metadata. This plugin will automatically apply the Java plugin,
add the gradleApi() dependency to the compile configuration, and perform plugin metadata
validations as part of the jar task execution.
例59.10 Using the Java Gradle Plugin Development plugin
build.gradle
apply plugin: 'java-gradle-plugin'Gradle provides some utility classes for maintaining collections of objects, which work well with the Gradle build language.
Gradleはオブジェクトのコレクションを管理するためのユーティリティクラスを提供しており、それらはGradleビルド言語の中で活用できます。
例59.11 ドメインオブジェクトの管理
build.gradle
apply plugin: DocumentationPlugin
books {
quickStart {
sourceFile = file('src/docs/quick-start')
}
userGuide {
}
developerGuide {
}
}
task books << {
books.each { book ->
println "$book.name -> $book.sourceFile"
}
}
class DocumentationPlugin implements Plugin<Project> {
void apply(Project project) {
def books = project.container(Book)
books.all {
sourceFile = project.file("src/docs/$name")
}
project.extensions.books = books
}
}
class Book {
final String name
File sourceFile
Book(String name) {
this.name = name
}
}gradle -q books の出力
> gradle -q books developerGuide -> /home/user/gradle/samples/userguide/organizeBuildLogic/customPluginWithDomainObjectContainer/src/docs/developerGuide quickStart -> /home/user/gradle/samples/userguide/organizeBuildLogic/customPluginWithDomainObjectContainer/src/docs/quick-start userGuide -> /home/user/gradle/samples/userguide/organizeBuildLogic/customPluginWithDomainObjectContainer/src/docs/userGuide
The Project.container() methods create instances of NamedDomainObjectContainer, that have many useful methods for managing and configuring the objects. In order
to use a type with any of the project.container methods, it MUST expose a property named “name”
as the unique, and constant, name for the object. The project.container(Class) variant of the container method creates
new instances by attempting to invoke the constructor of the class that takes a single string argument, which is the desired name of the object.
See the above link for project.container method variants that allow custom instantiation strategies.
Project.container()メソッドは、
オブジェクトの管理やコンフィグレーションに便利な多くのメソッドを提供する
NamedDomainObjectContainerのインスタンスを生成します。
project.containerのメソッドでタイプを扱うためには、
オブジェクトのユニークかつ固定の名前を提供する“name”プロパティを公開しなければなりません。
project.container(Class)メソッドおよびそのバリエーションは、
単一のstringを引数として取るクラスのコンストラクタの実行を試みることで新しいインスタンスを生成します。
このとき、引数はオブジェクトの名前となることが期待されます。
カスタムのインスタンス化戦略を可能にするproject.containerメソッドのバリエーションについては、上記のリンクを参照してください。
Gradle offers a variety of ways to organize your build logic. First of all you can put your build logic directly in the action closure of a task. If a couple of tasks share the same logic you can extract this logic into a method. If multiple projects of a multi-project build share some logic you can define this method in the parent project. If the build logic gets too complex for being properly modeled by methods then you likely should implement your logic with classes to encapsulate your logic. [40] Gradle makes this very easy. Just drop your classes in a certain directory and Gradle automatically compiles them and puts them in the classpath of your build script.
Gradleでは、様々な方法でビルドロジックを体系化できます。最初は、すべてのビルドロジックがタスクのクロージャに置かれているかもしれません。しかし、いくつかのタスクでロジックを共有したい場合はそのロジックをメソッドに切り出すことができます。マルチプロジェクトの場合、親プロジェクトでメソッドを定義すれば、サブプロジェクトでそのメソッドを共有できます。そうしてメソッドを切り出していけば、だんだんとビルドロジックが複雑になっていく場合もあるでしょう。そのときはオブジェクト指向のモデルを取り入れるのはどうでしょうか。 [41] Gradleでは、決まったディレクトリにクラスを放り込んでおけば自動的にコンパイルしてクラスパスに追加してくれるので、そういったモデルもとても簡単に実現できます。
Here is a summary of the ways you can organise your build logic:
ビルドロジックを体系化する方法について、いくつか例を挙げます。
POGOs. You can declare and use plain old Groovy objects (POGOs) directly in your build script. The build script is written in Groovy, after all, and Groovy provides you with lots of excellent ways to organize code.
POGOs。plain old Groovy Objects (POGOs) をビルドスクリプト内で直接宣言して使用できます。結局のところビルドスクリプトはGroovyで書くわけですから、Groovyで使えるいろんな方法でビルドロジックを体系化できるのです。
Inherited properties and methods. In a multi-project build, sub-projects inherit the properties and methods of their parent project.
プロパティとメソッドの継承。マルチプロジェクトでは、すべてのサブプロジェクトが親プロジェクトからプロパティとメソッドを継承します。
Configuration injection. In a multi-project build, a project (usually the root project) can inject properties and methods into another project.
設定のインジェクション。マルチプロジェクトでは、あるプロジェクト(普通ルートプロジェクトですが)が別のプロジェクトにプロパティとメソッドを注入できます。
buildSrcproject. Drop the source for your build classes into a certain directory and Gradle automatically compiles them and includes them in the classpath of your build script.buildSrcプロジェクト。ビルドスクリプトで使いたいクラスのソースを決まったディレクトリに入れておけば、Gradleは自動的にそのクラスをコンパイルしてクラスパスに追加します。Shared scripts. Define common configuration in an external build, and apply the script to multiple projects, possibly across different builds.
共有スクリプト。外部のスクリプトファイルに共通で使う設定を定義して、それをいろいろなプロジェクトのビルドスクリプトでプロジェクトに適用できます。別々のビルドに含まれているプロジェクトの間でも共有可能です。
Custom tasks. Put your build logic into a custom task, and reuse that task in multiple places.
カスタムタスク。ビルドロジックをカスタムタスクにすれば、いろんな場所でそのロジックを再利用できます。
Custom plugins. Put your build logic into a custom plugin, and apply that plugin to multiple projects. The plugin must be in the classpath of your build script. You can achieve this either by using
build sourcesor by adding an external library that contains the plugin.カスタムプラグイン。ビルドロジックをカスタムプラグインにすれば、いろんなプロジェクトでそのプラグインを適用することができます。プラグインはビルドスクリプトのクラスパスに追加しなければなりませんが、buildSrcプロジェクトや外部ライブラリにそのプラグインを含めれば簡単に追加できます。
Execute an external build. Execute another Gradle build from the current build.
外部ビルドの実行。現在のビルドから、外部の別のビルドを呼び出すことができます。
External libraries. Use external libraries directly in your build file.
外部ライブラリ。外部のライブラリを直接ビルドで使うことができます。
Any method or property defined in a project build script is also visible to all the sub-projects. You can use this to define common configurations, and to extract build logic into methods which can be reused by the sub-projects.
プロジェクト内で定義されたプロパティとメソッドは、そのプロジェクトのサブプロジェクトでもすべて使用できます。これを使って共通設定を定義したり、よく使うビルドロジックを抽出して複数のサブプロジェクトで再利用したりできます。
例60.1 プロパティとメソッドの継承を使う
build.gradle
// Define an extra property ext.srcDirName = 'src/java' // Define a method def getSrcDir(project) { return project.file(srcDirName) }
child/build.gradle
task show << {
// Use inherited property
println 'srcDirName: ' + srcDirName
// Use inherited method
File srcDir = getSrcDir(project)
println 'srcDir: ' + rootProject.relativePath(srcDir)
}gradle -q show の出力
> gradle -q show srcDirName: src/java srcDir: child/src/java
You can use the configuration injection technique discussed in 「クロスプロジェクト設定Cross project configuration」 and 「サブプロジェクトの設定Subproject configuration」 to inject properties and methods into various projects. This is generally a better option than inheritance, for a number of reasons: The injection is explicit in the build script, You can inject different logic into different projects, And you can inject any kind of configuration such as repositories, plug-ins, tasks, and so on. The following sample shows how this works.
「クロスプロジェクト設定Cross project configuration」や「サブプロジェクトの設定Subproject configuration」で紹介した設定のインジェクションを使って、複数のプロジェクトにプロパティとメソッドを注入できます。設定のインジェクションは、一般的には継承よりいい選択肢になるはずです。たくさん理由はありますが、たとえばインジェクションはスクリプト内で明示的に使用していることが分かりますし、いくつかのプロジェクトだけに別のロジックを注入することもできます。また、リポジトリ設定やGradleプラグイン、タスクなどどんな設定でも注入できます。インジェクションの例は以下のサンプルをご覧ください。
例60.2 プロパティとメソッドのインジェクション
build.gradle
subprojects {
// Define a new property
ext.srcDirName = 'src/java'
// Define a method using a closure as the method body
ext.srcDir = { file(srcDirName) }
// Define a task
task show << {
println 'project: ' + project.path
println 'srcDirName: ' + srcDirName
File srcDir = srcDir()
println 'srcDir: ' + rootProject.relativePath(srcDir)
}
}
// Inject special case configuration into a particular project
project(':child2') {
ext.srcDirName = "$srcDirName/legacy"
}child1/build.gradle
// Use injected property and method. Here, we override the injected value srcDirName = 'java' def dir = srcDir()
gradle -q show の出力
> gradle -q show project: :child1 srcDirName: java srcDir: child1/java project: :child2 srcDirName: src/java/legacy srcDir: child2/src/java/legacy
When you run Gradle, it checks for the existence of a directory called buildSrc.
Gradle then automatically compiles and tests this code and puts it in the classpath of your build script.
You don't need to provide any further instruction. This can be a good place to add your custom tasks and plugins.
Gradleは実行されたときにbuildSrcというディレクトリがないか確認します。
そして、中のコードを自動的にコンパイル、テストして、ビルドスクリプトのクラスパスに追加してくれるのです。
何かを設定する必要は一切ありません。このディレクトリは、カスタムタスクやプラグインを追加するのに適しています。
For multi-project builds there can be only one buildSrc directory, which has to be
in the root project directory.
マルチプロジェクトのビルドでは、ルートプロジェクトに一つだけbuildSrcディレクトリを作成できます。
Listed below is the default build script that Gradle applies to the buildSrc project:
buildSrcプロジェクトには、次のビルドスクリプトがデフォルトで適用されます。
図60.1 デフォルトのbuildSrcビルドスクリプトDefault buildSrc build script
apply plugin: 'groovy'
dependencies {
compile gradleApi()
compile localGroovy()
}This means that you can just put your build source code in this directory and stick to the layout convention for a Java/Groovy project (see 表23.4「Javaプラグイン - デフォルトプロジェクトレイアウトJava plugin - default project layout」).
つまり、Java/Groovyプロジェクトのレイアウト規約(表23.4「Javaプラグイン - デフォルトプロジェクトレイアウトJava plugin - default project layout」参照)に従って、このディレクトリにソースコードを置くだけでいいということです。
If you need more flexibility, you can provide your own build.gradle. Gradle applies the default build script
regardless of whether there is one specified. This means you only need to declare the extra things you need. Below is an example.
Notice that this example does not need to declare a dependency on the Gradle API, as this is done by the default build script:
さらに柔軟性が必要なときは、自分でbuild.gradleを用意することもできます。
上記のデフォルトビルドスクリプトは、この場合でも適用されます。つまり、必要なものだけを追加で定義できるのです。次の例を見てください。Gradle APIへの依存関係は、デフォルトのビルドスクリプトで宣言されているため、ここでは宣言する必要がありません。
例60.3 カスタムbuildSrcビルドスクリプト
buildSrc/build.gradle
repositories {
    mavenCentral()
}
dependencies {
testCompile 'junit:junit:4.11'
}
The buildSrc project can be a multi-project build, just like any other regular multi-project build. However,
all of the projects that should be on the classpath of the actual build must be runtime dependencies of the root project in
buildSrc. You can do this by adding this to the configuration of each project you wish to export:
buildSrcプロジェクトは、マルチプロジェクトにすることができます。このプロジェクトは、普通のGradleマルチプロジェクトと同じように動作します。
ただし、実際のビルドのクラスパスに置きたい全てのプロジェクトを、buildSrcルートプロジェクトのruntime依存関係にしなければなりません。これは、エクスポートしたい全てのプロジェクトの設定に、以下のコードを追加することで実現できます。
例60.4 buildSrcルートプロジェクトにサブプロジェクトを追加する
buildSrc/build.gradle
rootProject.dependencies {
runtime project(path)
}ノート: 本例のソースコードは、Gradleのバイナリ配布物またはソース配布物に含まれています。以下の場所をご参照ください。samples/multiProjectBuildSrc
You can use the GradleBuild task. You can use either of the
dir or buildFile properties to specify which build to execute,
and the tasks property to specify which tasks to execute.
GradleBuildで別のビルドを呼び出して実行することができます。そのとき、呼び出すビルドのディレクトリやビルドスクリプトに渡すプロパティを指定したり、実行するタスクのタスクプロパティを設定できます。
例60.5 別のビルドを呼び出す
build.gradle
task build(type: GradleBuild) {
buildFile = 'other.gradle'
tasks = ['hello']
}other.gradle
task hello << {
println "hello from the other build."
}gradle -q build の出力
> gradle -q build hello from the other build.
If your build script needs to use external libraries, you can add them to the script's classpath in the
build script itself. You do this using the buildscript() method, passing in a closure which
declares the build script classpath.
ビルドスクリプトを実行するときに外部のライブラリを使いたいなら、そのライブラリをビルドスクリプトのクラスパスに追加しなければなりません。buildscript()メソッドにクロージャを渡し、その中でビルドスクリプトのクラスパスを設定できます。
例60.6 ビルドスクリプトのクラスパスを宣言する
build.gradle
buildscript {
repositories {
mavenCentral()
}
dependencies {
classpath group: 'commons-codec', name: 'commons-codec', version: '1.2'
}
}The closure passed to the buildscript() method configures a
ScriptHandler instance. You declare the build script
classpath by adding dependencies to the classpath configuration. This is the same way
you declare, for example, the Java compilation classpath. You can use any of the dependency types described
in 「依存関係の定義方法 How to declare your dependencies」, except project dependencies.
buildscript()メソッドに渡すクロージャは、ScriptHandlerのインスタンスにパラメータなどを設定するものです。ビルドスクリプトのクラスパスを追加するには、classpathで依存関係を宣言しましょう。形式はJavaでコンパイル時のクラスパスを宣言するときなどと同じです。「依存関係の定義方法 How to declare your dependencies」に記載されているタイプの依存関係は、「プロジェクトへの依存」を除けばすべて使えます。
Having declared the build script classpath, you can use the classes in your build script as you would any other classes on the classpath. The following example adds to the previous example, and uses classes from the build script classpath.
外部ライブラリのクラスをビルドスクリプトのクラスパスを追加すれば、他のクラスと同じようにスクリプト内で使えるようになります。次の例では、先ほどの例に加え、クラスパスに追加したクラスを実際に使っています。
例60.7 外部ライブラリをビルドスクリプトで使用する
build.gradle
import org.apache.commons.codec.binary.Base64 buildscript { repositories { mavenCentral() } dependencies { classpath group: 'commons-codec', name: 'commons-codec', version: '1.2' } } task encode << { def byte[] encodedString = new Base64().encode('hello world\n'.getBytes()) println new String(encodedString) }
gradle -q encode の出力
> gradle -q encode aGVsbG8gd29ybGQK
For multi-project builds, the dependencies declared in the a project's build script, are available to the build scripts of all sub-projects.
マルチプロジェクトの場合、プロジェクトのビルドスクリプトでクラスパスを宣言すれば、そのサブプロジェクトすべてで追加したライブラリを使用できるようになります。
For reasons we don't fully understand yet, external dependencies are not picked up by Ant's optional tasks. But you can easily do it in another way. [42]
何でかよく分からないのですが、Antのオプショナルタスクでは先ほどの方法で追加した外部ライブラリを拾ってくれないようです。しかし、次のようにすればこの問題は簡単に解決できます。
例60.8 Ant optional dependencies
build.gradle
configurations {
ftpAntTask
}
dependencies {
ftpAntTask("org.apache.ant:ant-commons-net:1.9.3") {
module("commons-net:commons-net:1.4.1") {
dependencies "oro:oro:2.0.8:jar"
}
}
}
task ftp << {
ant {
taskdef(name: 'ftp',
classname: 'org.apache.tools.ant.taskdefs.optional.net.FTP',
classpath: configurations.ftpAntTask.asPath)
ftp(server: "ftp.apache.org", userid: "anonymous", password: "me@myorg.com") {
fileset(dir: "htdocs/manual")
}
}
}This is also a good example for the usage of client modules. The POM file in Maven Central for the ant-commons-net task does not provide the right information for this use case.
これはクライアントモジュールのいい使用例でもあります。mavenのセントラルリポジトリにあるant-commons-netタスクのpom.xmlは、このユースケースのための正しい情報を提供していません。
Gradle offers you a variety of ways of organizing your build logic. You can choose what is right for your domain and find the right balance between unnecessary indirections, and avoiding redundancy and a hard to maintain code base. It is our experience that even very complex custom build logic is rarely shared between different builds. Other build tools enforce a separation of this build logic into a separate project. Gradle spares you this unnecessary overhead and indirection.
Gradleは、ビルドロジックを体系化するための様々な方法を提供しています。自分の分野に合った方法を選択して、不必要に複雑にならないように、一方でコードベースの重複やメンテナンス性の低下を避けられるように、適切なバランスを探っていくことができます。これまでの経験では、非常に複雑なビルドロジックでさえ、異なるビルド間で共有することはあまりありませんでした。いくつかのビルドツールでは、このビルドロジックを、ひとつの別のプロジェクトにして分離します。Gradleでは、そのような無駄なオーバーヘッドや複雑さを省くことができます。
[40] Which might range from a single class to something very complex.
[41] 一つの単純なクラスから、複雑なクラスまで
[42] In fact, we think this is a better solution. Only if your buildscript and Ant's optional
task need the same library would you have to define it twice. In such a
case it would be nice if Ant's optional task would automatically pick up the classpath defined
in the “gradle.settings” file.
Gradle provides a powerful mechanism to allow customizing the build based on the current environment. This mechanism also supports tools that wish to integrate with Gradle.
Gradleは、実行環境に合わせてビルドをカスタマイズするためのパワフルな仕組みを提供しています。また、この仕組みにより、外部ツールがGradleを統合して使用するのを手助けします。
Note that this is completely different from the “init” task
provided by the “build-init” incubating plugin (see Chapter 47, Build Init Plugin).
Initialization scripts (a.k.a. init scripts) are similar to other scripts in Gradle. These scripts, however, are run before the build starts. Here are several possible uses: 初期化スクリプト(init scripts)は、Gradleで使う他のスクリプトと似たものですが、ビルドの開始前に実行されます。使用する場面としては次のようなものがあります。
Set up enterprise-wide configuration, such as where to find custom plugins.
企業内で適用される設定、たとえば、カスタムプラグインのダウンロード先などを設定する。
Set up properties based on the current environment, such as a developer's machine vs. a continuous integration server.
実行環境に依るプロパティをセットする。たとえば、開発者のマシンとインテグレーションサーバーで異なるプロパティをセットする。
Supply personal information about the user that is required by the build, such as repository or database authentication credentials.
ビルド時に要求される、ユーザーの個人情報をセットする。リポジトリやデータベースの認証情報など。
Define machine specific details, such as where JDKs are installed.
マシン固有の情報を定義する。JDKのインストール場所など。
Register build listeners. External tools that wish to listen to Gradle events might find this useful.
ビルドのリスナーを登録する。Gradleのイベントをリスンしたい外部ツールにとって便利かもしれません。
Register build loggers. You might wish to customize how Gradle logs the events that it generates.
ビルドのロガーを登録する。Gradleがイベントを記録する方法をカスタマイズしたいことがあるかもしれません。
One main limitation of init scripts is that they cannot access classes in the buildSrc project (see
「buildSrcプロジェクトのソースをビルドするBuild sources in the buildSrc project」 for details of this feature).
初期化スクリプトの主な制限は、buildSrcプロジェクトにアクセスできないことです(この機能の詳細は「buildSrcプロジェクトのソースをビルドするBuild sources in the buildSrc project」を参照してください)。
There are several ways to use an init script:
初期化スクリプトを使うには、いくつかの方法があります。
Specify a file on the command line. The command line option is
-Ior--init-scriptfollowed by the path to the script. The command line option can appear more than once, each time adding another init script.コマンドラインでファイルを指定する。
-Iか--init-scriptオプションに初期化スクリプトのパスを渡します。このオプションを複数並べて、初期化スクリプトを追加していくこともできます。Put a file called
init.gradlein theUSER_HOME/.gradle/init.gradleという名前のファイルをUSER_HOME/.gradle/Put a file that ends with
.gradlein theUSER_HOME/.gradle/init.d/.gradleという拡張子のファイルをUSER_HOME/.gradle/init.d/Put a file that ends with
.gradlein theGRADLE_HOME/init.d/.gradleという拡張子のファイルを
GRADLE_HOME/init.d/
If more than one init script is found they will all be executed, in the order specified above. Scripts in a given directory are executed in alphabetical order. This allows, for example, a tool to specify an init script on the command line and the user to put one in their home directory for defining the environment and both scripts will run when Gradle is executed.
複数の初期化スクリプトが見つかった場合、そのすべてが上で記載した順番で実行されます。同じディレクトリのスクリプトはアルファベット順に実行されます。これにより、たとえば、ツールがコマンドラインで初期化スクリプトを指定し、ユーザーはホームディレクトリに環境設定のためのスクリプトを置いて、ビルド時にその両方を実行する、といったことが可能です。
Similar to a Gradle build script, an init script is a Groovy script. Each init script has a
Gradle instance associated with it. Any property reference
and method call in the init script will delegate to this Gradle instance.
Gradleのビルドスクリプトと同様、初期化スクリプトもGroovyスクリプトです。すべての初期化スクリプトにGradleのインスタンスが割り当てられ、初期化スクリプト内でのプロパティアクセス、メソッドコールはすべてこのGradleインスタンスに委譲されます。
Each init script also implements the Script interface.
また、すべての初期化スクリプトはScriptインターフェースを実装しています。
You can use an init script to configure the projects in the build. This works in a similar way to configuring projects in a multi-project build. The following sample shows how to perform extra configuration from an init script before the projects are evaluated. This sample uses this feature to configure an extra repository to be used only for certain environments.
初期化スクリプトを使ってプロジェクトの設定を変更することができます。これは、マルチプロジェクトでプロジェクトの設定を変更する方法と同じように動作します。次のサンプルは、プロジェクトが評価される前に、初期化スクリプトで追加的な設定を行うための方法を示すものです。このサンプルでは、ある環境でのみ使用する特別なリポジトリを設定しています。
例61.1 プロジェクト評価前に初期化スクリプトで追加的な設定を行う
build.gradle
repositories {
mavenCentral()
}
task showRepos << {
println "All repos:"
println repositories.collect { it.name }
}init.gradle
allprojects {
repositories {
mavenLocal()
}
}gradle --init-script init.gradle -q showRepos の出力
> gradle --init-script init.gradle -q showRepos All repos: [MavenLocal, MavenRepo]
In 「ビルドスクリプトで外部ライブラリを使うときの依存関係設定External dependencies for the build script」 it is was explained how to add external dependencies to a
build script. Init scripts can also declare dependencies. You do this with the
initscript() method, passing in a closure which declares the init script classpath.
「ビルドスクリプトで外部ライブラリを使うときの依存関係設定External dependencies for the build script」でビルドスクリプトに依存関係を追加する方法が解説されていますが、初期化スクリプトでも似たような方法で依存関係を定義できます。初期化スクリプトに依存関係を追加するには、initscript()メソッドに初期化スクリプトのクラスパスを宣言したクロージャを引き渡してください。
例61.2 初期化スクリプトの外部依存関係定義
init.gradle
initscript {
repositories {
mavenCentral()
}
dependencies {
classpath group: 'org.apache.commons', name: 'commons-math', version: '2.0'
}
}The closure passed to the initscript() method configures a
ScriptHandler instance. You declare the init script
classpath by adding dependencies to the classpath configuration. This is the same way
you declare, for example, the Java compilation classpath. You can use any of the dependency types described
in 「依存関係の定義方法 How to declare your dependencies」, except project dependencies.
initscript()に渡したクロージャは、ScriptHandlerインスタンスを設定します。これは、たとえば、Javaのコンパイルクラスパスを宣言するのと同じ方法です。「依存関係の定義方法 How to declare your dependencies」に載っている依存関係は、プロジェクト依存関係を除いてすべて使うことができます。
Having declared the init script classpath, you can use the classes in your init script as you would any other classes on the classpath. The following example adds to the previous example, and uses classes from the init script classpath.
このようにして初期化スクリプトのクラスパスを宣言すれば、初期化スクリプト内でどんなクラスでもインポートできます。次の例では、前の例に加えて、クラスパスからクラスをインポートして使用しています。
例61.3 外部依存関係を持つ初期化スクリプト
init.gradle
import org.apache.commons.math.fraction.Fraction initscript { repositories { mavenCentral() } dependencies { classpath group: 'org.apache.commons', name: 'commons-math', version: '2.0' } } println Fraction.ONE_FIFTH.multiply(2)
gradle --init-script init.gradle -q doNothing の出力
> gradle --init-script init.gradle -q doNothing 2 / 5
Similar to a Gradle build script or a Gradle settings file, plugins can be applied on init scripts.
例61.4 Using plugins in init scripts
init.gradle
apply plugin:EnterpriseRepositoryPlugin class EnterpriseRepositoryPlugin implements Plugin<Gradle> { private static String ENTERPRISE_REPOSITORY_URL = "https://repo.gradle.org/gradle/repo" void apply(Gradle gradle) { // ONLY USE ENTERPRISE REPO FOR DEPENDENCIES gradle.allprojects{ project -> project.repositories { // Remove all repositories not pointing to the enterprise repository url all { ArtifactRepository repo -> if (!(repo instanceof MavenArtifactRepository) || repo.url.toString() != ENTERPRISE_REPOSITORY_URL) { project.logger.lifecycle "Repository ${repo.url} removed. Only $ENTERPRISE_REPOSITORY_URL is allowed" remove repo } } // add the enterprise repository maven { name "STANDARD_ENTERPRISE_REPO" url ENTERPRISE_REPOSITORY_URL } } } } }
build.gradle
repositories{
mavenCentral()
}
task showRepositories << {
repositories.each{
println "repository: ${it.name} ('${it.url}')"
}
}gradle -q -I init.gradle showRepositories の出力
> gradle -q -I init.gradle showRepositories
repository: STANDARD_ENTERPRISE_REPO ('https://repo.gradle.org/gradle/repo')The plugin in the init script ensures that only a specified repository is used when running the build.
When applying plugins within the init script, Gradle instantiates the plugin and calls the plugin
instance's Plugin.apply() method. The gradle object is passed as a parameter,
which can be used to configure all aspects of a build.
Of course, the applied plugin can be resolved as an external dependency as described in 「初期化スクリプトの外部依存関係External dependencies for the init script」
The Gradle Wrapper (henceforth referred to as the “wrapper”) is the preferred way of starting a Gradle build. The wrapper is a batch script on Windows, and a shell script for other operating systems. When you start a Gradle build via the wrapper, Gradle will be automatically downloaded and used to run the build.
Gradleラッパー(以後ラッパーとします)は、Gradleのビルドを実行する方法として推奨されているものです。 ラッパーは、バッチスクリプト(Windows用)とシェルスクリプト(その他のOS用)で提供されます。 このラッパーを使ってGradleビルドを実行すると、Gradleが自動的にダウンロードされ、それを使ってビルドが実行されます。
The wrapper is something you should check into version control. By distributing the wrapper with your project, anyone can work with it without needing to install Gradle beforehand. Even better, users of the build are guaranteed to use the version of Gradle that the build was designed to work with. Of course, this is also great for continuous integration servers (i.e. servers that regularly build your project) as it requires no configuration on the server.
ラッパーは、バージョン管理システムにチェックインするべきです。ラッパーと一緒にプロジェクトを配布することで、前もってGradleをインストールすることなく、誰もがすぐプロジェクトで作業できるようになります。 さらにいいことに、ラッパーを使ってもらうことで、ビルドに使用されるGradleのバージョンをプロジェクトが想定しているものに強制することができます。 もちろん、ラッパーは継続的インテグレーションサーバーで作業するときも非常に便利です。サーバーでビルドの設定を行う必要がないからです。
You install the wrapper into your project by adding and configuring a Wrapper
task in your build script, and then executing it.
ラッパーを自分のプロジェクトにインストールするには、Wrapperタスクをビルドスクリプトに追加、設定してから、タスクを実行します。
After such an execution you find the following new or updated files in your project directory (in case the default configuration of the wrapper task is used).
このタスクを実行すると、(wrapperタスクのデフォルト設定が使われていれば、)プロジェクトディレクトリで以下のファイルが作成、または更新されるはずです。
例62.2 ラッパーにより生成されるファイル
Build layout
simple/
gradlew
gradlew.bat
gradle/wrapper/
gradle-wrapper.jar
gradle-wrapper.propertiesAll of these files should be submitted to your version control system. This only needs to be done once. After these files have been added to the project, the project should then be built with the added gradlew command. The gradlew command can be used exactly the same way as the gradle command.
これらのファイルは、すべてバージョン管理システムに格納するべきです。この作業は一回だけ行えば大丈夫です。これらのファイルがプロジェクトに追加されたら、以後のビルドはこのgradlewコマンドで行ってください。 gradlewコマンドは、gradleコマンドと全く同じように使うことができます。
If you want to switch to a new version of Gradle you don't need to rerun the wrapper task. It is good enough
to change the respective entry in the gradle-wrapper.properties file, but if you want to take
advantage of new functionality in the Gradle wrapper, then you would need to regenerate the wrapper files.
Gradleを新しいバージョンに変更する場合でも、wrapperタスクを再実行する必要はありません。
gradle-wrapper.properties ファイルの、関係するエントリを変更するだけです。
ただ、例えばgradle-wrapperの機能が改良された場合などは、wrapperファイルを再作成してください。
If you run Gradle with gradlew, the wrapper checks if a Gradle distribution for the wrapper is available. If so, it delegates to the gradle command of this distribution with all the arguments passed originally to the gradlew command. If it didn't find a Gradle distribution, it will download it first.
gradlewを実行すると、ラッパーはまず、指定されたディストリビューションが利用できるかどうか確認します。 利用できなければディストリビューションを新しくダウンロードし、利用可能ならgradlewコマンドに指定された引数を、そのディストリビューションのgradleコマンドにそのまま渡して実行します。
When you configure the Wrapper task, you can specify the Gradle version you wish to use. The gradlew
command will download the appropriate distribution from the Gradle repository.
Alternatively, you can specify the download URL of the Gradle distribution. The gradlew command will use this URL to download
the distribution.
If you specified neither a Gradle version nor download URL, the gradlew command will download whichever version
of Gradle was used to generate the wrapper files.
Wrapperタスクを設定する際は、使いたいGradleのバージョンを指定することができます。その場合、作成されるgradlewコマンドはGradleリポジトリから適切なディストリビューションを選んでダウンロードします。
または、GradleのディストリビューションをダウンロードするURLを直接指定することもできます。この場合は、gradlewコマンドはディストリビューションのダウンロードにそのURLを使用します。
Gradleのバージョンもダウンロード先も指定しなかった場合は、ラッパーファイルを作成したGradleのバージョンがダウンロードするGradleのバージョンに使用されます。
For the details on how to configure the wrapper, see the Wrapper class in the API documentation.
For the details on how to configure the wrapper, see Wrapper
ラッパーの詳細な設定方法についてはWrapperを参照してください。
If you don't want any download to happen when your project is built via gradlew, simply add the Gradle
distribution zip to your version control at the location specified by your wrapper configuration.
A relative URL is supported - you can specify a distribution file relative to the location of gradle-wrapper.properties file.
gradlewコマンドでプロジェクトをビルドする際、ダウンロード処理を一切走らせたくない場合は、ラッパーの設定で指定した場所にGradleのzipファイルを追加してバージョン管理システムに格納してください。
相対パスもサポートされています。gradle-wrapper.propertiesからの相対パスでディストリビューションファイルを指定することができます。
If you build via the wrapper, any existing Gradle distribution installed on the machine is ignored.
ラッパーを使ってビルドする場合、マシンにインストールされているGradleディストリビューションがあっても無視されます。
The Wrapper task adds appropriate file permissions to allow the execution of the gradlew *NIX command.
Subversion preserves this file permission. We are not sure how other version control systems deal with this.
What should always work is to execute “sh gradlew”.
Wrapperタスクは、生成したgradlew *NIXコマンドを実行できるよう、適切なファイルパーミッションを追加します。
Subversionはちゃんとこのファイルパーミッションを保存してくれますが、他のバージョン管理システムではどのように扱われるのかわかりません。
確実を期すならsh gradlewで実行してください。
The 1.0 milestone 3 release brought a new API called the tooling API, which you can use for embedding Gradle into your own custom software. This API allows you to execute and monitor builds, and to query Gradle about the details of a build. The main audience for this API will be IDEs, CI servers, other UI authors, or integration testing of your Gradle plugins. However, it is open for anyone who needs to embed Gradle in their application.
A fundamental characteristic of the tooling API is that it operates in a version independent way. This means that you can use the same API to work with different target versions of Gradle. The tooling API is Gradle wrapper aware and, by default, uses the same target Gradle version as that used by the wrapper-powered project.
Some features that the tooling API provides today:
- You can query Gradle for the details of a build, including the project hierarchy and the project dependencies, external dependencies (including source and Javadoc jars), source directories and tasks of each project.
- You can execute a build and listen to stdout and stderr logging and progress (e.g. the stuff shown in the 'status bar' when you run on the command line).
- Tooling API can download and install the appropriate Gradle version, similar to the wrapper. Bear in mind that the tooling API is wrapper aware so you should not need to configure a Gradle distribution directly.
- The implementation is lightweight, with only a small number of dependencies. It is also a well-behaved library, and makes no assumptions about your classloader structure or logging configuration. This makes the API easy to bundle in your application.
In the future we may support other interesting features:
- Performance. The API gives us the opportunity to do lots of caching, static analysis and preemptive work, to make things faster for the user.
- Better progress monitoring and build cancellation. For example, allowing test execution to be monitored.
- Notifications when things in the build change, so that UIs and models can be updated. For example, your Eclipse or IDEA project will update immediately, in the background.
- Validating and prompting for user supplied configuration.
- Prompting for and managing user credentials.
Please take a look at 19章Gradleデーモン The Gradle Daemon. The Tooling API uses the daemon all the time. In fact, you cannot officially use the Tooling API without the daemon. This means that subsequent calls to the Tooling API, be it model building requests or task executing requests can be executed in the same long-living process. 19章Gradleデーモン The Gradle Daemon contains more details about the daemon, specifically information on situations when new daemons are forked.
As the tooling API is an interface for developers, the Javadoc is the main documentation for it.
This is exactly our intention - we don't expect this chapter to grow very much.
Instead we will add more code samples and improve the Javadoc documentation.
The main entry point to the tooling API is the
GradleConnector.
You can navigate from there to find code samples and other instructions.
Another very important set of resources are the samples that live
in “$gradleHome/samples/toolingApi”. These samples also specify all of the
required dependencies for the Tooling API, along with the suggested repositories to obtain the jars from.
Build comparison support is an incubating feature. This means that it is incomplete and not yet at regular Gradle production quality. This also means that this Gradle User Guide chapter is a work in progress.
Gradle provides support for comparing the outcomes (e.g. the produced binary archives) of two builds. There are several reasons why you may want to compare the outcomes of two builds. You may want to compare:
A build with a newer version of Gradle than it's currently using (i.e. upgrading the Gradle version).
A Gradle build with a build executed by another tool such as Apache Ant, Apache Maven or something else (i.e. migrating to Gradle).
The same Gradle build, with the same version, before and after a change to the build (i.e. testing build changes).
By comparing builds in these scenarios you can make an informed decision about the Gradle upgrade, migration to Gradle or build change by understanding the differences in the outcomes. The comparison process produces a HTML report outlining which outcomes were found to be identical and identifying the differences between non-identical outcomes.
The following are the terms used for build comparison and their definitions.
- “Build”
In the context of build comparison, a build is not necessarily a Gradle build. It can be any invokable “process” that produces observable “outcomes”. At least one of the builds in a comparison will be a Gradle build.
- “Build Outcome”
Something that happens in an observable manner during a build, such as the creation of a zip file or test execution. These are the things that are compared.
- “Source Build”
The build that comparisons are being made against, typically the build in its “current” state. In other words, the left hand side of the comparison.
- “Target Build”
The build that is being compared to the source build, typically the “proposed” build. In other words, the right hand side of the comparison.
- “Host Build”
The Gradle build that executes the comparison process. It may be the same project as either the “target” or “source” build or may be a completely separate project. It does not need to be the same Gradle version as the “source” or “target” builds. The host build must be run with Gradle 1.2 or newer.
- “Compared Build Outcome”
Build outcomes that are intended to be logically equivalent in the “source” and “target” builds, and are therefore meaningfully comparable.
- “Uncompared Build Outcome”
A build outcome is uncompared if a logical equivalent from the other build cannot be found (e.g. a build produces a zip file that the other build does not).
- “Unknown Build Outcome”
A build outcome that cannot be understood by the host build. This can occur when the source or target build is a newer Gradle version than the host build and that Gradle version exposes new outcome types. Unknown build outcomes can be compared in so far as they can be identified to be logically equivalent to an unknown build outcome in the other build, but no meaningful comparison of what the build outcome actually is can be performed. Using the latest Gradle version for the host build will avoid encountering unknown build outcomes.
As this is an incubating feature, a limited set of the eventual functionality has been implemented at this time.
Only support for comparing Gradle builds is available at this time.
Both the source and target build must execute with Gradle newer or equal to version 1.0.
The host build must be at least version 1.2.
Future versions will provide support for executing builds from other build systems such as Apache Ant or Apache Maven, as well as support for executing arbitrary processes (e.g. shell script based builds)
Only support for comparing build outcomes that are zip archives is supported at this time.
This includes jar, war and ear archives.
Future versions will provide support for comparing outcomes such as test execution (i.e. which tests were executed, which tests failed, etc.)
The compare-gradle-builds plugin can be used to facilitate a comparison between two Gradle builds. The plugin
adds a CompareGradleBuilds task named “compareGradleBuilds”
to the project. The configuration of this task specifies what is to be compared. By default, it is configured to compare the current build with itself
using the current Gradle version by executing the tasks: “clean assemble”.
apply plugin: 'compare-gradle-builds'
This task can be configured to change what is compared.
compareGradleBuilds {
sourceBuild {
projectDir "/projects/project-a"
gradleVersion "1.1"
}
targetBuild {
projectDir "/projects/project-b"
gradleVersion "1.2"
}
}The example above specifies a comparison between two different projects using two different Gradle versions.
You can use the build comparison functionality to very quickly try a new Gradle version with your build.
To try your current build with a different Gradle version, simply add the following to the build.gradle of the root project.
apply plugin: 'compare-gradle-builds'
compareGradleBuilds {
targetBuild.gradleVersion = "«gradle version»"
}Then simply execute the compareGradleBuilds task. You will see the console output of the “source” and “target” builds as they are executing.
If there are any differences between the compared outcomes, the task will fail. The location of the HTML report providing insight into the comparison will be given. If all compared outcomes are found to be identical, and there are no uncompared outcomes, and there are no unknown build outcomes, the task will succeed.
You can configure the task to not fail on compared outcome differences by setting the ignoreFailures property to true.
compareGradleBuilds {
ignoreFailures = true
}For an archive to be a candidate for comparison, it must be added as an artifact of the archives configuration. Take a look at 52章アーティファクトの公開 Publishing artifacts for more information on how to configure and add artifacts.
The archive must also have been produced by a Zip, Jar,
War, Ear task. Future versions of Gradle
will support increased flexibility in this area.
This chapter describes the new incubating Ivy publishing support provided by the “ivy-publish”
plugin. Eventually this new publishing support will replace publishing via the Upload task.
If you are looking for documentation on the original Ivy publishing support using the Upload task please see
52章アーティファクトの公開 Publishing artifacts.
This chapter describes how to publish build artifacts in the Apache Ivy format, usually to a repository
for consumption by other builds or projects. What is published is one or more artifacts created by the build, and an
Ivy module descriptor (normally ivy.xml)
that describes the artifacts and the dependencies of the artifacts, if any.
A published Ivy module can be consumed by Gradle (see 51章依存関係の管理 Dependency Management) and other tools that understand the Ivy format.
The ability to publish in the Ivy format is provided by the “ivy-publish” plugin.
The “publishing” plugin creates an extension on the project named “publishing” of type PublishingExtension.
This extension provides a container of named publications and a container of named repositories. The “ivy-publish” plugin works with
IvyPublication publications and IvyArtifactRepository repositories.
Applying the “ivy-publish” plugin does the following:
- Applies the “
publishing” plugin -
Establishes a rule to automatically create a
GenerateIvyDescriptortask for eachIvyPublicationadded (see Section 65.2, “Publications”). -
Establishes a rule to automatically create a
PublishToIvyRepositorytask for the combination of eachIvyPublicationadded (see Section 65.2, “Publications”), with eachIvyArtifactRepositoryadded (see Section 65.3, “Repositories”).
If you are not familiar with project artifacts and configurations, you should read 52章アーティファクトの公開 Publishing artifacts, which introduces these concepts. This chapter also describes “publishing artifacts” using a different mechanism than what is described in this chapter. The publishing functionality described here will eventually supersede that functionality.
Publication objects describe the structure/configuration of a publication to be created. Publications are published to repositories via tasks, and the
configuration of the publication object determines exactly what is published. All of the publications of a project are defined in the
PublishingExtension.getPublications() container. Each publication has a unique name within the project.
For the “ivy-publish” plugin to have any effect, an IvyPublication must be added to the set of publications.
This publication determines which artifacts are actually published as well as the details included in the associated Ivy module descriptor file.
A publication can be configured by adding components, customizing artifacts, and by modifying the generated module descriptor file directly.
The simplest way to publish a Gradle project to an Ivy repository is to specify a SoftwareComponent to publish.
The components presently available for publication are:
Table 65.1. Software Components
| Name | Provided By | Artifacts | Dependencies |
java |
Java Plugin | Generated jar file | Dependencies from 'runtime' configuration |
web |
War Plugin | Generated war file | No dependencies |
In the following example, artifacts and runtime dependencies are taken from the `java` component, which is added by the Java Plugin.
Example 65.2. Publishing a Java module to Ivy
build.gradle
publications {
ivyJava(IvyPublication) {
from components.java
}
}
It is also possible to explicitly configure artifacts to be included in the publication. Artifacts are commonly supplied as raw files, or as instances of
AbstractArchiveTask (e.g. Jar, Zip).
For each custom artifact, it is possible to specify the name, extension, type, classifier
and conf values to use for publication. Note that each artifacts must have a unique name/classifier/extension combination.
Configure custom artifacts as follows:
Example 65.3. Publishing additional artifact to Ivy
build.gradle
task sourceJar(type: Jar) {
from sourceSets.main.java
classifier "source"
}
publishing {
publications {
ivy(IvyPublication) {
from components.java
artifact(sourceJar) {
type "source"
conf "runtime"
}
}
}
}
See the IvyPublication class in the API documentation for more detailed information on how artifacts can be customized.
The generated Ivy module descriptor file contains an <info> element that identifies the module.
The default identity values are derived from the following:
organisation-Project.getGroup()module-Project.getName()revision-Project.getVersion()status-Project.getStatus()branch- (not set)
Overriding the default identity values is easy: simply specify the organisation, module
or revision attributes when configuring the IvyPublication. The status
and branch attributes can be set via the descriptor property (see
IvyModuleDescriptorSpec). The descriptor property can also be
used to add additional custom elements as children of the <info> element.
Example 65.4. customizing the publication identity
build.gradle
publishing {
publications {
ivy(IvyPublication) {
organisation 'org.gradle.sample'
module 'project1-sample'
revision '1.1'
descriptor.status = 'milestone'
descriptor.branch = 'testing'
descriptor.extraInfo 'http://my.namespace', 'myElement', 'Some value'
from components.java
}
}
}
Gradle will handle any valid Unicode character for organisation, module and revision (as well as artifact name, extension and classifier).
The only values that are explicitly prohibited are '\', '/' and any ISO control character.
The supplied values are validated early during publication.
At times, the module descriptor file generated from the project information will need to be tweaked before publishing. The “ivy-publish”
plugin provides a hook to allow such modification.
Example 65.5. Customizing the module descriptor file
build.gradle
publications {
ivyCustom(IvyPublication) {
descriptor.withXml {
asNode().info[0].appendNode('description',
'A demonstration of ivy descriptor customization')
}
}
}In this example we are simply adding a 'description' element to the generated Ivy dependency descriptor, but this hook allows you to modify any aspect of the generated descriptor. For example, you could replace the version range for a dependency with the actual version used to produce the build.
See IvyModuleDescriptorSpec.withXml() in the API documentation for more information.
It is possible to modify virtually any aspect of the created descriptor should you need to. This means that it is also possible to modify the descriptor in such a way that it is no longer a valid Ivy module descriptor, so care must be taken when using this feature.
The identifier (organisation, module, revision) of the published module is an exception; these values cannot be modified in the descriptor using the `withXML` hook.
Sometimes it's useful to publish multiple modules from your Gradle build, without creating a separate Gradle subproject. An example is publishing a separate API and implementation jar for your library. With Gradle this is simple:
Example 65.6. Publishing multiple modules from a single project
build.gradle
task apiJar(type: Jar) {
baseName "publishing-api"
from sourceSets.main.output
exclude '**/impl/**'
}
publishing {
publications {
impl(IvyPublication) {
organisation 'org.gradle.sample.impl'
module 'project2-impl'
revision '2.3'
from components.java
}
api(IvyPublication) {
organisation 'org.gradle.sample'
module 'project2-api'
revision '2'
}
}
}If a project defines multiple publications then Gradle will publish each of these to the defined repositories. Each publication must be given a unique identity as described above.
Publications are published to repositories. The repositories to publish to are defined by the PublishingExtension.getRepositories()
container.
Example 65.7. Declaring repositories to publish to
build.gradle
repositories {
ivy {
// change to point to your repo, e.g. http://my.org/repo
url "$buildDir/repo"
}
}
The DSL used to declare repositories for publishing is the same DSL that is used to declare repositories for dependencies (RepositoryHandler).
However, in the context of Ivy publication only the repositories created by the ivy() methods can be used as publication destinations.
You cannot publish an IvyPublication to a Maven repository for example.
The “ivy-publish” plugin automatically creates a PublishToIvyRepository
task for each IvyPublication and IvyArtifactRepository
combination in the publishing.publications and publishing.repositories containers respectively.
The created task is named “publish«PUBNAME»PublicationTo«REPONAME»Repository”,
which is “publishIvyJavaPublicationToIvyRepository” for this example. This task is of type
PublishToIvyRepository.
Example 65.8. Choosing a particular publication to publish
build.gradle
apply plugin: 'java' apply plugin: 'ivy-publish' group = 'org.gradle.sample' version = '1.0' publishing { publications { ivyJava(IvyPublication) { from components.java } } repositories { ivy { // change to point to your repo, e.g. http://my.org/repo url "$buildDir/repo" } } }
gradle publishIvyJavaPublicationToIvyRepository の出力
> gradle publishIvyJavaPublicationToIvyRepository :generateDescriptorFileForIvyJavaPublication :compileJava UP-TO-DATE :processResources UP-TO-DATE :classes UP-TO-DATE :jar :publishIvyJavaPublicationToIvyRepository BUILD SUCCESSFUL Total time: 1 secs
The “publish” plugin (that the “ivy-publish” plugin implicitly applies) adds a lifecycle task
that can be used to publish all publications to all applicable repositories named “publish”.
In more concrete terms, executing this task will execute all PublishToIvyRepository tasks in the project.
This is usually the most convenient way to perform a publish.
Example 65.9. Publishing all publications via the “publish” lifecycle task
gradle publish の出力
> gradle publish :generateDescriptorFileForIvyJavaPublication :compileJava UP-TO-DATE :processResources UP-TO-DATE :classes UP-TO-DATE :jar :publishIvyJavaPublicationToIvyRepository :publish BUILD SUCCESSFUL Total time: 1 secs
At times it is useful to generate the Ivy module descriptor file (normally ivy.xml) without publishing your module to an Ivy repository.
Since descriptor file generation is performed by a separate task, this is very easy to do.
The “ivy-publish” plugin creates one GenerateIvyDescriptor task
for each registered IvyPublication,
named “generateDescriptorFileFor«PUBNAME»Publication”, which will be
“generateDescriptorFileForIvyJavaPublication” for the previous example of the “ivyJava” publication.
You can specify where the generated Ivy file will be located by setting the destination property on the generated task.
By default this file is written to “build/publications/«PUBNAME»/ivy.xml”.
Example 65.10. Generating the Ivy module descriptor file
build.gradle
model {
tasks.generateDescriptorFileForIvyCustomPublication {
destination = file("$buildDir/generated-ivy.xml")
}
}gradle generateDescriptorFileForIvyCustomPublication の出力
> gradle generateDescriptorFileForIvyCustomPublication :generateDescriptorFileForIvyCustomPublication BUILD SUCCESSFUL Total time: 1 secs
The “ivy-publish” plugin leverages some experimental support for late plugin configuration,
and the GenerateIvyDescriptor task will not be constructed until the publishing extension is configured.
The simplest way to ensure that the publishing plugin is configured when you attempt to access the GenerateIvyDescriptor task
is to place the access inside a model block, as the example above demonstrates.
The same applies to any attempt to access publication-specific tasks like PublishToIvyRepository.
These tasks should be referenced from within a model block.
The following example demonstrates publishing with a multi-project build. Each project publishes a Java component and a configured additional source artifact. The descriptor file is customized to include the project description for each project.
Example 65.11. Publishing a Java module
build.gradle
subprojects {
apply plugin: 'java'
apply plugin: 'ivy-publish'
version = '1.0'
group = 'org.gradle.sample'
repositories {
mavenCentral()
}
task sourceJar(type: Jar) {
from sourceSets.main.java
classifier "source"
}
}
project(":project1") {
description = "The first project"
dependencies {
compile 'junit:junit:4.11', project(':project2')
}
}
project(":project2") {
description = "The second project"
dependencies {
compile 'commons-collections:commons-collections:3.1'
}
}
subprojects {
publishing {
repositories {
ivy {
// change to point to your repo, e.g. http://my.org/repo
url "${rootProject.buildDir}/repo"
}
}
publications {
ivy(IvyPublication) {
from components.java
artifact(sourceJar) {
type "source"
conf "runtime"
}
descriptor.withXml {
asNode().info[0].appendNode('description', description)
}
}
}
}
}The result is that the following artifacts will be published for each project:
- The Ivy module descriptor file: “
ivy-1.0.xml”. - The primary “jar” artifact for the Java component: “
project1-1.0.jar”. - The source “jar” artifact that has been explicitly configured: “
project1-1.0-source.jar”.
When project1 is published, the module descriptor (i.e. the ivy.xml file) that is produced will look like:
Note that «PUBLICATION-TIME-STAMP» in this example Ivy module descriptor will be the timestamp of when the descriptor was generated.
Example 65.12. Example generated ivy.xml
output-ivy.xml
<?xml version="1.0" encoding="UTF-8"?> <ivy-module version="2.0"> <info organisation="org.gradle.sample" module="project1" revision="1.0" status="integration" publication="«PUBLICATION-TIME-STAMP»"> <description>The first project</description> </info> <configurations> <conf name="default" visibility="public" extends="runtime"/> <conf name="runtime" visibility="public"/> </configurations> <publications> <artifact name="project1" type="jar" ext="jar" conf="runtime"/> <artifact name="project1" type="source" ext="jar" conf="runtime" m:classifier="source" xmlns:m="http://ant.apache.org/ivy/maven"/> </publications> <dependencies> <dependency org="junit" name="junit" rev="4.11" conf="runtime->default"/> <dependency org="org.gradle.sample" name="project2" rev="1.0" conf="runtime->default"/> </dependencies> </ivy-module>
The “ivy-publish” plugin functionality as described above is incomplete, as the feature is still incubating.
In upcoming Gradle releases, the functionality will be expanded to include (but not limited to):
- Convenient customization of module attributes (
module,organisationetc.) - Convenient customization of dependencies reported in
module descriptor. - Multiple discrete publications per project
This chapter describes the new incubating Maven publishing support provided by the “maven-publish”
plugin. Eventually this new publishing support will replace publishing via the Upload task.
If you are looking for documentation on the original Maven publishing support using the Upload task please see
52章アーティファクトの公開 Publishing artifacts.
This chapter describes how to publish build artifacts to an Apache Maven Repository. A module published to a Maven repository can be consumed by Maven, Gradle (see 51章依存関係の管理 Dependency Management) and other tools that understand the Maven repository format.
The ability to publish in the Maven format is provided by the “maven-publish” plugin.
The “publishing” plugin creates an extension on the project named “publishing” of type PublishingExtension.
This extension provides a container of named publications and a container of named repositories. The “maven-publish” plugin works with
MavenPublication publications and MavenArtifactRepository repositories.
Applying the “maven-publish” plugin does the following:
- Applies the “
publishing” plugin -
Establishes a rule to automatically create a
GenerateMavenPomtask for eachMavenPublicationadded (see Section 66.2, “Publications”). -
Establishes a rule to automatically create a
PublishToMavenRepositorytask for the combination of eachMavenPublicationadded (see Section 66.2, “Publications”), with eachMavenArtifactRepositoryadded (see Section 66.3, “Repositories”). -
Establishes a rule to automatically create a
PublishToMavenLocaltask for eachMavenPublicationadded (seeSection 66.2, “Publications”).
If you are not familiar with project artifacts and configurations, you should read the 52章アーティファクトの公開 Publishing artifacts that introduces these concepts. This chapter also describes “publishing artifacts” using a different mechanism than what is described in this chapter. The publishing functionality described here will eventually supersede that functionality.
Publication objects describe the structure/configuration of a publication to be created. Publications are published to repositories via tasks, and the
configuration of the publication object determines exactly what is published. All of the publications of a project are defined in the
PublishingExtension.getPublications() container. Each publication has a unique name within the project.
For the “maven-publish” plugin to have any effect, a MavenPublication must be added to the set of publications.
This publication determines which artifacts are actually published as well as the details included in the associated POM file.
A publication can be configured by adding components, customizing artifacts, and by modifying the generated POM file directly.
The simplest way to publish a Gradle project to a Maven repository is to specify a SoftwareComponent to publish.
The components presently available for publication are:
Table 66.1. Software Components
| Name | Provided By | Artifacts | Dependencies |
java |
23章JavaプラグインThe Java Plugin | Generated jar file | Dependencies from 'runtime' configuration |
web |
26章War プラグインThe War Plugin | Generated war file | No dependencies |
In the following example, artifacts and runtime dependencies are taken from the `java` component, which is added by the Java Plugin.
Example 66.2. Adding a MavenPublication for a Java component
build.gradle
publishing {
publications {
mavenJava(MavenPublication) {
from components.java
}
}
}
It is also possible to explicitly configure artifacts to be included in the publication. Artifacts are commonly supplied as raw files, or as instances of
AbstractArchiveTask (e.g. Jar, Zip).
For each custom artifact, it is possible to specify the extension and classifier values to use for publication. Note that
only one of the published artifacts can have an empty classifier, and all other artifacts must have a unique classifier/extension combination.
Configure custom artifacts as follows:
Example 66.3. Adding additional artifact to a MavenPublication
build.gradle
task sourceJar(type: Jar) {
from sourceSets.main.allJava
}
publishing {
publications {
mavenJava(MavenPublication) {
from components.java
artifact sourceJar {
classifier "sources"
}
}
}
}
See the MavenPublication class in the API documentation for more information about how artifacts can be customized.
The attributes of the generated POM file will contain identity values derived from the following project properties:
groupId-Project.getGroup()artifactId-Project.getName()version-Project.getVersion()
Overriding the default identity values is easy: simply specify the groupId, artifactId
or version attributes when configuring the MavenPublication.
Example 66.4. customizing the publication identity
build.gradle
publishing {
publications {
maven(MavenPublication) {
groupId 'org.gradle.sample'
artifactId 'project1-sample'
version '1.1'
from components.java
}
}
}
Maven restricts 'groupId' and 'artifactId' to a limited character set ([A-Za-z0-9_\\-.]+) and Gradle enforces this restriction.
For 'version' (as well as artifact 'extension' and 'classifier'), Gradle will handle any valid Unicode character.
The only Unicode values that are explicitly prohibited are '\', '/' and any ISO control character.
Supplied values are validated early in publication.
The generated POM file may need to be tweaked before publishing. The “maven-publish”
plugin provides a hook to allow such modification.
Example 66.5. Modifying the POM file
build.gradle
publications {
mavenCustom(MavenPublication) {
pom.withXml {
asNode().appendNode('description',
'A demonstration of maven POM customization')
}
}
}In this example we are adding a 'description' element for the generated POM. With this hook, you can modify any aspect of the POM. For example, you could replace the version range for a dependency with the actual version used to produce the build.
See MavenPom.withXml() in the API documentation for more information.
It is possible to modify virtually any aspect of the created POM should you need to. This means that it is also possible to modify the POM in such a way that it is no longer a valid Maven Pom, so care must be taken when using this feature.
The identifier (groupId, artifactId, version) of the published module is an exception; these values cannot be modified in the POM using the `withXML` hook.
Sometimes it's useful to publish multiple modules from your Gradle build, without creating a separate Gradle subproject. An example is publishing a separate API and implementation jar for your library. With Gradle this is simple:
Example 66.6. Publishing multiple modules from a single project
build.gradle
task apiJar(type: Jar) {
baseName "publishing-api"
from sourceSets.main.output
exclude '**/impl/**'
}
publishing {
publications {
impl(MavenPublication) {
groupId 'org.gradle.sample.impl'
artifactId 'project2-impl'
version '2.3'
from components.java
}
api(MavenPublication) {
groupId 'org.gradle.sample'
artifactId 'project2-api'
version '2'
artifact apiJar
}
}
}If a project defines multiple publications then Gradle will publish each of these to the defined repositories. Each publication must be given a unique identity as described above.
Publications are published to repositories. The repositories to publish to are defined by the PublishingExtension.getRepositories()
container.
Example 66.7. Declaring repositories to publish to
build.gradle
publishing {
repositories {
maven {
// change to point to your repo, e.g. http://my.org/repo
url "$buildDir/repo"
}
}
}
The DSL used to declare repositories for publication is the same DSL that is used to declare repositories to consume dependencies from,
RepositoryHandler. However, in the context of Maven publication only
MavenArtifactRepository repositories can be used for publication.
The “maven-publish” plugin automatically creates a PublishToMavenRepository
task for each MavenPublication and MavenArtifactRepository
combination in the publishing.publications and publishing.repositories containers respectively.
The created task is named “publish«PUBNAME»PublicationTo«REPONAME»Repository”.
Example 66.8. Publishing a project to a Maven repository
build.gradle
apply plugin: 'java' apply plugin: 'maven-publish' group = 'org.gradle.sample' version = '1.0' publishing { publications { mavenJava(MavenPublication) { from components.java } } } publishing { repositories { maven { // change to point to your repo, e.g. http://my.org/repo url "$buildDir/repo" } } }
gradle publish の出力
> gradle publish :generatePomFileForMavenJavaPublication :compileJava :processResources UP-TO-DATE :classes :jar :publishMavenJavaPublicationToMavenRepository :publish BUILD SUCCESSFUL Total time: 1 secs
In this example, a task named “publishMavenJavaPublicationToMavenRepository” is created, which is of type
PublishToMavenRepository.
This task is wired into the publish lifecycle task.
Executing “gradle publish” builds the POM file and all of the artifacts to be published, and transfers them to the repository.
For integration with a local Maven installation, it is sometimes useful to publish the module into the local .m2 repository. In Maven parlance, this is
referred to as 'installing' the module. The “maven-publish” plugin makes this easy to do by automatically creating a
PublishToMavenLocal task for each MavenPublication
in the publishing.publications container. Each of these tasks is wired into the publishToMavenLocal lifecycle task.
You do not need to have `mavenLocal` in your `publishing.repositories` section.
The created task is named “publish«PUBNAME»PublicationToMavenLocal”.
Example 66.9. Publish a project to the Maven local repository
gradle publishToMavenLocal の出力
> gradle publishToMavenLocal :generatePomFileForMavenJavaPublication :compileJava :processResources UP-TO-DATE :classes :jar :publishMavenJavaPublicationToMavenLocal :publishToMavenLocal BUILD SUCCESSFUL Total time: 1 secs
The resulting task in this example is named “publishMavenJavaPublicationToMavenLocal”. This task is wired into the publishToMavenLocal lifecycle task.
Executing “gradle publishToMavenLocal” builds the POM file and all of the artifacts to be published, and “installs” them into the local Maven repository.
At times it is useful to generate a Maven POM file for a module without actually publishing. Since POM generation is performed by a separate task, it is very easy to do so.
The task for generating the POM file is of type GenerateMavenPom, and it is given a name based on the name
of the publication: “generatePomFileFor«PUBNAME»Publication”. So in the example below,
where the publication is named “mavenCustom”,
the task will be named “generatePomFileForMavenCustomPublication”.
Example 66.10. Generate a POM file without publishing
build.gradle
model {
tasks.generatePomFileForMavenCustomPublication {
destination = file("$buildDir/generated-pom.xml")
}
}gradle generatePomFileForMavenCustomPublication の出力
> gradle generatePomFileForMavenCustomPublication :generatePomFileForMavenCustomPublication BUILD SUCCESSFUL Total time: 1 secs
All details of the publishing model are still considered in POM generation, including components`, custom artifacts,
and any modifications made via pom.withXml.
The “maven-publish” plugin leverages some experimental support for late plugin configuration,
and any GenerateMavenPom tasks will not be constructed until the publishing extension is configured.
The simplest way to ensure that the publishing plugin is configured when you attempt to access the GenerateMavenPom task
is to place the access inside a model block, as the example above demonstrates.
The same applies to any attempt to access publication-specific tasks like PublishToMavenRepository.
These tasks should be referenced from within a model block.
Listed below are some of the stand-alone samples which are included in the Gradle distribution. You can find these samples in the
directory of the distribution.GRADLE_HOME/samples
Gradleの配布物には、スタンドアローンで動作するサンプルが含まれています。以下にその一覧を掲載しました。これらのサンプルは、配布物の
ディレクトリに入っています。GRADLE_HOME/samples
表A.1 Samples included in the distribution 配布物に入っているサンプル
| Sample サンプル | Description 説明 |
announce
|
A project which uses the announce plugin アナウンスプラグインを使うプロジェクト |
application
|
A project which uses the application plugin アプリケーションプラグインを使うプロジェクト |
buildDashboard
|
A project which uses the build-dashboard plugin |
codeQuality
|
A project which uses the various code quality plugins. |
customBuildLanguage
|
This sample demonstrates how to add some custom elements to the build DSL. It also demonstrates the use of custom plug-ins to organize build logic. ビルドDSLへカスタム要素を追加するデモです。カスタムプラグインを使ってビルドロジックを体系化するデモでもあります。 |
customDistribution
|
This sample demonstrates how to create a custom Gradle distribution and use it with the Gradle wrapper. Gradleのカスタムディストリビューションを作る方法、およびそのディストリビューションをGradleラッパーで使う方法をデモしています。 |
customPlugin
|
A set of projects that show how to implement, test, publish and use a custom plugin and task. カスタムプラグインやカスタムタスクの実装、テスト、公開および使用方法を示す、いくつかのサンプルプロジェクト |
ear/earCustomized/ear
|
Web application ear project with customized contents 中身をカスタマイズしたWebアプリケーションearプロジェクト |
ear/earWithWar
|
Web application ear project Webアプリケーションearプロジェクト |
groovy/customizedLayout
|
Groovy project with a custom source layout ソースコードのレイアウトをカスタマイズしたGroovyプロジェクト |
groovy/mixedJavaAndGroovy
|
Project containing a mix of Java and Groovy source JavaとGroovyのソースが混ざって含まれているプロジェクト |
groovy/multiproject
|
Build made up of multiple Groovy projects. Also demonstrates how to exclude certain source files, and the use of a custom Groovy AST transformation. 複数のGroovyプロジェクトで構成されたビルド。特定のソースファイルを除外する方法、およびGroovyのカスタムAST変換を使う方法を示すデモでもあります。 |
groovy/quickstart
|
Groovy quickstart sample Groovyクイックスタートサンプル |
java/base
|
Java base project 基本的なJavaプロジェクト |
java/customizedLayout
|
Java project with a custom source layout ソースコードのレイアウトをカスタマイズしたJavaプロジェクト |
java/multiproject
|
This sample demonstrates how an application can be composed using multiple Java projects. 複数のJavaプロジェクトを使ってアプリケーションを組み立てるデモ |
java/quickstart
|
Java quickstart project Javaクイックスタートプロジェクト |
java/withIntegrationTests
|
This sample demonstrates how to use a source set to add an integration test suite to a Java project. ソースセットを使って、Javaプロジェクトに結合テスト・スイートを追加する方法を示すサンプル |
javaGradlePlugin
|
This example demonstrates the use of the java gradle plugin development plugin. By applying the plugin, the java plugin is automatically applied as well as the gradleApi() dependency. Furthermore, validations are performed against the plugin metadata during jar execution. |
maven/pomGeneration
|
Demonstrates how to deploy and install to a Maven repository. Also demonstrates how to deploy a javadoc JAR along with the main JAR, how to customize the contents of the generated POM, and how to deploy snapshots and releases to different repositories. Mavenリポジトリにデプロイ、インストールするデモ。メインのJARに加えてJavaDocのJARをデプロイしたり、生成されるPOMの内容をカスタマイズしたり、スナップショットとリリース版を違うリポジトリにデプロイしたりもしています。 |
maven/quickstart
|
Demonstrates how to deploy and install artifacts to a Maven repository. Mavenリポジトリにアーティファクトをデプロイ、インストールするデモ |
osgi
|
A project which builds an OSGi bundle OSGiバンドルをビルドするプロジェクト |
scala/customizedLayout
|
Scala project with a custom source layout ソースコードのレイアウトをカスタマイズしたScalaプロジェクト |
scala/fsc
|
Scala project using the Fast Scala Compiler (fsc). Fast Scala Compiler (fsc)を使ったScalaプロジェクト |
scala/mixedJavaAndScala
|
A project containing a mix of Java and Scala source. ScalaとJavaのソースが混ざって含まれているプロジェクト |
scala/quickstart
|
Scala quickstart project Scalaクイックスタートプロジェクト |
scala/zinc
|
Scala project using the Zinc based Scala compiler. |
testing/testReport
|
Generates an HTML test report that includes the test results from all subprojects. |
toolingApi/customModel
|
A sample of how a plugin can expose its own custom tooling model to tooling API clients. |
toolingApi/eclipse
|
An application that uses the tooling API to build the Eclipse model for a project. Tooling APIを使ってEclipseのプロジェクトモデルを構築するアプリケーション |
toolingApi/idea
|
An application that uses the tooling API to extract information needed by IntelliJ IDEA. IntellJ IDEAで必要な情報を、Tooling APIを使って抽出するアプリケーション |
toolingApi/model
|
An application that uses the tooling API to build the model for a Gradle build. |
toolingApi/runBuild
|
An application that uses the tooling API to run a Gradle task. |
userguide/distribution
|
A project which uses the distribution plugin |
userguide/javaLibraryDistribution
|
A project which uses the Java library distribution plugin |
webApplication/customized
|
Web application with customized WAR contents. 中身をカスタマイズしたWARをビルドするWebアプリケーションプロジェクト |
webApplication/quickstart
|
Web application quickstart project Webアプリケーション クイックスタートプロジェクト |
This sample demonstrates how to add some custom elements to the build DSL. It also demonstrates the use of custom plug-ins to organize build logic. ビルドDSLへカスタム要素を追加するデモです。カスタムプラグインを使ってビルドロジックを体系化するデモでもあります。
The build is composed of 2 types of projects. The first type of project represents a product, and the second represents a product module. Each product includes one or more product modules, and each product module may be included in multiple products. That is, there is a many-to-many relationship between these products and product modules. For each product, the build produces a ZIP containing the runtime classpath for each product module included in the product. The ZIP also contains some product-specific files.
このビルドは、二種類のプロジェクトから構成されています。「製品」プロジェクトと「製品モジュール」プロジェクトです。 「製品」は複数の「製品モジュール」から構成されており、ひとつの「製品モジュール」は複数のプロジェクトに含まれる可能性があります。 つまり、「製品モジュール」とプロジェクトが、多対多の関係になっているのです。 各「製品」は、「製品モジュール」の実行時クラスパスを固めたZIPファイルを作成します。さらに、ZIPファイルには「製品」が指定したファイルも格納されます。
The custom elements can be seen in the build script for the product projects (for example,
basicEdition/build.gradle). Notice that the build script uses the
product { } element. This is a custom element.
「製品」プロジェクトのビルドスクリプト(basicEdition/build.gradleなど)では、独自のカスタム要素が使用されています。ビルドスクリプトで、product { }という要素が使われていることに注目してください。これがカスタム要素です。
The build scripts of each project contain only declarative elements. The bulk of the work is done by 2
custom plug-ins found in buildSrc/src/main/groovy.
プロジェクトのビルドスクリプトには、要素の宣言しか含まれていません。処理の大半はbuildSrc/src/main/groovyにある二つのカスタムプラグインで記述されています。
This sample demonstrates how to create a custom Gradle distribution and use it with the Gradle wrapper. Gradleのカスタムディストリビューションを作る方法、およびそのディストリビューションをGradleラッパーで使う方法をデモしています。
This sample contains the following projects:
このサンプルには次のプロジェクトが含まれています。
The
plugindirectory contains the project that implements a custom plugin, and bundles the plugin into a custom Gradle distribution.pluginディレクトリに入っているプロジェクトで、カスタムプラグインを実装してディストリビューションにバンドルしています。The
consumerdirectory contains the project that uses the custom distribution.consumerディレクトリに入っているプロジェクトで、そのカスタムディストリビューションを使用しています。
A set of projects that show how to implement, test, publish and use a custom plugin and task. カスタムプラグインやカスタムタスクの実装、テスト、公開および使用方法を示す、いくつかのサンプルプロジェクト
This sample contains the following projects:
このサンプルには、以下のプロジェクトが含まれています。
The
plugindirectory contains the project that implements and publishes the plugin.pluginディレクトリのプロジェクトで、プラグインを実装して公開しています。
The
consumerdirectory contains the project that uses the plugin.consumerディレクトリのプロジェクトで、そのプラグインを使用しています。
This sample demonstrates how an application can be composed using multiple Java projects. 複数のJavaプロジェクトを使ってアプリケーションを組み立てるデモ
This build creates a client-server application which is distributed as 2 archives. First, there is a client ZIP which includes an API JAR, which a 3rd party application would compile against, and a client runtime. Then, there is a server WAR which provides a web service.
このビルドはクライアント・サーバー型のアプリケーションを作成するもので、配布物になるのは二つのアーカイブです。 サードパーティ製のアプリケーションをコンパイルするためのAPIを含むJARとクライアントのランタイムが入ったZIPファイル、 そして、Webサービスを提供するサーバーWARファイルを作成します。
For Gradle users it is important to understand how Groovy deals with script variables. Groovy has two types of script variables. One with a local scope and one with a script-wide scope.
Gradleユーザーにとって、Groovyがスクリプトの変数をどう扱うか理解しておくことは大事なことです。 Groovyには、二種類のスクリプト変数があります。一つがローカルスコープのもので、もう一つがスクリプトスコープのものです。
例B.1 変数のスコープ:ローカルスコープとスクリプトスコープ
scope.groovy
String localScope1 = 'localScope1' def localScope2 = 'localScope2' scriptScope = 'scriptScope' println localScope1 println localScope2 println scriptScope closure = { println localScope1 println localScope2 println scriptScope } def method() { try { localScope1 } catch (MissingPropertyException e) { println 'localScope1NotAvailable' } try { localScope2 } catch(MissingPropertyException e) { println 'localScope2NotAvailable' } println scriptScope } closure.call() method()
gradle の出力
> gradle localScope1 localScope2 scriptScope localScope1 localScope2 scriptScope localScope1NotAvailable localScope2NotAvailable scriptScope
Variables which are declared with a type modifier are visible within closures but not visible within methods. This is a heavily discussed behavior in the Groovy community. [43]
型修飾のついた変数は、クロージャ内からは見えていますが、メソッドからは見えていません。これは、Groovyコミュニティでもよく議論されている振る舞いです。 [44]
It is important to keep in mind that Gradle has a distinct configuration and execution phase (see 56章ビルドのライフサイクルThe Build Lifecycle).
Gradleが設定フェーズと実行フェーズを区別していることは常に頭に入れておきましょう。とても重要なことです。(56章ビルドのライフサイクルThe Build Lifecycle参照)
例B.2 設定フェーズと実行フェーズの区別
build.gradle
def classesDir = file('build/classes') classesDir.mkdirs() task clean(type: Delete) { delete 'build' } task compile(dependsOn: 'clean') << { if (!classesDir.isDirectory()) { println 'The class directory does not exist. I can not operate' // do something } // do something }
gradle -q compile の出力
> gradle -q compile The class directory does not exist. I can not operate
As the creation of the directory happens during the configuration phase, the
clean
task removes the directory during the execution phase.
ディレクトリの作成は設定フェーズで起こっていて、実行フェーズでcleanタスクがそのディレクトリを削除してしまっています。
[43] One of those discussions can be found here: http://groovy.329449.n5.nabble.com/script-scoping-question-td355887.html
[44] これらの議論のうちの一つを、ここで見ることができます。 http://groovy.329449.n5.nabble.com/script-scoping-question-td355887.html
Gradle is under constant development and improvement. New versions are delivered on a regular and frequent basis (approximately every 6 weeks). Continuous improvement combined with frequent delivery allows new features to be made available to users early and for invaluable real world feedback to be incorporated into the development process. Getting new functionality into the hands of users regularly is a core value of the Gradle platform. At the same time, API and feature stability is taken very seriously and is also considered a core value of the Gradle platform. This is something that is engineered into the development process by design choices and automated testing, and is formalised by 「後方互換性ポリシー Backwards Compatibility Policy」.
Gradleプロジェクトは現在も活発に開発、改善されており、新しいバージョンが定期的に、また頻繁にリリースされています(大体6週間に一度)。 新しい機能および修正を頻繁にリリースすることで、それらの新機能が素早くユーザーにより確認され、実際の現場で得られた貴重なフィードバックを開発プロセスに組み入れることができるのです。新しい機能を多くのユーザーに定期的に届けることは、Gradleプラットフォームの重要な価値の一つです。 それと同時に、APIや機能の安定性もとても重要であり、これもGradleプラットフォームの大事な価値の一つだと考えています。 新機能は、設計上の選択により開発プロセスに組み入れられ、自動テストされ、「後方互換性ポリシー Backwards Compatibility Policy」に従って正式採用されるようになっています。
The Gradle feature lifecycle has been designed to meet these goals. It also serves to clearly communicate to users of Gradle what the state of a feature is. The term feature typically means an API or DSL method or property in this context, but it is not restricted to this definition. Command line arguments and modes of execution (e.g. the Build Daemon) are two examples of other kinds of features.
Gradleの機能ライフサイクルは、これらの目的を達成するために設計されました。 また、機能ライフサイクルは、ある機能が今どんなステータスにあるのか、ユーザーに明確に伝えることにも寄与します。 機能という用語は、たいていの場合APIやDSLのメソッドやプロパティを指しますが、それだけにとどまりません。 コマンドライン引数や実行モード(例えばBuild Deamon)などもその一つです。Features can be in one of 4 states:
機能の状態は、以下の四つのうちいずれかとなります。
Internal
非公開
Incubating
試験的
Public
公開
Deprecated
非推奨
Internal features are not designed for public use and are only intended to be used by Gradle itself. They can change in any way at any point in time without any notice. Therefore, we recommend avoiding the use of such features. Internal features are not documented. If it appears in this User Guide, the DSL Reference or the API Reference documentation then the feature is not internal.
非公開の機能は、広く使われることは想定しておらず、Gradleが内部的に使うためのものです。これらの機能は、いつでもどんな風にも予告なく変更される可能性があります。 従って、これらの機能を使うことは推奨しません。 また、非公開機能はドキュメント化もされません。もしユーザーガイドやDSLリファレンス、APIリファレンスに載っているなら、それは非公開機能ではないということです。
Internal features may evolve into public features.
非公開機能は、公開機能に昇格する可能性があります。
Features are introduced in the incubating state to allow real world feedback to be incorporated into the feature before it is made public and locked down to provide backwards compatibility. It also gives users who are willing to accept potential future changes early access to the feature so they can put it into use immediately.
試験的な状態にあると書かれた機能は、正式に公開される前に、実際の運用で発生したフィードバックを受け付けている状態のものです。フィードバックが組み込まれ、正式に公開されると、上位互換性を保証するために固定化されることになります。 これらの機能は、機能が変更されるリスクを受け入れられるユーザーに向けて公開されているもので、そういったユーザーであればすぐに使ってみることができます。
A feature in an incubating state may change in future Gradle versions until it is no longer incubating. Changes to incubating features for a Gradle release will be highlighted in the release notes for that release. The incubation period for new features varies depending on the scope, complexity and nature of the feature.
試験的な機能は、試験的でなくなるまでは将来のバージョンのGradleで変更されるかもしれません。変更された場合はリリースノートで通知します。 新機能の試験期間は、その範囲や複雑性、機能の性質によって様々です。
Features in incubation are clearly indicated to be so. In the source code, all methods/properties/classes that are incubating are
annotated with Incubating, which is also used to specially mark them in the DSL and API references. If an incubating
feature is discussed in this User Guide, it will be explicitly said to be in the incubating state.
試験的な機能は、試験的であるとはっきり明示されます。ソースコードでは全ての試験的なメソッド、プロパティ、クラスはIncubatingアノテーションで注釈されます。これはDSLリファレンスやAPIリファレンスにマークする際も使用されます。試験的機能についてユーザーガイドで言及するときは、試験的な状態にあることを明示的に記載します。
The default state for a non-internal feature is public. Anything that is documented in the User Guide, DSL Reference or API references that is not explicitly said to be incubating or deprecated is considered public. Features are said to be promoted from an incubating state to public. The release notes for each release indicate which previously incubating features are being promoted by the release.
非公開でない機能のデフォルトのステータスが公開です。 ユーザーガイド、DSLリファレンス、APIリファレンスにおける全ての記載内容は、明示的に試験的とか非推奨などと書かれていない限り公開状態と考えてください。 機能は、試験的な状態から公開機能へと言わば昇格します。試験的だった機能が公開状態に昇格した場合は、そのバージョンのリリースノートで通知します。
A public feature will never be removed or intentionally changed without undergoing deprecation. All public features are subject to the backwards compatibility policy.
公開状態の機能は、非推奨とならない限り決して削除されたり意図的に変更されたりすることはありません。 全ての公開機能は上位互換性ポリシーの対象となります。
Some features will become superseded or irrelevant due to the natural evolution of Gradle. Such features will eventually be removed from Gradle after being deprecated. A deprecated feature will never be changed, until it is finally removed according to the backwards compatibility policy.
Gradleの発展に伴って、いくつかの機能は別のものに取って代わられたり、不適切になったりすることがあります。 そのような機能は、非推奨とされた後、やがてはGradleから削除されます。 非推奨の機能は、上位互換性ポリシーに従い、削除されるまで決して変更されることはありません。
Deprecated features are clearly indicated to be so. In the source code, all methods/properties/classes that are deprecated are
annotated with
“@java.lang.Deprecated”
which is reflected in the DSL and API references.
In most cases, there is a replacement for the deprecated element, and this will be described in the documentation.
Using a deprecated feature will also result in a runtime warning in Gradle's output.
非推奨の機能は、非推奨であるとはっきり明示されます。ソースコードでは全ての非推奨メソッド、プロパティ、クラスは@java.lang.Deprecatedアノテーションで注釈されます。これはDSLリファレンスやAPIリファレンスにも反映されます。ほとんどの場合、非推奨となった要素には代替となるものが用意され、ドキュメントにも記載されます。また、非推奨の機能を使うと、Gradle実行時に警告メッセージが出力されます。
Use of deprecated features should be avoided. The release notes for each release indicate any features that are being deprecated by the release.
非推奨機能の使用は避けるべきです。リリースノートには、そのリリースで非推奨となった機能が全て記載されています。
Gradle provides backwards compatibility for across major versions (e.g. 1.x, 2.x
etc.).
Once a public feature is introduced or promoted in a Gradle release it will remain indefinitely or until it is deprecated. Once
deprecated, it may be removed in the next major release. Deprecated features may be supported across major
releases, but this is not guaranteed.
Gradleはメジャーバージョン間(1.x、2.xなど)で上位互換性を保持します。
一度Gradleのリリースに導入されたり昇格したりした公開機能は、非推奨にならない限り決して変更されません。
機能がいったん非推奨になると、次からのメジャーリリースでは削除される可能性があります。
非推奨機能がメジャーバージョンをまたいでサポートされる場合もありますが、必ずそうとは限りません。
The gradle コマンドには次の使用方法があります:command has the following usage:
gradle [option...] [task...]
コマンドライン・オプションは下記のgradleコマンドリストに示されている物が利用可能です。 The command-line options available for the gradle command are listed below:
-?,-h,--helpShows a help message.
ヘルプのメッセージを参照
-a,--no-rebuildDo not rebuild project dependencies.
プロジェクトの依存関係をリビルドしません。
-
--all Shows additional detail in the task listing. See 「タスクの一覧Listing tasks」.
タスク実行時の応答の詳細状況を表示をします。 「タスクの一覧Listing tasks」を参照。
-b,--build-fileSpecifies the build file. See 「ビルドスクリプトを指定して実行するSelecting which build to execute」.
ビルド対象のgradleファイルを指定します。「ビルドスクリプトを指定して実行するSelecting which build to execute」参照。
-c,--settings-fileSpecifies the settings file.
設定ファイルを指定します。
-
--continue Continues task execution after a task failure.
タスクを失敗しても、実行処理を継続します。
-
--configure-on-demand (incubating) Only relevant projects are configured in this build run. This means faster builds for large multi-projects. See 「Configuration on demand」.
-D,--system-propSets a system property of the JVM, for example
-Dmyprop=myvalue. See 「GradleプロパティとシステムプロパティGradle properties and system properties」.JVMの環境変数を設定します, 例えば
-Dmyprop=myvalue。 「GradleプロパティとシステムプロパティGradle properties and system properties」を参照。-d,--debugLog in debug mode (includes normal stacktrace). See 18章ロギングLogging.
デバックモードのログ出力(スタックトレースを含みます)。18章ロギングLogging参照。
-g,--gradle-user-homeSpecifies the Gradle user home directory. The default is the
.gradledirectory in the user's home directory.Gradleのユーザディレクトリを指定します。デフォルトはユーザディレクトリ配下の
.gradleになります。-
--gui Launches the Gradle GUI. See 12章GradleのGUIを使うUsing the Gradle Graphical User Interface.
Gradle GUIを起動します。12章GradleのGUIを使うUsing the Gradle Graphical User Interface参照。
-I,--init-scriptSpecifies an initialization script. See 61章初期化スクリプトInitialization Scripts.
初期化スクリプトを指定します。61章初期化スクリプトInitialization Scripts参照。
-i,--infoSet log level to info. See 18章ロギングLogging.
ログレベルをinfoに指定します。18章ロギングLogging参照。
-m,--dry-runRuns the build with all task actions disabled. See 「空実行Dry Run」.
タスクを実行しない形でビルドを走らせます。「空実行Dry Run」参照。
-
--no-color Do not use color in the console output.
コンソールの出力をカラフルにしない指定。
-
--offline Specifies that the build should operate without accessing network resources. See 「キャッシングに関するコマンドラインオプション Command line options to override caching」.
ネットワークにアクセスしない形でビルドを実行する指定です。「キャッシングに関するコマンドラインオプション Command line options to override caching」参照。
-P,--project-propSets a project property of the root project, for example
-Pmyprop=myvalue. See 「GradleプロパティとシステムプロパティGradle properties and system properties」.ルートプロジェクトに、プロジェクトプロパティを設定します。例えば
-Pmyprop=myvalue。「GradleプロパティとシステムプロパティGradle properties and system properties」参照。-p,--project-dirSpecifies the start directory for Gradle. Defaults to current directory. See 「ビルドスクリプトを指定して実行するSelecting which build to execute」.
Gradleの実行ディレクトリを指定します。デフォルトはカレントディレクトリです。 「ビルドスクリプトを指定して実行するSelecting which build to execute」参照。
-
--parallel (incubating) Build projects in parallel. Gradle will attempt to determine the optimal number of executor threads to use. This option should only be used with decoupled projects (see 「分離されたプロジェクト Decoupled Projects」).
-
--parallel-threads (incubating) Build projects in parallel, using the specified number of executor threads. For example
--parallel-threads=3. This option should only be used with decoupled projects (see 「分離されたプロジェクト Decoupled Projects」).-
--profile Profiles build execution time and generates a report in the
buildDir/reports/profileProfilesコマンドはビルド実行時に
buildDir/reports/profile-
--project-cache-dir Specifies the project-specific cache directory. Default value is
.gradlein the root project directory. See 「キャッシング Caching」.プロジェクトのキャッシュディレクトリを指定します。 デフォルトは
.gradleディレクトリ上のルートプロジェクトディレクトリになります。 「キャッシング Caching」参照。-q,--quietLog errors only. See 18章ロギングLogging.
ログ出力をエラーのみにします。18章ロギングLogging参照。
-
--recompile-scripts Specifies that cached build scripts are skipped and forced to be recompiled. See 「キャッシング Caching」.
ビルドキャッシュファイルを無視してリコンパイルを強制する指定です。 「キャッシング Caching」参照。
-
--refresh-dependencies Refresh the state of dependencies. See 「キャッシングに関するコマンドラインオプション Command line options to override caching」.
依存状態をリフレッシュします。 「キャッシングに関するコマンドラインオプション Command line options to override caching」参照。
-
--rerun-tasks Specifies that any task optimization is ignored.
タスク最適化を無視する指定です。
-S,--full-stacktracePrint out the full (very verbose) stacktrace for any exceptions. See 18章ロギングLogging.
例外発生時にフルスタックトレースを出力します。18章ロギングLogging参照。
-s,--stacktracePrint out the stacktrace also for user exceptions (e.g. compile error). See 18章ロギングLogging.
ユーザ例外のスタックトレースを出力します。(例えばコンパイルエラー) 18章ロギングLogging参照。
-u,--no-search-upwardsDon't search in parent directories for a
settings.gradlefile.親ディレクトリの
settings.gradleファイルを探しません。-v,--versionPrints version info.
バージョン情報を表示します。
-x,--exclude-taskSpecifies a task to be excluded from execution. See 「タスクを除外してビルドするExcluding tasks」.
除外タスクを指定します。「タスクを除外してビルドするExcluding tasks」参照。
The above information is printed to the console when you execute gradle -h.
gradle -hコマンドを実行するとき上記の情報は表示されます。
The
19章Gradleデーモン The Gradle Daemon
contains more information about the daemon.
For example it includes information how to turn on the daemon by default
so that you can avoid using
--daemon
all the time.
19章Gradleデーモン The Gradle Daemonのリンクはデーモンに関しての情報を多く含みます。
例えば、デフォルトで--daemon指定をつける方法等
-
--daemon Uses the Gradle daemon to run the build. Starts the daemon if not running or existing daemon busy. 19章Gradleデーモン The Gradle Daemon contains more detailed information when new daemon processes are started.
Gradle デーモンの状態でビルドを実行します。 既存のデーモンが未実行 または 忙しければ 19章Gradleデーモン The Gradle Daemon 新しいデーモンプロセスを実行します。
-
--foreground Starts the Gradle daemon in the foreground. Useful for debugging or troubleshooting because you can easily monitor the build execution.
Gradle daemonをフォアグラウンドの状態で実行します。容易にビルド時の例外をモニターできるので、 デバックやトラブルシューティングに役立ちます。
-
--no-daemon Do not use the Gradle daemon to run the build. Useful occasionally if you have configured Gradle to always run with the daemon by default.
対象のビルドを実行させる為にGradleデーモンを使いません。 デーモンモードで実行することをデフォルトにしていれば、時々有用です。
-
--stop Stops the Gradle daemon if it is running. You can only stop daemons that were started with the Gradle version you use when running
--stop.Gradleデーモンが実行されていれば停止します。 実行しているバージョンのGradleの
--stopで停止させてください。
The following system properties are available for the gradle command. Note that command-line options take precedence over system properties.
システムプロパティの設定には以下のgradleコマンドが利用可能です。 ただしコマンドラインオプションのシステムプロパティの指定が優先されることに注意
gradle.user.home
Specifies the Gradle user home directory.
Gradleユーザディレクトリの指定
The 「gradle.propertiesを使用したビルド環境の構築Configuring the build environment via gradle.properties」 contains specific information about Gradle configuration available via system properties.
「gradle.propertiesを使用したビルド環境の構築Configuring the build environment via gradle.properties」 にGradleの設定で利用可能なシステムプロパティの情報が記載されています。
The following environment variables are available for the gradle command. Note that command-line options and system properties take precedence over environment variables.
環境変数の設定には以下のgradleコマンドが利用可能です。 ただしコマンドラインオプションの環境変数の指定が優先されることに注意
-
GRADLE_OPTS Specifies command-line arguments to use to start the JVM. This can be useful for setting the system properties to use for running Gradle. For example you could set
GRADLE_OPTS="-Dorg.gradle.daemon=true"to use the Gradle daemon without needing to use the--daemonoption every time you run Gradle. 「gradle.propertiesを使用したビルド環境の構築Configuring the build environment via gradle.properties」 contains more information about ways of configuring the daemon without using environmental variables, e.g. in more maintainable and explicit way.JVMを始めるために使用するコマンドライン引数を指定します。 Gradleの実行のために使用させるのに役立つことができます。例えば
GRADLE_OPTS="-Dorg.gradle.daemon=true"の指定は--daemonをコマンドラインで指定する事無く実行させることが出来ます。 「gradle.propertiesを使用したビルド環境の構築Configuring the build environment via gradle.properties」に 環境変数を使う事無しに、デーモンモードでの設定をする情報が記載されています。 例えばより維持可能でより明示的な方法で。-
GRADLE_USER_HOME Specifies the Gradle user home directory (which defaults to “
USER_HOME/.gradle” if not set).Gradleのユーザディレクトリを指定します
-
JAVA_HOME Specifies the JDK installation directory to use.
Gradle has been mainly developed with Idea IntelliJ and its very good Groovy plugin. Gradle's build script
[45]
has also been developed with the support of this IDE. IntelliJ allows you to define any filepattern to be
interpreted as a Groovy script. In the case of Gradle you can define such a pattern for
build.gradle
and settings.gradle. This will already help very much. What is missing is the classpath
to the Gradle binaries to offer content assistance for the Gradle classes. You might add the Gradle jar
(which you can find in your distribution) to your project's classpath. It does not really belong there, but
if you do this you have a fantastic IDE support for developing Gradle scripts. Of course if you use
additional libraries for your build scripts they would further pollute your project classpath.
Gradleは主にIdea IntelliJとそのすばらしいGroovyプラグインを利用して開発されています。
Gradleのビルドスクリプト
[46]
の開発にも、このIDEのサポートを利用することができます。
IntelliJは任意のファイルパターンをGroovyスクリプトとして解釈することができます。
Gradleの場合はbuild.gradleやsettings.gradleのようなパターンを定義できます。
これは非常に役に立ちます。
Gradleクラスに対するコンテンツアシストを提示するためのGradleバイナリに対するクラスパスの設定は行われません。
プロジェクトのクラスパスに、GradleのJAR(配布物に含まれています)を追加するとよいでしょう。
実際にはそこにあるべきものではないのですが、これを行うことでGradleスクリプトの開発に対するIDEのすばらしいサポートが受けられるようになります。
もちろん、ビルドスクリプトのための追加のライブラリを使うならば、それはプロジェクトのクラスパスを汚染することになりますが。
We hope that in the future *.gradle files
get special treatment by IntelliJ and you will be able to define a specific classpath for them.
われわれは、将来においてIntelliJが*.gradleファイルを特別に扱い、
それらに特化したクラスパスの定義が可能になることを希望しています。
There is a Groovy plugin for eclipse. We don't know in what state it is and how it would support Gradle. In the next edition of this user guide we can hopefully write more about this.
EclipseにはGroovyプラグインがあります。 我々はその現状や、Gradleをどうサポートできるのかを把握していません。 ユーザーガイドの次の版ではもう少し詳しい記述を追加したいと思っています。
What we can do for you is to spare you typing things like
throw new org.gradle.api.tasks.StopExecutionException()
and just type
throw new StopExecutionException()
instead. We do this by automatically adding a set of import statements to the Gradle scripts before Gradle
executes them. Listed below are the imports added to each script.
我々にできるのは、
throw new org.gradle.api.tasks.StopExecutionException()のような記述のタイプ量を節約して
代わりにthrow new StopExecutionException()とだけタイプすればよいようにすることです。
Gradleスクリプトの実行前に一連のimport文を自動的に追加することでこれを実現しています。
以下はスクリプトに追加されるimportの一覧です。
図E.1 Gradleがimportするパッケージgradle-imports
import org.gradle.* import org.gradle.api.* import org.gradle.api.artifacts.* import org.gradle.api.artifacts.cache.* import org.gradle.api.artifacts.component.* import org.gradle.api.artifacts.dsl.* import org.gradle.api.artifacts.ivy.* import org.gradle.api.artifacts.maven.* import org.gradle.api.artifacts.query.* import org.gradle.api.artifacts.repositories.* import org.gradle.api.artifacts.result.* import org.gradle.api.component.* import org.gradle.api.distribution.* import org.gradle.api.distribution.plugins.* import org.gradle.api.dsl.* import org.gradle.api.execution.* import org.gradle.api.file.* import org.gradle.api.initialization.* import org.gradle.api.initialization.dsl.* import org.gradle.api.invocation.* import org.gradle.api.java.archives.* import org.gradle.api.jvm.* import org.gradle.api.logging.* import org.gradle.api.platform.jvm.* import org.gradle.api.plugins.* import org.gradle.api.plugins.announce.* import org.gradle.api.plugins.antlr.* import org.gradle.api.plugins.buildcomparison.gradle.* import org.gradle.api.plugins.jetty.* import org.gradle.api.plugins.osgi.* import org.gradle.api.plugins.quality.* import org.gradle.api.plugins.scala.* import org.gradle.api.plugins.sonar.* import org.gradle.api.plugins.sonar.model.* import org.gradle.api.publish.* import org.gradle.api.publish.ivy.* import org.gradle.api.publish.ivy.plugins.* import org.gradle.api.publish.ivy.tasks.* import org.gradle.api.publish.maven.* import org.gradle.api.publish.maven.plugins.* import org.gradle.api.publish.maven.tasks.* import org.gradle.api.publish.plugins.* import org.gradle.api.reporting.* import org.gradle.api.reporting.components.* import org.gradle.api.reporting.dependencies.* import org.gradle.api.reporting.plugins.* import org.gradle.api.resources.* import org.gradle.api.specs.* import org.gradle.api.tasks.* import org.gradle.api.tasks.ant.* import org.gradle.api.tasks.application.* import org.gradle.api.tasks.bundling.* import org.gradle.api.tasks.compile.* import org.gradle.api.tasks.diagnostics.* import org.gradle.api.tasks.incremental.* import org.gradle.api.tasks.javadoc.* import org.gradle.api.tasks.scala.* import org.gradle.api.tasks.testing.* import org.gradle.api.tasks.testing.junit.* import org.gradle.api.tasks.testing.testng.* import org.gradle.api.tasks.util.* import org.gradle.api.tasks.wrapper.* import org.gradle.buildinit.plugins.* import org.gradle.buildinit.tasks.* import org.gradle.external.javadoc.* import org.gradle.ide.cdt.* import org.gradle.ide.cdt.tasks.* import org.gradle.ide.visualstudio.* import org.gradle.ide.visualstudio.plugins.* import org.gradle.ide.visualstudio.tasks.* import org.gradle.jvm.* import org.gradle.jvm.plugins.* import org.gradle.jvm.toolchain.* import org.gradle.language.* import org.gradle.language.assembler.* import org.gradle.language.assembler.plugins.* import org.gradle.language.assembler.tasks.* import org.gradle.language.base.* import org.gradle.language.base.artifact.* import org.gradle.language.base.plugins.* import org.gradle.language.c.* import org.gradle.language.c.plugins.* import org.gradle.language.c.tasks.* import org.gradle.language.cpp.* import org.gradle.language.cpp.plugins.* import org.gradle.language.cpp.tasks.* import org.gradle.language.java.* import org.gradle.language.java.artifact.* import org.gradle.language.java.plugins.* import org.gradle.language.jvm.* import org.gradle.language.jvm.plugins.* import org.gradle.language.jvm.tasks.* import org.gradle.language.nativebase.tasks.* import org.gradle.language.objectivec.* import org.gradle.language.objectivec.plugins.* import org.gradle.language.objectivec.tasks.* import org.gradle.language.objectivecpp.* import org.gradle.language.objectivecpp.plugins.* import org.gradle.language.objectivecpp.tasks.* import org.gradle.language.rc.* import org.gradle.language.rc.plugins.* import org.gradle.language.rc.tasks.* import org.gradle.nativeplatform.* import org.gradle.nativeplatform.platform.* import org.gradle.nativeplatform.plugins.* import org.gradle.nativeplatform.sourceset.* import org.gradle.nativeplatform.tasks.* import org.gradle.nativeplatform.test.* import org.gradle.nativeplatform.test.cunit.* import org.gradle.nativeplatform.test.cunit.plugins.* import org.gradle.nativeplatform.test.cunit.tasks.* import org.gradle.nativeplatform.test.plugins.* import org.gradle.nativeplatform.test.tasks.* import org.gradle.nativeplatform.toolchain.* import org.gradle.nativeplatform.toolchain.plugins.* import org.gradle.platform.base.* import org.gradle.platform.base.binary.* import org.gradle.platform.base.component.* import org.gradle.platform.base.test.* import org.gradle.plugin.use.* import org.gradle.plugins.ear.* import org.gradle.plugins.ear.descriptor.* import org.gradle.plugins.ide.api.* import org.gradle.plugins.ide.eclipse.* import org.gradle.plugins.ide.idea.* import org.gradle.plugins.javascript.base.* import org.gradle.plugins.javascript.coffeescript.* import org.gradle.plugins.javascript.envjs.* import org.gradle.plugins.javascript.envjs.browser.* import org.gradle.plugins.javascript.envjs.http.* import org.gradle.plugins.javascript.envjs.http.simple.* import org.gradle.plugins.javascript.jshint.* import org.gradle.plugins.javascript.rhino.* import org.gradle.plugins.javascript.rhino.worker.* import org.gradle.plugins.signing.* import org.gradle.plugins.signing.signatory.* import org.gradle.plugins.signing.signatory.pgp.* import org.gradle.plugins.signing.type.* import org.gradle.plugins.signing.type.pgp.* import org.gradle.process.* import org.gradle.sonar.runner.* import org.gradle.sonar.runner.plugins.* import org.gradle.sonar.runner.tasks.* import org.gradle.testing.jacoco.plugins.* import org.gradle.testing.jacoco.tasks.* import org.gradle.util.*
A
- アーティファクト / Artifact
??
B
- ビルドスクリプト / Build Script
??
C
- コンフィグレーション / Configuration
- コンフィグレーション注入 / Configuration Injection
??
D
- DAG
- 依存関係 / Dependency
??
- 依存関係の構成 / Dependency Configuration
??
- 依存関係の解決 / Dependency Resolution
??
- 無閉路有向グラフ / Directed Acyclic Graph
A directed acyclic graph is a directed graph that contains no cycles. In Gradle each task to execute represents a node in the graph. A dependsOn relation to another task will add this other task as a node (if it is not in the graph already) and create a directed edge between those two nodes. Any dependsOn relation will be validated for cycles. There must be no way to start at certain node, follow a sequence of edges and end up at the original node.
無閉路有向グラフとは循環を持たない有向グラフである。 Gradleでは実行対象となる各タスクはグラフ内のノードとして表現される。 他のタスクに対するdependsOnによる関連は、(既にグラフに存在していなければ)このタスクをノードとして追加し、 それら2つのノード間に方向性を伴った辺を作成する。 あらゆるdependsOn関連は循環を持たないことが検証される。 あるノードから開始して、辺を順にたどり、元のノードにたどり着く道があってはならない。
- ドメイン特化言語 / Domain Specific Language
A domain-specific language is a programming language or specification language dedicated to a particular problem domain, a particular problem representation technique, and/or a particular solution technique. The concept isn't new - special-purpose programming languages and all kinds of modeling/specification languages have always existed, but the term has become more popular due to the rise of domain-specific modeling.
ドメイン特化言語とは、特定の問題領域や特定の問題表現技法と解決技法に特化した プログラム言語ないしは言語に対する仕様である。 その概念は新しいものではなく、 特定用途のプログラム言語や、あらゆる種類のモデリング・仕様記述言語は常に存在する。 しかし、ドメイン特化モデリングの興隆によって、この用語は有名になりつつある。
- DSL
I
R
- リポジトリ / Repository
??
S
- ソースセット / Source Set
??
T
- タスク / Task
??
- 推移的依存関係 / Transitive Dependency
??