In addition to supporting a traditional command line interface, Gradle offers a graphical user interface. This is a stand alone user interface that can be launched with the --gui option.
伝統的なコマンドラインインターフェースに加え、Gradleはグラフィカルユーザーインターフェースも提供しています。これはスタンドアローンのインターフェースで、--guiオプションを使って起動できます。
Note that this command blocks until the Gradle GUI is closed. Under *nix it is probably preferable to run this as a background task (gradle --gui&)
このコマンドは、GUIをクローズするまでブロックされることに注意してください。*nixでは、バックグラウンドタスク(gradle --gui&)で実行した方がいいかもしれません。
If you run this from your Gradle project working directory, you should see a tree of tasks.
このコマンドをgradleプロジェクトの作業ディレクトリで実行すると、タスクのツリーが表示されることが分かります。
It is preferable to run this command from your Gradle project directory so that the settings of the UI will be stored in your project directory. However, you can run it then change the working directory via the Setup tab in the UI.
このコマンドは、自分のgradleプロジェクトのディレクトリで実行した方がいいでしょう。そうすれば、UI設定がプロジェクトのディレクトリに保存されるからです。しかし、コマンドを実行してから、UIのSetupタブで作業ディレクトリを変更することもできます。
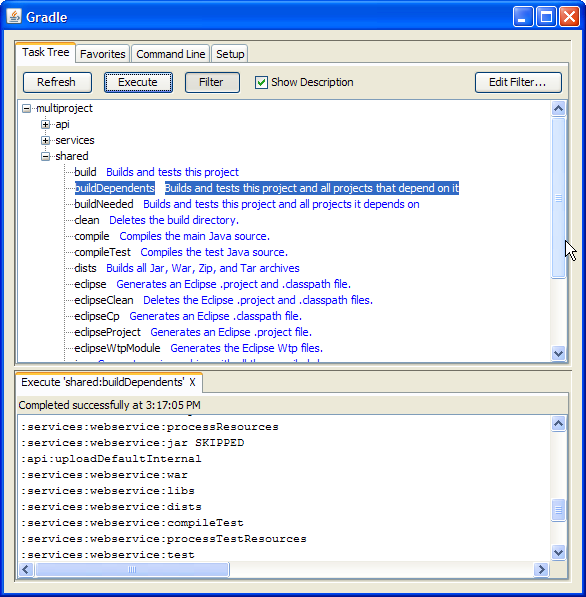
The UI displays 4 tabs along the top and an output window along the bottom.
UIには上部に4つのタブがあり、下部には出力を表示するウィンドウがあります。
The Task Tree shows a hierarchical display of all projects and their tasks. Double clicking a task executes it.
Task Treeは、すべてのプロジェクトとタスクの階層構造を表示します。タスクをダブルクリックすると、そのタスクが実行されます。
There is also a filter so that uncommon tasks can be hidden. You can toggle the filter via the Filter button. Editing the filter allows you to configure which tasks and projects are shown. Hidden tasks show up in red. Note: newly created tasks will show up by default (versus being hidden by default).
また、フィルターも用意されているので、一般的でないタスクは非表示にすることができます。フィルターを有効にするかどうかはFilterボタンで切り替えできます。 フィルター編集画面では、どのタスクとプロジェクトを表示するかを設定します。非表示に設定されたタスクは赤色で強調されます。 注意: 新しく作成されたタスクは、デフォルトでは表示に設定されます(デフォルトで非表示に設定されるのではなく)。
The Task Tree context menu provides the following options:
タスクツリーのコンテキストメニューでは、以下の機能も使うことができます。
Execute ignoring dependencies. This does not require dependent projects to be rebuilt (same as the -a option).
依存関係を無視したタスクの実行する。依存プロジェクトを再ビルドしません(-aオプションと同じ)。
Add tasks to the favorites (see Favorites tab)
タスクをお気に入りに追加する(Favoritesを参照してください)。
Hide the selected tasks. This adds them to the filter.
選択したタスクを隠す。タスクをフィルターに追加します。
Edit the build.gradle file. Note: this requires Java 1.6 or higher and requires that you have .gradle files associated in your OS.
build.gradleファイルの編集。注意: この機能を使うには、1.6以上のバージョンのJavaが必要です。また、OS上で.gradleファイルの関連づけを設定しなければなりません。
The Favorites tab is a good place to store commonly-executed commands. These can be complex commands (anything that's legal to Gradle) and you can provide them with a display name. This is useful for creating, say, a custom build command that explicitly skips tests, documentation, and samples that you could call “fast build”.
Favoriteタブでは、よく実行するコマンドをお気に入りとして保存できます。保存するコマンドは複雑なもの(Gradleにとって正しいものならなんでもかまいません)でもよく、わかりやすい表示名をつけることもできます。お気に入りは、テストやドキュメンテーション、サンプル作成などを明示的にスキップする、"急速なビルド"と呼べるようなカスタムビルドを作成するのに便利だと言えます。
You can reorder favorites to your liking and even export them to disk so they can imported by others. If you edit them, you are given options to “Always Show Live Output”. This only applies if you have “Only Show Output When Errors Occur”. This override always forces the output to be shown.
お気に入りは、好きなように並び替えることができます。また、お気に入りをディスクにエクスポートしたり、そこから逆にインポートしたりすることも可能です。 お気に入りを追加、編集するとき、"Always Show Live Output"というオプションがあるはずです。 これは、'Only Show Output When Errors Occur'(エラー発生時のみ出力を表示する)設定を有効にしているときのみ適用されるオプションです。 このオプションを有効にすると、その設定を上書きし常に出力が表示されるようになります。The Command Line tab is where you can to execute a single Gradle command directly. Just enter whatever you would normally enter after 'gradle' on the command line. This also provides a place to try out commands before adding them to favorites.
Command Lineタブでは、ひとつのgradleコマンドを直接実行できます。いつも'gradle'のあとに入力しているコマンドを入力するだけです。お気に入りにコマンドを追加する前に、試しにそのコマンドを実行してみることもできます。The Setup tab allows configuration of some general settings.
Setupタブは、一般的な設定を行うところです。
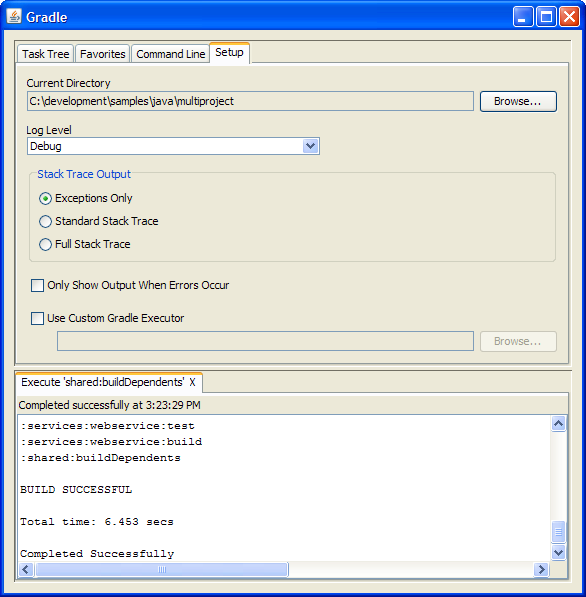
Current Directory
Defines the root directory of your Gradle project (typically where build.gradle is located).
gradleプロジェクトのルートディレクトリを設定します(典型的には、build.gradleが置かれているディレクトリになります)。
Stack Trace Output
This determines how much information to write out in stack traces when errors occur. Note: if you specify a stack trace level on either the Command Line or Favorites tab, it will override this stack trace level.
ここでは、エラーが発生したとき、どれだけの情報をスタックトレースに書き出すかを設定します。注意: スタックトレースレベルをCommand LineタブやFavoritesタブで指定している場合、ここで設定したスタックトレースレベルは上書きされます。
Only Show Output When Errors Occur
Enabling this option hides any output when a task is executed unless the build fails.
有効にすると、ビルドに失敗しない限り出力が表示されないようになります。
Use Custom Gradle Executor - Advanced feature
Use Custom Gradle Executor - 高度な機能
This provides you with an alternate way to launch Gradle commands. This is useful if your project requires some extra setup that is done inside another batch file or shell script (such as specifying an init script).
gradleコマンドの実行方法を変更できます。これは、自分のプロジェクトが、バッチファイルやシェルスクリプトの中で追加的なセットアップをしてからgradleを呼び出しているときに便利です。